Wednesday, April 23, 2025

Blorange Blocks

In my stash I had a jelly-roll type assortment of 2½" wide strips made from American Jane fabrics. There were 24 strips equally divided between 12 orange strips and 12 blue strips. I decided to repeat a block quilt like the one I made in teals and described in my post for 1/4/25 and my post for 1/20/25. Making this quilt in 6" finished blocks from WOF 2½" wide strips, there is very little waste and so it is becoming a favorite of mine for consuming color coordinated jelly rolls. Each blue/orange pair of WOF strips makes four blocks. The quartets are outlined in a following photo.


The blue and orange color combination was very familiar to me, but initially I could not quite place why. Yes, per color theory this combination is named complementary, since blue and orange are on opposite sides of the color wheel. Still, something else was niggling at me. Then I remembered. One of my grandsons, in his toddler years was a Blippi fan, and those are Blippi's signature colors. My grandson has aged beyond Blippi, so I missed my window in making this quilt for him. Sigh. Grandchildren's preferences do not always align with my current stash. On the bright side, that circumstance provides a valuable excuse for buying more fabric! But back to this quilt. Its disposition is undecided. I may donate it for a community quilt. There may be a toddler out there somewhere who is a Blippi fan.


Balancing by placing the more strikingly different blocks near the edges, — the zippers, alphabet, and multi-color floral, as examples — this is the final block arrangement and joining. Blocks measures 6", so top is 36" x 48". Should I add a border? Yes, a border would make binding easier to apply and more stable. Though I needed to be careful that the needed backing did not exceed one WOF.  The border I added would be narrow, actually more a divider than a border. 


I did not want an orange or blue border since either color would blend in with about half the blocks. There are blocks that have a hint of yellow in them: the zippers, the pansies, and the ovals. I decided that a narrow yellow border would be a nice break from blue and orange and hint at the cheerful yellow tidbits scattered within these few blocks. I opted for a pin dot, low-volume orange fabric for the binding. I chose orange for the binding since that yellow narrow border would act as a buffer.


The pieced backing echoes the blue and orange vibe and keeps with the blocks theme. Both of these fabrics are from the American Collection by Sandy Klop. 


For the FMQ I repeated the "circles" I did on my shades-of-teal baby block quilt, post for 1/20/25. I stitched the curves one arc at a time (one fourth of a circle) using my HQ Half Circle Templates. I used the outer edge of the 8" half-circle with a ½" echo foot, forcing the arcs to hit at the corners of the 6" squares. In the yellow border I stitched a row of half circles using the clamshell ruler from Handi-Quilter. The photo of the rulers has red stars indicating what portion I used. Actually both of these rulers are the older HQ designs. The newer rulers are different. 


In going back and looking at the post for the teal blocks quilt, I noticed I am really more fond of yellow than I am aware. So fond in fact, I elected to execute my FMQ in a cheery yellow thread. The white in the block fabric is a rather cream tone. Blue or orange would have shown up on half the blocks and disappeared on the other half. Note to self: I am getting braver; seems like now I want my quilting to show up. The following photos are closeups of the quilting in the blocks and the quilting in the outer yellow border.


I made labels as I usually do, with my initials, the year of completion, and the quilt name. I opted for Blorange, a blend of blue and orange. I considered Blippi Blorange , or perhaps even Blippi Blorange Blocks (cringe?),  but thought the character Blippi might go out of recognition. Either of those names would have been kind of anyway and also a mouthful to say. Simply Blorange it is.


Blorange finished at 38" wide and 50" tall. Here are views of the front and back. It really gives me a happy vibe just to look at it.


Thursday, April 17, 2025

Free Fun Bonus

In my previous post I assembled 64 right triangles in a red/white colorway from a zip-loc bag I picked up at the free table of my April guild meeting. There were 16 other triangles in that same bag in an assortment of aboriginal type prints. I intended to restrain myself from playing with those, telling myself I should return the favor to some other quilter, giving her the opportunity to also have some fun. Alas! I  could not resist. I caved. They were looking at me, calling. Here are the two 6" blocks I assembled. A source photo of the original triangles is in my previous post.


Maybe these will become a pair of coasters or maybe they will just keep my other orphan blocks company in a bin in my closet. Sometimes I wonder if orphan blocks are capable of breeding. Maybe not quite as prolifically as the scientific data provided by Jonathan Lemon in his comic strip Rabbits Against Magic. Hundreds maybe, but certainly not billions...

Wednesday, April 16, 2025

Free Fun

From the free table at my last guild meeting I picked up a zip-loc bag containing precut triangles, predominantly red and white but with enough tiny flags on the white print with to be patriotic. There was no pattern or notes of any kind in the bag. I was on my own. The first thing I did when I got  home was count and sort the pieces in the bag. There were 24 red triangles, 24 white triangles, 8 red triangles tipped with white and 8 white triangles tipped with red. The tipped triangles were a curiosity and I pondered what to do with those. I calculated I could get 8 blocks total out of the 64 pieces. If I paired solid rectangles among themselves, I could get 6 blocks of those, and if I paired tipped triangles among themselves, I could get 2 blocks of those.


But what if I intertwined those two populations? I tried pairing a solid triangle with a same color triangle tipped in the opposite color and learned that four of those units could assemble into a cute central pinwheel. I was able to make 4 mini-pinwheel blocks, 2 red and 2 white.  That meant I could make 4 more blocks out of all the solid triangles. The 8 block total I could make was 4 pinwheels and 4 mini-pinwheels. Since the mini-pinwheels were either predominantly red or white, I took care to make 2 large pinwheels of red/white polarity and two pinwheels of the opposite white/red polarity. Next up was how to assemble these 8 blocks.


At first I tried a light to dark vertical theme grouping similar blocks together for more impact  as seen in the first two images on left. Then, still keeping the light-to dark algorithm, I interspersed small and large pinwheel blocks as seen in the  right most image, liking this slightly better.


But I was really quite fond of those mini-pinwheel blocks and still wanted to group them together for more impact. I followed my desire to place them in the center as I tend to do with my favorite blocks. I placed the large pinwheel blocks in the top and bottom rows. All that remained to decide was how best to situate those large pinwheel blocks in order to best take advantage of their two different polarities. The top and bottom diamond formations in the next image were interesting but not really my cup of tea.


I was most content with the following placement where the top and bottom rows followed a high contrast checkerboard of triangles pattern instead of forming a central diamond. Also this arrangement does not have a top/bottom orientation based on dark/light and can be used horizontally as well as vertically. The blocks are a 6" finished size and this assembly so far is 12½" by 24½".


So what will I do with this creation? Shhh... do not ask that question! Perhaps it will be short table runner. Or perhaps it will become a wall hanging for a small space. If inspired, and if the right fabrics float my way or tumble out of my stash, I may border it for a community baby quilt. The possibilities are endless. At the very least, it will keep my other UFOs company in my closet/drawer/box. I enjoyed thinking this through, like solving a puzzle. That technique with the tipped triangles forming mini central pinwheels caught my attention and I may try to use this newly-learned trick again somewhere. My afternoon was spent in low stress bliss.

By the way, also in that zip-loc bag were other triangles in super cool prints and striking colors. There were 4 white triangles, 8 print triangles, and 4 white triangles tipped in 4 of the colors of the 8 prints. What can be made of this? Adding a white would surely stretch it further. Or maybe, this pleasing combination may find its way back into the zip-loc bag and onto the free table at the next guild meeting. I should not have all the fun!

Wednesday, April 9, 2025

O's (with X's) Completion

My previous post about this quilt was dated 3/30/2025. The blocks had been a joint venture in piecing with the ladies of my Cut-Ups Group from our September get together. Each member made one or two blocks with red or gray or black fabric from their stash. This way there was a nice variety of the O colors. I asked the ladies to send along the O blocks intact without the four outer right angle corners trimmed. I trimmed those stray right triangles uniformly and made them into pinwheels to brighten the mood and give the quilt a whimsical tone. I assembled the eighteen blocks into five columns. The completed size of the O blocks quilt is 45" wide by 53" tall.


Since the quilt top was slightly wider than one usable WOF, I needed to piece the back. Three grays in an offset arrangement added interest. I thought a red, gray, and black combination would be too garish as a backing. I used the Handi GADGETS Swish Template to FMQ the quilt sandwich, creating a kind of mustache motif. This Handi-Quilter video shows the template being used and other variations possible with it. The swish portion of the video begins one minute in.


The binding is alternating red, gray, and black fabrics joined to echo the colors of the O's. All that is left to do before donating O's to community quilts is to add an AVQ label. Yay! I am happy and proud with this one.

Tuesday, April 8, 2025

GQCCC Quilt Show

Saturday, April 5th, I went with my friend Kathie to the  Guild of Quilters of Contra Costa County (GQCCC) Quilt Show, about 35 minutes away. It showcased about 128 quilts and hosted a handful of vendors. We knew the show would be low-key and not as large an investment of energy and time as would a huge show like PIQF or Houston's International Quilt Festival. We anticipated a Goldilocks adventure - not too little, not too big... just right. As I was leaving the house my husband called after me to have fun, but not to buy any more than three kits! 

The venue was the Elk's Lodge in Walnut Creek, CA, complete with free, close-in parking. A regular win-win! The show program featured the guild's opportunity quilt, an intricate work of art titled Cleopatra's Wallpaper

QUILTS
I enjoyed just meandering and so I was not as diligent in taking photos as I usually am. Fortunately Kathie helped me out by sending me some of hers after the fact to insert in this post. The featured artist of the show, Jackie Seidell, was a GQCCC member. Following are photos of three of her quilts that especially appealed to me. The first, #108 titled Baskets, particularly impressed me due to the 3D nature effect and Jackie's paint and pencil techniques to create it. Also, I have a particular fondness for baskets. My husband jokes that if I die before he does, the first thing he is going to do is toss out all the baskets I've collected.
 
Baskets


Garden Fiesta
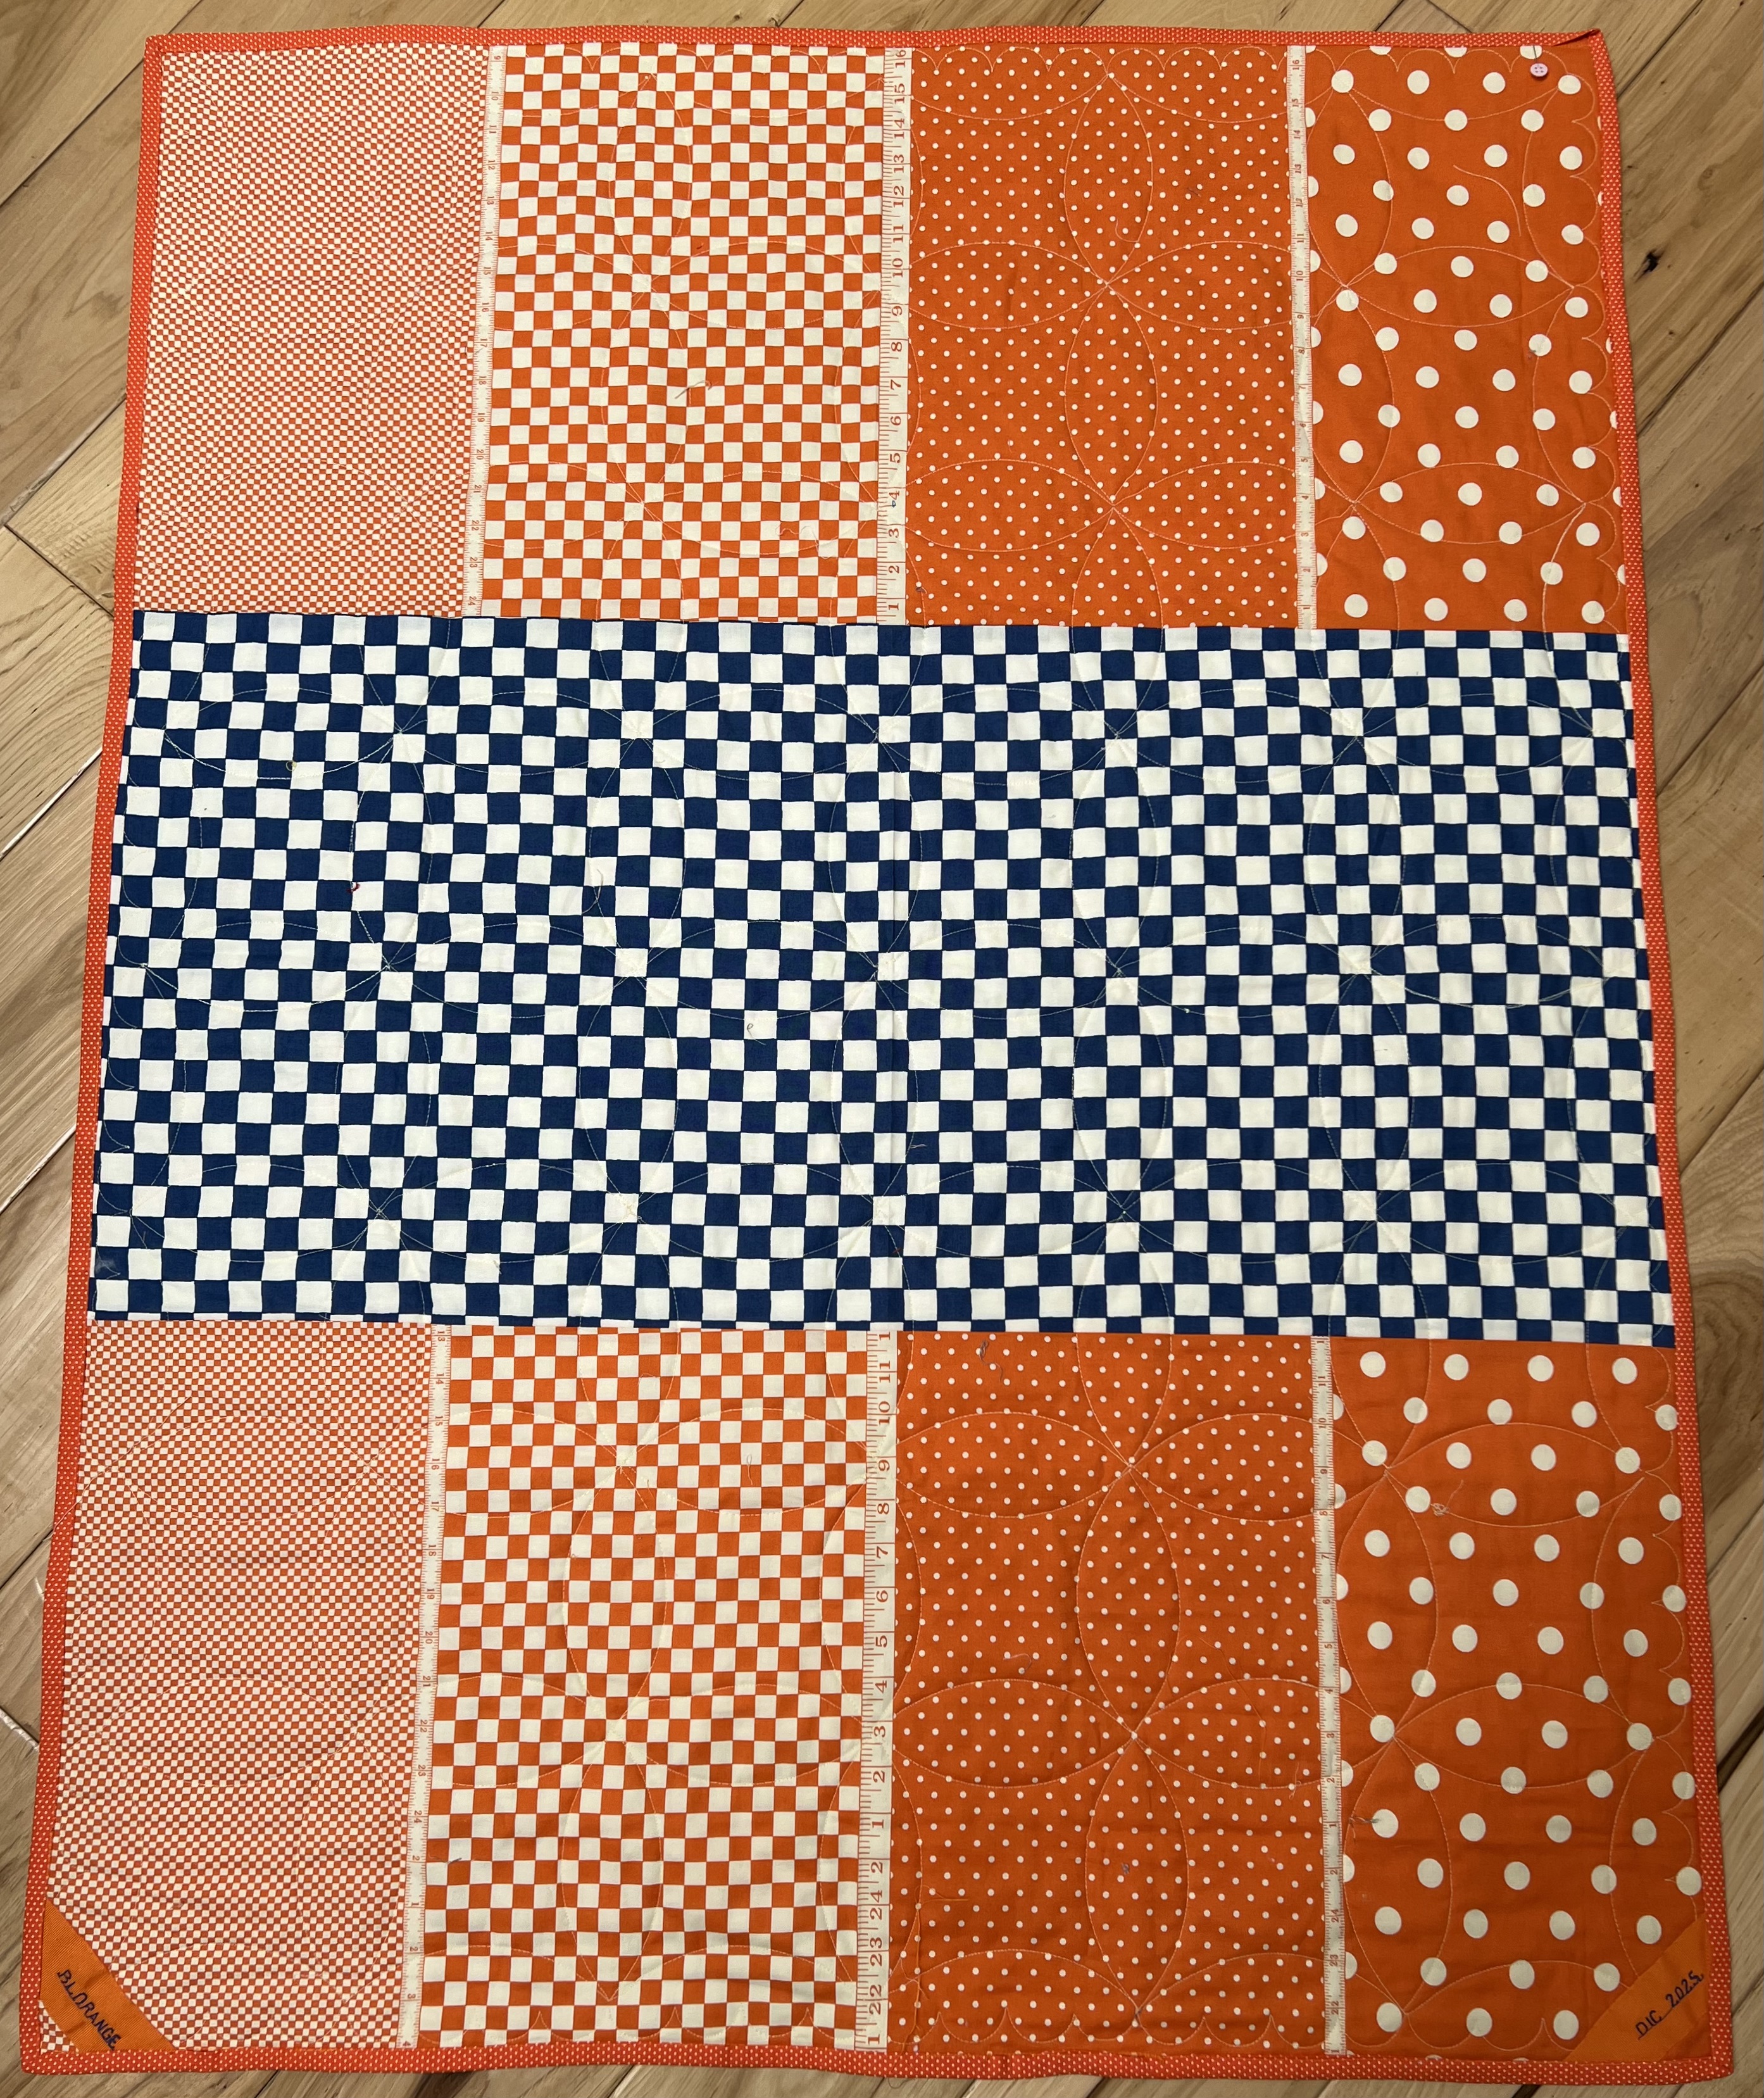
In the voting sheet of my program for the best use of color section, I chose Garden Fiesta #111 by Jackie Seidell. I love blues and red — they often compete as my favorite color — and so this combination really wowed me. Here is an amusing anecdotal story. I was talking to my almost 7 year old grandson during a recent phone conversation (from his iPad) and asked him what his favorite color was. He promptly answered CYAN. I guess he truly is of the computer/printer generation.


Circle Fun 2
A third quilt of Jackie's is titled Circle Fun 2. She created it from a thread play class using a circular attachment on her sewing machine. It does look like it would be entertaining and pleasurable to make. Those offset nested circles surely set off the FMQ loops that change in size. I am not an avid fan of modern quilt design, but this one is far from stark and austere. It makes me smile!


Tahoe Sampler
This woodsy sampler quilt is one of several generated during one of GQCCC's retreats. I really do like quilts where each block is different. They are so engaging to piece together because each block is a new experience. I was surprised to read, however, that at the guild's retreat, each member made several copies of the same block and then they exchanged them. This approach may be efficient, but I am not sure I'd be willing to give up the selfish joy of making each individual block myself. Tahoe Sampler reminds me of a Thimbleberries quilt I made in 2007 from a 2004 set of pattern books. An outdoor photo of it is shown below the story card of Tahoe Sampler. Other images of my Thimbleberries quilt are in my post for 1/7/2015.


Merry Merry Snowmen
Another sampler quilt displayed was  #39 Merry Merry Snowmen by Kathy Tedesco. Although I love the whimsy of this quilt, it has a lot of appliqué, which is "the A word" in my view of quilting. I do not do appliqué. I am lousy at appliqué when I attempt appliqué, and so I avoid appliqué. That opinion does not keep me from thoroughly admiring and enjoying the talents of others.


My Christmas with the Kranks
Kerry O'Brien's quilt #40 My Christmas with the Kranks impressed me. As I mentioned before I love red. I also love red and white quilts, but I would never have the patience to make one. Doing so would make me very Kranky. I attend craft shows to inspire me for future projects of my own, to learn and discover new techniques, to be submersed in shapes and patterns, and to wallow in the colors that surround me. But I also greatly enjoy quilts that are eye candy and which I can appreciate but never sew for myself. My Christmas with the Kranks falls into that last category. It is helpful to remember that you do not have to consume everything over which you salivate in a candy store.


On Safari
Some quilts are very effective solely by means of their simplicity and #43 On Safari by Carol Madsen is a striking example of that. The pattern is based on a rail fence variation. The feature fabric squares look like their borders alternate. Looking more closely, clever placement of tri-striped blocks shows off the adorable animal print while preserving the illusion of two borders. I especially wanted to take note of this technique for making a community quilt with my small group called Cut-Ups when my month comes due. I have some lovely print fabrics that would do well with this treatment. The classic dilemma of the varying quarter in seam allowance in a group project could be easily handled with a few quick trims of a rotary cutter. My graphic prints would not need to be chopped up, either.  But please save me from the temptation of overzealous fussy cutting!


PURCHASES
Preliminary online scouting of the show info indicated that the vendors would not be a particular draw for me. I would not find it at all difficult to adhere to the three-kit guidance my husbandly tossed out teasingly as I left. I did not even bring a large tote bag with me as I usually do. Pleasantly, I still wound up partaking of several of the vendors' wares none-the-less. None of my purchases were fabric and they all fit in my purse! From Featherweight Finery  I got a light weight pendant for a dragon-loving granddaughter. The artist is smart enough to take into account that even if the pendant flips over, the rainbow toned scales on the  backside are still lovely to flaunt.


At the Sew 2 Cute Embroidery Shop I picked up this one of a kind excavator patch for a grandson who is into construction equipment. The dime is in the photo for scale. I do not yet know what the patch will go on, but he and I will figure it out.

 
At Fat Stitch I bought a 25 yard roll of black twill tape printed like a tape measure. I will use it to tie up gift quilts or other crafted items. When I buy clothes from the Gudrun Sjödén website they come wrapped in twill tape and it is just a nice classy touch and reminds me of the My Favorites Things song from the musical Sound of Music.
 🎶   Brown paper packages tied up in string... these are a few of my favorite things  🎶"
I was going to buy a second roll for my daughter. The price for 25 yards was only $12.75 so about 50¢ a yard. Then my friend pointed out that 25 yards is a lot and I could just give my daughter part of my roll. Good idea!


I have been trying to convince my husband to whittle down his wallet to something smaller and thinner containing only the bare essentials. Now he has his thick leather wallet striped with green masking tape to make it more visible when he sets its down somewhere. To handle both visibility via color choice and bulkiness via light weight construction, I bought him these two options to consider. They each have three slots for credit cards and the leather one has a clear front to display an ID. I've shown both sides of the purple and both the outside and inside of the green print. The purple leather one is from DesignersNeeds. The green cloth one is from Stitches of Joy. Will my husband consider the change? That remains to be seen... fingers crossed.


Then there is an item I did not purchase at all. I won this notebook as a door prize. The winning number is the red ticket at the base. As we were leaving the show, I checked the number board and Voila! I was a winner. I keep an ongoing spiral notebook of projects as I do them. It beats hunting around for some random piece of paper where I wrote down a measurement or calculated a yardage. The notebook I am currently using is nearly full so this one can be waiting in the wings. Timing is everything!


Fun show. Fun company. Fun buys. Like Goldilocks, everything was just right!

Sunday, April 6, 2025

Sassy Simple Tote Bag

Which comes first? The fabric or the pattern? This is a classic question for the initial concept of a new quilt. Well, for this small project, the fabric was definitely the decider. At my small group quilt meeting, one of the members was sharing fabric. I picked up this cool sassy print thinking it might appeal to a pre-teen or teenager. I had just the perfect tote bag pattern in mind for it. I would pair it with a dark brown and black print from my stash.


Here are the feature fabric main body, the lining, and the handles cut out. I needed to be a little creative since the print is directional and I could not use a wrap around method if I wanted both sides of the bag and lining to sit upright. There would need to be a seam in the middle of the bottom. As is usual with simple projects, overconfidence leads to a bunch of goofs. That added seam was a simple modification that led to a couple math errors. Nothing I could not handle by making the bag slightly smaller than called for in the pattern. 


This project was just a lightweight cloth bag for a young girl to carry random stuff or to roll up into a small bundle and stash somewhere when not in use. Here is the finished bag, front view and side view showing gussets. It is a simple construction without stabilizer or stiffeners or zippers. Its selling feature is the striking fabric sporting clever catch phrases. "Glitter is always an option." "I am not a morning person." "Not today." "Today has been cancelled." "Be your own kind of beautiful." "Oh my Dior." "Lipstick and hustle." "Is it Friday yet?" "Sassy club." It is all about attitude! I picture it going well with a black jean jacket, simple T-shirt, and brown hiking boots.


Perhaps a bit of personalization on the inside will add to the allure. I added a name label embroidered in brown on red grosgrain ribbon. Yes, the photo reads purple, but it really is brown! Happy Birthday to my granddaughter!