PATTERNI bought a 1997
beyond the reef pattern as my guild's fabric sale because I liked the Hawaiian themed quilts it offered - four of them. They are a simplified, pixellated
30" square stylized version of a needle turn appliqué quilt. The first one I made was a deep pink flower, Anthurium; I wanted deep pink/red for the month of February. Its process is shown in
my blog post for 2/18/22. This one, the second I chose to make was a fern, Laua'e in Hawaiian. I chose a green fabric for the month of March. The batik fabric I used was actually a fern print which I paired with white Kona cotton.


FABRIC and CUTTINGI cut out all the squares in green and white and chain pieced the required number of HSTs and QSTs. I cut them in half or quarters, pressed each open, and trimmed square. I did this in small batches so it did not seem too tedious. Once I got into a rhythm, the process was kind of methodical and restful, sort of like a chant ...
ASSEMBLYThe pixellated pattern is made from a grid. The grid for a Laua'e fern follows. I numbered the rows 1 thru 11 on the far left.
I then set myself up assembly line style to sew the postage stamps 2½" squares together one column at a time, starting at the left. I am sewing column 10 in the next photo. My supply squares are situated to the upper left and placement grid located to the lower left beside my growing chain pieced assembly. My next column to add, the tenth, is in a stack to the right with the squares sequenced in the appropriate order to add one numbered row at a time.
The chained piece assembly of 121 squares is beginning to take shape. The pointing direction of my numbered pins on the left edge will remind me which way to press the seams in that row. Once pressed in alternating left and right directions I lay them out at my machine in rows, rotated so the numbering pins are at the bottom, and join two rows at a time, then four rows at a time, then stragglers to make 11 rows joined.
BORDERS and BINDINGAfter joining the eleven rows. I am ready to figure out and add my borders, a 2½" wide inner one of white and an outer one of 2½" green batik squares. I chose to make the outer border in squares rather than a continuous strip of the batik fabric so it would have the same mottled look as the interior fern pattern. The binding would match the batik outer border with a narrow flange of white inserted as an accent.
FMQ and LABELS
The backing is a gray that seems to pickup the colors of the fern specks. After auditioning several greens, I liked the gray best. Once sandwiched with bamboo batting, I started my FMQing, intent on growing my quilting skills with a variety of patterns. I have a sit-down, mid-arm HQ
Sweet Sixteen. In the green ferns I did feathers on a curvy spine, tossing in a curlicue in far corners where I got trapped in my travels. I used a lime green thread but it barely shows up. In the white interior spaces I did parallel lines in the parallelograms, a few spirals, and a few pebbles. I considered doing it all in pebbles but I am still improving the quality of my pebbles and so limited practice at a time in the eight HSTs is a good compromise. I also got to practice parallel lines with a ruler and orthogonal lines in the central grid.

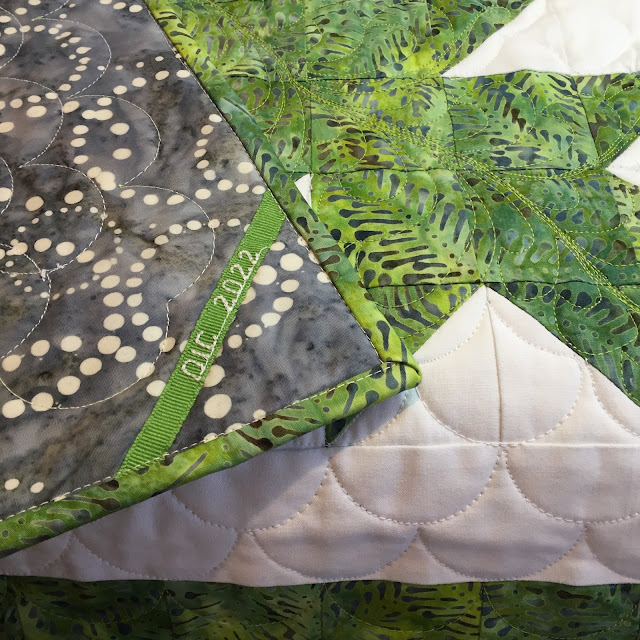
In the outer borders I wanted to do clamshells, with white thread in the inner white borders and with lime green thread in the outer border. In the white borders I was careful to tuck the clamshells down between the green ferns. In the green outer border I only did one row of shells, concerned that my binding would clip the tops off a second row. Although my name label is on the the back, I put the quilt title label subtly on the front lower right corner LAUA'E_FERN.
LESSONS LEARNEDIn retrospect, after completion, I reconsidered my border decisions. The edges are wavy although I thought I'd been careful not to stretch them during binding application. Perhaps making the batik border as a pieced set of squares, instead of a continuous cut of fabric, contributed to a larger length due to seam allowance build-up. But I do I think it lay flat before quilting. An equally likely a culprit is that there was a lot of FMQ in the central section and not along the edges. It will be tricky to stitch it now that the binding is on, but I decided to try quilting some diagonal parallel lines between the outermost row of clamshells and the binding along the border to see if that would help helped draw the edges in a bit. I learned that my Slim ruler designed by Angela Walters does have handy 45° guidelines that helped me keep the tilt angle correct on my stitched piano key borders. I initially thought the binding might fight my efforts but I was able to work around it.

Was is worth it? I think so, even though the effort was more than I anticipated. I estimated about one hour to do the ¼" spaced parallel lines along the four edges; instead it took me 45 minutes per side. Although the improvement is subtle (very subtle) I did get a lot of practice with parallel stitching so I do not regret the effort. Here is the before picture followed by the after picture. There was some improvement but not a huge amount.
This is very long post for a 30" square quilted wall hanging or table topper. But my quilting is about process, and not necessarily about product. Be that as it may, here is a final photo of the finished quilt
Laua'e (Fern) illuminated at an angle to display the FMQ I fretted over so much.