Saturday, December 23, 2023

Cut Ups Community Quilt

I belong to a small twelve-person sub-group of the Amador Valley Quilters called the Cut Ups. We gather monthly and, at each meeting, one member proposes a block pattern and fabric selections. Members each make one or more blocks. Once gathered, assembled, sandwiched, and quilted, the finished quilt is donated to charity. September was my month and I picked a block pair from the Open Options quilt pattern by Material Girlfriends. Each member made two pair of blocks. There were twelve colors choices from a fat quarter bundle, paired with white. Here is an example of four blocks, two complementary pairs, in one of the twelve colors.


After playing around with the forty-eight blocks on my design wall, this was the decided arrangement.


The backing was a deep royal blue and the quilting pattern was one of diagonal waves. Quilted with white thread, the wavy lines show up best on the back.

 
It was bound with a blue binding, accented with red piping. Labels were added on one back corner.


This quilt will be ready to be give away to a community charity after a quick washing. The washing with Synthrapol® and Color Catchers® are a must to preserve that white fabric from discoloration from the dark blue. This quilt has no name. The new owner can decide that. Here is the finished quilt. It measures 54" wide by 72" tall.

Monday, December 18, 2023

Boudoir Bathing Tote

As a quick gift for a friend recently having surgery I whipped up this tote bag. It is the second one I have made. The first one, in a knitting theme focus fabric, was for my sister and is shown in my post for 9/30/23. The pattern I used was Turn It Into a Tote, a one-page set of instructions designed by the shop owner of Back Porch Fabrics in Pacific Grove, CA. The pattern takes only ½ yard of a theme fabric and 1 yard of another coordinate. It is fast becoming one of my go-to patterns especially for gifting.


The bathing beauties of the theme fabric are so outrageously self-indulgent they seem to evoke a smile, just as one should be when pampering oneself after surgery. I chose the lining and strap fabric in a cool tone color combination of mint and aqua. The shapes reminded me of the flagstone flooring you might find in an upscale luxurious bathroom ensuite. I included the extra fabric with the tote to display the other ladies. One can never get enough of relaxing in bubble baths.

Friday, November 24, 2023

Mickey Mouse Pillow

When I attended the Long Beach International Quilt Festival with my two granddaughters last July, they were fascinated by an embroidery machine that was stitching an image of Minnie Mouse. The previous day, when we were not there, the demo embroidery sample had been Mickey Mouse and we got to take that sample home with us. It has about a 4" border on all four sides of Mickey before trimming. I promised the girls I would make Mickey into a pillow.

 
These embroidered images take literally hours to stitch completely. We had to leave before Minnie was finished but the girls were thrilled that we had Micky Mouse as a souvenir.


Based on the rectangular shape of Mickey Mouse, the pillow would be a non-standard shape. Even if I could, I would be unable to buy an appropriately sized pillow form. I had stowed away an old worn and and torn white bed sheet which I'd cut up, planning to use it as a base for a strip quilt. Cutting a piece of that sheet to the correct size, I used it and a bag of polyester stuffing to make my own pillow form. 


All the light blue swirls in the embroidered background fill reminded me I had the perfect fabric in my stash for the pillow backing. There was enough that I could make a generous ruffle all around as well. Since I thought it was unwise to deal with a zipper next to all that bulk of the ruffle, I made an overlapping envelope back instead.


The Mickey Mouse embroidered section measures 10½" wide by 15¾" and I added a 2⅜" wide ruffle all around. The pillow is very plump and, taking that into account, the pillow measures approximately 15" wide and 19" tall. I can't wait to give Mickey to the girls when they visit at Thanksgiving. Yes, they liked it!

Sunday, November 12, 2023

My DL2Q Blog Book - Vol. 19

When Blog2Print had a 35% off sale I seized the opportunity to publish my 19th DL2Q blog book. The site has sales often enough that I rarely, if ever, pay full price. Here are two pair of pages from inside the book. The first pair is images of my "Third Saturday of the Month" outdoor quilt displays. The second pair is my daughter, visiting from Oklahoma, sandwiching her Story of the Sky creation to quilt on my Sweet Sixteen Handi-Quilter. Those glossy pages seem to enhance everything. Blog2Print really does a nice job. I am always pleased with the finished bound hardcover book.


DianeLoves2Quilt - Vol. 19: October 20, 2022 - June 15. 2023
Volume 19 contains 248 pages over a time period of nearly 8 months in 23 posts. I picked a cover design, Mini Print - beige, that blended with the gray Christmas Cars quilt and complemented all the blues of my daughter's quilt Story of the Sky.


The Dedication for DianeLoves2Quilt - Vol. 19 and the subsequent Table of Contents read as follows:
Spectating at the Houston International Quilt Festival starts off Vol. 19: participation in the Stir Crazy Museum Show closes it. In the intervening pages are visits with my daughter and grandkids, sharing sewing and quilting with them. A crocheted cardigan is included, tucked away among small sewing projects and finished UFOs.
- Diane Chambers
I added DianeLoves2Quilt - Vol. 19 (far right, beige) to my shelf with the others. They all look relatively the same thickness, but are not, really. DianeLoves2Quilt - Vol. 8 (middle, medium blue) and DianeLoves2Quilt - Vol. 9 (middle, sage green) are the thickest at 429 and 355 pages respectively. This number of pages is actually a bit awkward to handle when holding the book and browsing through it so I like to keep it to between 200 and 250 pages. The number of pages and number of posts do not necessarily track with each other chart. The nerd in me cannot be suppressed as I show this lack of correlation in the following chart of number of pages in blue columns and the number of posts in a red line.


The number of pages also does not reflect the time period covered. The thickest books do not necessarily cover the longest time period. In the following chart, the red line of "months covered" do not directly follow the blue columns of "number of pages".  When I just started blogging, it took me almost a year and a half (17.8 months) to build up enough posts for a 228 page book. Mostly I get these books printed about twice a year. For any of my readers who want to try these books, for me and my post style/length/photos I've learned the following rules of thumb:
  • 200-250 pages is a comfortable thickness for holding and browsing
  • the number of months covered depends on how long the posts are; I aim for 6-8 months
  • 24 posts makes a one-page table of contents
  • keeping track of cover colors gives me variety when displayed on the shelf; in my humble opinion, consistent colors are not as exciting and also run the risk of a style or pattern being discontinued


These are links to previous volumes and reminders to what covers I selected. Volume 12 has the best, most complete, selection of hints.
  • DL2Q Volume 19 posted 11/12/2023 cover choice Mini Print Beige
  • DL2Q Volume 18 posted 01/25/2023 cover choice Polka Dots - yellow
  • DL2Q Volume 17 posted 07/05/2022 cover choice Red Swirls
  • DL2Q Volume 16 posted 01/29/2022 cover choice Strawberry Chocolate
  • DL2Q Volume 15 posted 01/29/2022 cover choice Orange Swirls
  • DL2Q Volume 14 posted 12/28/2020 cover choice Red Hearts
  • DL2Q Volume 13 posted 04/24/2020 cover choice Solid Green
  • DL2Q Volume 12 posted 02/23/2020 cover choice Waves-N-Whirls
  • DL2Q Volume 11 posted 03/04/2019 cover choice Tree
  • DL2Q Volume 10 posted 07/05/2018 cover choice Brown Swirls
  • DL2Q Volume 9 posted 06/22/2018 cover choice Polka Dots - green
  • DL2Q Volume 8 posted 06/27/2017 cover choice Polka Dots - blue
  • DL2Q Volume 7 posted 06/27/2017 cover choice Polka Dots - pink
  • DL2Q Volume 6 posted 06/27/2017 cover choice Red Swirls
  • DL2Q Volume 5 posted 12/16/2015 cover choice Green Swirls
  • DL2Q Volume 4 posted 03/18/2015 cover choice Plum Flowers
  • DL2Q Volume 3 posted 03/18/2015 cover choice Flowers - yellow
  • DL2Q Volume 2 posted 04/14/2014 cover choice Flowers - pink
  • DL2Q Volume 1 posted 04/17/2013 cover choice Blue Swirls

Wednesday, November 1, 2023

Pumpkin Pleasures at Wooden Gate

I got an email from Wooden Gate Quilts that they were having a sale on Fall fabrics. This pumpkin print caught my eye since I like to collect pumpkins of different materials and patterns and sizes. I bought online and paid for 1¼ yards to make two 22" square pillows, planning to make the trip to the store nineteen miles away a couple days later to pick it up.


Wouldn't you know it, the day I went to pick up my fabric there was a trick or treat Halloween event at the Danville Livery Shopping Center where the quilt shop is. It was a zoo and parking was a challenge but it was kind of cute to see all the kiddos meandering around in costumes. As a fuddy-duddy, I would not have chosen to go on that day; but thrown into the situation, it was a pleasant diversion I most likely would have tried to avoid. The horse team got priority over my parking spot.


Browsing the store I got a couple more items other than the yardage I had pre-paid for. This book, Modern Halloween ©2107 attracted my interest and was included in the fall sale so I bought a copy. The prelude read
Halloween isn't meant to be cute. Leave that for the Easter Bunny. Or at least Halloween for adults doesn't have to be cute. There will be no smiling bats wearing pink hair bows here. Halloween is the one time of the year to embrace the spookier, scarier side of things. The designs in this book are for the modern and mature Halloween enthusiast (doesn't that sound official?) Really, these are projects that can add a unique seasonal touch to your home without making it seem like you have decorated the place for a preschool party.
I am happy with smiling and whimsical pumpkins that can do dual purpose for Halloween and Thanksgiving, even as a grandma. I paged through the book and did like the clean lines of some of the patterns. I was going to get a second copy for my daughter but decided instead to hold off until I saw her at Thanksgiving and see if she wanted a copy. As I browsed Amazon to get a screen grab image for this post, Amazon informed me I had purchased this book before. I immediately felt guilty and careless if I'd already purchased it and stashed it away, forgetting about it. Then I checked the detail of the order and realized I had sent it directly to my adult daughter in Oklahoma in June 2019. She, her husband, and kids are into the ghoulish and zombie type of Halloween. My daughter and I laughed about the book over the phone today, and she was going to look for it first thing when she got home. 


At Wooden Gate's fall sale I also picked up a plush, squishy, fuzzy, pumpkin in a peachy orange. It is the one in the foreground of the next image. I added it to my collection already on the hearth. In the image after that, I typically turn those two jack o' lantern pumpkins on the far right around to face the wall so they do double duty at Thanksgiving. I hope their feelings are not hurt but I would think they would prefer an extended stay on the hearth to plastic bin time in the attic.


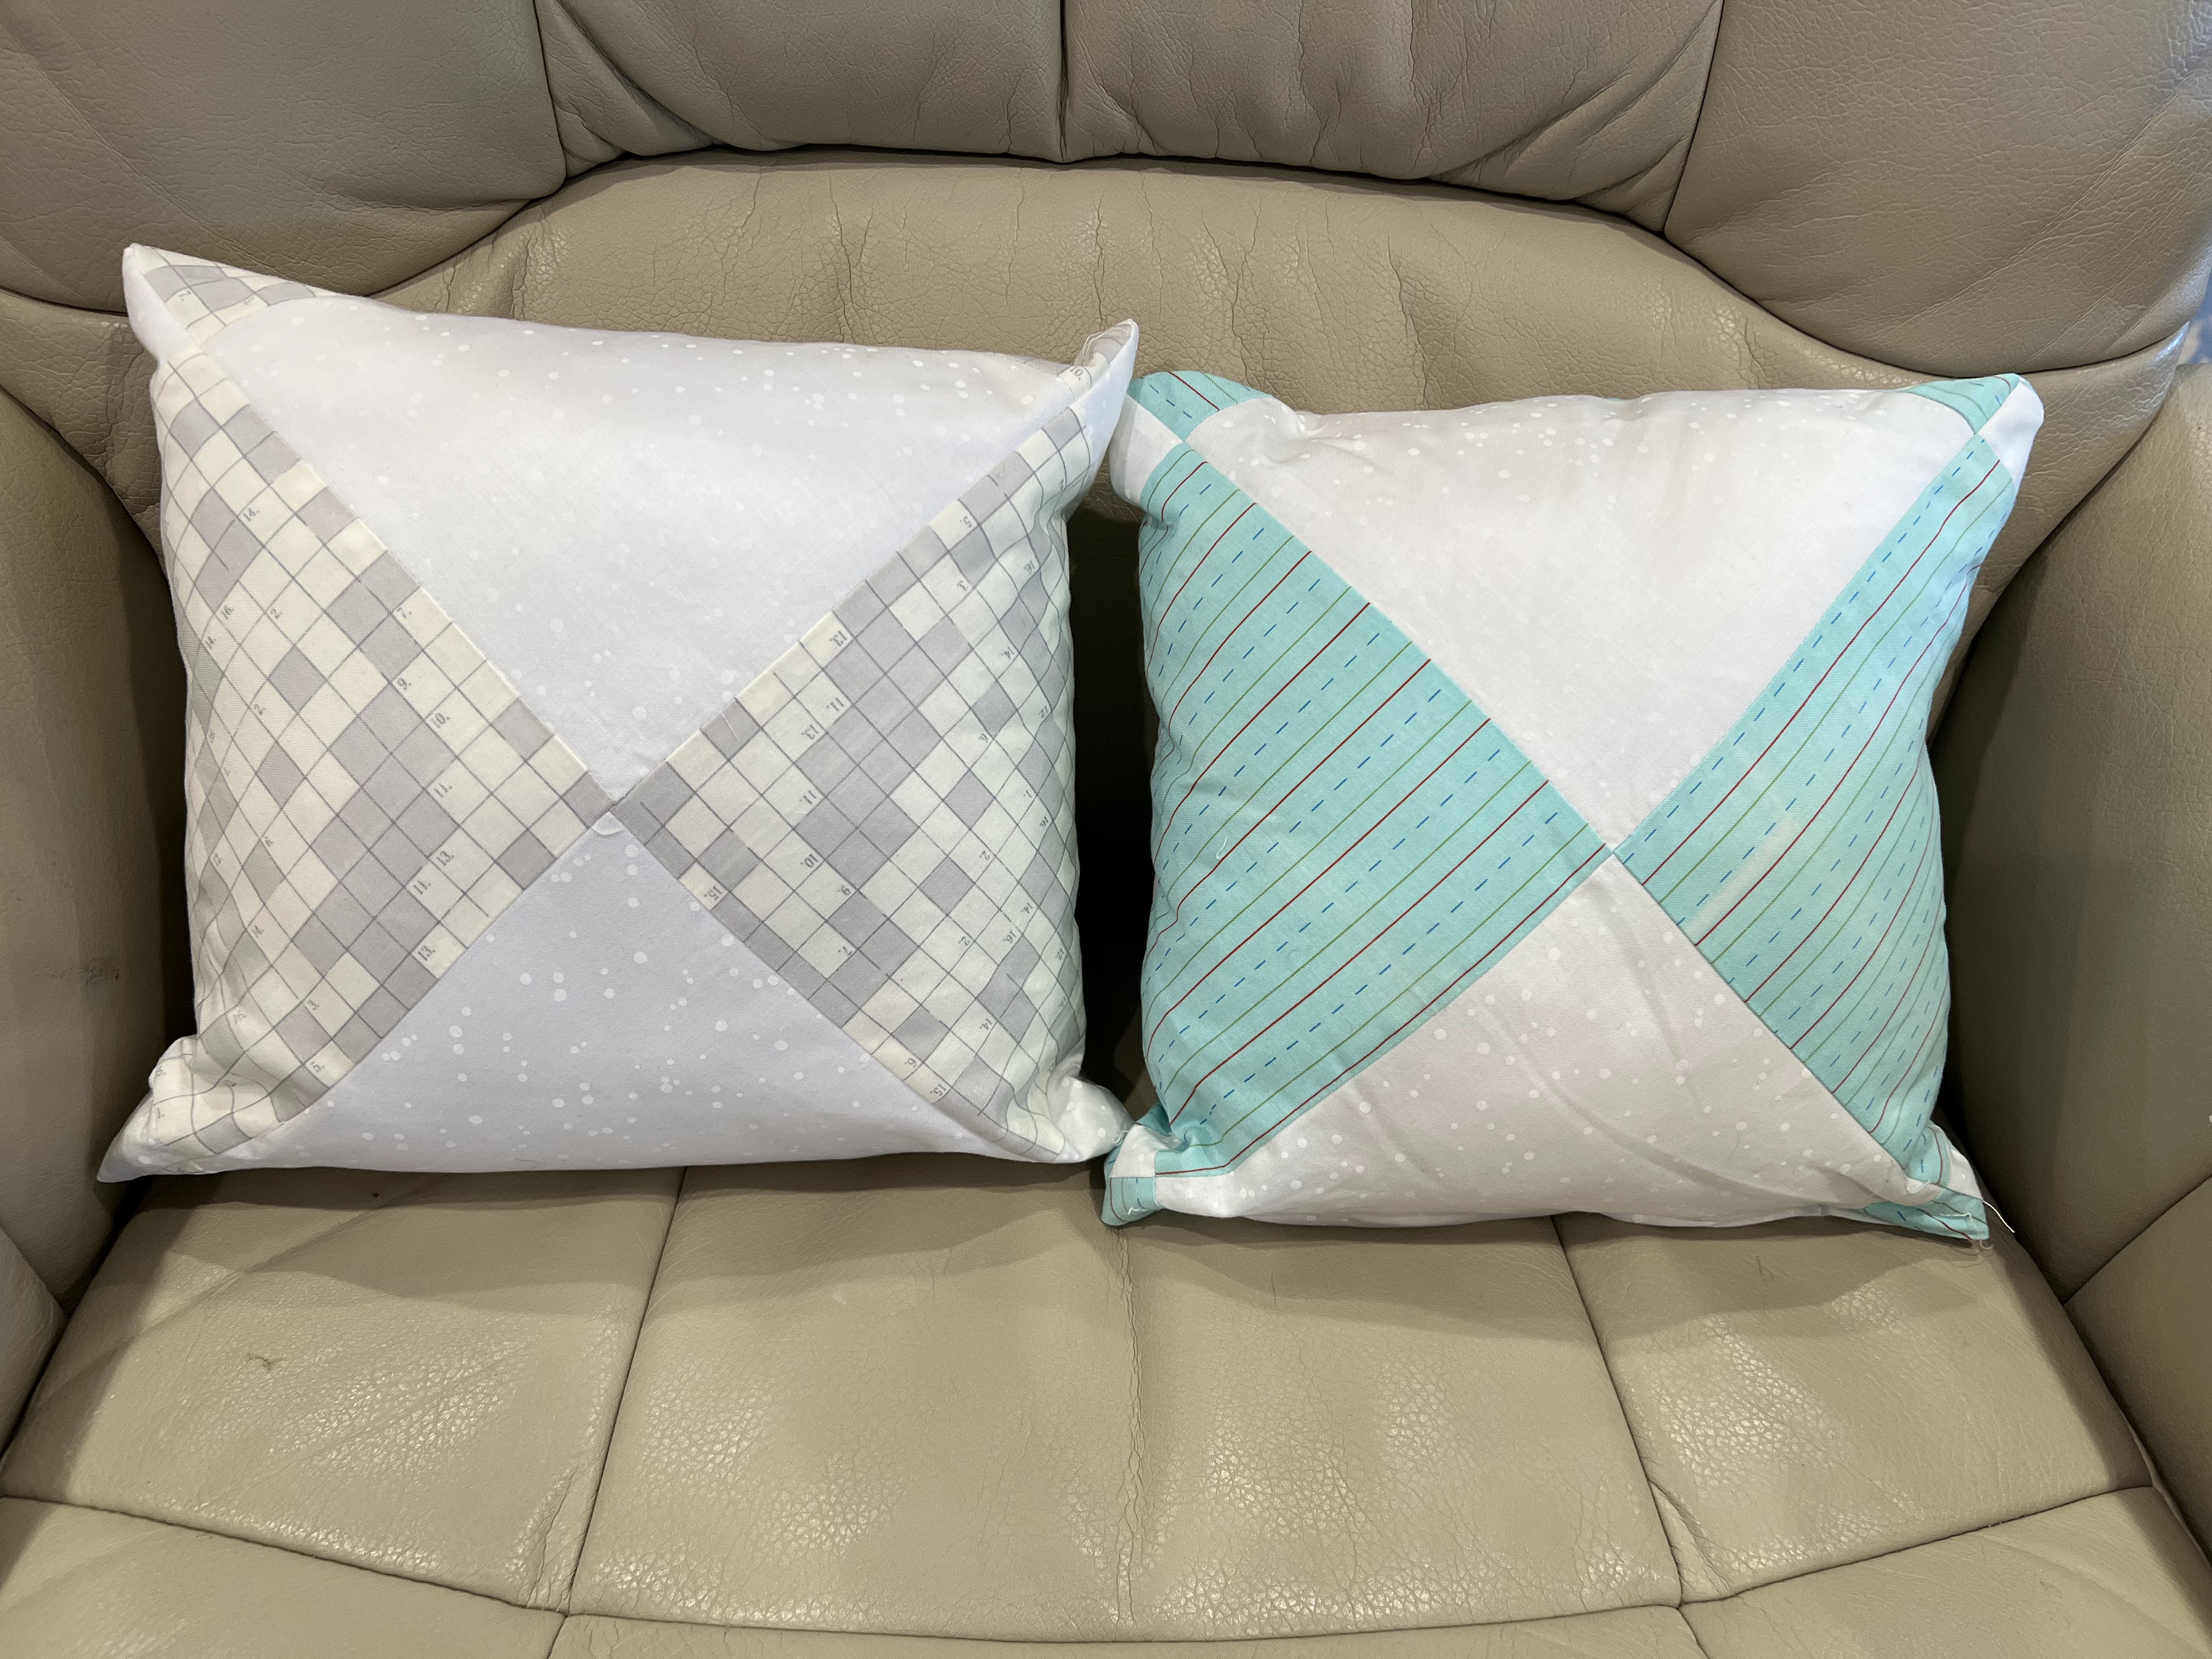
Determined not to stash away the pumpkin fabric and forget about it, I order two 22" pillow forms from Amazon. I already had two 18" zippers so I was all set to make up those pillows right away. There would be little waste or leftover scraps since I'd gotten just the right amount of fabric. But I thought the selvages were so cute with the row of itty bitty pumpkins that I did not want to throw them away. I was able to salvage two rows and decided to place them diagonally across the top corner of each pillow. I cut ¼ " away from the white section of the selvage and used that as a seam allowance. Then I flipped over the strip and stitched very close to the edge with white thread, below the dotted black line, leaving the bit of fuzzy fringe intact.


The diagonal selvage bands came out cute but small relative to the entire pillow. Next time I do this I will cut a longer strip of selvage, even if the text shows, so it will be farther down from the pillow corner and more visible.


The two pillows are now deployed on either side of my hearth. I expected the pale gray to play a larger role. But the dark gray is dominant enough that the pillows have more of an orange/black Halloween vibe. I do love the plaid of the pumpkins, though.


Oh, by the way, I did buy two patterns from Etsy, one for sewn pumpkins (Kim Kruzich) and one for knitted pumpkins. (Marie Mayhew). Oh, well. Maybe I'll get to them next year. They look like fun.

Wednesday, October 25, 2023

Mini Pillows from Extra Blocks

While working on a community quilt with some of my quilty friends, I had two sets of a four block quad leftover from the quilt pattern Open Options by Material Girlfriends. I could have made one two-sided pillow but it would have been rather large. Instead, I had two pillow forms that were each approximately half the square size of a four block quad. By placing a form on the diagonal and folding the quad block corners in to the center I could make two mini-pillows. I would remove half of one block and insert a zipper in that seam, carefully, since it was a bias seam and could stretch. Then there would be an access side to insert the pillow form.


I spent WAY too much time on this supposedly quick project intended to use up extra blocks, spare pillow forms, and short zippers -- all items already in my stash. I will not blog about it in detail, especially since I took minimal photos of my goofs to illustrate this trivial pillow task. In summary these are the mistakes I made:
  1. I thought I needed to add a strip to give more seam allowance and supply more fabric for overlap at the zipper. I did not. I wound up ripping it off.
  2. I underestimated the seam allowance size needed to make the pillow cover fit the form snugly. I re-seamed three times going from ¼" to ½" to ¾" before saying this is good enough. It could have been tighter still, but I wanted to declare this "quick" project done!
  3. I took the first zipper, the one in the aqua pillow, out twice and inserted it a third time due to the seam allowance change. You can guess how this warped that bias edge and how difficult it was to pick out stitches from the zipper tape. I had learned by the second grey pillow; I only inserted the 9" zipper once using the largest seam allowance.
  4. I should not have used zippers at all and just stitched the opening closed. These pillows are small enough at under 11" to be just tossed in the wash as is, without removing the covers.
When completed though, I liked the diagonal block wrap idea and was pleased at the way the edges of the pillows look with contrasting triangles peeking out.


Those triangles peek out differently for the front and the back of each pillow.


I also liked the four patch block effect on the pillow corners.


I still think this is a cute idea for leftover blocks. Remember the old adage, "Measure twice, cut once"? I need a new adage. "Measure once to avoid sewing three times!"

Tuesday, October 17, 2023

House Pillowcases

My friend Kathie and I get together once a month to sew a project or try a new technique. In October I was going to demonstrate, and she was going to learn, the burrito method of making pillowcases. My 5/27/19 blog post has a brief tutorial on the sewing portion of how I make these. She made one pillowcase at my house with my fabric selections and me coaching her. I just love that house fabric! I waffled between orange and brown as the color for the accent strip and then decided the brown would bring out the tree trunks.


Kathie loved the magic of how these come out and liked the additional bonus of making French seams. She went home that night and made a pillowcase of her own, adding a touch of decorative stitching to the accent strip. I liked that idea and added some itty bitty decor on my accent band, also. I first tried to find the correct brown color thread in my stash but was unsuccessful, having only brown options that were too dark (almost black) and brown choices that were too light (almost beige). Necessity being the mother of invention, I found instead a bright green like the border and used it to make decorative leaves. I like the way the "foliage" echoes the trees.

A couple days later, I got out my fabrics again to make the complementary partner to the king size pillowcase we had made that day as a learning tool. I had assured Kathie that after she'd made a few pillowcases and the technique was no longer new, she could whip out a pillowcase in 20-30 minutes. Confident I knew what I was doing, I sewed my second pillowcase up in short order, being careful enough to reverse the polarity of the band side. Then I went to photograph the pair for my blog and ... whoops! They were different widths. So much for cocky self confidence. At least I discovered this faux pas before deploying them on the bed.

In my blog post for 5/11/19 I had stated cutting instruction for standard, queen, and king size pillowcases for directional and non-directional fabric. I quote here, highlighting where I had goofed. 

With directional fabric for a king size pillow (20" x 36"):
Cut the main body 41"along the grain x 37" slightly less than the WOF. The 41" wraps around the pillow with only one seam along the length. Main body needs 1¼ yards to accommodate the 41".

I had absent-mindedly left out the step of cutting the 37" widthNo harm, no foul. I simply cut off the excess width from the completed pillowcase, leaving a ½" for the new French seam at the far end from the opening, and sewed the seam again.


Here is the finished pair of cases. They are folded for storage in my linen closet -- in half, and then thirds; but trust me, yes, the two pillowcases are indeed the same size now.

Thursday, October 12, 2023

Just a Pillow

This is "just a pillow" but it has a story behind it. It all started with a fat quarter I bought on sale at a neighboring guild's fabric sale. Although I do not normally tend toward a neutral palette, I loved the intricate line drawing in this architectural themed fabric. What to do with it? I know. I will make a pillow. I will find a coordinating fabric in my stash for the back.

If I sew ½" seams around two 18" fabric squares, the cover will fit snugly on an 18" pillow form. I have to buy a pillow form. Wouldn't the pillow look cute with black fringe trim around it? I have to buy black fringe trim. Off I go on a commando raid to the fabric store. This phenomenon is called scope creep and budget exceedance; both are always possible with even the simplest of projects. 

I trekked over to the trim department and the cheapest fringe I could find was $7.99 per yard. I needed two yards and a bit to turn corners so I was looking at over $16 + tax. I decided the fabric was striking enough. Fringe would only detract. This project, after all, had started with the piddly $1 for a fat quarter.  

Bins at the fabric store for 14", 16", and 22" pillow forms were full but the 18" bin was empty (of course). I finally located an 18" square pillow form but there was no price on it. "How much could it be?", I scoffed. Up to the register I go. When I was told the price was a mere $27.99, I let out a resounding "Yikes"! The clerk pointed out to me that the form was for indoor/outdoor weather conditions and therefore more pricey. She called for another clerk to meet me back at the pillow forms and the second clerk did locate one final remaining non-specialized 18" form at almost half the price and also on sale at 25% off. Whew! That's more like it! They had been sold out of the "basic" forms but I was willing to spring $11.99 for a "premium" form, especially after dodging that $27.99 cost. 

I did have a perfectly coordinating fabric in my stash, black and white dots on a background that was the exact beige of the focal print. It looked like the two were made for each other. I also happened to already have 16" zipper that I could insert in the bottom seam.

Here is the front and back of the completed pillow. It took me less time to make the pillow than it did to buy the form, decide against fringe, find the zipper, and write this blog post.


It goes great on my husband's recliner. It is kind of manly, too. However, it is still "just a pillow". And to think... it all started with a $1 "bargain".