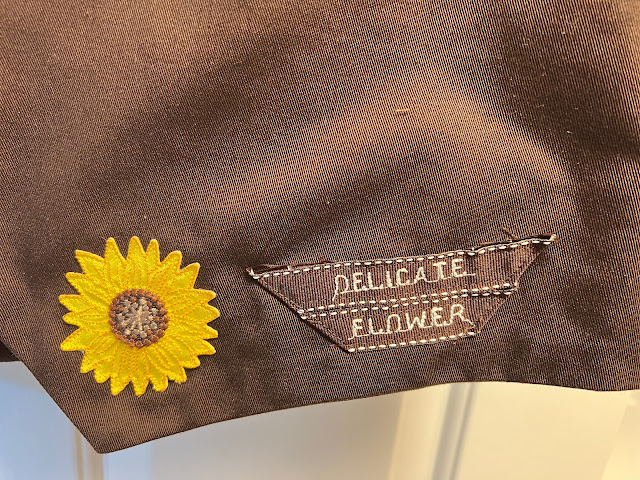
In my previous post from 7/17/23 I showed the Adventure Guides vests I'd made for my son and his two daughters. Alas, they were too small... sort of. They did fit in a fashion, but they were so short that there would not be much room for more badges. I needed to lengthen them in some way. I did not want to remove the personal appliqués nor the ribbon names I'd stitched on the front, so I needed to lengthen them by inserting a band. For the first of the three vests I "patched", I thought it would be easier to only have one seam on the back and two on the front. I needed to un-sew the side seams to insert the extensions this way. Big mistake. Too much effort. For the other two, I accepted two seams on each the front and the back.
When I did resew the side seams on that first vest, I took a smaller seam allowance to allow a bit more room around the chest. I did have to scratch my head a bit; the math never worked out on the first vest. The front band I inserted on Vivian's is wider than the back band I added on the bottom, and yet the front and back side seams are the same length. Go figure.Sunday, July 23, 2023
Patched Adventure Vests
Monday, July 17, 2023
Adventure Vests
When my son Dan was young, he and his dad were active in the YMCA father/son activity program in the mid to late 1980's called Indian Guides. The father/daughter program was called Indian Princesses. There were mother/daughter and mother/son options as well. The YMCA sponsored program still exists and is popular today but its name has been changed to Adventure Guides. Per a 2003 article in the Los Angeles Times
While YMCA officials say the name change was not a reaction to Native Americans offended by the Indian theme, an executive board member for the American Indian Movement said hundreds of tribes, American Indian organizations and non-Indian organizations have taken a position that programs and sports teams should stop using American Indian themes and mascots.
The participants still wear vests and sport patches representing the different activities they did together. They no longer exchange wampum and their tents are no longer tee-pees, but Dan and his girls have fun together in the renamed YMCA program. I mailed Dan's vest and that of his Dad down to him. He and his younger daughter Lillian are modeling them. Dan is wearing what used to be his dad's vest and Lillian is wearing his. I'd had to add extra length to Dan's vest to accommodate all the patches he was accumulating. Adult and child patches are the same size so a smaller vest could not hold them all.
Nine year old Vivian's vest was a boy's size L. She is an avid reader and chose the name Bookworm. I made it two lines instead of one to match the appliqué.

Kalin [a co-founder of the craft site Etsy] said that he named the site Etsy because he "wanted a nonsense word because I wanted to build the brand from scratch. I was watching Fellini's 8 ½ and writing down what I was hearing. In Italian, you say etsi a lot. It means 'oh, yes' (actually it's "eh, si"). And in Latin and French, it means 'what if'." In Greek, Etsy means "just because".
I delayed publishing this post in order to add pictures of Dan, Vivian, and Lillian in their vests. When I went to SoCal to visit last weekend, they tried them on and bummer... they were too small. Well they fit, but just barely, and they were not long enough to have room for many badges. I brought the three vests back home with me and I will make new ones or add length and width to these. The process is to be determined. But I least I brought all the badges home with me so I will be able to add them after enlarging the vests or making new ones. I will find a way to salvage and transfer the personalized appliqués and name ribbons.
Sunday, July 16, 2023
Alameda County Fair Entries
For the 2023 Alameda County Fair I entered two quilts. Details on sewing the two quilts are in my 9/18/22 post for X Marks the Spot and in my 5/12/22 post for Quilt by Number. When the fair ended and I retrieved the two quilts earlier this week, I remembered I had not published a post about their display. I'll admit I was a tiny bit bummed that I did not get any ribbons this year, not even an honorable mention, but it was still a source of some pride to see them hanging from the ceiling. I was curious to read the judges' comments when I picked them up. Entries are judged using the American System of Judging where exhibits are judged against each other. Judges may choose to omit a placing if it is believed to be without merit.
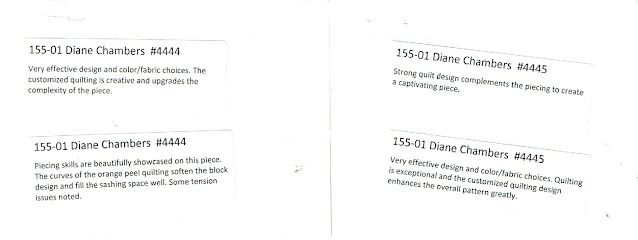
XMARKS THE SPOT, ENTRY#4444- Very effective design and color/fabric choices. The customized quilting is creative and upgrades the complexity of the piece.- Piecing skills are beautifully showcased on this piece. The curves of the orange peel quilting soften the block design and fill the sashing space well. Some tension issues noted.
QUILT BY NUMBER, ENTRY#4445- Strong quilt design complements the piecing to create a captivating piece.- Very effective design and color/fabric choices. Quilting is exceptional and the customized quilting design enhances the overall pattern greatly.
These two got 1st place (tiny blue dot in lower right corner of each).
Tuesday, July 4, 2023
Tipus and Treetops - Backing
This post is continued from my previous post 6/30/2023 where I created the top for this quilt. Although grateful for people's input and interest, after due consideration I chose to make the quilt five blocks by five blocks. It called out to me to be square. Here it is wrapped around the corner of my design wall. I made three more blocks the same as others I'd made. Two extra blocks incorporated those stripes I like and I set them in the upper right diagonal to balance the two in the lower left diagonal. I had to unsew and resew the upper right corner block with the tipu (little bird) border to offset the height of the center correctly, but that was no great effort to do. Now those five landscape orientated centers undulate up and down in that top row, as in the middle and bottom rows. Rows two and four have portrait oriented centers that also subtly undulate down and up. The symmetry of this five by five array pleases me.
Although I had yards and yards of gray fabrics, the teal ones are more appealing and exciting. I had partial yards of the teal feature fabrics left over — not so much the "tulip" one but the tipus and trees and mesh. I decided to use them uncut and full width. I experimented with the placement and what looked best was the teal mesh on the bottom; positioned there it weighted the composition and acted like grass. Next the trees were in the middle; they are the most interesting and centrally placed are more of a focus. Tipus are on top like birds in the air. For the extra width I needed, I used the large graphic charcoal and white sunflower print, fussy cutting for symmetric sunflower placement.
.jpg)


.jpg)


