Showing posts with label Tool. Show all posts

Sunday, July 18, 2021

AVQ Fabric Sale

Friday July 16th, I went to my guild's fabric sale – over 10,000 yards of 100% quilting cotton for $3/yd. I really do not need more fabric and yet I had to support my guild's fund raiser, right?  My husband, Frank, came with me for companionship and his packhorse capabilities. Before we go to quilt or craft shows I always tell him what my goals are to get and what items to avoid. He is a pretty eagle-eyed shopper.

FABRIC
This time I told him no more kits; I have a backlog. I also asked for his intervention with no more novelties; every novelty fabric is another quilt. Exceptions might be prints in a large enough yardage to be used as backings. I was looking for mainly solids, even precuts in an assortment of solids. In that area all I found was 1½  yards of a solid orange and 2 yards of a mini-check that could be used as  graphic sashings or borders.


I used to have a dress in a drop-from-the-shoulders-frock-type style in the barnyard print, shown on the left, that Frank fondly called my bumpkin dress - as in country bumpkin. He brought me this roll of 3 yards and urged I buy it for nostalgia sake. He also found a 3 yard roll of the pale blue swirls on the right. Both can work as a backing.


I came across a bin of flannel and found four ½ yard pieces that will work great for burp cloths. Three out of the four will even go with fat quarters and ½ yard pieces I already have in my stash drawer of flannels. Two fat quarters make a burp cloth and I will use the pattern from my post dated 6/18/14.


Near the racks of hanging panels I found a bin of ornament panels. My kids were born in the 1980's when these panels were prevalent in the fabric stores. I would insert a ribbon loop at the top, sew and turn them, and the kids would help me stuff them. At the holidays, in addition to those we placed on the tree, we would have a sufficient surplus to hang many of them from curtain tension rods in windows and doorways. This next photo is of the grandkids in Thanksgiving of 2018 decorating our stairs with the same stuffed ornaments their mom did.


At 50¢ each, I bought eight of these panels: three houses, two calico toys, two nativity, and one gilded gold. I already have the Home for the Holidays made up from decades ago and they turned out really cute back then. I bought three more panels of those which will yield twenty-four (3x8) more stuffed houses. I already have the calico ornaments made up but still I bought two more panels which will yield twenty (2x10) more ornaments. The nativity scene I have never seen before. Each makes a scene of eight figures so there are sixteen more ornaments. The final panel has gold gilded ornament in deep green and red tones, also unseen before by me. When I unfolded the panel I noticed that someone had snipped off one of the squares but it will still yield the front and back of thirteen. Total: 24 + 20 +16 + 13 = 63 + an extra diamond that says Merry Christmas.


Yes, I know I said no more kits. But I found this kit for a 56"x56" Paddington Bear quilt. It does not have the pattern included but I was able to buy the pattern on eBay when I got home. Why is this an exception to my no more kits restriction? Because at the last AVQ fabric sale in September/October 2020, which I did not attend, my friend Mary Ann found and set aside for my purchase a Paddington bear quilt kit in a tin. I have it sewn and sandwiched, awaiting FMQ, and planned to gift it to my daughter's sister-in-law who is due in late September or early October. She just found out she is having twin boys. What luck to come upon another Paddington Bear quilt kit, similar but not exactly alike, which will be perfect for a second baby! Each have square panels for the blocks like for a cloth book. They even have the same striped fabric in common.  Although the one from the last sale measures 48"x48" and the one from this sale measure 56"x56", I can easily leave off one or more borders totaling 4", on the second one so the sizes match.


That's it for the potentially practical purchases. I did not, however, get away scott free on novelties! I caved and bought two ½ yard pieces of this funky chicken print novelty. Too discontinuous for a pillowcase, too small for a backing, too large a print for sashings – if not for it's unabashed cuteness it would be totally useless. I just liked it and it only totaled $3. Maybe for a pillow...?
 

PATTERNS:
I bought two old patterns that seemed interesting. One is a pieced version that imitates the intricate appliqué work of a Hawaiian quilt.  The other is from 2004 and introduces a "new" technique. I was curious. It looks like those blue flowers are about 12" tall. Just one would make a striking pillow. I read a cute statement somewhere suggesting that "pillows are stuffed animals for adults".


TOOLS:
I came across this set of craft scissors from Lakeshore. I have very artistic granddaughters who will love these. The names of the blades are amusing. Some shapes are understandable; others not so much.
Six colors on the left from pink to pale green:
     Volcano, Dragon Back, Jigsaw, Large Pinking, Majestic, Large Scallop
Six colors on the right from medium green to pale blue:
     Bat Wings, Cloud, Imperial, Cracker, Rockies, Small Wave 


And as for my husband who came along... he only bought two plastic triangle rulers for his garage. Though maybe I can attribute the purchase of the bumpkin dress fabric to him.



Those who were at the sale when we were there and don't remember my husband, may possibly remember the closeups of the front and the back of his shirt.

Monday, July 13, 2020

Three Little Kittens

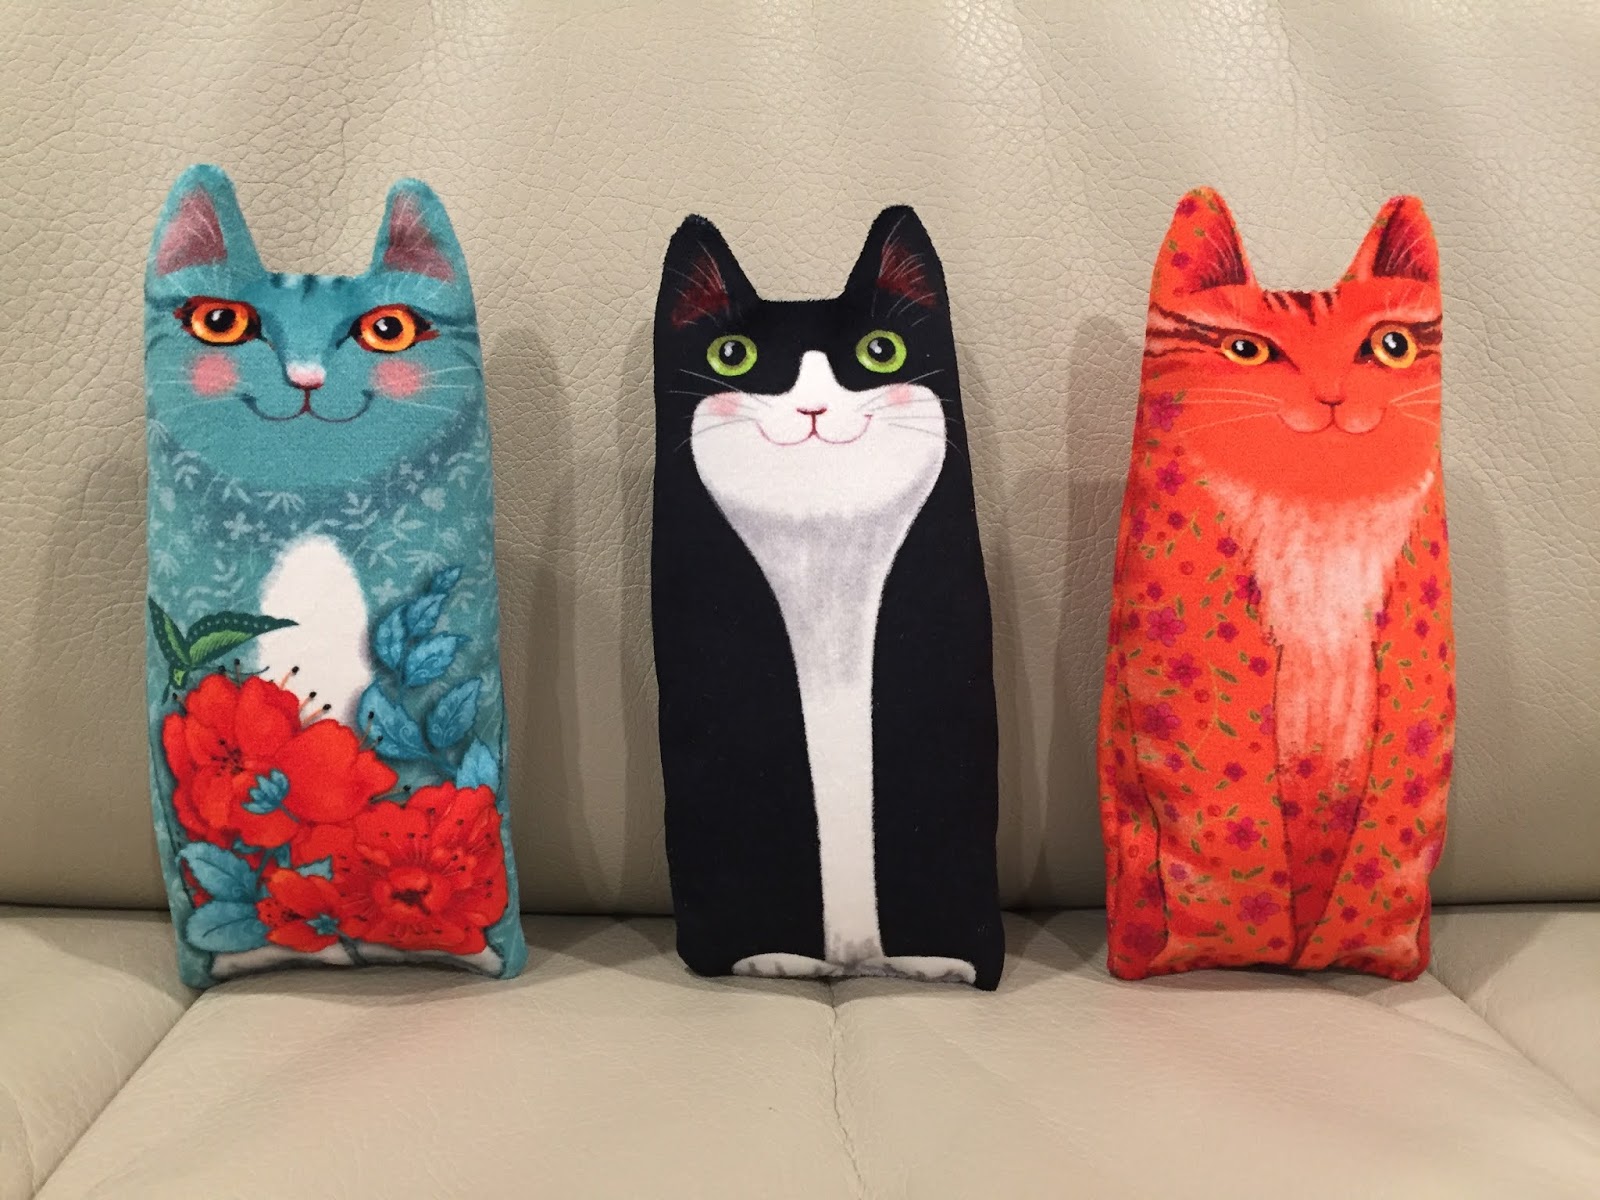
After a big project completion I need a smaller one for instant gratification. I liken this practice to a palette cleanser between courses of a big meal. These three small hand-sized stuffed velvet kittens did the trick after my completion of Fifty Shades of Taupe in my previous post. I bought this kit of a trio of kittens, made in France, from Renaissance Ribbons. The fabric is a heavy duty 100% polyester velvet that is so soft, smooth, and appealing to the touch it reminds me of the silky fur on the tummy of a six-week old puppy. Each kitten comes in its own package™ with a one page instruction card written in French. Luckily the diagrams told me all I needed to know.


Construction is simple. Two sides of the front view of a kitten are sewn right sides together, turned right side out, stuffed, and then whip stitched closed at the base. Because the fabric has a heavy almost rubberized backing and is slippery on the front when the two right sides are against each other, I used Clover Wonder Clips™ to hold the two pieces in place while stitching around the perimeter.


My trusty tools for turning and poking out corners came to my rescue, even for the thick fabric.


The three kittens were given French names: Filou translates to Trickster, Plume means Feather, and Lune is equivalent to  Moon.


My husband has been wanting to get a cat for quite a while so these will need to do in the interim. They feel very much like stroking a real feline. I am sure, though, that he will insist they are far from an adequate substitution for the real thing. I insist they are much, much cuter and less demanding.


Each is the perfect size for a small child's hand. I suspect if a grandchild or two visits, I will be quite willing to have one or more kitten travel home in a suitcase. For now they are decor in my family room since they have such tactile and visual appeal to me.


I confess. I thought I was buying an extra kitten for myself when I actually bought another entire set of three. Maybe I will make them up now or perhaps save them for another between-big-projects break. I do tend to like whimsical pillow type accents in my family room. Linking up now with MCM #183 at Cooking Up Quilts...

Saturday, June 20, 2020

Third Saturday of June 2020

On the third Saturday of the month my quilt guild has begun a tradition of hanging quilts in the front of their homes as a source of enjoyment for the community and as a thank you for the essential workers during the pandemic. My April display was described in my post for 4/22/20. For the month of June, we were asked to hang quilts which leaned toward a masculine theme for Father's Day. This was my display for June. After each photo are the names of the quilts and a link to a post that tells more about each.


In front of garage doors from left to right
  • Tool Quilt whose poem reads a few of my favorite things 2/18/2012
  • Thimbleberries 1/7/2015
  • Train quilt from 2008 in refrigerator car colors for husband's 60th birthday 7/24/2018


Patriotism near front door
  • American flag on bench (pre-blogging therefore earlier than 2011)
  • Blue and white mystery quilt at top (pre-blogging therefore earlier than 2011)
  • Debbie Mumm 40"x40" table topper second down 3/31/2014 (second half of post)
  • Quilt from scraps third down (pre-blogging therefore earlier than 2011)
  • Quilt assembled from winnings from guild June 2017 Block of the Month 9/11/2017
  • Painted barn quilt board 2/11/2020
This monthly tradition is fun and makes for a lot of reminiscing. But I do wonder... what happened in May 2020?

Wednesday, April 8, 2020

Easter Pillowcases & Bunnies

I originally bought these two fabrics for coordinating dresses for my two southern California granddaughters. But they grew before I sewed the dresses and the yardages in my closet did not. Hence I made the two bunny prints up into standard size Easter pillowcases. Since the fabric was directional, I needed at least 41" length for the main body to wrap around the pillow – more than the usual 27" or ¾ yard. The pillowcases have a handedness to them. When the main body print is upright at the head of the bed, the two cases open out on opposite sides. I fussy cut so that the stripes on the accent fabric, which also has a directionality to it, follow a mirror image sequence on the two pillowcases. The stripe is not from the fabric line; I was happy when I found it in my stash and it had so many of the colors in the two bunny prints. In the following photo each pillowcase has been folded in half lengthwise and in thirds crosswise so a sixth of its size is visible.


I like for the contrasting borders to be oriented so that when they drape over the edge of the mattress they are upright. This next photo displays a closeup of the adorable bunny prints.


Since Easter is just around the corner, I got out a panel that makes two bunnies and three baby bunnies. The designer is Stacy Hsu and I love all her stuff, especially the doll panels. It wasn't until I started cutting out all the pieces that I noticed pink, aqua and soft orange colors aqua were similar to the pillowcase colors. Then... "Hey wait a minute, these are the same bunnies!" I realized. I had bought each of these fabrics and did not make the connection they were both Stacy Hsu.


I rummaged in my garbage and found the selvages for the pillow fabric. Sure enough. It was Spring Bunny Run by Stacy Iest Hsu for Moda. Now I really wanted to make those bunny dolls since they coordinated. My daughter-in-law had said that one set per household was fine, not one per child as I started out doing with Lil' Red and Coral the Mermaid, having made three of each. The six-year-old and four-year-old sisters would be getting the pillowcases so they could share these five bunnies with their two year old brother.


Sewing these is a snap. Cutting out all the pieces seems to take forever; but with experience I have learned to do a lot of the straight parts with my rotary cutter.


They are so cute it is worth it. The following photos are closeups of the girl bunny and the boy bunny in their finery. Her skirt has pockets with blooming flowers. He sports a dapper red bow tie.


Stuffing them used to be a part where I struggled. I tried a variety random implements to get the stuffing deep down into those slender legs and arms but the task was always challenging and time-consuming. Then I visited the booth of a vendor who made and sold dolls and teddy bears. She demonstrated the tool and convinced me I needed it – which she was selling, of course. I bought it and this was the first time I have used it. That vendor was so right! The tips are serrated and open to grip the stuffing so it can be pulled and manipulated into the crevices and spaces. The stuffing gripper – I just made up that name – is sized so well to get way down to the tips of those long limbs.


Not wanting to break social distancing by going to the post office in person, I learned about USPS online for package pickup and it is great. I was able to calculate the postage, pay for it with a credit card, and print the labels all perched in front of my Mac screen. The package containing the pillowcases and bunnies is sitting near my front door, ready to be put out first thing in the morning for the mailman to pickup. This Easter may be unconventional, but even if this stuffing tool were to be the only surprise for me in my Easter basket I would be very pleased – even if I had to forgo a little bit of chocolate.

Thursday, June 28, 2018

Drapery Panels with Grommets

My family room has two 4 foot wide windows and an 8 foot wide sliding glass door. I planned on making four drapery panels, one each for the two 4 foot wide windows and two for the 8 foot wide sliding glass door. Panels would hang on only one half of the windows and remain open at all times. They were to add softness and homeyness to the room and not be functional for light control. The drapes were to coordinate with the rug on the floor which is a floral swirl pattern in blue, aqua, taupe, and navy on a grey background.


I picked a large scale fabric of stylized trees in the same colors as the rug but on an ivory background. I wanted the drapes to run floor to ceiling and, since the fabric is a very large scale print, I did not want to detract from the graphics with pleats. I decided to do a grommet style drape. I had never done this before. However, when my kids were babies I would sew their clothes and add gripper snaps at the crotch and down the legs. Other than grommets being way bigger, how different could they be from gripper snaps?


The pattern repeat of my chosen fabric is 25". To go floor to ceiling in an 8 foot tall room requires 96" plus 4½" turnover for the top heading 4" wide stiffener. Adding a 4½" rule of thumb allowance to turn up a hem totals a length of 105". Four repeats is too little at 100". At 125", five repeats is a bit wasteful, but necessary. I cut four lengths of fabric five repeats long each. I turned over 4½" at the top edge and stitched on a 4½" wide non-woven heading stiffener butted up to the fold. Then I wrapped ½" of the fabric over the lower edge of the stiffener and zigzagged in place. The back side of the header is visible in later pictures. The non-woven header is shown in the next photo.


I initially bought Dritz plastic grommets size #12 with that are meant to snap in place. But they did not hold well enough with the thickness of two layers of fabric and a stiffener sandwiched between the two layers. They may possibly be OK for sheers or light weight curtains but most definitely not for drapes. Instead I ordered size #12 metal grommets from Amazon, 1-9/16" hole diameter. From my ancient low tech drafting days I used a plastic circle template to draw the hole sizes to cut out. Using a 1⅝" hole was perfect and I drew them with a fine 0.5 mm marker on the right side.


Drapes must have an even number of grommets in order to return to the wall the same at either side. I chose eight, a pretty common standard and the quantity in which the sets of grommets are typically packaged and sold. The holes for the eight grommets were equally spaced  6⅝" apart:

½sp O space O space O space O space O space O space O space O ½sp

Before cutting out the holes,  I stabilized the three layer sandwich so the fabric and header would stay aligned. I stitched a vertical line at each position and then, with the largest stitch size I had on my Pfaff, I stitched all across the header parallel to the top, through the midline of the grommet circles, a stitching line I would later remove.


To get the hole started I first tried folding the fabric in half and snipping in the center of the circle. That was difficult to do through six thicknesses and I nearly nicked the tip of my fingertip a couple times. I later came up with slicing a starting slot by poking a hole with a seam ripper and slicing outward to a point on the drawn circle. I inserted a straight pin at the marked line so I did not overshoot.


Cutting out 32 circles with scissors was not as onerous a task as I first thought it might be. My husband tried using a hole saw in his drill press in the garage but that method just shredded the fabric and flung the sample far out into the driveway. After cutting out the stabilized holes, the next step is to insert the front part of the grommet, the one with crenellations along the inner diameter (like the tower of a castle or the top of a rook in chess), into the hole from the front of the drapes. The hole fits snugly around the upward facing crenellations and I smoothed all around with my pointer finger or thumb.


Then I added the grommet back retaining ring with teeth that grip the fabric. Each of those upright tabs from the grommet front will then get curled outward and bent over, tucked within the annulus of the grommet back all around.


A closeup of the black hard rubber tool illustrates a base with a curved upper surface to mate with the grommet front. A plug then flips over the mated grommet assembly that sandwiches the fabric header. When pounded down with a mallet or squeezed into place with a press, the grommet back and front are then joined, crimping the drapery fabric in between.


My husband has a press so we did not need to pound with a mallet. I was lucky to have him as my brute force input.


At first I had bought four sets of eight grommets each, exactly the amount I needed for the drapes. My husband wisely encouraged me to buy some extra grommets so we could experiment with non-drapery fabric and perfect the installation technique. I did order one more set of eight from Amazon and they were there within a day.  Doing trial runs also gave us the experience of learning how to remove grommets that did not go in quite as desired. His array of tools to peel open those bent over crenellations was quite extensive.


The circle on the right in our practice panel was cut - er, uh, shredded by the hole saw.  Removed and deformed grommets can most definitely not be used again. We only had one out of 32 go in poorly in the real drapes. I was not paying enough attention and an extra fold of fabric had gotten crimped in. All is fixed and to our satisfaction now. 


The grommets look great in the drapes on the rod.


We bought a rod that looks like pipe for an industrial vibe.


The drapes slide easily and are not so crowded that the fabric print is lost.


Backing away a bit, here is what the corner of the room looks like. That blue leather chair is my favorite to curl up in and read in –  or stretch out on and nap.


There are a lot of patterns going on in this room, a quilter's delight. They all seem to work together because they share so many colors in common. I have a post March 30, 2018 about positioning the fireplace tile. 


The hardest part about this project was dragging around and manipulating the weight of each panel. By the third panel, I realized it was best to pile the panel on a chair and slide that chair from the cutting table, to the ironing board, to the sewing machine, and finally to the grommet marking and press station on my hall counter. Other than that, it was all straight sewing and not rocket science. 

I have thirty two of these leftover cut-out holes. They are double sided. Like donut holes, they must be good for something. Perhaps the folks at Lets Bee Social #231 will have some ideas.