Showing posts with label mask. Show all posts

Monday, March 1, 2021

Masks for Grandkids

Last year I made masks but did not blog about them. I felt sewing them was for the good of the community and not necessarily a work of art nor a creative endeavor. When my daughter-in-law Carrie asked me to sew a few more for her kids, I found myself scratching my head trying to remember how I did them – in what styles and in what sizes. This blog post is to help me remember for the future. I surprise myself sometimes how often I refer back to a blog post to jog my memory about some detail or time frame.

Pleated Masks are more time consuming but that is the style I prefer to wear. Personally I like the pleated style because it does not cling so close to my face. I made ten of these, five each in two different sizes for my Southern California grandkids. Since this grandson is about to turn three, I made sure I picked prints that would appeal to either gender. The pink and purple ones I'd made previously for his two older sisters are hardly something a macho three-year-old boy would wear. From top to bottom there are sailboats, farm scenes, carnival ride tickets, polka dots, and scraps from the Very Hungry Caterpillar quilt called Munch, post dated 4/13/20. Here are the masks before I inserted the elastic at each end. They were based on the following URL. https://www.instructables.com/AB-Mask-for-a-Nurse-by-a-Nurse/

I left off the long ties since for the kids just slipping them over their ears is easier  – they do not have to stand still as long. At each end, instead of extending the ties, I made ½" wide casings to feed through elastic that, once adjusted, could be tied off to size. This is how my last efforts at 100% sizing fits a six year old child.

I made them in two sizes and this time was wise enough to label what it was. I printed out the pattern at 1" = ⅞" and 1" = ½" and labeled them with a dry erase marker 88% and 50%. I learned the hard way that dry erase marker does NOT come out of fabric, no way, no how. Google it and you will see I am right. It is a great choice for markings that will not fade.


Here are my notes for the pleated masks. I can get two masks out of a fat quarter, one of each size.


Round Masks are much quicker to make and I think perhaps the kids might prefer them because they are more minimal. I made twelve of these, four fabrics in each of three sizes. Sort of – I could only get two of the peach paper doll print, so the third, the smallest, is pink. The recommended size for a child size is 9" but again I think this is a bit large for a young child, especially those that are pre-school and kindergarten age. I made these based on a 7", 8" or 9" circle. I folded the corners over ¾" leaving a roomy channel for the ¼" elastic. Again I was wise enough to label the size, this time as the diameter of the starting circle. The round masks can be made from scraps and do not require a fat quarter. (Hmmm... ironic, since they are made from quarter circles...). I used this YouTube tutorial for the round masks. https://www.youtube.com/watch?v=0OEAimq9_Lw 


Here are my notes for the plate style masks. I made them from square scraps folded in quarters rather than trying to find plates of the correct diameter.


Since I am social distancing and staying staying out of stores, I ordered elastic from Amazon for these masks. It only cost me $10 – for 100 yards! What does 100 yards of ¼" elastic look like? Not bad. Here is it compared to a spool of thread and a pencil. It also fit nicely on a cone thread holder my son-in-law Jeremy bought me one Christmas. I used a generous 20" for each mask so I already have consumed over 12 yards (22 x 20"@36"/yd = 12.22 yards). I also sent off an extra 10 yards so I have used up almost 25% of the 100 yards already. I will have it for a while, but it is far from being a lifelong commitment.


Once I'd fed the lengths of elastic through each casing, I packaged the masks up to ship off to Southern California along with two zip lock snack bags containing five yards each each white and black elastic. Yup. I stuffed all that into the smallest size priority mail flat rate shipper. They do nest very well. They are on their way to my grandkids. I will just have to imagine any smiles hidden from view behind the masks. Aah, but I can still get a hint from the twinkle in their eyes.


Tuesday, November 24, 2020

Masquerade Extras

The completion of Masquerade, a quilt in the making for nine years, was announced last month in my post for 10/16/20. You do not make a quilt from 173 hexagons, each from 6 equilateral triangles, without having some leftover triangles. What a shame to toss out those perfectly uniform shapes as scraps. I joined them together as far as they would go in quasi-random order to make one side of a pillow. I was not free-spirited enough to be totally random. Total randomness would have resulted in two triangles of the same color falling side by side somewhere, and I prohibited that from happening. 

I also had a narrow strip of the mask fabric left over. Not large enough to make a pillowcase but certainly adequate to add a focus band on a pillow. I flat fell seamed a blue band and a green band on either side of this mask piece. 


I joined the banded mask section to the pieced triangle section right sides together to create sort of wrap-around seams. The result was a tube size 21" x 13".  I sewed one short end closed and turned the unit right side out. A couple straight stitching lines an inch or so in from the long edges gave it two solid-color flanges.  This pillow was a quick, spontaneous, impromptu creation so I added no zipper nor Velcro nor overlapping flap. I stuffed it as is and machine sewed the remaining short edge closed. The result was this pillow. The following photos show front and back – or maybe back and front depending on your preference. 


But wait! I still had some half-equilateral triangles left over from the edges of the strips used to cut the full triangles. How could I waste those luscious colors and toss them in the trash? Granted they were small and showed the selvage printing, but that could be interesting, too. I sewed them together matching those with similar angle slants and leaving the selvage printing in place. Some were bigger than others but since they had all been cut from 3½" strips, they made several uniform width columns. If grouped judiciously, they could approach approximately equal heights. I had leftover piped, striped binding from the Masquerade quilt, so I tucked some in the seam at either end before adding orange vertical edge strips. After trimming, I added blue and green horizontal bands on the top and bottom as on the previous pillow. I sized the added blue and green strips such that this pillow also ended up at 21" x 13". Since these blue and green bands were narrower, I chose not to stitch them flat as flanges. They adjoined a swirly orange back in a continuous soft contour.


Again, I stuffed this pillow without much extra decorum or attention to future removal of the cover. If dirty, it can be tossed in the washer and dryer as is. Here is the front and back after stuffing to be plump, yet soft and squishy.


But wait! I still had two equilateral triangles and some more black and white striped binding. This was enough to make this little 9" square pillow. Depending on your screen size when you are reading this post, the image made be bigger than the pillow. Perhaps I should  call it a pillow-ette? 


The front fabric of the quilt was not all I had left over. I had 8 yards of the fabric to use for the backing of the king-size quilt. See my 9/16/20 post for the story behind the graphic blue backing fabric. There was a fair amount remaining, but not necessarily in the size configuration for a pair of king size pillowcases. But I am quilter! I can piece! Aha! I was careful to use flat fell seams so there would be no raw edges nor bumps where the sleeper might choose to lay his head. My resulting jigsaw puzzle ended up with an embedded mask band in the discontinuous backing fabric and a pillowcase border of black and white stripe binding fabric. The white accent band was from the same piping fabric as the quilt binding.

So here are the three pillows, a pillowcase, and a section of Masquerade folded back to expose the backing fabric. I had better be dark in my daughter's bedroom. This is a pretty wild combination of colors and shapes and patterns, not necessarily conducive to falling asleep.


The trio of scrap pillows is displayed on a small bench at the foot of my bed prior to my mailing them to my daughter. I am not sure where she will place them in her bedroom or if her 8-year-old daughter and 5-year-old son will make off with them.


Here is the entire collection: Masquerade quilt, two pillowcases, and three pillows. I have already shipped off all the components to Oklahoma as of this post. I am still six months before her 10th wedding anniversary next May.

Friday, October 16, 2020

Masquerade Quilt Is Complete

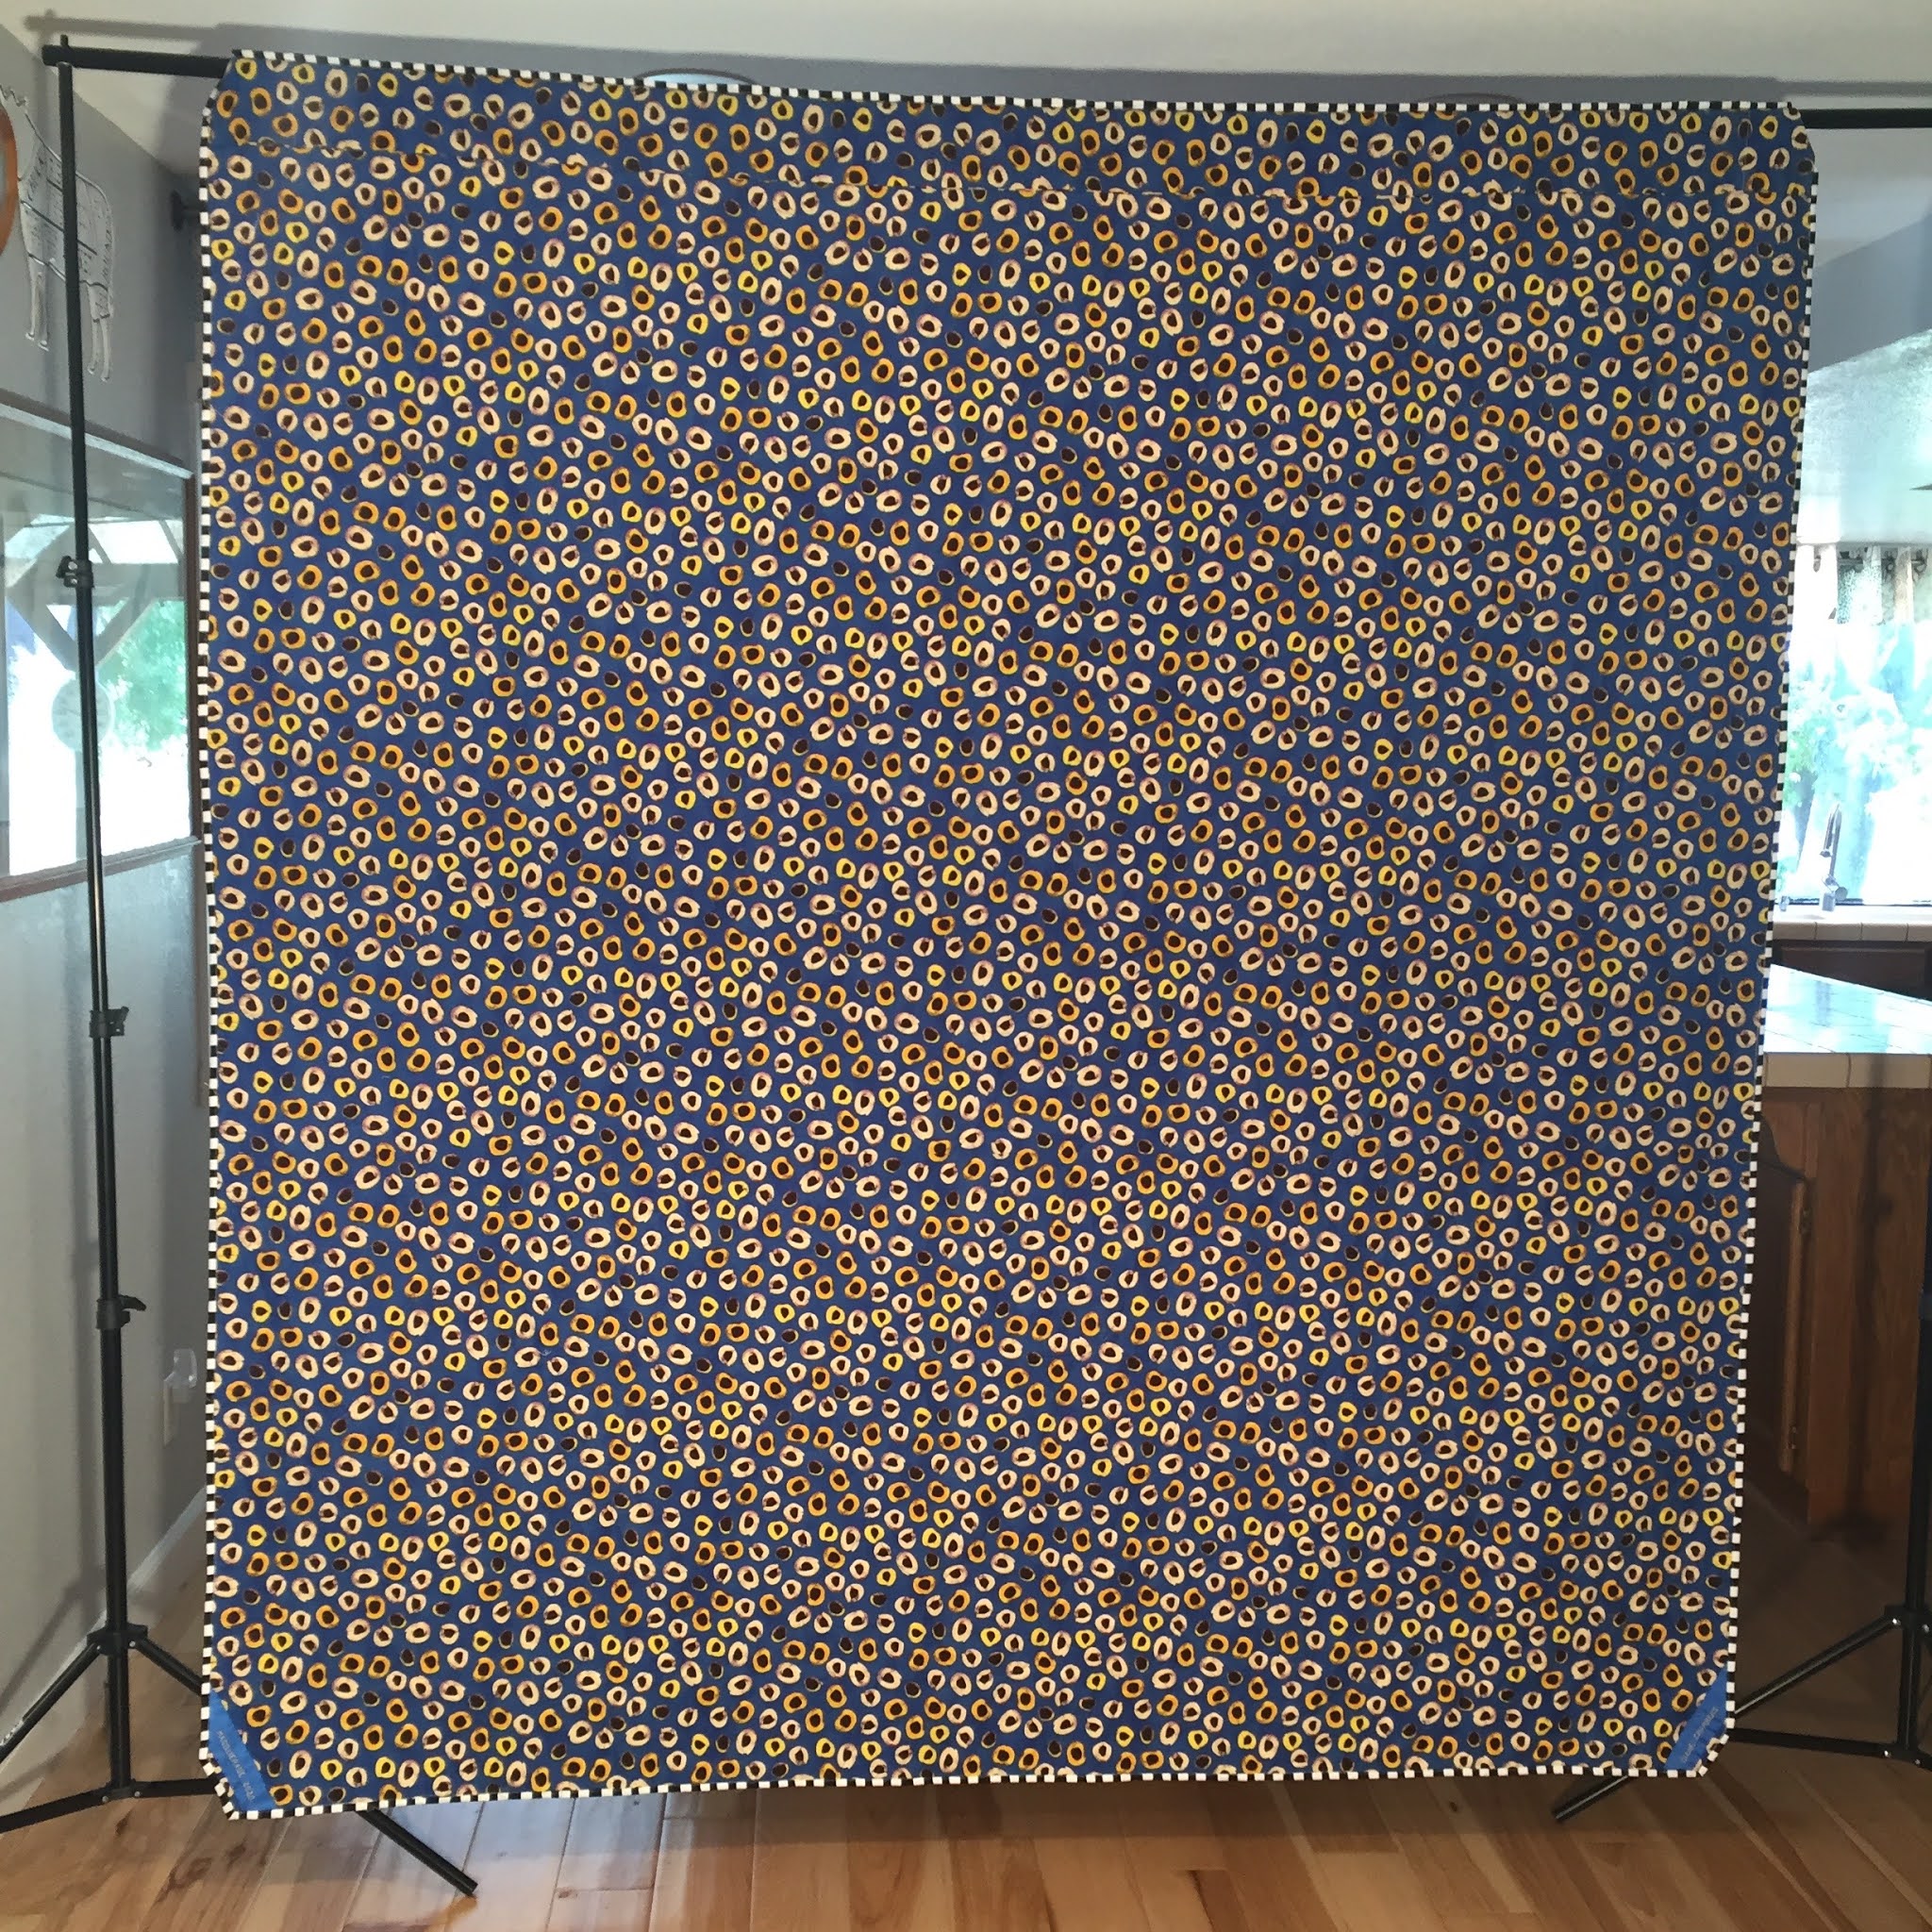
Technically, Masquerade was complete after the label and binding were attached (previous post 10/14/20); but after nine years in the making, and nine posts throughout the process, the quilt deserved a tenth post dedicated to its completion. The king size quilt also needed a hanging sleeve in order to be photographed. It is the largest quilt I have ever made. I am proud I made it totally on my own – no sub-contracting for the quilting. At 88" x 92" it is too big for even my 6'4" husband to hold up for me, and so here is Masquerade, displayed on a rack, indoors, with additional lighting from a high intensity lamp.


We initially tried for the natural lighting of outdoor photographs but the wind was battling us. I had to time a shot when the quilt was vertical and not moving and orient myself relative to the quilt so that at least one view was looking straight on. Harder yet, my husband is concentrating in this photo on keeping the entire contraption from blowing over; 56 square feet makes quite a sail. Gale force winds are not required to topple over the frame, only a persistent breeze. Angling to optimize the sun for lighting often works at cross purposes to choosing a direction that minimizes the forces of the wind. Advertising banners often have holes or slits in them to allow the wind to pass though. Obviously I was not about to do that to Masquerade.


I have a greater admiration for photographers. I will spare showing you images from my many failed attempts due to 1) legs of the stand blocking the quilt, 2) the camera tilted too much to level the photo afterward by cropping, 3) parts of fingers over the lens, 4) blurred image because of  the quilt moving, 5) blurred image because of me moving. But, I did get one almost straight-on outdoor photo during a lull in the breeze while no cloud was passing over and obscuring the sun. The Seuss striped binding was an experiment for me and I like the results. It brings spots of brightness to the edges of the quilt both in this outdoor photo of the front and the following indoor photo of the back. I do love the backing fabric, also. Its history, having been designed by a blind artist, is told in my post for 9/16/20 and in my post for 8/21/17 when I bought it.


Indoor photography is easier, if I could manage the distance. Off to the far right, out of view of the shot, are the stairs. I crouched on them to be at the right height and far enough away to get a meager selection of straight-on photos. There is however, a traffic-blocking feature between rooms. That inconvenience may be offset by the "privacy screen" feature created next to the kitchen eating area.


I am pleased, and proud, and relieved to have finally, finally, completed Masquerade. Begun for my daughter's wedding in 2011, I told myself if I did not complete this quilt while confined indoors during the pandemic, I never would. The quilt's design has changed from the original expectation, but so have the times. Several quilters in my guild are noting pandemic on their labels but I do not want a strong reminder of this period in time. I am waiting for this social distancing to pass, sooner rather than later, I hope. I think the name Masquerade contains the concept of mask. This double entendre can be a subtle history marker while placing all those masks in a party and upbeat light.

Nine years may sound like a long time but, as I look back on it, it was really two months of concentrated effort after a "gap of giving up" that was just shy of nine years. My husband claims I would be remiss if I did not admit that during those two active months, the quilt was affectionately referred to as "the quilt from hell". (Or perhaps sometimes, not so affectionately, as seen in my 9/25/20 post about skinning a quilt.) Not willing to allow another "gap of giving up" to occur, I doggedly pushed ahead to completion. 

Below are links to the nine previous posts in chronological order by their publication date. They document the fabric acquisition, fussy cutting of the hexagons, piecing, arranging, re-designing, more solids cutting, supplemental piecing, re-arranging, sandwiching, FMQing, un-FMQing, more FMQing, labeling, binding, and photographing. My daughter may like to someday read a blow by blow description of this quilt in the making. She was always so encouraging to me during our phone calls these last few months since its resurrection. She patiently fielded my creeping progress reports in which I kept saying "I'm still trying to figure out ___", "almost there...", or "in the home stretch now...", among other "the check is in the mail type" platitudes.  Masquerade, the admittedly sometimes "quilt from hell" has, upon completion, officially become the "quilt from my heart". I fervently hope she and her family will use it and enjoy it for many years to come. 

Wednesday, October 14, 2020

Masquerade Labels and Binding

The free motion quilting on a quilt, especially one as large as this king size one, is always the hardest and most time-consuming part for me. FMQ was the topic of my posts for  9/25/20, FMQing triangles and  10/12/20, FMQing inserts and hex centers. Finishing details like machine embroidering the labels and attaching the binding do take an effort but a much more manageable one than free motion quilting  – most of the time. I wanted blue grosgrain ribbon for the labels on Masquerade, but, as luck would have it, I did not have any. Normally I would just dash into my local craft store and have them measure out ½ or ¾ yard for me. But, during this pandemic, I am not leaving my home for anything non-essential; plus, the store I would use does not regulate its customer traffic safely enough for my satisfaction at this contagious time. Fortunately, there is almost always the option of purchasing online, partnered with mail delivery or curbside pickup. So to cut two labels, each about 10" long, I needed to ordered an entire roll of blue grosgrain ribbon – 25 yards of it! It was $10 for the whole roll so the price was not that bad. Maybe I can ribbon weave some pillow covers with the non-trivial length of leftovers. But then I would need a second color - no? This thought process reminds me of the book If You Give a Mouse a  Cookie.


Having some extra was good. It was not until the fifth attempt was I successful in embroidering the quilt name and date. My first attempt was progressing great but the thread broke before the file "0" of "2020". When I tried just adding another digit I goofed, and the letter "M" from the beginning of the word appeared instead. On try #2 the thread broke after 7 letters of the 15 character phrase; on try #3, the thread broke almost immediately. I rethreaded my machine top thread, removed the bobbin and cleaned and oiled the area before reinserting the bobbin. Perhaps the eye of the needle was too small or had a burr? I changed from an 80/12 to a 90/14 machine needle. On try #4 the entire phrase came out fine – almost. It appeared to me the second character, the "A", was slightly squashed so it read as MISQUERADE. Perhaps I was constraining the free flow of the ribbon somehow. Since I tend to be fussy, I decided to try one more time. Lo and behold, attempt #5 was a winner! MASQUERADE_2020. I was able to embroider my name exactly as I had wanted it on the first try, the bottom most label in the following photo. Whew! I had visions of using up the bulk of that 25 yards.

For the quilt binding I wanted to do the flanged binding, first because I like the crisp look and second because I did not want to hand stitch (88 + 92 + 88 + 92) = 360 inches along the perimeter. There is a full tutorial on this binding technique at Susie's Magic Binding. I've used it previously on my Fun Guys quilt (6/17/15 post), my E_I_E_I_O quilt (12/9/15 post), and my Whirligiggles quilt (3/23/20 post). For a ⅜" wide binding with an ⅛" flange I cut a white strip 1⅝" and a striped strip 1⅜" wide then sewed them along their length with a ¼" seam. I chose the black and white stripe as the main binding fabric as a graphic accent.  To me black and white fits in with a masked ball.


I made sure to stagger the bias seams of the two fabrics when I joined them, eventually...


... nearing the end. Finally!


Pressing along the 10 yard length of the binding took three passes of the iron: once to set the seam, once again to press it open, and a third time to fold it in half revealing the ⅛ flange.


At the tapered end of the ironing board, the length of binding kept slipping off to the front or back. The pressing process went much more smoothly merely by placing a square board with a straight edge over the pointy end of the board. Then the binding was able to hang straight down from each end of the ironing board.


I used Clover Wonder Clips® to hold the folded over binding and checked periodically for a uniform ⅜" width with a hemming gage.


Using a stitch-in-the-ditch foot, I sewed within that white flange all around the quilt. The bunched up quilt made quite a pile on the surface of my sewing cabinet.


Along the edges with the inserted isosceles triangles, here is the way the binding looked. The white thread is neatly camouflaged within the white flange. The parallel quilting lines in the triangular inserts were spaced apart a similar amount to the stripes on the binding. For the binding around the four quilt corners, I navigated two 120° angles at each of the four corner hexagons. 


I put the labels on the back in the lower two corners, angled to parallel one edge of the corner hexagon. The two corners are folded in to meet each other in the next photo.


It is about time to reveal the completed quilt, right? As soon as I put on the hanging sleeve I will be able to display it all at once, take some pictures, and publish my final post on Masquerade. I am so looking forward to completing this one!