Monday, January 28, 2019

Knitting Needle Organization

It took a while but now I feel my knitting needles are under control organization wise. How long you ask? Many years. A weekend getaway was the triggering event of the endeavor. In 2011, shortly after my son's September wedding, he and his wife wanted to thank me and my husband for our help and involvement with their wedding. They gifted us with a weekend trip to Cambria Pines Lodge, a homey, peaceful lodge in Cambria, CA nestled on a hillside among the pine trees. My husband and I used our thank you gift in November, 2011.


We stayed in this cabin. Did I bring along knitting? No.


A few steps from the main lodge and our cabin was a trail head of a path to the village.


The village at Cambria was filled with quaint buildings and one of them we visited was a yarn shop called Ball & Skein. Did I buy a lot of yarn or needles there? No.


The travelogue introduction to this post was brought about because I was remembered where I first learned of and bought my circular needle storage case, eight years ago. It was a specialty case from della Q designed to efficiently organize and hold circular knitting needles. It contains pockets labeled for each needle size.


Do not ask me why, because it is very illogical, but I hesitated to take the needles out of their original packaging. I populated the case only with random circular needles that did not have a package associated with them. This was very few.  "But how will I know what size it is if I take it out of the pocket?" I anxiously asked myself. "Well how did you know what size it was when it was out of the original packaging?" I debated back. It turns out the size is printed on the needle and, as a backup, I have this hand dandy needle sizer, even if the printing on the needle is missing, too small, or illegible.


So I removed each circular needle from its original packaging and stored it in that specialty case. Here is the mess I left behind. It is silly but I was hesitant to toss the circular and double pointed needles packaging. When the saver in me lost this battle, I dutifully separated out the plastic from the heavy paper inserts and trashed or recycled the packaging they had been sold in.


Here are those circular needles neatly stored away in that specialty case. Much better, right? There are several lengths in most of those pockets. Each pocket has a printed cloth tab, neatly labeling the pocket contents. This is a real knitter's case and collection (mine) and not an idealized picture as seen on the della Q website. Check out the site however; there are several very informative videos there. I just learned by watching one of them that I can optionally rotate those needles with the points facing in. Then I could tuck in the flap of each pocket for an even tidier appearance.


These were my mom's circular needles and I could not bear to part or alter them. They were passed down to me when she died in 1979 so they are at least 40 years old and still in the original packaging. Note the original prices too, $2.00 and $1.80. I just paid $18.00 for a 16" US size 8 circular needle with sleek "turbo charged" tips. I keep these for nostalgia.


Once that organizational bug bit, I just had to purchase online a case for my double pointed needles (DPNs). Here is my trifold case rolled up after I'd populated it with my collection of DPNs. 


The inside is very tidy and I can see at a glance if I do not have a size I need.


When I set out to reorganize there are always those odds and ends leftover that I do not know how to handle. Dare I throw out those three grey DPNs and three red DPNs and risk then finding the fourth? Those metal DPNs are so slippery, dropping stitches off the end or pulling out the needle inadvertently happens all too frequently. I am really not too fond of them so why do I keep them? 


 I never know when I might need to 
  • stuff an appendage or tiny doll or toy or 
  • fish something out of the crevice between the bed and the nightstand or
  • scratch on itch in a hard to reach place on my back or
  • scratch on itch inside a cast or 
  • hold a piece of plastic aloft over an iced cake so it does not get plastered down or
  • hold my place in a magazine or
  • include it in a folded piece of fabric so the fold remains soft and does not crease or
  • point to something in the newspaper as I am reading over my husband's shoulder or
  • use for some other critical purpose I have not yet even realized!
I am linking up with Main Crush Monday #145 at Cooking Up Quilts. For those interested in my fabric purchases during that Cambria weekend, check out my post dated November 20, 2011.  The comments by my daughter and daughter-in-law are particularly amusing. My daughter had been married in May 2011, just a few months before my son. Both new brides were not in kid mode at the time they commented. But then somewhere along the line their tunes changed because 2011 was five grandkids ago!

Sunday, January 20, 2019

Elephant and Lion Hats

I remember being in North Carolina visiting my sister on a trip in 2015 and browsing a craft store together. I bought two of these Top This hat kits on the bargain table for $1 each intending to make them up immediately. Well you know how that goes. I rediscovered the kits for an elephant and a lion hat in my sewing room the other day and decided that four years had been long enough in temporary storage. Inspired to knit them, I was  surprised to learn that they take merely two to three hours each. Possibly wanting more in the future I researched and found that Mary Maxim still carries these cute hats with animal heads called Top This! by DMC. They are also available other places like JoAnn's and Amazon in a wide variety of heads other than the soccer ball, owl, and elephant pictured in the photo.


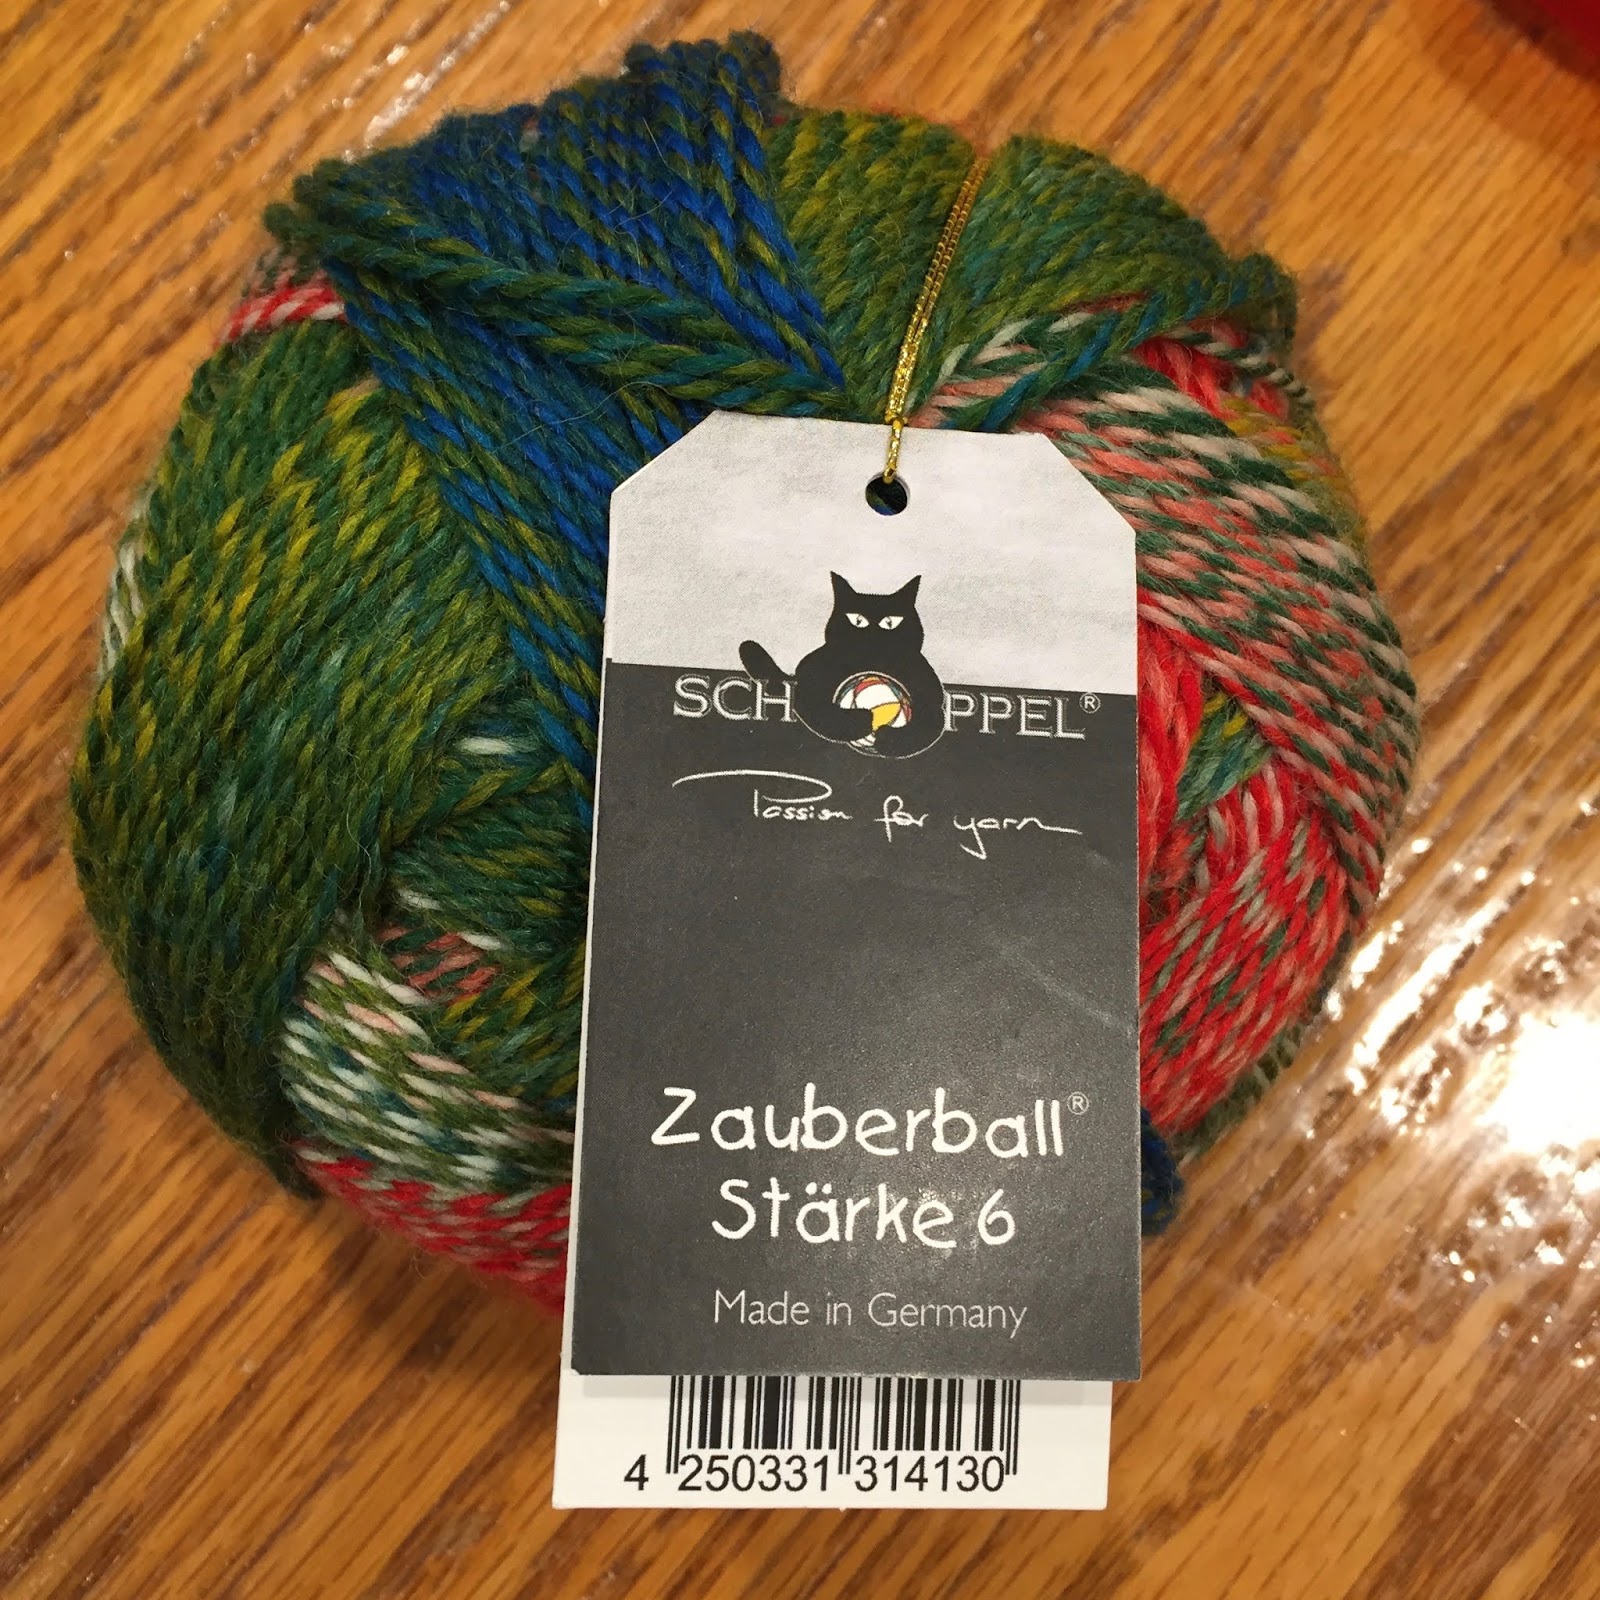
The yarn is 78% acrylic and 22% Nylon, and comes in a 2.82 oz ball, enough to make a toddler hat or an adult hat size small. It is self striping with three colors: a solid, a multi color, and another solid with a definitely different fuzzy texture. The non fuzzy portion has a kind of knit cording rather than twisted strand composition. In the following photo, the cording can be seen best in the green and the magenta.  The yellow and the orange are the fuzzy ones.


That two-three hours execution time I mentioned...?  Well that does not count the time of my expeditions before hand. I had to run out specially to buy a shorter 16" long circular needle in US size 8. Apparently I own circular needles only in larger lengths in order to accommodate a large quantity of stitches. The pattern calls for US size 9 but I tend to knit loosely and so went down a size. Two rounds into the hat, I abandoned the circular needle in favor of double pointed needles. My hands were cramping working in the confines of such a small circle. The pattern called for 60 stitches and instead of using four needles and knitting with the fifth I used three and knitted with a fourth. That way I could have 20 stitches on each needle and put a marker midway to give me divisions of ten. This was handy for the decreases which were distributed six to a round near the top. That cheery lilac face on the left is a "yarn cozy" that I bought a few days ago to keep balls of yarn tidy. See post for 1/16/19. I was trying it out and it worked well.


The hat instruction on the inside of the Top This label are quite simple, 10 rounds of ribbing, 15 rounds of stockinette stitch and then the decrease rounds for the crown. To keep track, I have an app on my cell phone called Tap.Count that cost me $.99 to download. Yes, I know I could use a pencil and a piece of paper but this is kind of convenient to have nearby and just touch to increment. (I am also less likely to throw out my cell phone, than I am to inadvertently toss a piece of scrap paper.) In the decrease portion within six sections near the crown of the hat, I had a round where there were 10 stitches between markers, then 9, then 8, etc.  Rather than count rounds, I used the app to help remind me how many stitches I was supposed to have between markers by decrementing... 10, 9, 8, 7, 6, 5, 4, 3, 2, 1. I included a screen shot of the app on the left and a screen shot of its description on the right. I must admit I have been unable to figure out how to increment by anything other than "1" as touted; but then again, I have yet to find a need to count by 2's, 5's, or 10's, at least not during knitting. Maybe my version of the app is not current.


I must admit, the foam backer for attaching the animal head was well glued onto the yarn label. Peeling it off took some persistence because I was being careful not to tear or distort it. I made sure to orient the side with the residual glue against the knit portion of the hat and not outfacing where it might stick to the wearer's hair.


Here is the finished elephant hat. It is really not so pointed at the top like a cone head.


It looks that way because initially I set it over a Hershey Kiss pillow to photograph it.


Stretched over a bowl it looks much more suited to a normal shaped head.


At the website for the Craft Yarn Council I found this head circumference chart with guidelines that a toddler's head typically measures 16-18 inches in circumference. This finished hat measured 13" in a non-stretched, relaxed state but the ribbing can easily stretch to 18". I am hoping it will fit snug enough to stay on but not so tight as to constrict blood flow to the brain. If it is too small, I may make another but have to substitute another yarn for the top of the crown. I have 1.2 oz left out of the original 2.8 oz, which is not quite enough needed for a second hat. If math is to be believed, the first one required 1.6 oz. The elephant head can be easily transferred to the second, larger hat.


I am about to start a second hat out of orange and pink for a lion and have lined up my tools. To be less concerned about size, I plan to use US size 9 needles as called for in the pattern, swapping out the US size 8 that are in the photo. The lilac yarn cozy with the face worked out well so I'd planned to use it again for this hat. Actually, I forgot to use it! But then I did the hat all in one day and it is not like the yarn got bounced around and scuffed up in my knitting project bag. 


Again I will forgo the circular needle, even though I'd also bought a 16" one in US size 9. I'd first thought working with double pointed needles would be more cumbersome, having to stop and switch needles three times a round, but that definitely proved not to be the case, at least it was not for me. I put 20 stitches on each double pointed needle and put markers to designated where 10 stitches fell. I was very careful not to twist when I joined. The beginning of the round is conveniently marked by the strand of yarn left over from casting on.


I did need to be careful that stitches did not slip off the either tip of the needles. When the stitches were centered all was fine, but once or twice I did see a dropped stitch. It occurred at the transition between needles during the stockinette stitch portion where stitches are not compressed so close to each another as they are during ribbing. The wayward stitch had not traveled far down though, and I was able to fish it up easily. The following photo shows just how close those end stitches are to the needle tips. 


The head is very easy to attach since it comes with its own ribbon ties. I tie a bow and double knot it on the inside, leaving the ribbon length untrimmed as is. The head can be removed for laundering or for transferring to a different hat. The character head is 100% polyester so I do not think it has to be removed for laundering. I think that perhaps it might take longer to dry however. 


Voila! The completed Lion head hat is smiling at me. I love how the yarn banded itself and where the fuzzy orange stripe landed.


Using the US size 9 needles the circumference came out slightly larger, maybe by about 1 inch, to 14". It is stretchy enough it is hard to measure for sure.


The elephant and lion buddies look cute side by side. I can just imagine the photo will be even better when it is the children who will be wearing them standing be side by side.


I am crushing on these knit hats right now so I will share with Main Crush Monday #144.

Friday, January 18, 2019

Burp Cloths Again

My daughter's sister-in-law is due to have a baby boy mid-February and I customarily make flannel burp cloths as gifts for infants. Most moms like the extra absorbency of the triple flannel and I love putting together the fabric combinations. It's a win-win. When my daughter visited at Thanksgiving, I had her down-select some flannel pairings from those that I had drawn from my stash. I hoped to get her insight on the taste of the mom-to-be. Per her opinion, I arranged them from left to right, most favored to least, and took a photo so I would remember when I got around to sewing them in a few weeks. The  cartoon-like print one far right was judged not to be consistent with the sister-in-law's more conservative taste, but my daughter said, "It is so darn cute, Mom, you cannot leave it out."


Here are ten completed burp cloths, sewn in complementary pairings. Made from two fat quarters each, they finish up at 20" long by 12" wide. They are shown folded in thirds in the photos. My tutorial for them is in my post for 6/18/2014.


The baby boy is to be named Wyatt. I was tempted – but I did refrain  – from titling this post Wyatt Burp.


Even before the previous ten were finished, I set about to replenishing my flannel stash.  Here are six more half-yards that I will eventually make up into six burp cloths, three complementary pairs. The starred gold picks up the pom-poms on the snowmen hats, the soft pink dot echoes the piggies playing in the mud puddles, and the butter-yellow dots calls attention to those little chicks that are tucked away amongst the farm animals. Do I store these fabrics in my flannel drawer or make them up now for some future baby-to-be?

Wednesday, January 16, 2019

Yarn Store Purchases

A yarn store this week relocated from the neighboring town of Pleasanton to my home town of Livermore, just steps away from the Post Office and right next to my hair salon. It is called Knit This Purl That and the following photo shows the storefront with its proud owner. 


One of my small project goals for 2019 (post for 1/15/2019) was to "Have a knitting project going", so of course I needed to visit there today and make a few purchases. I wisely spread out my purchases into the areas of tools, books, and yarn. In the category of tools I bought these yarn cozies. They are reputed to work well with pull skeins whether the yarn is drawn out from the inside or outside. I look forward to them being effective. I had an awful time with my 14 oz jumbo skeins from Michael's tangling or pulling out chunks of the wound interior when I made my round adult blanket (post for 1/9/2019). Granted these cozies are not intended to work on such a large skein of yarn, but maybe they will, when the hank gets smaller. In the future I am going to try to avoid buying those jumbo size skeins.


This book was so precious I could not pass it up. I also can highly praise the store that the price was just pennies different from Amazon, enabling my desire to buy locally to be rewarding without being costly.  By the way, Amazon does not have a "Look inside" option for this book so support your local store to see its contents. I will say the lion, frog, panda, chicken, and fox are all adorable. Which will I do first? Hard decision since each is more precious than the other. I will let the colors in my current yarn stash guide my choice.


Lastly I bought some yarn that called to me. It is self striping and I liked the tweed effect within the strands. It is recommended for 4 mm knitting needles, American size 6.


Made in Germany it is a machine washable blend, 75% Virgin wool and 25% Nylon. The 150 gram ball converts to a bit over 5 ounces.


I want to make a Baby Surprise Jacket out of it. I made one once before and it was straight forward garter stitch with minimal seaming and was a lot of fun. It is in my post from 12/8/2014 but here is a photo of how the striping fell with this pastel variegated yarn. 


I can't wait to see how the more boldly colored yarn I just bought will make up. Now if I can just remember where I "filed" the Baby Surprise Jacket pattern... I must sheepishly admit I have bought it twice already. But the second time, I also scanned it so at least I may be able to locate the electronic version on my computer. Aha! That method just worked. All I have to do now is print it out. Dang! My colored ink cartridges need replenishing...

Tuesday, January 15, 2019

2019 Quilting Goals

I was having a difficult time deciding what I wanted to commit to in the year 2019. My goals in 2018 were streamlined to the guidance "Maximize Enjoyment and Minimize Guilt" and were described in my post for 1/4/2018. It was a gallant goal, great for guidance, but hard to assess how successful I was in attaining it. In 2014 I had a nine bullet list and my 2014 in Review post dated 12/31/2014 will attest to the fact that I completed all items on the 2014 list. Goals for 2019 aims for the best of two worlds. The following images are reminders of my goals, an image of weighted scales on the left for 2018 and a list of check boxes on the right for 2014. Sharing the following goals with Let's Bee Social #258.

Morale boosters
  • Do what excites me when it excites me, not make it wait in a prioritized queue
  • Sew for fun, not guilt
  • Enjoy my blogging and comment regularly and generously on other's posts
  • Put at least one entry in the county fair
  • Share at least three times at a guild meeting
  • Continue to generate blog books
Craft enhancement, skill builders, inspiration
  • List, organize, possibly photograph the kits in my stash
  • Consolidate my scraps
  • Review and watch Craftsy classes I have already purchased
  • Attend guild meetings - aim for 50%
  • Attend quilt shows - aim for one major and two minor
Large Projects
Small Projects
  • Assemble the Stacy Hsu doll panels
    – one cowboy, one cowgirl, one elf pair, second elf pair, one bunny pair
  • Make up Renaissance Ribbon kits
    – kitten trio, bunny pair, iPad case
  • Burpcloths as needed
    – of course
  • Have a knitting project going

Friday, January 11, 2019

Christmas Present, Past, and Future

CHRISTMAS PRESENT: This Christmas I'd made a set of five ornaments for my Southern California grandkids but had not tackled the second set for my Oklahoma grandkids. I just completed and mailed off that second set but it was easier this time around since I used what I had learned the first time I made them a few weeks ago. The following photo is of the Southern California set, the first one I made. Note how skinny the neck is on each elf and notice the details in Santa's mittened hand at the end of his very thin arm. Those narrow places made for very difficult turning and even harder stuffing. See post for 12/16/19.


This second time I sewed farther out into the blue background to make those pinch points wider and easier to deal with. I was also not quite as religious in following the profiles of the hair and ears and toes.


I left my opening for stuffing up near the pom-poms; that way I could stuff some fluff into them, too.


This set for my Oklahoma grandkids, turned out looking puffier. Santa may have put on a few pounds over the holidays after eating all those cookies. The hand, neck, feet, and pom-pom details on Santa and the elves – details I did not struggle to sew around this time – still stood out against the aqua border. It may not have been as realistic as the first set I made for my Southern California grandkids but I think I may be permitted to stretch realism a bit when it comes to Santa and his elves. My revisionistic solution was a win-win.


I kept all the unused parts from the two fabric panel for future use. I have 282 inches of that red and green diagonal stripe in a band that is 1¾ inches wide. The nearly 8 yards (short by ⅙ yard) might make a thin banding or sashing or narrow binding. Some day I may use those little figures in another quilt.


I have saved similar instructional or illustrative pictures from other cloth books, ornaments, and doll panels. Some examples of the ones I could lay my hands on quickly are in the next photo.


And I know these Stacy Hsu panel images live on from the Goldilocks (8/2/18 post) and Red Riding Hood (3/8/16 post) doll sets.


Other Stacy Hsu doll sets, images from Coral the mermaid (5/14/17 post), Madeline the cowgirl and Wes the cowboy (12/21/17 post) live on also, but they are safely put away, i.e. "temporarily misplaced", within my scraps somewhere. Writing this inspires me to gather them all in one place.

CHRISTMAS PAST: The grandkids had fun decorating my tree with stuffed ornaments when they visited at Thanksgiving in 2018. When my daughter returned home to Oklahoma, she lamented that she'd wished she'd thought to bring brought some of them back with her. I packed a few up and sent them off since they were favorites of hers from her Strawberry Shortcake days as a little girl. Can you name the characters? There is Strawberry Shortcake in the left column and pet cat Custard on the upper right. Huckleberry Pie is in the center column and pet dog Pupcake is on the lower right. It is only six ornaments for now (plus the five above) but it is a start at spreading and keeping the stuffed ornament tradition alive. Ornaments like these hold such memories because I would sew them and turn them right-side out and my kids Robin and Daniel – parents now themselves – would stuff them with me. One year I even took my sewing machine and supplies with me on a lakeside vacation where we rented a house for a week. We would watch Anne of Green Gables video marathons (VHS – we pre-dated DVDs) and stuff ornaments in the evening or for a break in the heat of the day.


CHRISTMAS FUTURE: Believe it or not, I searched my stash and I had no more of those panels left. I used to buy a couple panels every year, each with six to eight ornaments. One year there was even a panel with twelve ornaments for the twelve days of Christmas. But I guess those types of panels went out of style or popularity. Never fear, eBay to the rescue. I bought a panel, called Embroidery Christmas Ornaments, that contained the front and back of six ornaments.


I sewed them up and sent them off for my daughter to stuff with her 6 and 3½ year old kids. Although she is a busy working mom, she still managed to make a Grinch dress for her daughter, and I thought if I gave her a head start, all she would need to do was squeeze in time to whip stitch closed the openings. She has not yet put away her Christmas decorations, so I am still in time. Better yet, she and I can consider ourselves early for Christmas 2019! I will link this post up to Let's Bee Social #257. Maybe others will be inspired to get a head start on their Christmas 2019, also.