Showing posts with label Thanksgiving. Show all posts

Saturday, September 14, 2024

Bin_There_Done_That is DONE!

I named this 55" x 55" quilt  BIN THERE DONE THAT. I wonder if anyone will recognize this quilt as derived from JoAnn Fabrics' 2006 Block of the Month Spice Meadows or even realize how far back the blocks date — nearly two decades. The fun Noah's Ark fabric on the back makes it feel a bit more contemporary... maybe. Actually I chose the striped backing fabric because I already had a generous amount of it  in my stash and the colors go really well with the front.

Noah's Ark has the same muted reds, soft golds, greens, and tan beiges as the front blocks. An exception is royal blue instead of regal purple. Here is a close-up of the backing fabric with my customary grosgrain ribbon labels on the lower corners of the quilt back. Here are previous posts about this quilt.

2/07/24 laying out collection of blocks from circa 2006
2/19/24 rediscovery of blocks in a bin and incentive to resurrect
2/27/24 sandwiching and quilt pattern decisions
9/07/24 FMQ completion
9/14/24 (this post) finished in time for Thanksgiving


These colors, except for some royal blue on the back instead of purple accents on the front, remind me of Thanksgiving hues. Bin There Done That kind of goes with the turkeys, don't ya think? I plan to deploy this quilt for Thanksgiving 2024.


Sunday, November 20, 2022

Third Saturday of November 2022

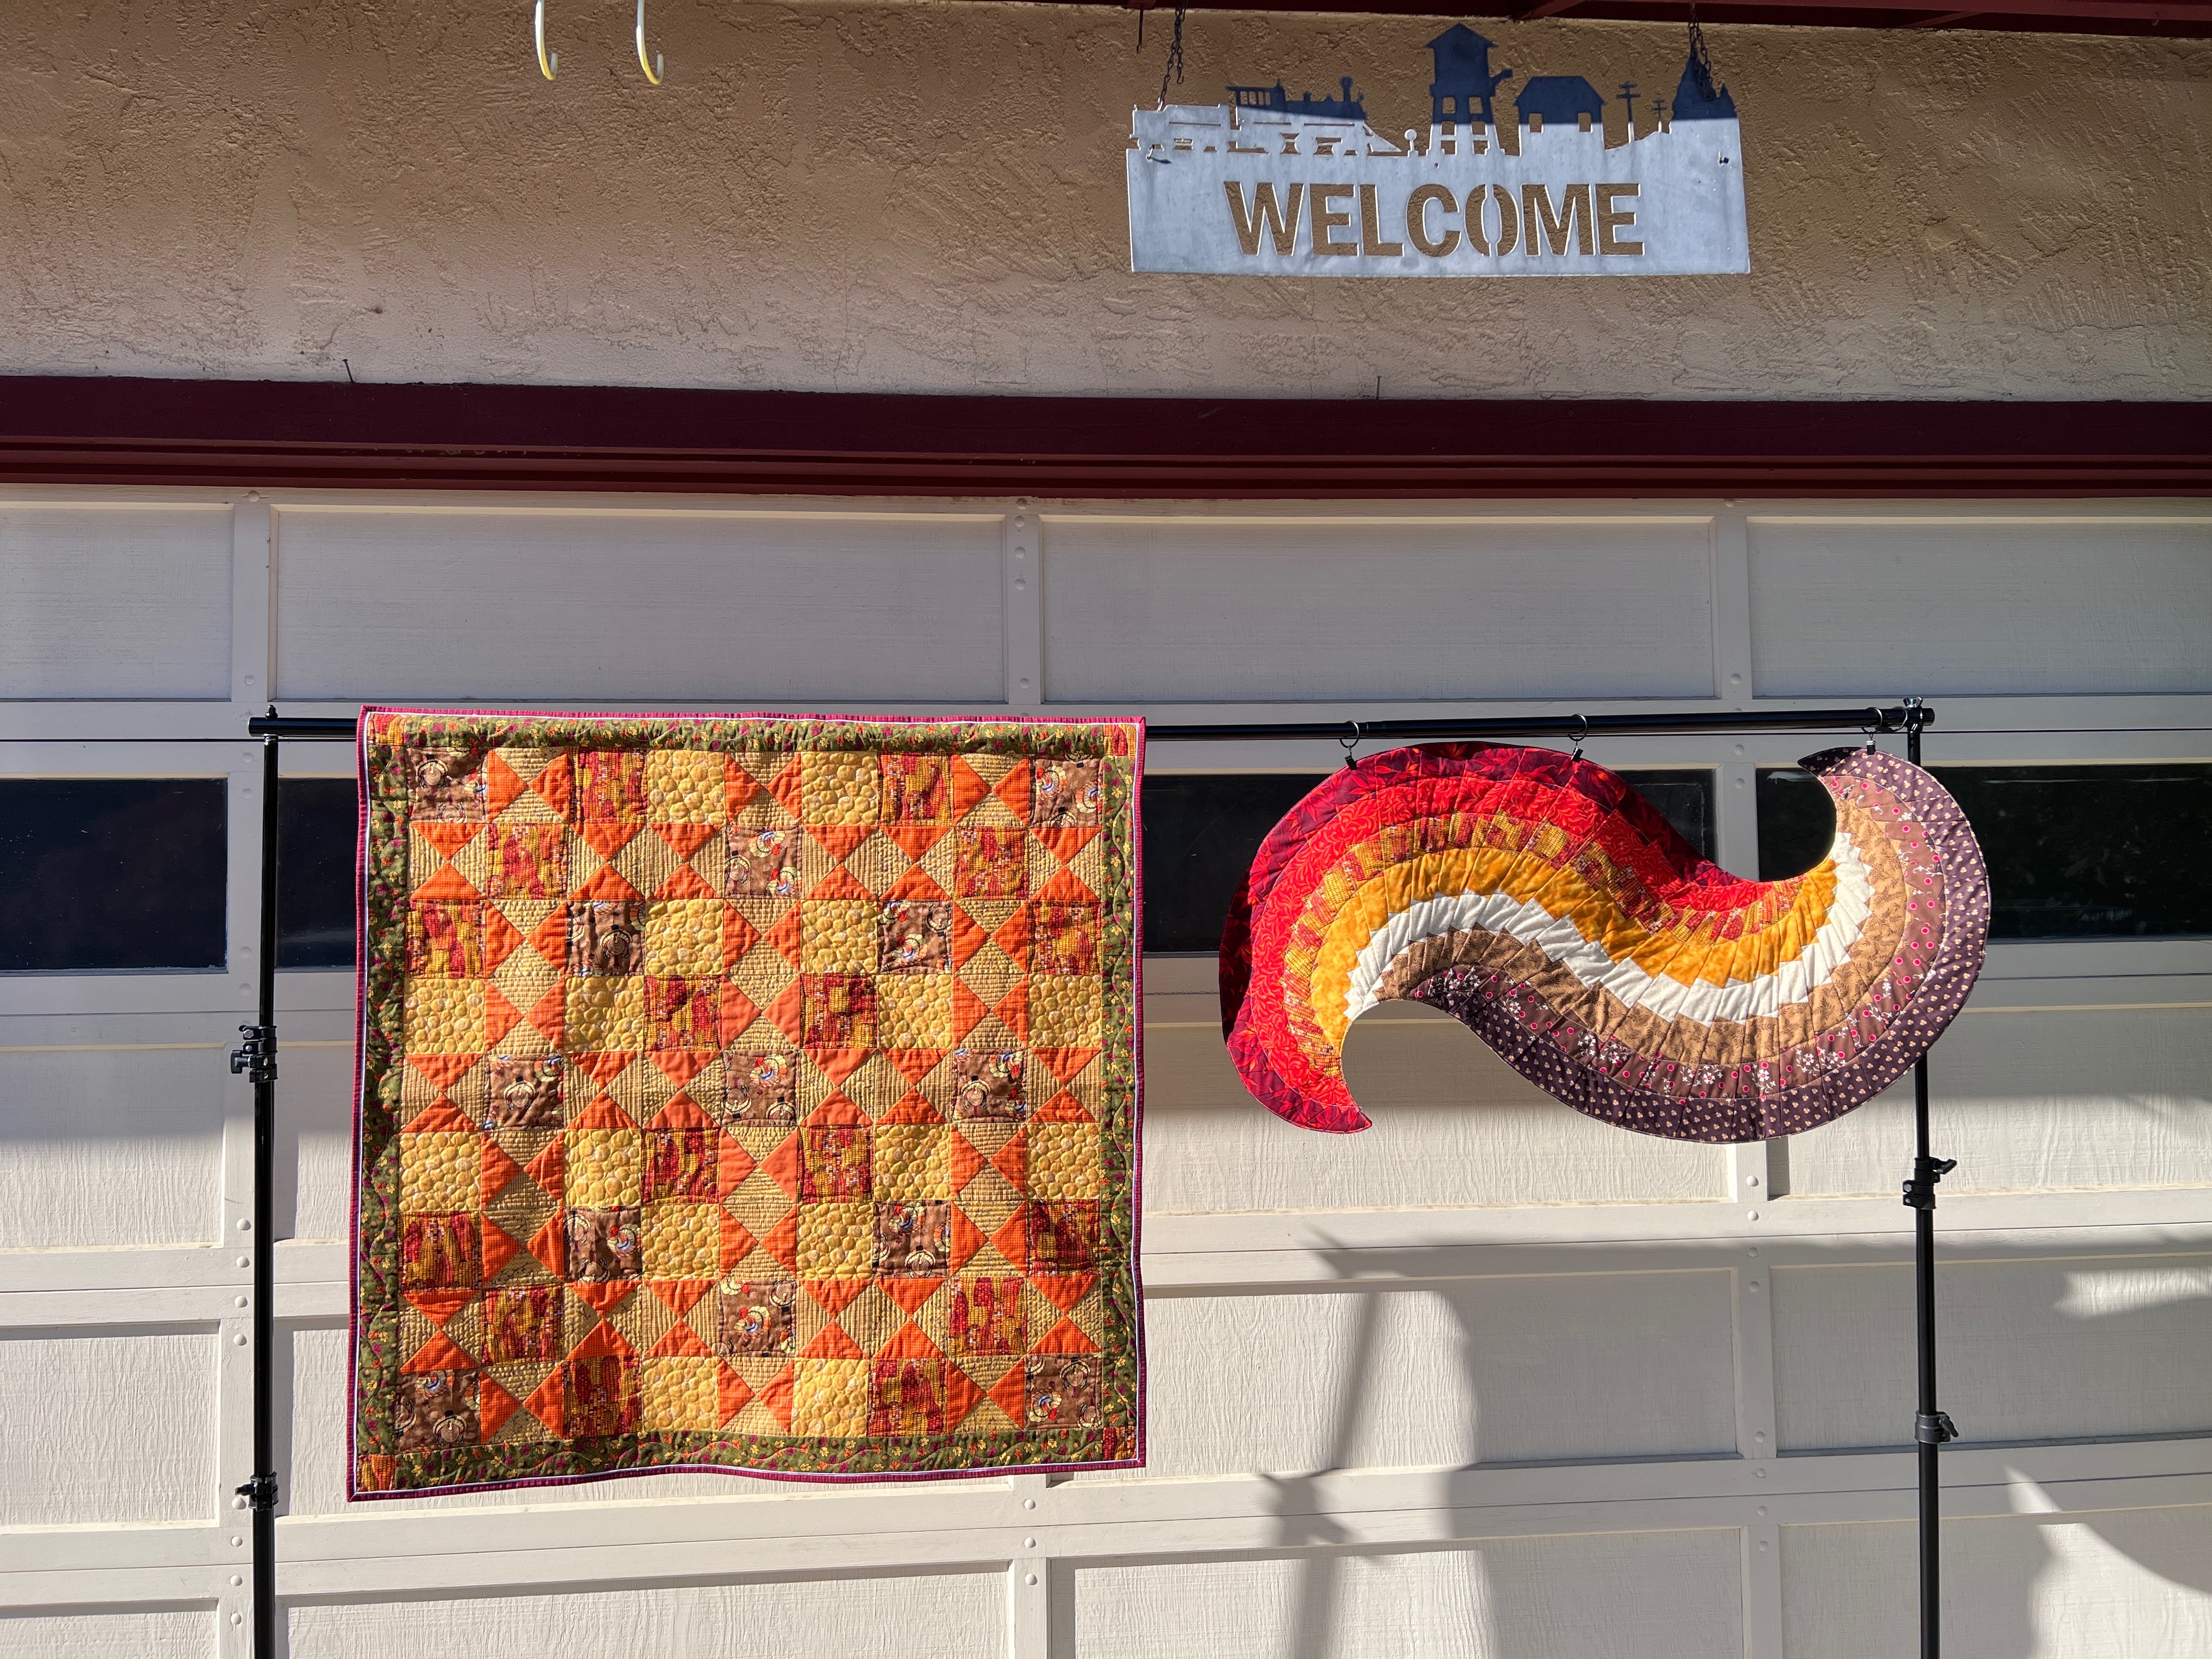
These are two quilts I selected to display for Hang Your Quilt Day this month, the Third Saturday of November 2022. The checkerboard quilt hanging on the left measures 40" x 40" and its title is Gobble. The nine Ohio Star blocks that make it up have novelties fabrics of turkey and Indian corn. My 11/8/2020 post gives closeups and more details. The spiral table runner on the right is a favorite pattern of mine. My 11/4/2011 post has details for making it.


Hang Your Quilt Day
Beginning April 2020, my quilt guild members began a tradition of hanging quilts in the front of their homes on the third Saturday of the month as a source of enjoyment for the community and as a thank you for the essential workers during the pandemic. My initial post about this practice is in my blog post dated 4/22/2020.

Sunday, November 22, 2020

Pumpkin Time

Buried deep within the contents of my drawer of panels, I resurrected an autumnal scene of a rural path wending its way up to the door of a rural home. The ¾ yard length of fabric featured a central scene roughly 20" wide by 24" tall, flanked by two other half-size scenes of houses and paths on each side, each roughly 10" wide x 12" tall  . The colors were rich and cornucopia-like and seemed to draw the viewer in. I separated the five scenes and spread them apart from each other, planning to fill in the top, bottom, and side edges with some other fabric. But what would be interesting enough in that large of an expanse and yet would not compete with the the striking landscapes?


I liked the tan and brown checked border on the large scene and noted that the half-size scenes sported a similar motif. On one, the border was an orange and yellow check, and on another,  it was a two-toned green check.


Even the other two had a contoured green check on the hillside and a wonky green check in the wavy border.


I recalled that I had some checkerboard blocks squirreled away. I'd made them up from houndstooth fabric and then had decided not to use them in a quilt for my grandson which I titled Be Happy, post for 4/27/18. I dug them out from my "Blocks to Make into Whatever" plastic bin. I liked the muted tones of the houndstooth colors, and also that houndstooth is like a tiny mini-check. I scattered them in the open spaces on my design wall and contemplated that with some creative unstitching and restitching I could make them work. The blocks were not an exact size fit; but if I took off the borders, rejoined the central check parts, and compensated for size in the borders, I could incorporate them. True, the taking apart and resewing probably took more time than mass producing more checkerboards from additional houndstooth fabric, but where is the challenge in that? Having one side be the color-pairing complement of the other, (yellow in orange and orange in yellow) and the top and bottom be complements of each other (brown in red and red in brown) added visual interest and used the colors in equal amounts.


I still had to do some fill-in around the perimeter of the large central scene. But I had some green houndstooth that was a close color blend with the outermost border on the central panel.


I used light tan thread to puff quilt around the checkerboard squares because I wanted uniformity plus, I did not want to keep switching colors. I used green thread to outline the pumpkins and hillsides, to stitch in the ditch around the central panel and any green borders, and to add a ridge-like texture to the diagonal golden furrows. 


My choice of backing fabric kept up the check theme with. After consideration, I rejecting several names... Pumpkin Paths (hard to pronounce and sounds to much like Pumpkin Patch)... Pumpkin Pathways (too long)... Paths to Grandma's House (too maudlin). I chose simply Pumpkin Time and made up the two corner grosgrain ribbon labels accordingly to my custom.


It was a kind of funky choice, but I picked a spotted Kaffe Fasset ombre stripe for the binding. The colors were almost a perfect match except for the lime that introduced just enough spark to brighten up the edges a bit and draw the eye outward in places. The Pumpkin Time finished at 42" wide by 50" tall.


I wanted this quilt in a complete enough state for the November Hang a Quilt Day, so I halted there. Perhaps I may go back and quilt some dark blue texture in the skies amidst the moon and stars. (My pebbles have improved.) I know for sure those deep brown ridges in the main walk of the central panel need some parallel horizontal lines to go with the adjacent diagonal-lined furrows I'd stitched in green. It is the Thanksgiving season and I am thankful Pumpkin Time is complete enough to enjoy for this year's holiday. Additional adornment will be like the whipped cream on the pumpkin pie – not really necessary but certainly delectable.

Saturday, November 21, 2020

Third Saturday of November 2020

For "Hang Your Quilt Day" this month, the theme was Thanksgiving. I scrambled to make up some smaller quilts for this holiday since I had none other than the pumpkin one on the lower right. I actually enjoyed playing with the muted golden color scheme which is not the norm for me.


The checkerboard quilt hanging on the left measures 40" x 40" and its title is Gobble. The nine Ohio Star blocks that make it up have novelties fabrics of turkey and Indian corn. My 11/8/2020 post gives closeups and more details.


The Pumpkin Time quilt hanging in the center measures 42" x 50" and was made this past week from a several-year-old panel and some re-purposed checkerboard blocks from a previous project. The central pathway in each of the five images leads to a quaint home. I wanted this quilt hung for the third Saturday of November so the quilting on it is minimal due to my self-imposed time crunch, but I may do more. The descriptive blog post on it is yet to come. I was too hard-pressed to complete it to blog about it. Update: My post about sewing Pumpkin Time is dated 11/22/2020.


The 30" x 33" wall hanging titled Harvest Moon, hanging in the upper right, came from a long-forgotten kit. I had fun with the chicken print backing on this one; but check my post for 11/9/2020 for more details.


The pumpkin wall hanging on the bottom right measures 31" x 39". The final quilt on the lower right is a repeat from the third Saturdays of September (9/19/2020) and October (10/18/2020); but, hey, pumpkins are good throughout the fall months. My 10/31/2017 post describes its completion and quilting.


Beginning April 2020, my quilt guild members began a tradition of hanging quilts in the front of their homes on the third Saturday of the month as a source of enjoyment for the community and as a thank you for the essential workers during the pandemic. My initial post about this practice is dated 4/22/20.

Monday, November 9, 2020

Harvest Moon Wallhanging

As I rummaged through my fabric drawers looking for autumn-toned fat quarters for my previous spontaneous Thanksgiving quilt (post for 11/8/2020) I came across a kit I had bought  on a clearance sale and squirreled away. It was a modest size 30" x 33" and came complete with backing and binding. The manufacturer of the featured panel was Wilmington Prints. I do not know the year because the selvages were not included on the panel section supplied in the kit. I estimate the design to be five or more years old.

Upon research (actually my husband's googling for me out of curiosity to find the copyright year for the panel), I learned that the image was one of five from a larger panel, and the quilt store had added the sashing  fabrics. Do I try to find those other four satellite images? No. This quilt assembly was to reduce my stash not add to it. I report this find only for interest.


After years of being stored, sight unseen, the image of that round mellow moon still mesmerized me and I was drawn in by the rich autumnal colors. The kit had all necessary components, even backing and binding, so I decided to make up the kit, right then and there. I was able to do it in one sitting and was sort of kicking myself that I had let it linger so long. Sequential borders of rust check, solid black, mottled gold, and a green stripe went on smoothly and easily to frame the central image. This wallhanging was not a lesson in piecing for me but rather would provide good practice in FMQing. I echo quilted around the moon to enhance its super roundness. After I stitched around the hills and  leaves of the trees, I echoed those shapes as well, resulting in a surprise central filler pattern in the two major regions of sky. In the three pathways at the bottom, I stitched ruler-guided scallops in the center, and ruler guided straight diagonal lines on the left, and converging lines on the right. I tried not to get carried away in the details of the pumpkins and houses, reminding myself that sometimes less is more.


For the striped border I did ruler work for parallel lines, piano keyboard style. They are more of a texture and do not show up a lot on the front; they are more obvious on the back. In the mottled gold band I did a ruler-guided wavy line which again shows up better on the back than the front. Eventually I will build up my nerve to quilt in a contrasting color that is more visible. I keep waiting until my skill level rises. I used a pale peach thread on the front and a muted green thread on the back. The kit-supplied mini pumpkin rust fabric for the binding complemented both the front panel scene and the backing landscape fabric. In the next two photos the front edge is flipped over onto the backing so both sides are visible, stripes on the front and landscape on the back with that mini-pumpkin print binding around a corner and along an edge.


These are the rulers I used: the straight one Slim by Angela Walters is on the left and the wavy and scalloped ones by Handiquilter are on the right. I add strips of sandpaper to keep them from slipping during use.


I was pleased that the kit had come with a backing fabric since usually kits do not. It was a deep dark brown almost solid that I decided to set aside as a blender for future use. Instead I substituted from my stash a landscape print that I had been reluctant to cut up. As a backing it could live on in its uncut glory. I omitted a hanging sleeve because I might use quilt on either side. I added my typical labels at each lower corner and titled the small quilt simply Harvest Moon like the panel name. Can you find two turkeys strutting their stuff and six scarecrows standing tall on the job? The backing tickles me as a Thanksgiving version of Where's Waldo.
 

Sunday, November 8, 2020

Thanksgiving Quilt

This quilt was not planned. I had no pattern. It was not a kit lurking in my stash prodding me with little stabs of guilt. I had no intended recipient but there was a motive for its creation. The third Saturday of each month my guild promotes hanging out quilts with a given theme. This November the theme would be Thanksgiving and I suddenly realized I had no quilts with that theme.  None. With all the quilts I have made, I had nary a one with a turkey or indian corn or the golden tones of a hayride or sheaves of wheat. This blog post describes my process when I do not have a plan. It was actually kind of fun and freeing. I did not pre-calculate if I had enough of a fabric. I just forged ahead until I ran out.  

I had just finished readying kits for my quilt guild's Block of the Month activity and I had written up directions for making QSTs, quarter square triangles. The technique of making them oversized and trimming them to a precise size inspired me to make a whole slew of them. Here is my practice block, that kicked off my frenzy. It was inspired from Block #1 of the Fat Quarter Shop's Sewcialites program.


I made a slew of QSTs and placed them around turkey squares. Since I am usually a precise, controlled quilter, this is as close to improvisational as I get.


I did not have enough of the soft-tone, solid orange so I was flexible and made some QSTs with an orange mini-check and some QSTs with an orange plaid. I ran out of gold vine so I improvised by continuing with a tan houndstooth. I threw caution to the wind - sort of. I still could not bring myself to randomize where those similar yet different fabrics went.


Unsure how to fill in those four L-shaped blank spaces around the central block, I remembered I had an indian corn fat quarter that might be fun to incorporate. I cut squares and laid them over those corner bow ties and liked the look; so I replaced the bow tie corners with indian corn squares. I saved those removed bow ties corners to use elsewhere as a potholder, trivet pad, doll blanket, block in another quilt, etc. or to add them to my plastic shoe box collection labeled "blocks to use wherever". 


As I was stepping back to assess at the creation on my design wall thus far, my husband came into my sewing room. We both stared at it a bit then simultaneously looked at each other and uttered one word ... dull. I dug through my stash and cut squares from this yellow-y gold fabric sporting perky white, green, and copper spirals. Adding them to the quilt provided a bit of the brightness it needed.


Having decided which prints looked best where, I sewed them up into nine Ohio Star blocks: four corner ones with diagonal turkeys and indian corn, four mid-side ones with spirals, and one center one, modified with the bow tie corners removed. I would later add a green autumn leaf border as well.


Having assembled the top, I needed to FMQ it. My chosen patterns were matchstick lines ¼" apart in the tan and beige triangles of the QSTs. In the turkey and indian corn squares I did only curved edge perimeter lines so those squares would puff up like little pillows and not obscure the seasonal novelty prints. I opted for a pebble pattern in the spiral squares. I was not skilled in making well rounded adjacent circles so this casual, impromptu, relatively small quilt was the perfect place to practice. This next photo is poor quality in color accuracy but the late afternoon lighting shows up the FMQ very well. I no longer fear pebbles, although I do now know they are very time consuming.


Next is a closeup of one of the four corner Ohio Stars. The autumn leaf border print added some needed green relief. I determined its width by how much fabric I had - only a fat quarter. I improvised by adding indian corn squares as cornerstones. Indian corn and turkey alternate along the diagonals of the quilt. I sewed a ruler guided wave stitch in the border. I inserted an unexpected peek of lilac piping to the burgundy binding. The lilac is meant to call attention to the spark of lilac in the turkey's wing feathers.
 

The following photos are closeups of the center Ohio Star and one of the four mid-side Ohio Stars.


Here is a more color-correct overview of the front of the quilt.


I extend my fun in choosing the backing fabric. These stylistic brown wavy chickens with pink waddles and blue/aqua eyes are laughable. I had a just over a yard of this fabric that I'd bought on a lark because it made me smile. After I had purchased it and shown it to my husband, he thought those brown wavy chicken silhouettes were worms! Ugh! I never would have bought that fabric had it appeared that way to me. It was the perfect amount for this 40" square quilt. The pebbles and matchstick quilting remind me of eggs in straw nests. This occurrence was purely accidental.


I named this quilt Gobble. First, because it has turkeys on it and second, because it gobbled up my random pieces of fabric. Here are the name and date labels. As proof of my absence of planning, some photos were taken at night and some in daylight, hence the color variation. I suppose I could have color corrected them digitally to be consistent but that would further hamper the improvisational sprit that I was half-heartedly pursuing.


I learned a lot from this little exercise and resulting quilt.
  1. A one-day holiday – even though it is shy of a full season – is still worthy of a quilt
  2. It feels good to finally use that fabric I'd been saving
  3. It is helpful to practice a new technique while it is still fresh in my mind – QSTs
  4. Learning a new FMQ pattern on a small quilt is smart – no more fear of pebbles
  5. For uniformity, try to take photos under similar lighting conditions
  6. Not having a plan is freeing and fun – thankful that I realize that
  7. True improvisation will still be hard for me – does not mean I will refrain from trying