Showing posts with label Dan. Show all posts

Friday, November 21, 2025

Cuddly Construction Vehicles

I had two large graphic fabric panels of construction equipment that I wanted to sew into throws rather than wall hangings. My son works in the design/construction business and his son is just emerging from a toddler's crazy-about-building-vehicles phase. True, the Minecraft video game has somewhat superseded my now seven-year old grandson's big equipment infatuation. I am slightly late in sewing to meet his peak interest level. I may have missed my window, but I just could not let these big graphic panels go to waste. These were the two panels I had by Riley Blake Designs: A CAT® Dump Truck and a CAT® Excavator. Each is 36" tall and 43" wide and is digitally printed. Reluctant to abandon these stunning fabrics, I justified my belated sewing of these panels by couching them as a father/son throw duo. As throws they needed to have a soft backing and soft borders in order to be cuddly and tactilely desirable. Thinking snuggly fabrics for the backing would be appealing, I bought some minky in camel for the dump truck and some minky in ash for the excavator and wrapped it around to the front. 


Hoping to expand my skills by doing the wrap-around self-binding technique, I suspected the corner miters would be my challenge. As it turns out, they were a piece of cake when I found a YouTube tutorial from ShabbyFabrics for a baby receiving blanket. Using Cuddle® by Shannon fabric for the backing was my waterloo. Per the Missouri Star Quilt Company:
The term minky refers to any plush microfiber fabric made from 100% polyester fibers. Cuddle is the brand name of minky fabric by Shannon fabrics. While you may find minky fabric for sale that isn’t made by Shannon, the truth is, Shannon Cuddle fabric is the highest quality minky fabric around. 
I had purchased Cuddle® minky for the plush, and so skimping on fabric quality was not an issueI knew to be cautious with this project because I remembered I had sewn with a minky fabric before with not-particularly-stellar results as described in my 11/16/17 post. One of the four mitered corners on that project had been a disaster. This project all four of my miters were great. It was sewing the Cuddle® to the cotton along the four straight edges that was a struggle. The difference in stretchiness between a flexible minky fabric and a woven cotton fabric was a challenge to be conquered when seaming the two together. I pinned the dickens out of the seam, and still had problems. Here is my analysis of the issue.


Cuddle® is 60" wide and is very stretchy perpendicular to the selvage (white words in previous diagram) but — to my surprise — very non-elastic parallel to the selvage, even after cutting off the selvage. The woven cotton panels were the opposite; stretchy perpendicular to the selvage (black words in previous diagram) and stiffer parallel to the selvage (black words in photo). The flexible Cuddle® direction against the straight of grain of the woven I could handle with sufficient care, which as it turns out, were the shorter, vertical sides. I eased in the Cuddle®. The crossgrain of the woven against the unforgiving Cuddle® direction was a disaster, which as it turns out were the longer, horizontal sides. I tried with the woven fabric against the feed dogs and the Cuddle® against the feed dogs, either configuration to no avail, even though I had been scrupulous with cutting the two fabrics equal lengths. Easing in the woven was not working. I finally clipped tiny snips along the length of the Cuddle to introduce a bit of give and tugged my heart out. It did not come out perfect but certainly very acceptable. The  following photo is before any pressing or quilting. Closeups of the lower left and upper right corners reveal that the mitered corners were not a problem.


The ash-backed excavator went more smoothly than the camel-backed dump truck. I knew where the trouble spots were and that they were not at the miters where I was concerned. I'd cut the Cuddle® bigger by 11" on all fours sides of the woven panel. The wrap around borders were a generous 5½" wide. The finished throws measured ~54" wide by ~47" tall.


The next step I feared was quilting the center region. My plan was to just outline the truck and the excavator to hold the backing and front fabrics together and call it good. Mainly, I just wanted to smooth out those wrinkles. Theoretically, since there are no feed dogs on my long arm, there should be fewer issues. I practiced first with some Cuddle® scrap and the test worked out smoothly enough that my concerns were not justified. I also added some freeform lines contouring the clouds, or more specifically, the billows of stirred up dust. As a finishing touch, I did add a label with my name and the year on the lower front corner of each throw, using dark brown grosgrain ribbon.


Father and son both liked the gifts. Dan and William snuggled up together to watch football. Then my grandson decided he liked both throws and appropriated his dad's excavator as well as his own dump truck. William wrapped the dump truck around himself as a cape when he climbed the stairs to bed.


Seeing the reception the throws got, I was glad I had persevered in making them, even though I was at the outer reaches of a child's window of interest. Grudgingly, I even admit that the fluff and furry bits scattered throughout my sewing room, left behind from the Cuddle® plush, were worth the mess.

Tuesday, August 20, 2024

Added Patches for Adventure Guides Vests

With my son's family move to Colorado from California they will no longer be able to participate in YMCA Adventure Guides since the organization is California based only. They still wanted to preserve the memorable vests they have with the patches they've earned for the various activities. I was asked to add three more badges and some feathers to their vests.  On the front I added the blue bordered round badge with a fire truck and a black bordered badge shaped badge with  a special agent  reference to Dan's, Vivian's and Lillian's vests.

On the back I added the feathers which are for attending chapel; the colors have no real significance. Each vest also got a white bordered Polar Bear Club badge indicating participation in an early morning dip in frigid waters. Those with a repeat plunge earned an icicle to be hung from the badge.


If I needed practice on threading my sewing machine I certainly got it with this small project. On the left are the orange teal and yellow colors for the feathers. On the right are the black, royal blue, and white for the patches. These colors matched the badges for the closely spaced zigzag stitching about the perimeters. The brown was used in the bobbin thread for all.


Following are the images of the fronts and backs of the three vests for my son Dan, aka Delicate Flower, and his daughters Vivian aka BookWorm, and Lillian, aka Adventurous Dolphin. These photos are before the attachment of the additional feathers and patches. Larger photos and the creation of the vests themselves with their first round of badges is available in my post for 7/23/23.


Sunday, July 23, 2023

Patched Adventure Vests

In my previous post from 7/17/23 I showed the Adventure Guides vests I'd made for my son and his two daughters. Alas, they were too small... sort of.  They did fit in a fashion, but they were so short that there would not be much room for more badges. I needed to lengthen them in some way. I did not want to remove the personal appliqués nor the ribbon names I'd stitched on the front, so I needed to lengthen them by inserting a band. For the first of the three vests I "patched", I thought it would be easier to only have one seam on the back and two on the front. I needed to un-sew the side seams to insert the extensions this way. Big mistake. Too much effort. For the other two, I accepted two seams on each the front and the back.

When I did resew the side seams on that first vest, I took a smaller seam allowance to allow a bit more room around the chest. I did have to scratch my head a bit; the math never worked out on the first vest. The front band I inserted on Vivian's is wider than the back band I added on the bottom, and yet the front and back side seams are the same length. Go figure. 


I slashed Lillian's and her dad's vests horizontally and inserted the bands: 2" wide for 7-yr-old Lillian, 3" wide for 9-yr-old Vivian, and 4" wide for their dad. This was not as straight forward since the rest of the vest was already constructed with its lining; but I managed. The vests were not as pristine as I would have liked, but they are certainly serviceable. Due to the construction sequence, there needed to be top stitching to complete the assembly, but it turned out looking a bit decorative. The attention should be on the badges anyway as symbols of accomplishments. The vests are merely background.


The next part of this project, after modifying the vests, was to sew on 30 accumulated patches. I initially estimated that at 10 minutes per patch, that was 300 minutes or 5 hours. I did not want to disillusion myself into thinking that I would whip out this project one evening after dinner. I set aside a Saturday with no other commitments to do it. In order to get organized and get on a roll, I picked out all the matching thread colors first and wound two full brown bobbins. 


I started with the largest patches; they needed to be centered on the back of the each vest. Because each vest was a different size for same size patches, I needed to eyeball what location looked right and balanced but I was careful to make sure each patch was oriented level. Then I arranged four more patches in similar locations on the back of each of the vests. In the first hour and a half, I had attached five patches to the back of each of the three vests. Doing the math that is about 6 minutes per patch and not quite as onerous as initially estimated. The backs of all three vests are shown in the following photos.


It was a good thing I wound a second bobbin. I did need it for satin stitching around the final 5 patches. Here is the second batch of 15 patches, five patches on the front of each vest. I biased them toward the top so there will be room for several more patches as they are earned from extra activities. I completed this second round in about 2 hours. The fronts of all three vests are shown in the following photos.


I will clean the random strings and lint off the vests and give them a good pressing. Then I will ship them off to SoCal. I will not delay publishing this post for pictures of the the modified vests being worn by my son and granddaughters. If they still do not fit, I do not want to know.

Monday, July 17, 2023

Adventure Vests

When my son Dan was young, he and his dad were active in the YMCA father/son activity program in the mid to late 1980's called Indian Guides. The father/daughter program was called Indian Princesses. There were mother/daughter and mother/son options as well. The YMCA sponsored program still exists and is popular today but its name has been changed to Adventure Guides. Per a 2003 article in the Los Angeles  Times 

While YMCA officials say the name change was not a reaction to Native Americans offended by the Indian theme, an executive board member for the American Indian Movement said hundreds of tribes, American Indian organizations and non-Indian organizations have taken a position that programs and sports teams should stop using American Indian themes and mascots.

The participants still wear vests and sport patches representing the different activities they did together. They no longer exchange wampum and their tents are no longer tee-pees, but Dan and his girls have fun together in the renamed YMCA program. I mailed Dan's vest and that of his Dad down to him. He and his younger daughter Lillian are modeling them. Dan is wearing what used to be his dad's vest and Lillian is wearing his. I'd had to add extra length to Dan's vest to accommodate all the patches he was accumulating. Adult and child patches are the same size so a smaller vest could not hold them all. 


There were only two vests and three participants, plus those two vests were already covered in patches. I volunteered to make three new blank vests and was happily taken up on my offer. Here is the process for the newly sewn vests, starting with an old Simplicity pattern #7030 I had filed away. The Simplicity pattern company was founded in 1927 in New York City and is still around today, though merged and morphed with other companies. Based on the $11.95 price I doubt this specific pattern was too ancient. Besides when I went to use it, it had the original crisp, never-used, factory fold. It was not the one I originally used from thirty-odd years ago when Dan was about five. Packrat that I am, I probably do have that pattern squirreled away, but #7030 was the first one I could lay my hands on.


I could not find kettle cloth in any of my local fabric stores. It is what I used for the original vests but that fabric is not made any more. Instead I order cotton twill on line. It is a bit heavier that quilting cotton and so should be more durable. To personalize their vests, I ordered appliqués via the craft site Etsy and embroidered their Adventure Guides names on grosgrain ribbon. I cut out Dan's vest first. Dan's vest take up half the length of my cutting table and is a men's size L.


The story behind Dan's chosen name for Adventure Guides is that he was lying on the couch and the kids were jumping on him like in the book Hop On Pop. They were warned to be careful because dad was a delicate flower. Dan adopted the name Delicate Flower for his Adventure Guide's moniker. A sunflower is not exactly the most delicate of blooms. I had first bought a pink peonie-like bloom but it was too big so I switched to the smaller sunflower. I preferred the sunflower because the brown center went with the vest. Dan's dad also said it was more "bold and manly".


Nine year old Vivian's vest was a boy's size L. She is an avid reader and chose the name Bookworm. I made it two lines instead of one to match the appliqué.


For seven year old Lillian, I used a medium sized pattern and trimmed off the excess from the L size. She is an animal lover and chose the name Adventurous Dolphin. I was lucky to find a dolphin appliqué on Etsy.


By the way, I use Etsy a fair amount and wanted to know what the name stood for. Was it an acronym for something? From Wikipedia I learned
Kalin [a co-founder of the craft site Etsy] said that he named the site Etsy because he "wanted a nonsense word because I wanted to build the brand from scratch. I was watching Fellini's 8 ½ and writing down what I was hearing. In Italian, you say etsi a lot. It means 'oh, yes' (actually it's "eh, si"). And in Latin and French, it means 'what if'." In Greek, Etsy means "just because".

I delayed publishing this post in order to add pictures of Dan, Vivian, and Lillian in their vests. When I went to SoCal to visit last weekend, they tried them on and bummer... they were too small. Well they fit, but just barely, and they were not long enough to have room for many badges. I brought the three vests back home with me and I will make new ones or add length and width to these. The process is to be determined. But I least I brought all the badges home with me so I will be able to add them after enlarging the vests or making new ones. I will find a way to salvage and transfer the personalized appliqués and name ribbons.


Saturday, May 6, 2023

Dan's T-Shirt Quilt

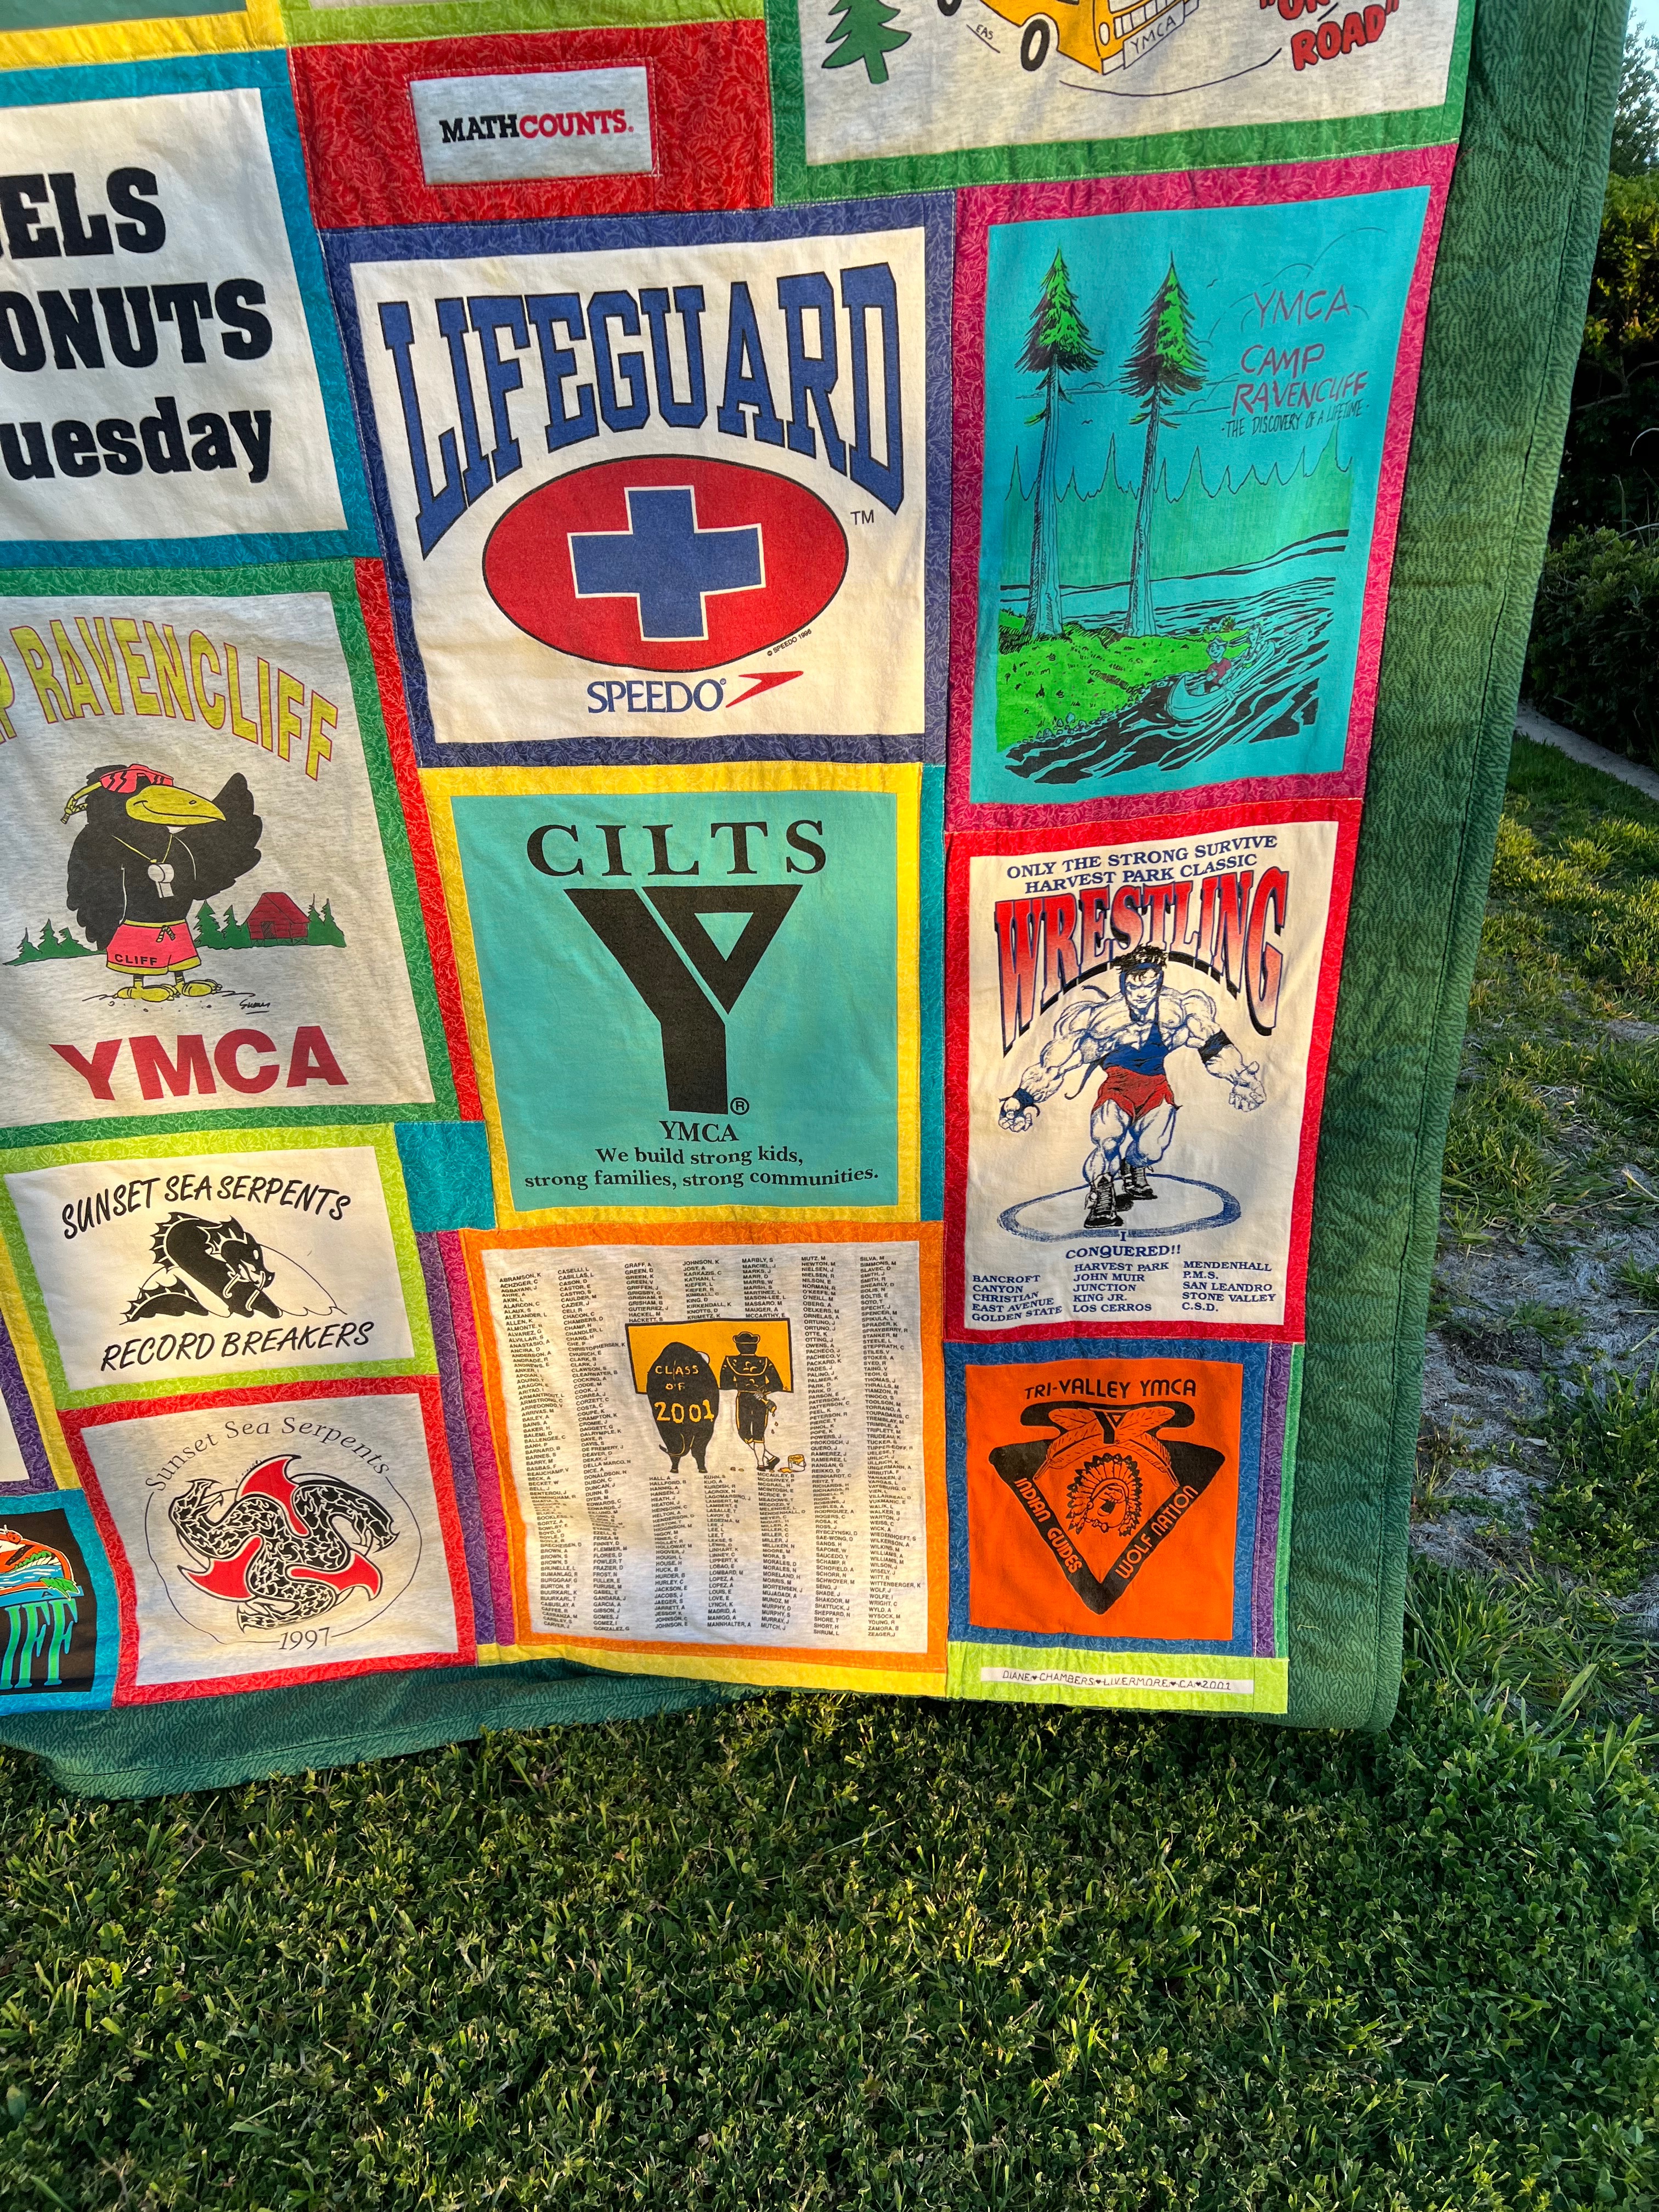
My son turned 40 and so I thought it was time to send him the T-shirt memory quilt I'd made him from when he graduated high school, class of 2001. The main categories were 

SPORTS: swimming Sunset Sea Serpents, water polo, life guarding, wrestling, baseball buddy
ACADEMICS: Mendenhall Middle School, Granada High School, MathCounts
CAMPING: as camper, as a CILT (camper in leadership training), at Ravencliff, at Loma Mar


Most T-shirt quilt patterns I have seen cut all the T-shirts the same size and then add uniform sashing in between. This was my first time and I cut out each shirt with minimum border around the image. This made it difficult to assemble with all the varying sizes. I scratched my head a lot with the math for the sashing sizes, colors, and quantities. Also for my first time, the quilting is minimal.

Most images are easily interpreted as sports, academics or camping. One block in the lower portion of the upper left quadrant stands out though – "BAGELS are DONUTS on Tuesday". What does that mean? That shirt commemorates when Dan was in leadership training at a camp. A truck had gotten stuck in the mud and Dan stood at the back pushing to get it free while someone else rev'd the motor to rock it out. One rear wheel kicked up a stone that flew up and hit Dan on the forehead. Although never unconscious he was being watched for a possible concussion. He did babble a bit and one of the phrases he uttered was, "BAGELS are DONUTS on Tuesday". The staff, once the concern had evolved to amusement, had a T-shirt made up for him to remember the incident.


Here are closeups of the remaining three quadrants of the quilt in clockwise order: upper right, lower right, lower left.


When it came to choosing a color for the backing, I left the choice up to Dan. Since he would be going off to Cal Poly, San Luis Obispo, he chose green because the college's school colors were green and gold. The backing fabric also has gold stars scattered throughout.


The quilt never went off to college. At the time, Dan hedged that he did not want to risk it on his bed. Maybe he was just headed off for bigger and better pursuits. But the T-shirt quilt is a good retrospective gift for a special 40th birthday. A wife and four kids later, he is smiling for both the past and the present.