Showing posts with label William. Show all posts

Friday, November 21, 2025

Cuddly Construction Vehicles

I had two large graphic fabric panels of construction equipment that I wanted to sew into throws rather than wall hangings. My son works in the design/construction business and his son is just emerging from a toddler's crazy-about-building-vehicles phase. True, the Minecraft video game has somewhat superseded my now seven-year old grandson's big equipment infatuation. I am slightly late in sewing to meet his peak interest level. I may have missed my window, but I just could not let these big graphic panels go to waste. These were the two panels I had by Riley Blake Designs: A CAT® Dump Truck and a CAT® Excavator. Each is 36" tall and 43" wide and is digitally printed. Reluctant to abandon these stunning fabrics, I justified my belated sewing of these panels by couching them as a father/son throw duo. As throws they needed to have a soft backing and soft borders in order to be cuddly and tactilely desirable. Thinking snuggly fabrics for the backing would be appealing, I bought some minky in camel for the dump truck and some minky in ash for the excavator and wrapped it around to the front. 


Hoping to expand my skills by doing the wrap-around self-binding technique, I suspected the corner miters would be my challenge. As it turns out, they were a piece of cake when I found a YouTube tutorial from ShabbyFabrics for a baby receiving blanket. Using Cuddle® by Shannon fabric for the backing was my waterloo. Per the Missouri Star Quilt Company:
The term minky refers to any plush microfiber fabric made from 100% polyester fibers. Cuddle is the brand name of minky fabric by Shannon fabrics. While you may find minky fabric for sale that isn’t made by Shannon, the truth is, Shannon Cuddle fabric is the highest quality minky fabric around. 
I had purchased Cuddle® minky for the plush, and so skimping on fabric quality was not an issueI knew to be cautious with this project because I remembered I had sewn with a minky fabric before with not-particularly-stellar results as described in my 11/16/17 post. One of the four mitered corners on that project had been a disaster. This project all four of my miters were great. It was sewing the Cuddle® to the cotton along the four straight edges that was a struggle. The difference in stretchiness between a flexible minky fabric and a woven cotton fabric was a challenge to be conquered when seaming the two together. I pinned the dickens out of the seam, and still had problems. Here is my analysis of the issue.


Cuddle® is 60" wide and is very stretchy perpendicular to the selvage (white words in previous diagram) but — to my surprise — very non-elastic parallel to the selvage, even after cutting off the selvage. The woven cotton panels were the opposite; stretchy perpendicular to the selvage (black words in previous diagram) and stiffer parallel to the selvage (black words in photo). The flexible Cuddle® direction against the straight of grain of the woven I could handle with sufficient care, which as it turns out, were the shorter, vertical sides. I eased in the Cuddle®. The crossgrain of the woven against the unforgiving Cuddle® direction was a disaster, which as it turns out were the longer, horizontal sides. I tried with the woven fabric against the feed dogs and the Cuddle® against the feed dogs, either configuration to no avail, even though I had been scrupulous with cutting the two fabrics equal lengths. Easing in the woven was not working. I finally clipped tiny snips along the length of the Cuddle to introduce a bit of give and tugged my heart out. It did not come out perfect but certainly very acceptable. The  following photo is before any pressing or quilting. Closeups of the lower left and upper right corners reveal that the mitered corners were not a problem.


The ash-backed excavator went more smoothly than the camel-backed dump truck. I knew where the trouble spots were and that they were not at the miters where I was concerned. I'd cut the Cuddle® bigger by 11" on all fours sides of the woven panel. The wrap around borders were a generous 5½" wide. The finished throws measured ~54" wide by ~47" tall.


The next step I feared was quilting the center region. My plan was to just outline the truck and the excavator to hold the backing and front fabrics together and call it good. Mainly, I just wanted to smooth out those wrinkles. Theoretically, since there are no feed dogs on my long arm, there should be fewer issues. I practiced first with some Cuddle® scrap and the test worked out smoothly enough that my concerns were not justified. I also added some freeform lines contouring the clouds, or more specifically, the billows of stirred up dust. As a finishing touch, I did add a label with my name and the year on the lower front corner of each throw, using dark brown grosgrain ribbon.


Father and son both liked the gifts. Dan and William snuggled up together to watch football. Then my grandson decided he liked both throws and appropriated his dad's excavator as well as his own dump truck. William wrapped the dump truck around himself as a cape when he climbed the stairs to bed.


Seeing the reception the throws got, I was glad I had persevered in making them, even though I was at the outer reaches of a child's window of interest. Grudgingly, I even admit that the fluff and furry bits scattered throughout my sewing room, left behind from the Cuddle® plush, were worth the mess.

Monday, August 4, 2025

Boy Scout and Karate Patches

My seven year old grandson, who now lives in Colorado, is in the Boy Scouts. On his most recent visit out to us in California, his mom brought patches for me to sew on his uniform. There were the three digits of his troop number and a diamond patch for his tour as a tiger cub. First my daughter-in-law and I did online research to figure out what went where. The diamond tiger is supposed to go on the left pocket in a specific location; the order of these diamond patches denotes progression through the organization. Unfortunately, I found conflicting images and instructions so I took a guess on location and convinced myself that there were no scout police.


One aspect was consistent. The diamond patches are sewn over the left pocket. If the pocket is to remain accessible and useful, positioning on a pocket tends to preclude sewing the patches on by machine with a zig zag stitch around the edges, my preferred go-to method. Then a read a hint that suggested removing the pocket, sewing on the patch, and then replacing the pocket. That is what I did. When other diamond cub scout rank patches are added, I will wing it with a similar solution. Per cub scout advancement rules Cub Scout Ranks in order are Lion Cub for Kindergarten, Tiger for 1st Grade, Wolf for 2nd Grade, and Bear for  3rd Grade. Sewing those patches on by hand is too tough on my fingers, thimble or no thimble. Bobcat is a special category which involves learning the oath and the salute, among other items.


Sewing on the three digits for his troop number was challenging, also. They are supposed to go high up near the shoulder. Even with turning the sleeve inside out I had to be careful to sew through only one thickness and to not crinkle or crease the sleeve fabric. An arched badge is supposed to go above the troop number at some point. That will be like setting in a sleeve I imagine, with less flexibility. I do not think whoever designed the patching locations for the scouts had any sewing or seamstress experience at all!


There was also a gear shaped activity badge but that had a loop on it to place over a button on the right pocket under the pocket flap. Finally! Something simple! No sewing was required. Here is the Boy Scout shirt, all "patched up" and ready to wear.


After sewing on the Boy Scout patches, I needed to sew on the patches for my Grandson's karate Gi. Per a web site karate for kids
The Karate uniform is called a Gi (pronounced ghee). Traditionalists will argue that the correct term is Dogi or Keikogi, depending on your point of view. In Japanese culture do means the way and keiko means practice so calling your uniform a dogi means the cloth of the way and calling your uniform a keikogi means the cloth of practice.
A Gi is relatively flat. Sewing on the patches is easy. First I lined up the three patches for participation in a tournament in the categories of techniques, sparring, and kata (form). I centered the large round one with the yin/yang symbol underneath a praying mantis. In the context of martial arts, the praying mantis symbolizes agility, precision, and patience. The spiritual meaning of a praying mantis often revolves around stillness, patience, and intuition, stemming from its characteristic posture and hunting style. Per Wikipedia
The mantis is a long and narrow predatory insect. While heavily armoured, it is not built to withstand forces from perpendicular directions. Consequently, its fighting style involves the use of whip-like/circular motions to deflect direct attacks, which it follows up with precise attacks to the opponent's vital spots. These traits have been subsumed into the Northern Praying Mantis style, under the rubric of "removing something" (blocking to create a gap) and "adding something" (rapid attack).
The snake on the upper right is from the Rocky Mountain Tournament of champions. I assume it is a cobra. The cobra emphasizes a "strike first, strike hard, no mercy" philosophy and is a fighting style characterized by aggressive, kick-oriented techniques and a focus on offense. Due to its origins in the movie Karate Kid, this style is said to be fictitious. I find a praying mantis along with a cobra represent conflicting approaches and mixed messages; but what do I know?


Two round patches are beneath. On the lower left, there is a patch for for nunchaku, a traditional martial arts weapon consisting of two sticks connected by a rope or chain. A patch for the Yin Yang symbol is on the lower right. In karate, the concept of Yin and Yang is often associated with the balance and interplay of opposing forces, both within the martial art itself and in the practitioner's overall development.


The Yin and Yang are like when my four grandchildren are visiting ages, 11, 9, 7, and 4.
You are excited and super busy when you are seeing them.
You collapse and breathe a sigh of exhaustion when they leave.

Tuesday, February 7, 2023

Sewing with Grandkids

My son Daniel brought his four kids – ages 8, 6, 4, and 2 – up for a four day weekend – Thursday January 26th through Sunday January 29th – giving his wife a well-deserved break. Vivian, the 8-yr-old, did some hand sewing with me the last time I visited in Southern California. This visit coming to my house she wanted to learn to use the sewing machine so we planned that for the first day after her arrival. We dug through my stash and found a pretty, floral cat panel that made two cats and a mouse. It was titled Mr. and Mrs. Fluffybottom and the mouse Mr. Meepers. Vivian carefully and meticulously cut out the white cat that she liked. We pinned the front and back together, right sides facing. She asked why face to face and I told her she would see why in a moment and set her up at my Pfaff to sew. Viv is large enough that she could feed the layered fabric under the pressure foot and still reach the foot pedal to power the machine.


She crept slowly around ¼" inch from the edge, removing the pins at appropriate times, with me by her side encouraging her. When it came time to turn the cat right sides out, I could see the understanding dawn on her face as she smiled big in recognition. We used this turning tool by Dritz, a Point Turner and Seam Creaser, to poke out the ears and smooth the seam along the body. Next step was stuffing it. I told her we had to run out to the store to get some fiber fill because I did not have enough to fill that large a stuffed cat. 


Timing is everything. A few days before the kiddos arrived I had order three bags of stuffing from Amazon. I particularly like this brand because it is silky to use, not scratchy or itchy to handle. I was a bit bummed when I thought it had not arrived yet. I was mistaken. When we left to go to the store, we found a big box on our front stoop. My husband brought it in the house and we let Vivian open it. She was thrilled to realize that I'd planned ahead for this activity.Vivian truly enjoyed the stuffing part.


Vivian's  6-yr-old sister Lillian and 4-yr-old brother William wanted to sew, too. I dug a Meow Cat Panel by Stacy Iest Hsu out of my stash and figured we could make the four kittens of the Mama Cats. They are simple, since there is only one piece that gets folded over and not two pieces needing alignment. Lillian picked the cream colored one and cut hers out by herself. William picked yellow but was perfectly content to have me take over and finish the cutting, part-way through. He was anxious to get to the part where we would run the machine and sew! Vivian and I cut out the remaining two kittens later, after Lillian and William had taken their turn at sewing.


Not quite tall enough to reach the foot pedal, Lillian and William each sat on my lap and guided the fabric under the pressure foot while I controlled the speed.  They learned how to raise and lower the pressure foot and cut off thread with the thread snips, third finger through the loop and thumb on the flat part. Lillian, now an old pro, mentored her younger brother on the third finger and thumb part of the tool.


Their dad took this photo. I was too involved with guiding and helping to photograph the process real time.


Lillian loved stuffing the kittens. William stuffed about two-thirds of one and concluded that this was no where near as exciting as running a machine or using tools. (He is a budding "Tim the Tool Man Taylor" in the making.) Lillian and Vivian each sewed up the bottom of a little kitten with an overcast stitch. Lillian particularly enjoyed picking her thread color from my case of spools. She was remarkable accurate at matching.  I lined the four kittens up for a photo and asked Lillian to pose with them.


Then Lillian proudly packed them up in a gift bag and delivered the four kittens to her three siblings and herself. 

Lillian wanted to sew up the black kitten that came from the panel, too, but we ran out of time. There were other activities that took precedence, like operating Grandpa's trains and playing with the real cat Tee. 


I finished the other animals on the panel and will be sending them off. Mrs. Fluffybottom went home with Vivian but Mr. Fluffybottom and Mr. Meepers will travel via US Postal Service instead of Southwest Airlines.

Friday, April 29, 2022

Stuffies for Grandkids

My quilting has taken a justifiable back seat lately. I just returned this weekend from visiting my four grandkids in southern California. Here are some stuffed toys I made for the younger two. These two construction vehicles were for my grandson who just turned four, made from a panel CAT Junior Crew by Caterpillar for Riley Blake Designs. 


This is a doll for my 15 month old granddaughter sewn from the Moda panel Friends.


The other two granddaughters are nearly 6 and recently turned 8. The 15 month old had already been whisked off to bed at the time of this photo of us all together.


Sometimes a few quick projects, made just for fun, combined with precious smiles and happy hugs, are all I need for a magical pick-me-up and renewed quilting inspiration.

Friday, November 9, 2018

Whose Baby Am I?

This is a cloth book for my seven month old grandson William. The book came from a panel printed by Elizabeth's Studio. I  gravitate toward the soft look of fabrics of this mill who adapts the artwork of talented artists into screen printed images. This collection of baby animals is from the work of artist John Butler.


Other examples that I have made from Elizabeth's Studio fabric are a cloth book My Baby's Day post for 12/17/12, a cloth book Little Baby Signs post for 12/16/14, and a pair of sepia toned seashore print pillowcases post for 8/17/16.

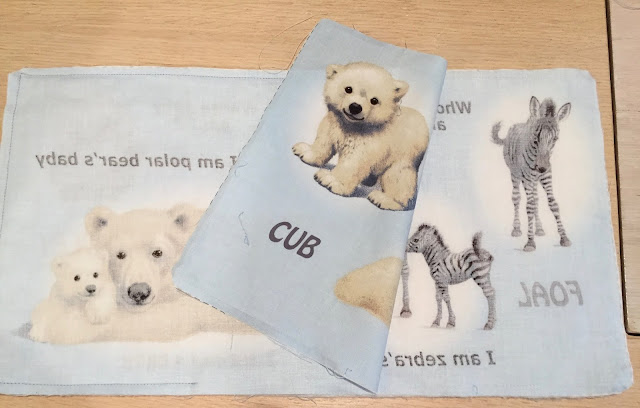
Sometimes the page numbers for a cloth book are printed outside the area of the book page itself as they were in Whose Baby Am I?. I actually prefer this method since then the images can be used as quilt blocks without the pesky numbers being there. But I needed to devise a way of recalling what order those pages should be in once I'd cut off the page information. I trim each page except for the bottom where the number is. I then "assemble" the raw book and take cell phone photos that help me to know what goes where. The front and back covers are easy since they are slightly larger. The middle is a giveaway too for this book, since it spans two pages. Here is the book sequenced as it should be, with a wide white paginated margin at the base.


I can safely trim off that larger lower margin, since I have a record now, and sandwich the two book layers, face to face with a piece of batting to give it a bit of substance. I also layer in some crinkle material on Etsy or crinkle material by American Felt and Craft for baby and pet toys in the cover stack or in the middle stack to make some noise for the baby when he plays with the book. I was whizzing along since these books do not take long to make and on my third layered stack, the middle one, I noticed something wrong when I went to turn it right side out. I had placed both printed pages facing the same direction instead of face to face. The wrong side of that zebra page would have been showing. Whoops. 


It is amazing how something that you can sew by zipping around the edges in less that 2 minutes can take 15 or more minutes to pick out. Because the back side was batting, the stitches sunk in and made picking them out more difficult, since I could not work from both sides easily. Ugh! Once I had right sides facing, I did a double check to be sure I had not put one in upside down. But I had not. Whew!


Turned, steamed, and edges top stitched, the completed Whose Baby Am I? book looks cute and crinkles adorably. I hope William likes it.