Friday, April 29, 2022

Stuffies for Grandkids

My quilting has taken a justifiable back seat lately. I just returned this weekend from visiting my four grandkids in southern California. Here are some stuffed toys I made for the younger two. These two construction vehicles were for my grandson who just turned four, made from a panel CAT Junior Crew by Caterpillar for Riley Blake Designs. 


This is a doll for my 15 month old granddaughter sewn from the Moda panel Friends.


The other two granddaughters are nearly 6 and recently turned 8. The 15 month old had already been whisked off to bed at the time of this photo of us all together.


Sometimes a few quick projects, made just for fun, combined with precious smiles and happy hugs, are all I need for a magical pick-me-up and renewed quilting inspiration.

Thursday, April 28, 2022

Voices in Cloth 2022

It was great to be at a quilt show again. The show I attended with my husband at the end of March was Voices in Cloth, put on by the East Bay Heritage Quilters (EBHQ).

As a bonus to the beautiful quilts, the venue was the Craneway Pavilion in Richmond, CA at the sunny south end of a 930 foot long brick structure that used to be an Old Ford assembly plant (circa 1931). With floor to ceiling windows on three sides its location on the waterfront of San Francisco Bay offers a panoramic view of the Oakland Bay Bridge, Treasure Island, Fishermans' Wharf, the Golden Gate Bridge, Angel Island, and Tiburon. Also dotting the landscape were the myriads of sailboats skimming close to the docks on their way out from the adjacent Richmond Yacht Club (est. 1932) to flit about the bay on a day when the weather was absolutely sunny and gorgeous. 


Frank and I met up with another couple at the show and ate lunch with Tekoa and Bill outdoors, basking in the beautiful weather and panoramic views. The following are a sampling of the quilts displayed at the show with a few words about what I found eye-catching and interesting about them. First up was one of Tekoa's entries; this show is sponsored by her guild.  The dark navy background gave it an overall Amish feel and served as a great backdrop to the centrally radiating rainbow of clear pure colors. Having recently working on quilting circles myself, I was particularly drawn to the piano key border spiced up with circles. I pondered how much was ruler work and how much was pure skill on the part of the quilter. Those circles are so perfectly round!


The next quilt to catch my eye was an Updated Oriental Star. I studied one block intently trying to figure out the piecing sequence.


The third quilt was a riotous splash of bold, complementary, yellow and purple. I studied it up close to prove to myself it really was made of only three different parts as the descriptor card stated.


I chose to call attention to a fourth and final quilt, which was silhouettes of saw blades and other tools. There are so many fabrics and prints available to purchase I do not think I will ever dye my own; but I must admit the hand dyes provided an awesome background for the silhouettes of saws and tools


Ok, let me digress. The word silhouette brings many random thoughts to my mind both with cartoons and music. For a blast from the past (if you are old enough) enjoy listening to this song Silhouettes (1957) by the Rays or Silhouettes (1965) by Herman's Hermits. The lyrics have a cute twist near the end. I was a big fan of Herman's Hermits.

 
Vendors in this show were mainly clothing and jewelry and not a lot of fabric, patterns, kits, or sewing tools. Since I am trying to restrict myself in purchases in order to reduce my stash, I was content with this situation. All I bought was two half-yard cuts of a particular yellow because it was, in my opinion, a hard shade to find. But, wait. We did not get out the door so scot free spending wise. My husband was browsing the market section where the hand made goods are for sale. A lover of cats and Christmas (and me) he was magnetically drawn to this quilt and suggested we buy it.


Aside from being very eye-catching, the more I studied it, the more inspiration I gained from this quilt. The upper left and lower right inner large corner squares must have come from a panel. I am guessing that only two squares remained, but by pairing them with a large scale print in the upper right and lower left inner corners, the composition was well balanced. I may very well use that idea in my future quilts. I liked that the filler stripe was made of geometric prints, either plaids or stripes, and that those stripes ran crosswise. They divide but so not steal attention. I liked how the snow landscape borders were fussy cut to showcase the houses and, although not mirror images, looked continuous. The red quilting looked striking against the white snow but white thread in the center panel did not distract from the fur of the white kitten. In fact the white snowflake pattern looked great in the blue sky and red window frame.


On the back it is a bit easier to note that the central region has white thread while the remainder has red thread but their co-existence do not appear blatantly obvious on the back. I will keep this in mind if I make a quilt where a change in lower thread color will work well. Changing color to match the top seems a lot easier than trying desperately and often fruitlessly attempting to balance the stitch tension with two very different thread colors. The scenic band across the pieced back was a fun surprise, also. Christmas Valley measures 51"W x 58"L. Since it has a hanging sleeve, we may substitute it for one of our curtains during the holidays.


The show was a fantastic. Attendees were thoughtfully polite in wearing masks and distancing so we felt safe. Time with friends, indoor eye-candy of quilts, and great outdoor weather with awesome views were yummy ingredients that made for an enjoyable and long-awaited outing.

Saturday, April 16, 2022

Third Saturday of April 2022

Today was rainy, but during a couple hours when the sun peeked through the clouds, I hung one perky quilt close to my front door under a protective overhanging order to keep up the my guild's third Saturday tradition. It is titled Cheery Daisy Stars, and dates from 2007. Details about this quilt are in the Third Saturday of March 2021 post. A relative of the Easter Bunny is keeping the quilt company.


Beginning April 2020, my quilt guild members began a tradition of hanging quilts in the front of their homes on the third Saturday of the month as a source of enjoyment for the community and as a thank you for the essential workers during the pandemic. My initial post about this practice is in my blog post dated 4/22/2020.

Saturday, April 9, 2022

Quilt by the Numbers - Circle FMQ begun

I have worked finally up the courage and emerged from my analysis paralysis to begin the FMQ on my quilt from the Zen Chic Figures fabric and Kira pattern from my previous post (4/5/22). What follows might not make sense if you have not read my previous post so let me at least repeat my terminology and the quilting pattern for a circular half of a quadrant.

After having completed one concentric circles quartet and partially muddling through a second concentric circles quartet, I have already learned a lot. Fabric does not have the precision of lines on paper. My brain knows this, but in my heart of hearts, I guess I acted as if this were not true. As I suspected, it is difficult to hold the arc rulers in place, especially the larger ones, even though I covered them with loads of sandpaper grips. What I did not anticipate is that a little bit of slippage changes the gap between concentric circles enough that the smaller chain of circles sandwiched in between sometimes extends beyond the boundaries. The 12" diameter outermost circle and the next smaller 9" diameter circle, even though they enclose a 1.5" channel are not aligned well enough, to contain the chain of spheres more fully. As I get better at holding the large arcs more securely, I am hoping they will be more aligned. Fortunately, the problem of the circles overhanging the channel edges gets less severe toward the center of the quartet. The smaller arc rulers are easier to hold and there is less distance for the fabric to stretch. I was still, however, successful in fitting in 5½" circles per ¼ quadrant, 22 circles per quartet. Following are closeups of the top half and the bottom half of the outer ring of one quartet in process.


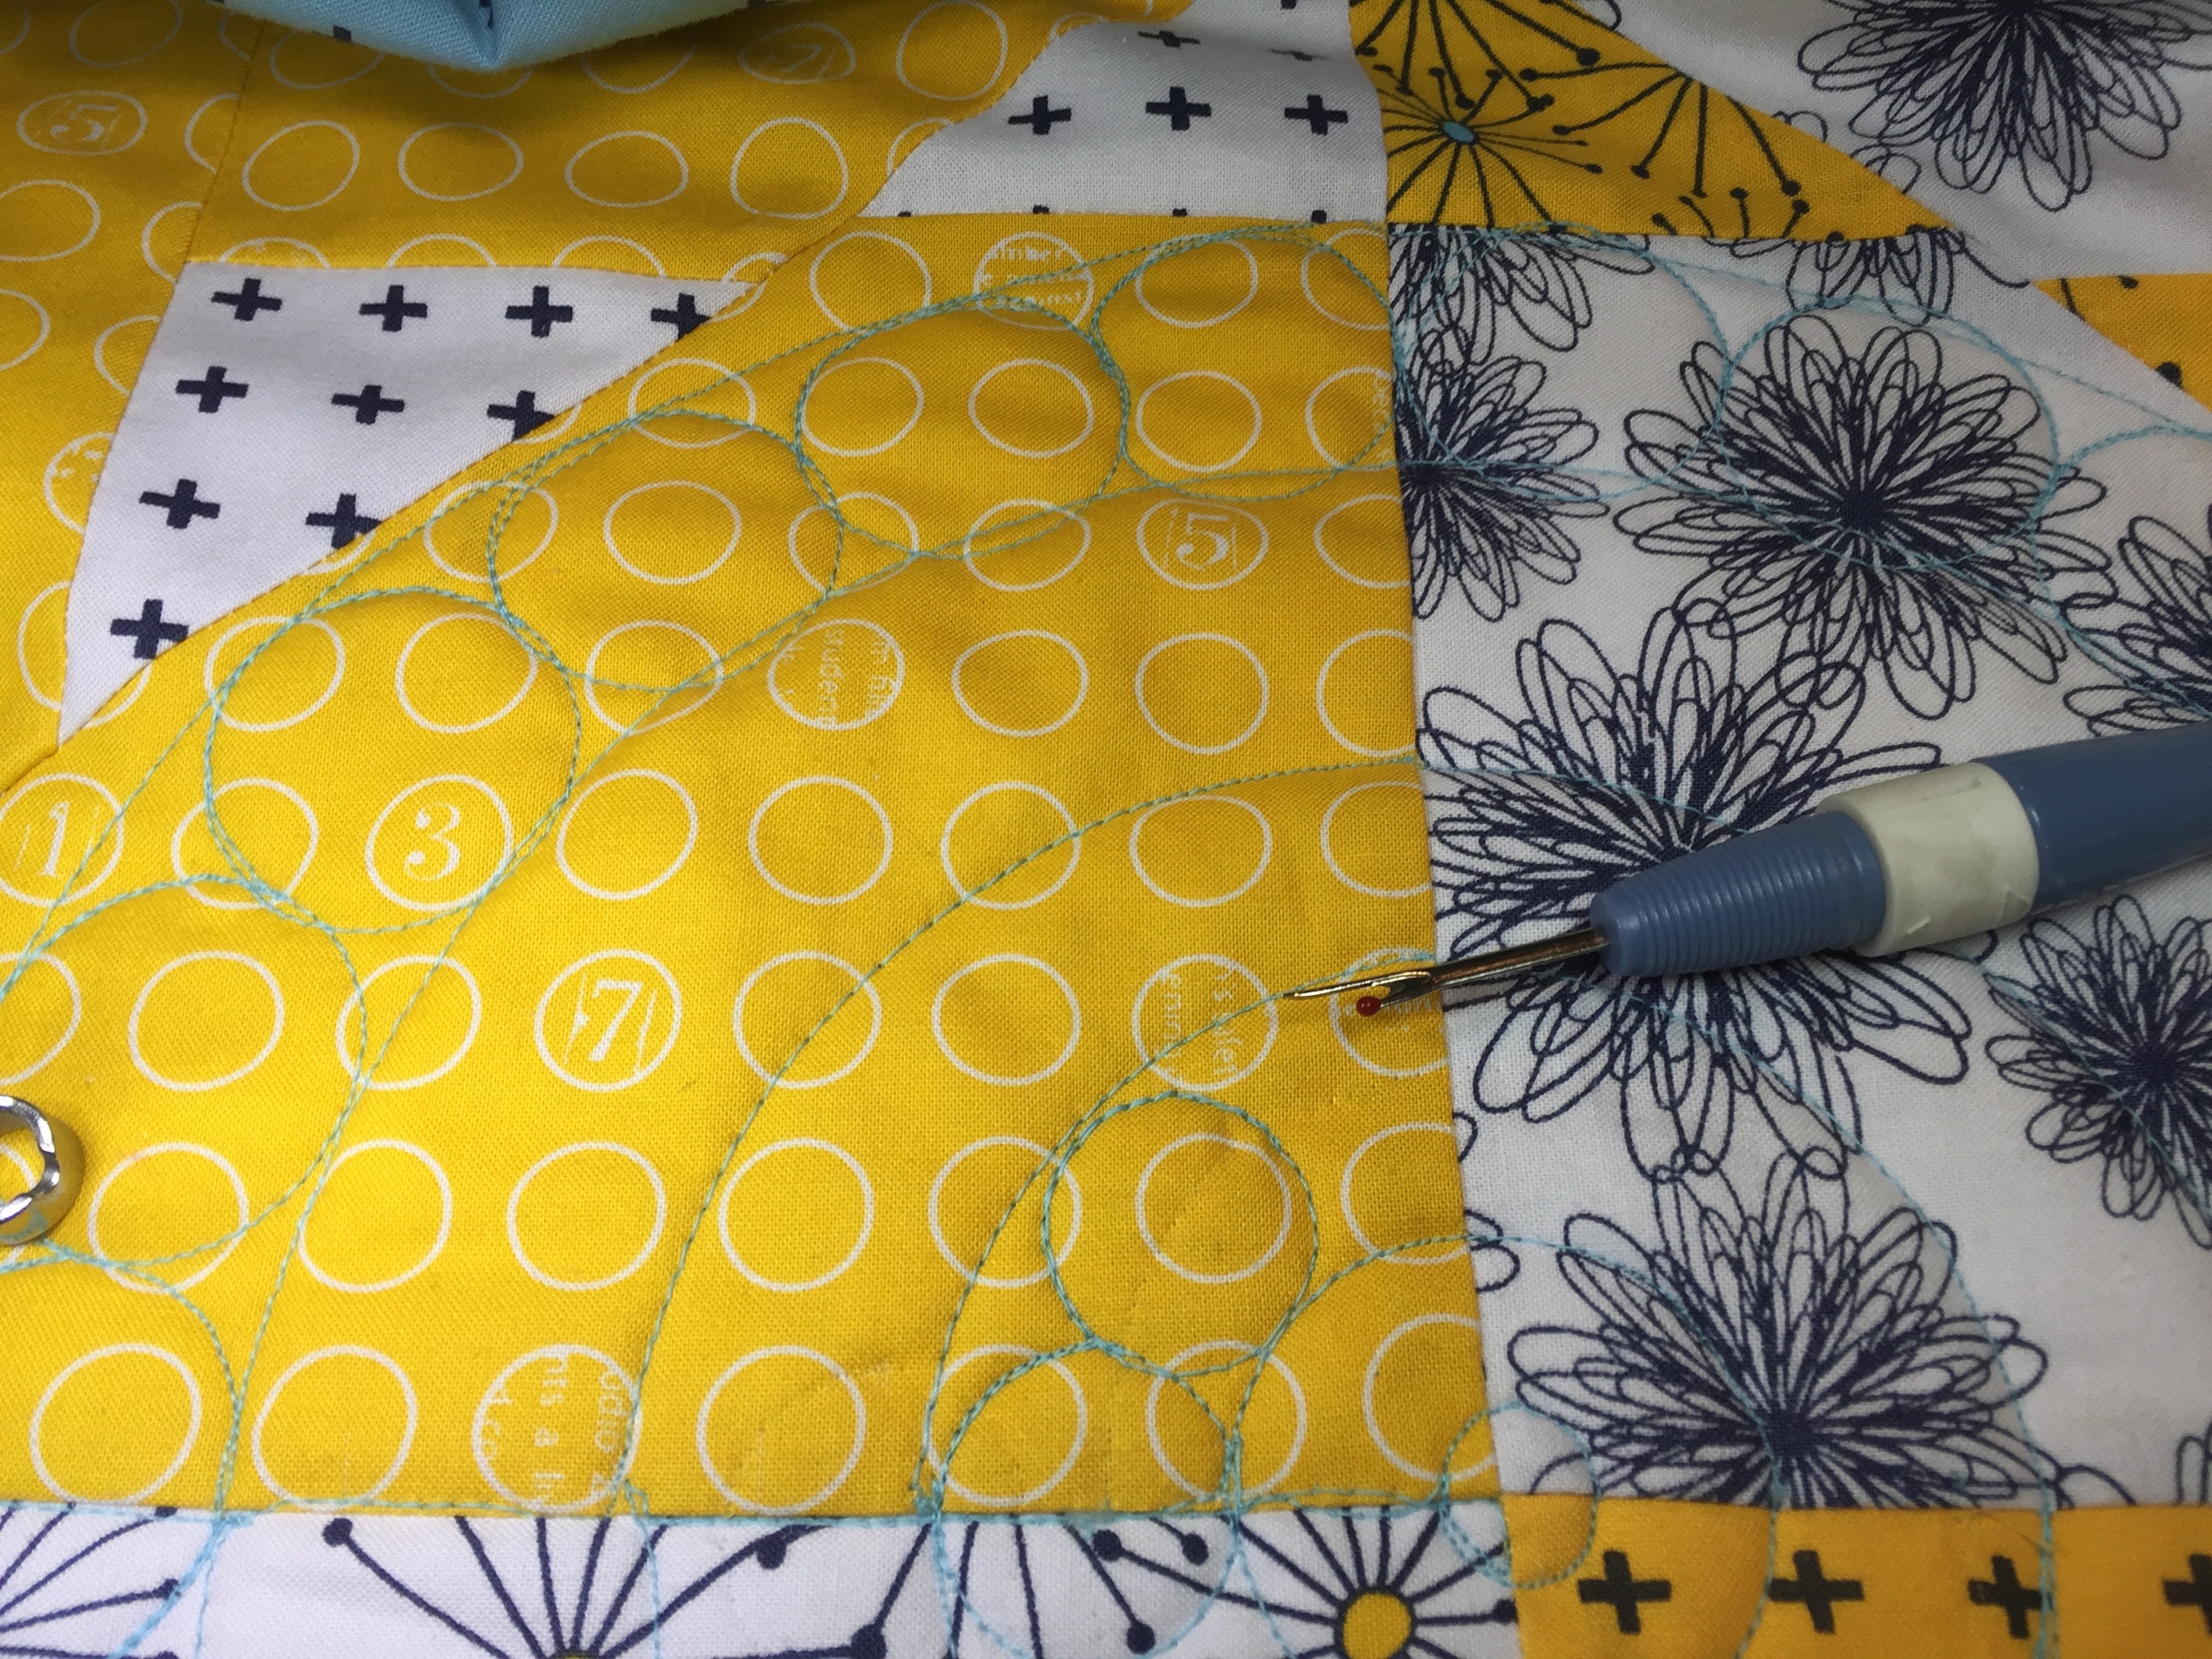
My second lesson learned is that I need to pay more attention and follow my diagrams. In the following photo the seam ripper points to a circle that is at 3" diameter when it should have been 4". Then I wrongly proceeded to place the 1" dimeter circles inward of the line instead of outward. They should be in the ring formed between the 6" diameter and a 4" diameter circle. I caught my error when I realized that sixteen 1" circles would not fit where I was putting them. As usual, it takes a lot more time and effort to pick out a stitching error than it does to create it. I goofed this way twice! But I persevered more carefully. I did have to spend time and effort picking out this goof since there was no way to recover from it and it was so obvious. I keep saying to my husband,  "I'm learning... I'm learning..." He replies, "Are you learning not to do this design again?" 


I want to capture what I have been learning. In stitching the large concentric circles I found that although the template is for half a circle, it is easier to just concentrate on a quarter of a circle at one time, in particular the center 90°. I concentrated on holding only half of the arc steady at a time, 90°,  and adjusting at four points on the completed circle. In the next two photos, I line up the registration scribe lines on the template (marked with orange tabs), with the central vertical and central  horizontal seams of the quarter. The unused section on either side provide good handles for holding the template in place, necessary even with all the radial strips of sandpaper grips I have added.  The first picture is for the 12" diameter, but even with the 6" diameter of the second photo I found this to be true. I could adjust the angle at four points and achieve a smooth transition at those junctures instead of trying to place a half where one size fits all perfectly. It doesn't. I've learned adjusting is not a crime nor an admission of failure; it is a sensible source of flexibility. 


One thing I have learned about that chain of twenty-two 1.5" circles sandwiched between the 12" and 10" diameter circles and that chain of sixteen 1.0" circles sandwiched between the 6" and 4" circles is that they do not always turn out to be exactly 22 or 16. Realistically, when I think about it, even if my spacing is off by only 1/16" per circle on that inner channel, with 16 circles that adds up to an inch or an entire circle! I have learned that fudging is my friend. At each seam line I adjust to enclose four 1" circles or five-and-a-half 1.5" circles per my diagram. If the circles within each channel overlap a tiny bit or space out a tiny bit, I keep telling myself it looks "organic" and that I like that look. I have complete all sixteen circle quartets and I did improve. Here are the tenth and eleventh quartets I sewed. I chose to photograph these particular two since the turquoise thread color contrasts enough to show the stitching. Also the blue quartet shows off the figures that I so like printed on the fabric. I succeeded in enclosing 22 circles in the outer ring and 16 circles in the inner ring on fifteen of the sixteen quartets. I am not revealing which of the sixteen quartets is amiss and I am not picking it out either. I'd rather spend my time learning get better at quilting and not better at picking out. It can remain a challenge for those looking at the quilt to find the anomaly.


I did improve my template wielding skill and my fudging capability. I decided to do all the circle quartets first before proceeding with the diamond quartets. I reasoned that the diamonds will be easier since they are straight lines rather than arcs. I am soon to learn if this is true.

Tuesday, April 5, 2022

Quilt by the Numbers - FMQ Decided

My current project is a quilt made from Zen Chic 10" fabric squares in the line Figures and a Kira pattern. Previous posts on it were 4/3/22 and 3/5/21 for piecing and FMQ planning respectively. Now I am ready to start quilting the assembled sandwich.

In my previous post where I was planning and working out the details of how I was to FMQ it, I used an Excel spreadsheet and did calculations ad nauseam. Then I got realistic. Once I understood the situation, I pretty much threw geometry and theory out the window to come up with a solution to get an integral number of small circles within two larger concentric circles. Certainly my Excel spreadsheet guided my guessing, but ultimately, I'd be restricted to using standard size templates and adjusting a bit. Now that I see my resulting diagram, it reminds me of a ball bearing with an inner race and an outer race, with ball bearings sandwiched in between. I am a retired mechanical engineer, so maybe that was my subconscious inspiration all along...? 


I had a set of Handi-Quilter templates for the 12", 9", 6", 4", and 2" diameter circles to use for the enclosing circles. All the even diameters use the outer edge of each template but the odd 9" diameter circle uses the inner edge of the 12" template. I used four out of the set of six for five diameters. I had to buy a Handi-Quilter mini-circles template for the 1.5" and 1.0" smaller circles for the inner chain of circles. I had other circle templates but not the exact diameters I needed. I was happy to purchase the mini-circles in other diameters to add to my repertoire.


So here are four blocks assembled in the circle quartet configuration and FMQ'd. I had to be careful and take it slow while stitching. The handling will surely be more difficult for a big quilt, but I think it will be manageable. I have a mid-arm Sweet-Sixteen so I need to move quilt and rulers in concert. Right now I plan to use turquoise thread although it does tend to blend into a few of the prints. Choosing a thread color is always difficult for me. As a relatively inexperienced FMQ'er, I fear a contrast will reveal my inadequacies; however, if it comes out good, I kick myself that the stitching does not show. It is true, though, that you cannot tell if you are improving, if you cannot see what you are doing while you are doing it, or how it came out once you've finished. This turquoise thread color choice remains an experiment and a challenge for me. Fingers crossed that my skilled performances show up in the contrasting regions (yellow below) and that my goofs get blended into the matching background (turquoise below). The design is clearly more visible on the white backing I used for my prototype. 


The straight lines in the diamond configuration quartets was easier to figure out. I did have to finagle to get half-circles to fall at the horizontal or vertical seams where the corners of the diamonds are formed. I was able use the HQ Swiss Cheese template for the 1.25 diameter circles. I got an additional use out of the HQ mini-circles template I had just bought for the circular quartets for the 1.0 diameter circles. I actually prefer the Angela Walters' straight rule Slim to the HQ equivalent straight ruler (which I own) because the lines are in black and white so they show up on light and dark fabrics both. HQ's registration marks are only printed in white.


The four blocks assembled with the central triangle pointing inward to form a diamond are FMQ'd below. I did manage to place the diagonal straight lines so that the small circles do fall in the corners. There are six per side on the larger diagonal and three per side on the smaller diamond. The stitching shows up better on the white backing. And so do my goofs!


Each block has circular FMQ on one half and straight FMQ on the other half. Below are two practice blocks. It was tricky fitting the circles evenly within an arc, as my multiple tries show in the left image. It also took a bit of measuring and a bit of fudging practice to get half circles on each end of a strait stretch so they would form full circles at the corners of the diamond. I did not succeed on the left. On the right is my second attempt: one circle and two half-circles in the smaller diagonal strip; four and two half-circles in the larger diagonal strip. In the circular quarter of the block, there are 5 ½ circles per larger quarter and four circles per smaller quarter.


Here is how the alternating circles and diamond quartets will nest. I am excited to try this on the real quilt. I will have sixteen times to get the concentric circles right and sixteen tries to get the concentric diamonds right. I think I will start with the circles.
 

Blocks: 64 = 8 x 8  = 16 quartets
Circles: 16
Diamonds: 16 = 9 diamonds (center) + 12 x ½-diamonds (edges) + 4 x ¼-diamonds (corners)


I am also pleased to have added to my growing circle template inventory. These are my rulers. Only the 1" and the ¾" have duplicates. I have used all but the 2 ½" circle; but I may use that on another project.

Sunday, April 3, 2022

Quilt by the Numbers - Assembly and FMQ Planning

Last post on this quilt in progress was 3/5/21 – yes, about one year ago – where I left off trying to arrange the 48 blocks I'd made. The 8 rows of 6 had a few blocks that just did not go together; the blocks with the figure prints, my favorites, were not prominent enough. I tried grouping the figure print blocks all together and that arrangement was too busy. 

A few blocks did not have enough contrast and others, those predominantly navy with yellow details, just looked olive drab dark at a distance. Acknowledging that I do poorly at random arranging, I strove instead to make order out of chaos with a pattern. Throwing out some blocks, making more blocks, and ordering them on a diagonal by color seemed to do the trick for me. The blocks I'd thrown out were the olive drab ones. I needed more yellow blocks and something to pair with yellow. I invaded my stash for some fabrics not in the initial layer cake. Solid white stuck out like a sore thumb but white with tiny orangey-yellow dots came to the rescue. It was still two-toned like the other prints.

Since I last touched this project about a year ago, I have made additional blocks and re-arranged them into a square quilt of 64 blocks; 8 rows of 6 changed to 8 rows of 8.  A few blocks made up in multicolor fabric were cheerful but seemed to stick out oddly among the other two-toned blocks. I kept those somewhat distracting-but-happy multicolor blocks, relocating them toward edges so they would be a bit more subtle. I liked that fabric enough though, that I was able to locate and buy some on eBay for the backing. Most likely I will also use that fabric for the binding. I made my quilt sandwich and hung the assembly over my upstairs railing so I could stare at it, waiting for FMQ inspiration to come to me.


Now how to FMQ this? A basic block has three triangles on a diagonal. Standing back I noticed that quartets of four blocks either appeared to surround circles (with out-pointing middle triangles) or surround diamonds (with in-pointing middle triangles). Each quartet measures about 17" x 17". There are sixteen quartets in this quilt


Since this quilt has a contemporary feel, I wanted the FMQ to reflect the same tone so I auditioned concentric circles and concentric diamonds. I liked the effect but needed to play with the spacing and size. I do not want this quilt too densely quilted and get in the way of a gentle drape (or take me forever to quilt). I am toying with the idea of unequal spacing and perhaps some embellishment between concentric shapes.


I slid two extra blocks inside sheet protectors and sketched some possible fillers between concentric shapes. I tried diagonal lines inside the inward pointing triangles; four of these would form  concentric diamonds. I tried arcs inside the outward pointing triangles; four of these would form concentric circles.


I then spent an inordinate amount of time with an excel spreadsheet trying to calculate what specific circle diameters were needed to encase a integral number of small circles. Eventually I realized that even if a got compatible sizes, correct to three decimals places, I still needed to have rulers in that particular size. I went with the "eyeball and trial and error" method and finally came up with a configuration that could work with some minimal fudging at the stitching phase. I made a paper model and then tested the stitching out on some spare blocks to establish how difficult the actual execution would be. In my next post I show my testing and final design commitment.