Showing posts with label FiftyShadesOfTaupe. Show all posts

Wednesday, June 14, 2023

Stir Crazy Museum Show

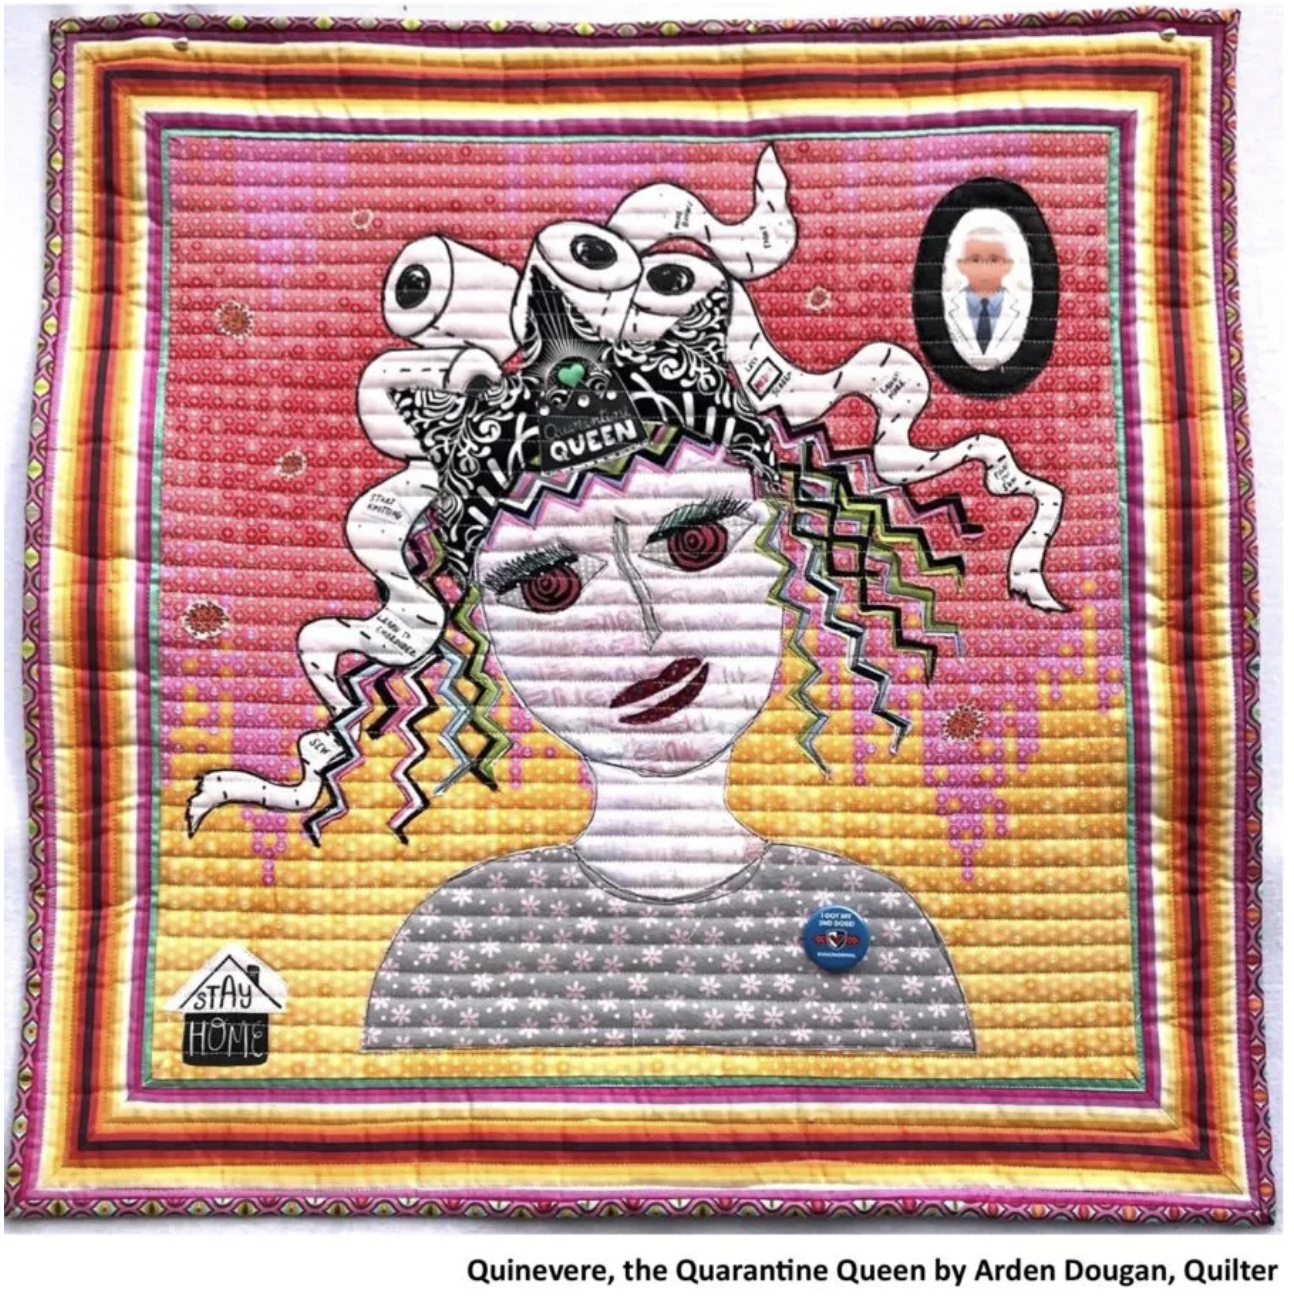
From February 1st thru May 31st the Museum of San Ramon Valley in Danville, CA held a quilt show featuring quilts made during the confinement of the COVID-19 pandemic. The logo and mascot of the show was a wall hanging titled Quinevere, the Quarantine Queen. It was a whimsical, delightful entry with toilet paper rollers in her hair and a portrait of Dr. Fauci hanging on the wall over her shoulder. The Danville website headlined the show as 'Stir Crazy Quilts' brings pandemic creativity to Museum of the San Ramon Valley


I entered two quilts that met the date criterion for when I made them. I noted after the fact both of them were gray tones and I am usually a brights person. The were Fifty Shades of Taupe (blog post for 6/29/2020) and Christmas Cars (blog post for 12/18/2020). I visited them and the rest of the entered quilts in the show in February at an opening reception with my husband; later in March when my daughter and granddaughter were visiting from Oklahoma I visited again with them. After these photos is the text of the information I submitted with each quilt.

FIFTY SHADES OF TAUPE: In the spring 2013 edition of McCAll's America Makes Fast Quilts magazine, a modern quilt in neutral tones surprisingly caught my eye. Typically, I love bright and jewel tone colors and am not fond of modern minimalism. To stretch both my style and my color palette I bough the kit. Luckily, (and rarely), I even bought the backing! Both sat in my stash seven years, until February 2020 when I began piecing it, determined to work from my stash during the pandemic. Maybe the colors were now appropriately boring? In June I worked on improving my FMQ skills with clamshell and circle templates The colors were still dull to me but I could still add zip by the curvaceous quilting and a suggestive title.


CHRISTMAS CARS: In December of 2019 I'd bought a whimsical panel of 12 vehicles because the atypical red/yellow/gray Christmas color combination caught my eye. Determined during the pandemic to sew from my stash, I wanted a larger quilt so I added triangles on the edges to double the size of each block and give it an "on point" feel. A diamond header was inspired by a seminole patchwork class I took. I tried different FMQ patterns to grow my skill both free form and with templates. The backing is a cute Dalmatian print.
I volunteered one Tuesday in April as a docent for the show but, alas, I learned Tuesday is typically a slow day and my interactions with viewers were minimal. Nobody came until very near to closing time. There is more traffic on other days and the show did in general have a good turnout during its duration. I cannot begrudge my time reading and relaxing amongst quilts. Here are pictures I took during my various visits to the show, a subset to share and remember.


My apologies for these next two. I do not have sufficiently high resolution pictures of the identification cards but I these quilts called to me enough that I wanted to remember them in my DianeLoves2Quilt blog. I think I am developing an affinity for gray (left) and yet still I love my jewel tone brights (right).


On June 2nd, I went back to the museum and picked up my two quilts. I was glad I got off my duff and made the effort to participate. Time immersed in others' creativity is never wasted.

Saturday, September 19, 2020

Third Saturday of September 2020

For "Hang Your Quilt Day" this month, the theme was fall. I chose to display three quilts in orange or straw colored hues.


The straw color in the largest quilt made me think of hay bales, hay rides, and corn mazes typical of fall. Fifty Shades of Taupe caught my eye as a kit from McCall's Quilting magazines, the Spring 2013 edition of America Makes Fast Quilts. I renamed it. It was published as Odds and EndsMy 6/29/2020 post is my last of five posts on the making of this quilt. It measures 60½" by 79½".


The trees in the medium sized quilt titled Orange and Grey have very sparse leaves which are not green; hence this quilt speaks fall to me with a modern twist.  Orange and Grey measures 40" x 50" and is made with fabrics by Lotta JansdotterMy 8/10/2016 post describes its completion.


The pumpkin wall hanging, because of the subject and the orange colors, says autumn to me. It measures 31" x 39". The pumpkin blocks were contributions from guild members; I won them as part of a Block of the Month activity. My 10/31/2017 post  describes this pumpkin wall hanging's completion and quilting.

Beginning April 2020, my quilt guild members began a tradition of hanging quilts in the front of their homes on the third Saturday of the month as a source of enjoyment for the community and as a thank you for the essential workers during the pandemic. My initial post about this practice is dated 4/22/20.

Monday, June 29, 2020

Completion of Fifty Shades of Taupe

Yesterday was a beautiful, but very windy, sunny day in California, as I sat upstairs in my sewing room by the open window putting the last few stitches in the binding of my Fifty Shades of Taupe quilt. My emotions were a mixture of pride and relief, and yet I was also feeling a bit lost. A quilt is like one of my children. I am proud that they have grown up so well and are thriving on their own. I am a bit relieved that my efforts with them are essentially done, and done pretty well. But I am also a bit lost, needing to find something equally enjoyable, another project to which I can devote my time and creative energy. I must either face a UFO or a blank design wall. So I put off starting the next sewing project and began to write a blog post, instead.


Four previous posts for the creation of this quilt were published on my DianeLoves2Quilt blog on Jun 16Jun 7Feb 6Feb 4, two for assembly and two for quilting.  That time gap between February and June was me subliminally thinking about how I wanted to quilt it. I may have lost a bit of momentum (as I was determined not to do per my Feb 6 post) but I regained it.


My last step before binding is creation of a label. For labeling my quilts I typically embroider my name, the date, and the name of the quilt on grosgrain ribbon and set those diagonally in the bottom two corners of the quilt. Each of the eight memory channels on my Pfaff Triptonic 2040 can hold 20 characters. My name and the year is 19 characters long. So far so good. My quilt name Fifty_Shades_of_Taupe is 21 characters long. Bummer. I knew substituting the number 50 for the word Fifty to spell 50_Shades_of_Taupe was an easy solution but it did not have the same appeal. Christian Grey from the novel Fifty Shades of Grey would not have skimped that way merely for an economy of characters. (My insight into that controversial book is in the first third of my Wander or Ponder post for March 24, 2015.) Then I came up with an idea which in hindsight seems obvious but wasn't at the time. I programmed "Fifty_" into a memory slot and "Shades_of_Taupe" into another memory slot and then sewed one immediately after the other. It worked like a charm and these are the labels I attached to the lower two corners, tucked tidily underneath the binding.


My binding is ⅜" wide and went on very smoothly with no major snags. The final quilt measured 60½" by 79½" so it took me several hours over a couple of days to unhurriedly hand-stitch 280" with music from my iPad playing softly in the background. It is similar to when your child leaves home for college or a job and you are left to reflect.  Hmmm... I noticed from a previous post that the assembled blocks measured 62½" by 82½" so quilting can take up about 2"-3" inches in each dimension on a quilt this size.


This quilt took enough effort (quilting, more so than piecing) that it is going to stick around my home for a while and not be given away. Unlike children, there will be no leaving the nest for this one - at least not in the near future. But then again there are so many quilts at my home I think it is near impossible to empty the nest. Just about every room has a quilt or two to curl up in and read or watch TV. Here are closeups of one corner, a foursome of blocks showing the print variety, and one solitary block. The solitary block is a favorite of mine because of the print and because the lines in the plus are straight, parallel, and equally spaced. I have omitted photos of those blocks whose lines are not so well behaved.


I had to wait until the next day for the wind to die down so my husband could hold Fifty Shades of Taupe outdoors for photos. The sun bleached out the contrast and so we photographed it in the shade. Here are the front and back. 


This quilt does not display my usual array of colors but it pleases me, even though it is outside my comfort zone. The indoor photo, although not straight on, is better for color clarity and tells me that neutrals can be appealing, too, especially if they showcase a variety of patterns as these do! My stretch to solids also shows off my FMQ more crisply, so I need to try a repeat on using non-prints. Fifty Shades of Taupe was a learning experience for me ... but definitely a far different learning experience (blush) from that of Anastasia Steele in the novel titled Fifty Shades of Grey. Still, I like the tongue-in-cheek parody of the erotic novel and I like this quilt! I hope others will like it too when I share at Cooking Up Quilts Main Crush #182.

Tuesday, June 16, 2020

FMQing Borders and Sashings

This is my fourth post about a Taupe/Gray/Cream/Black quilt that I have since named Fifty Shades of Taupe. My previous 6/7/20 post for this quilt addressed the FMQ on the main central area of its 35 blocks, where I tried my hand at clamshells and my rather unsteadier hand at long straight lines. Both of those chosen patterns involved ruler work, and so I was ready for something more relaxed. The original version of the quilt in the Spring 2013 edition of McCall's America Makes Fast Quilts suggest feathered vines in the borders. I felt the feathered vines would not complement the clamshells and would barely show up in the busy print of the border.  I thought a piano key border would echo the plus sign within each block. I know. I know. I wanted a break from ruler work. But I reasoned these would be shorter lines, farther apart, not as many, and closer to the edge so easier to work.

In a class taught by a HandQuilter educator, I learned it works better to go up and back on parallel lines before shifting the ruler, as opposed to up-shift-down-shift-repeat. It is not difficult to trace the stitching over the same line and I think it defines it better as well.  To make lines 1" inch apart, I again used my Angela Walters Slim ruler but for the 1" apart border lines I added a ½" echo foot attachment to my hopper foot, same as I used on a caterpillar quilt in my post for 4/11/20. One problem I had though, was that the pink extension rubbing against the ruler squeaked horribly, like nails on a chalkboard. I assumed I was pushing the ruler too hard against the pink ring, but much less pressure and I would lose the guidance advantage of using a ruler. I had not had this difficulty –  perhaps occasionally but not to the extreme –  with the metal hopper foot alone. I worried too that I would abrade away either the pink echo foot or the clear ruler or both.


After working for a while I rethought the issue, since the squeak was a real stress builder. What causes a squeak? Friction. What do you do for a squeaky hinge? Oil it. I decided to put a bit of Sewer's Aid on the foot and the ruler. I put a tiny drop on my finger and ran it along both surfaces. The noise went away instantly. Sewer's Aid by Dritz is designed to be spread on the machine surface to make fabric glide more easily when FMQing on a domestic, so it does not leave any oil stains on the fabric. It worked like a charm and I only had to apply it once. It took me two days of sewing to do the four sides of the border. I did not rush it and was pleased with the results


Next I needed to address the pale gray 1" sashings. I was hopeful that they were narrow enough I could leave them not quilted but they looked naked. The Spring 2013 edition of McCall's America Makes Fast Quilts suggest circles in those 1" strips.  I am terrible at circles so I needed something else. The design had to be symmetric left/right and up/down since at the corner intersections a directionality would be problematic. I decided on an orange peel motif. The pattern could accommodate where the four sashings met without a directionality issue.


The curves of the orange peel complemented the clamshells and eliminated a lot of stitch in the ditch tedium which for me is prone to whoopsies. Since there were no rulers involved, the stitch lines are "organic", the polite word for not perfect, slightly varying. 


Not all friction is bad. Sticky is good too. Yellow masking tape marked as a tape measure adheres lightly to my quilt top, helping me evenly space the orange peel units. Holding it in place with my fingertips as I quilt, I generally have to place it to sew only the first side of the sashing, eyeballing the spacing of the second side based on the first. It remains tacky enough to use the same piece over and over again. I conveniently stash it up on the wall when not in use. Using tape this way eliminates any need for marking. A strip or two of ordinary plain masking tape up on the wall is my spot to toss strings I snip off. Again, sticky to the rescue.


The following photo shows how the piano key border, the clamshells, the orange peel in the sashings and the long lines in the plus signs all work together.


I was able to piece this top in a day but I have since learned to acknowledge and accept that the quilting takes much longer. But the FMQ skill is what I need to build, so I put on some music and try to relax with it. I am still tense and tight in the shoulders as I sit at my HQ Sweet Sixteen but I am getting less uptight as my confidence builds. Every quilt has whoopsies. I am learning not to fear them now. The worst of them can be removed; the lesser ones are really not so bad and can be allowed to stay if you let them marinate for a day or so. Here are two I did pick out. With a little bit of steaming or misting and rubbing, the needle puncture holes go away.


I have completed four rows of five blocks each for the sashings. I need to complete the other three row of the seven rows. I have just shy of three days invested in orange peeling the sashing. If I do not take breaks and take my time I get sloppy. For now I will link up with Main Crush Monday #180 at Cooking Up Quilts.
Sunday, June 7, 2020

FMQing Clamshells and Lines

The last times I discussed this Taupe/Gray/Cream/Black quilt were in my post for 2/4/20 where I showed the assembly of the top and in my post for 2/6/20 where I discussed seaming the backing. It is hard to believe I let over three months slide by before tackling the quilting. I was feeling guilty that so much time had lapsed but I reviewed my intervening posts and realized I had been busy. I'd completed three other quilts in addition to a myriad of smaller projects which included dolls, burpcloths, pillowcases, kitchen valences, and masks for the coronavirus pandemic. While I was otherwise other occupied I subconsciously contemplated the FMQ on this quilt. A suggested FMQ design was given in the instructions in the source magazine, the Spring 2013 edition of McCall's America Makes Fast Quilts. Even if I do not slavishly follow the sample, I always like a proposal much better than the dreaded phrase "Quilt as Desired". The illustrated FMQ placed a rectangular spiral design in each block. Circles fill the pale gray perimeter strips. The border features a feathered vine.


I liked the linear aspects of the rectangular spiral but I thought I wanted something more curvy since the blocks were so straight. Plus, the square spirals were too much ruler work I told myself. I have alway wanted to learn how to do a clamshell filler so I decided to try my hand at that in the rectangles made of solid grey and put lines in the plus signs made out of a variety of prints. Lines would add texture and anything fancier would just get lost in the print. So much for my reluctance to do ruler work. Here is my sample practice block and the multi-clamshell ruler I used. I checked on the HandiQuilter website and I believe they redesigned the ruler to have only one arc instead of two on the smaller sizes. Pity. Having two is so much more convenient and requires half the ruler movement. I will treat this ruler with care since it would be difficult to replace


Surprising myself, it took me only a couple of those solid gray rectangles to get the hang of the HQ multi-clamshell ruler. I used the smallest size arcs, and learned how to adjust by compressing each row of two arcs by a bit so I got full arcs that were not flat or truncated at the top of the rectangle. I definitely am getting braver with my FMQ and using a thread color that contrasts. If I am going to do all that slow-going work, I want it to show. The occasional major clamshell slip was quite obvious but I forged ahead and picked it out after the block completion. Gross clamshell slips only happened about three times. Out of 35 blocks that is less than 10%.


I found the straight lines to be harder since the ruler kept slipping. On my first blocks, some lines had a jog, some lines drifted at an angle, and some were not equispaced. This next example block is probably one of the worst for line goofs. I may go back and pick some lines out if they continue to bug me, but a fellow quilter cautioned me to move on and not spend my time in un-sewing. She said you want to get better at quilting, not better at picking out. These lines are more textural in nature and tend to match the background color more so I may indeed let them be.


For the straight lines I tried both an HQ Mini Ruler by HandQuilter and a Slim ruler by Angela Walters.  I liked the Angela Walter ruler better because the dashed line guides alternate between black and white, making them visible on either light or dark fabric. But the rubberized back did not grip sufficiently to keep the ruler from slipping. I added the sandpaper grips by HandQuilter and, "Voila!", I had the best of both worlds. I used the Angela Walter "Slim" rule with extra grippers since the white/black lines were so much easier to follow. My lines were much improved.


Here are four blocks. I repeatedly rotated the clamshells and lines by 90° since the plus signs went up down and side to side. It took me a half hour to do each block but I took my time and did a few blocks a day. I have a sit-down long arm so I rotated the entire quilt with each block. This approach also meant I had to break thread at each block to start at the lower left corner of each block. I had 35 blocks. I took me a while but I was getting better all the time so it was worth it. I put on some music from my iPad and tried to chill and remain patient as I worked.


I made a chart for myself with arrows to indicate which direction the clamshells were to face so I would know where to start each block. I numbered and checked off each block as I completed it.


Constantly repositioning my quilt to do the next block, I kept losing my clear rulers in the folds of the quilt. I used those sticky post-it flags to make each ruler more visible.


I wondered if what I was doing was still called free motion quilting since strict meticulous use of rulers is not really motion that is free. Curious I googled the question and found this article by Leah Day defining free motion quilting. It boils down to FMQ implying being free to move in any direction whether marked or stenciled or guided by a ruler. So this quilting plan qualifies as FMQ. Why this is important totally escapes me; chalk it up to "Inquiring minds want to know". For the other sections of the quilt, I am toying with the idea of outward straight lines like a piano keyboard in the outer border, rather than a feathered vine in the outer border. I am reluctant to mix ruler work with will-nilly free-form work, as the proposed free-form feathered vine would be; but that may just be over-fussiness on my part. As for the suggested line of circles in the pale gray perimeters, I have to pick something else since I do poorly with circles. There are enough half circles with the clamshells anyway.

This is a quilt of neutrals which are not my first choice for colors (or lack there of). I prefer brights and jewel tones. My daughter is of the same color preferences as me and when she read my blog posts she commented, " Hmm... that's definitely an interesting color (non-color?) combination", and that the back was "a lot of Taupe". At least the fabrics allowed me to focus on the quilting, which is where I need to build my skills, and not be too distracted by the fabrics. The neutral tones, plus my daughter's remarks, inspired me in naming this quilt. I am going to call it "Fifty Shades of Taupe".