Each hexagon is surrounded by six equilateral triangles which form the points of a star. I planned to stitch three arcs in each point with matching thread in the colors pink, purple, blue, green, and orange. I would leave the hexagon mostly non-stitched, so as not to distract from its symmetry. To tack down the center though, there would be six short lines only, stitched in the ditch at 60° to each – like an asterisk – *. This asterisk stitching would not be continuous; I would have to start and stop at each center ... all 173 of them.
I had FMQ'd the pink triangles and a few of the pink center asterisks when I found a tuck in the backing. Horrified, I asked myself how this had happened. Was putting asterisks in the center of the hexagons a possible cause? Between hexagons, I was moving the quilt several inches without stitching, dragging thread, and perhaps bunching the backing. Or did the glitch originate in the layering? Usually, before I build my quilt sandwich, I put my batting in the dryer for a few minutes with a damp cloth to fluff out any wrinkles. I had forgotten to do that step before I centered the batting and spread it out on my backing, which was already taped to the floor. Rather than pick the batting back up again and cart it back upstairs to the dryer, I crawled around on the floor smoothing out the batting as best I could. I rationalized to myself that a few speed-bump-type lines were acceptable. Maybe they were not. Also, once I have made the sandwich I generally flip the three layers over and repeat the smoothing process on the back, doing a quality check. I was juggling such bulk with this king size quilt that I just plain forgot this step. In theory this additional smoothing step should have been redundant, but possibly it was not not. Whatever the casue I needed a recovery plan.
There were no other options to remove this tuck other than to "unFMQ". Picking out the stitches would be excruciatingly slow. Fortunately I was still near the two edges at one corner of the quilt so I painstakingly and resignedly set out to slice the stitches from their edges rather than pick them out from the top and bottom, using a "skin a quilt" method. I peeled back the backing from the corner and cut the stitches with a sharp tool using the batting as a buffer and being careful not to cut the backing. See YouTube skinning a quilt video.
I tried several tools to see which was sharpest and had the best geometry for the job. I thought it would be a rotary cutter with a fresh new blade or a razor blade; but, no, the best was the scalpel at the lower right. How appropriate for quilt surgery! Just touching it to the stitch under tension split the thread apart – except at those pesky asterisks where the lines had been double stitched. There stitch removal was a struggle and I had to be super careful to slice only threads and not fabric.
The residual clipped threads formed ghost images of circles. These came as a bonus secondary pattern surprise to me. It was tedious removing the thread snippets with tweezers, but I took my time. A lint roller worked well on the quilt front or backing fabric but not so well on the batting, already fluffy and slightly tacky from the temporary spray adhesive. Odif 505™ is a great product. It grips the layers well, but still it is forgivable for repositioning the fabric – kind of like the quilting world's version of Post-It notes.

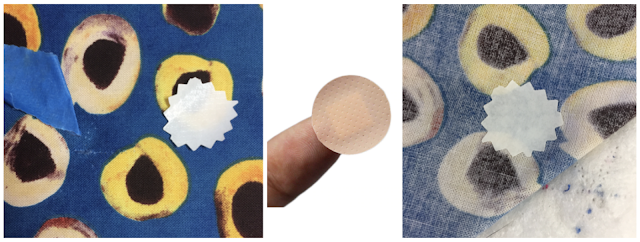
My scalpel wielding skill failed me only once, slicing a small slit less than ¼" in length in the backing. A circle of Wonder-Under® ironed on to backing will fix that. I pinked the edge so its presence in the quilt would not have a defined ridge that could be detected easily, and then ironed the spot onto the wrong side of the backing fabric only, much like an "on-the-spot" round bandaid. Although I peeled away the paper backing, I did not heat the area to adhere it to the batting just yet. Heaven forbid if I needed to do another "skinning". I did not want that one spot stuck where it should not be. I will complete the heat press later once the quilt stitching is complete. That is... if I can find where it is! For now the location is marked with blue masking tape.


Great reead thank you
ReplyDelete