Showing posts with label cars. Show all posts

Friday, December 18, 2020

Christmas Cars Complete

When I left off in my previous post, 12/12/20, I had the quilting in the background on Christmas Cars remaining to stitch. These expansive, blank areas are always daunting for me since there are no blocks to guide or inspire the design. I wanted 1) something subtle so as not to distract from the blocks, 2) something free-form that would not require labor-intensive ruler work, 3) something airy to reduce the amount of time invested in dense stitching, 4) something in keeping with the winter/Christmas theme, and lastly, 5) something within my getting-more-confident-beginner skill level. I thought about Christmas trees and snowflakes. Trees would be harder so I went for snowflakes. My bravery grew as I chanced using a contrasting thread color - white on gray. This is the lower right corner of Christmas Cars still in progress. Randomly-placing those differently-sized snowflakes took planning.


I was inspired by an online tutorial by blogger and quilter Lori Kennedy. Her snowflakes are uniform in size, on a regular gird, and are interspersed with spirals, which I omitted. But random does not come easily for me.


I cut out circles for snowflakes and laid them out to distribute them fairly evenly, although not too uniformly. A loosely pre-determined layout is helpful to me since I can only focus on one small section at a time as I am quilting, and so do not get an overview. I did keep vertical lines, a practical path to travel from one snowflake to another, and one less parameter I would need to decide.


Then I was concerned how to mark my decisions. I needed a tool that would leave a removable mark. This choice was another stalling point for me on this quilt. Many marking tools caution to check first in an inconspicuous place, leading me to fear these markers would leave something indelible. I selected a chalk that left only a faint line that I could readily brush off. I drew equi-spaced vertical lines with varying-spaced horizontal tick marks for the center of each snow flake.


Folding each paper circle in the center, I marked all the positions: first, those in the space above the car blocks, second, those in the space below the car blocks, and third, those in the triangles intermingled with the car blocks. The size of each snowflake I would decide spontaneously as I stitched.


I was pleased with the way the  snowflakes at the top near the seminole patchwork turned out. They emboldened me to try something else.


It occurred to me that  it would be fun to have some half-snowflakes, as if the gently falling snow was a backdrop to the vehicles driving about town. Serendipitously, this approach also eliminated me having to choose and decide yet another FMQ pattern within the gray triangles around the car blocks.


For the outer striped border, I did my old favorite of a piano key border. Yes, I did use a ruler to get the straight lines perpendicular to the edge; but, by going down the rough center of each white stripe only, I cut the number of lines in half. I placed and secured my labels in the two bottom corners before adding my binding outside those wobbly Suess-ian stripes. The dots and swirls on the gray monotone binding made me think of snow dancing about during its descent. The gray tied in with the background and the dots were a cute homage to the dalmatian spots on the backing.


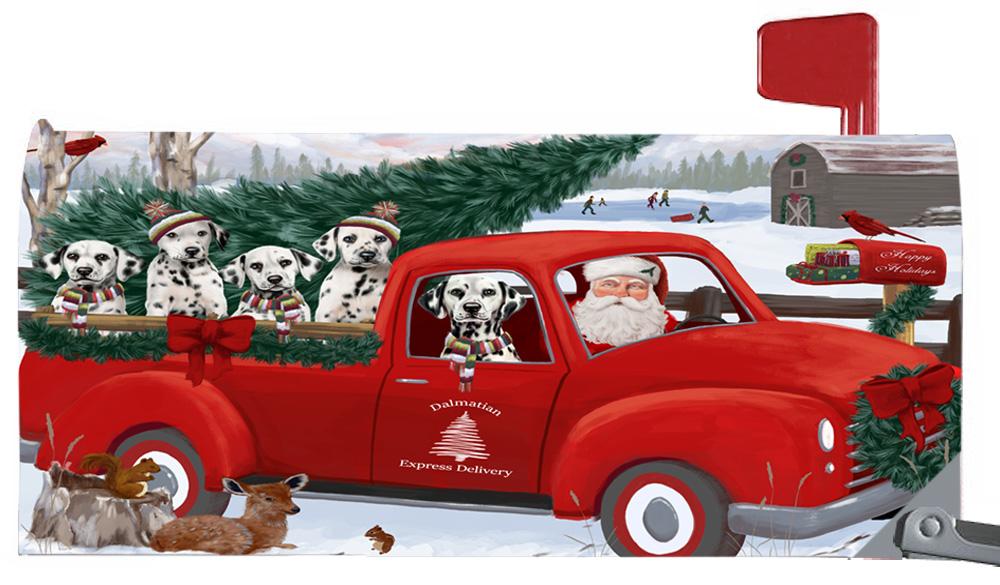
The dalmatian backing fabric is a whimsical touch, chosen mainly because its colors and scale were such a good fit. I will admit, the canines more commonly ride on fire engines or beer trucks, rather than Santa's sleigh. But the Father Christmas / breed  combination is not unheard of as seen by this mail box cover sold by  Doggie of the Day website.


Here is the completed quilt in its entirety spread out flat, followed by a couple of my attempts at artistic presentation within my home.


For a year marked by staying at home and keeping safe from Covid-19, making Christmas Cars brightened my mood and helped me imagine I was traveling after all.

Saturday, December 12, 2020

Christmas Cars Quilting

I started this quilt last Christmas so I would have it finished by Christmas 2020. Last season I even bought accessories to go with the completed quilt, whether that was forward thinking or wishful thinking can be debated. In my 12/20/19 post, I designed and assembled the quilt top, except for some indecisiveness about the borders. Then Christmas Cars lay in limbo for half a year until I completed the border. In July, I decided and prepped the backing and binding per my post for 7/21/20 and even made dalmatian pillowcases (7/28/20 post) from the backing leftovers.  After I made my quilt sandwich, once again indecision set in while I mulled over the quilting pattern. One thing for certain, I wanted to make the vehicle images standout and the background recede, so I started out with close parallel lines in the background only of these blocks.

The Christmas Cars quilt is still is not complete; but it is getting close. I had no advance plan for the remaining quilting, so my goal was to experiment and develop my skills. So far I have wound up stitching in four different FMQ patterns: parallel straight lines, scallops, near-the-ditch arcs, and circles.

PARALLEL STRAIGHT LINES
Since it is mid-December and I want the quilt for this Christmas, it was finally time to move forward. First, vertical lines ¼" apart, up to near the cars made the vehicles and their tree cargo stand out. I can almost imagine these long thin lines as being strands of tinsel. I used a straight ruler for this part, my favorite being Slim by Angela Walters because it has markings in both white and black so they stand out. It has a non-slip rubberized back but I find I need to supplement the roughness with sandpaper Handi-Grips by Handi-Quilter. While quilting these straight line I mused on other FMQ patterns for elsewhere. 


SCALLOPS
In the red and yellow triangles that surround the car blocks, I put scallops, partly because I wanted to try out my scallop ruler. On the red triangles, I oriented the scallops to look like garlands on a Christmas tree. Due to how the markings are on the ruler, this meant working from the triangle's tip toward its base. On the sideways scallops in the yellow, I worked from the base toward the tip. The yellow scalloping shows up better in a later photo.


NEAR-THE-DITCH ARCS
For the seminole diamonds at the top border of the quilt I did orange peel type curves within the red and the yellow. They were free-form with no ruler assist. I swooped across toward the right on the top and swooped back toward the left on the bottom. My muscle memory did not seem to last from one end to the other, so the swooped swags look "organic". Hmmm... maybe if I had stitched one diamond at a time they would be more consistent within each diamond.


CIRCLES
Next I had to deal with those big red half-triangle insets along the vertical edges. They had never sat  well with me, so I chose to use them as more ruler practice, hoping to make them prettier at best, or less obtrusive, at worst. I have always like pebbling and circles but lack skill in that area. I had a Hand-Quilter ruler I had not tried yet, called HQ Swiss Cheese Template. Besides, circles would carry through on the Christmas theme with ball ornaments


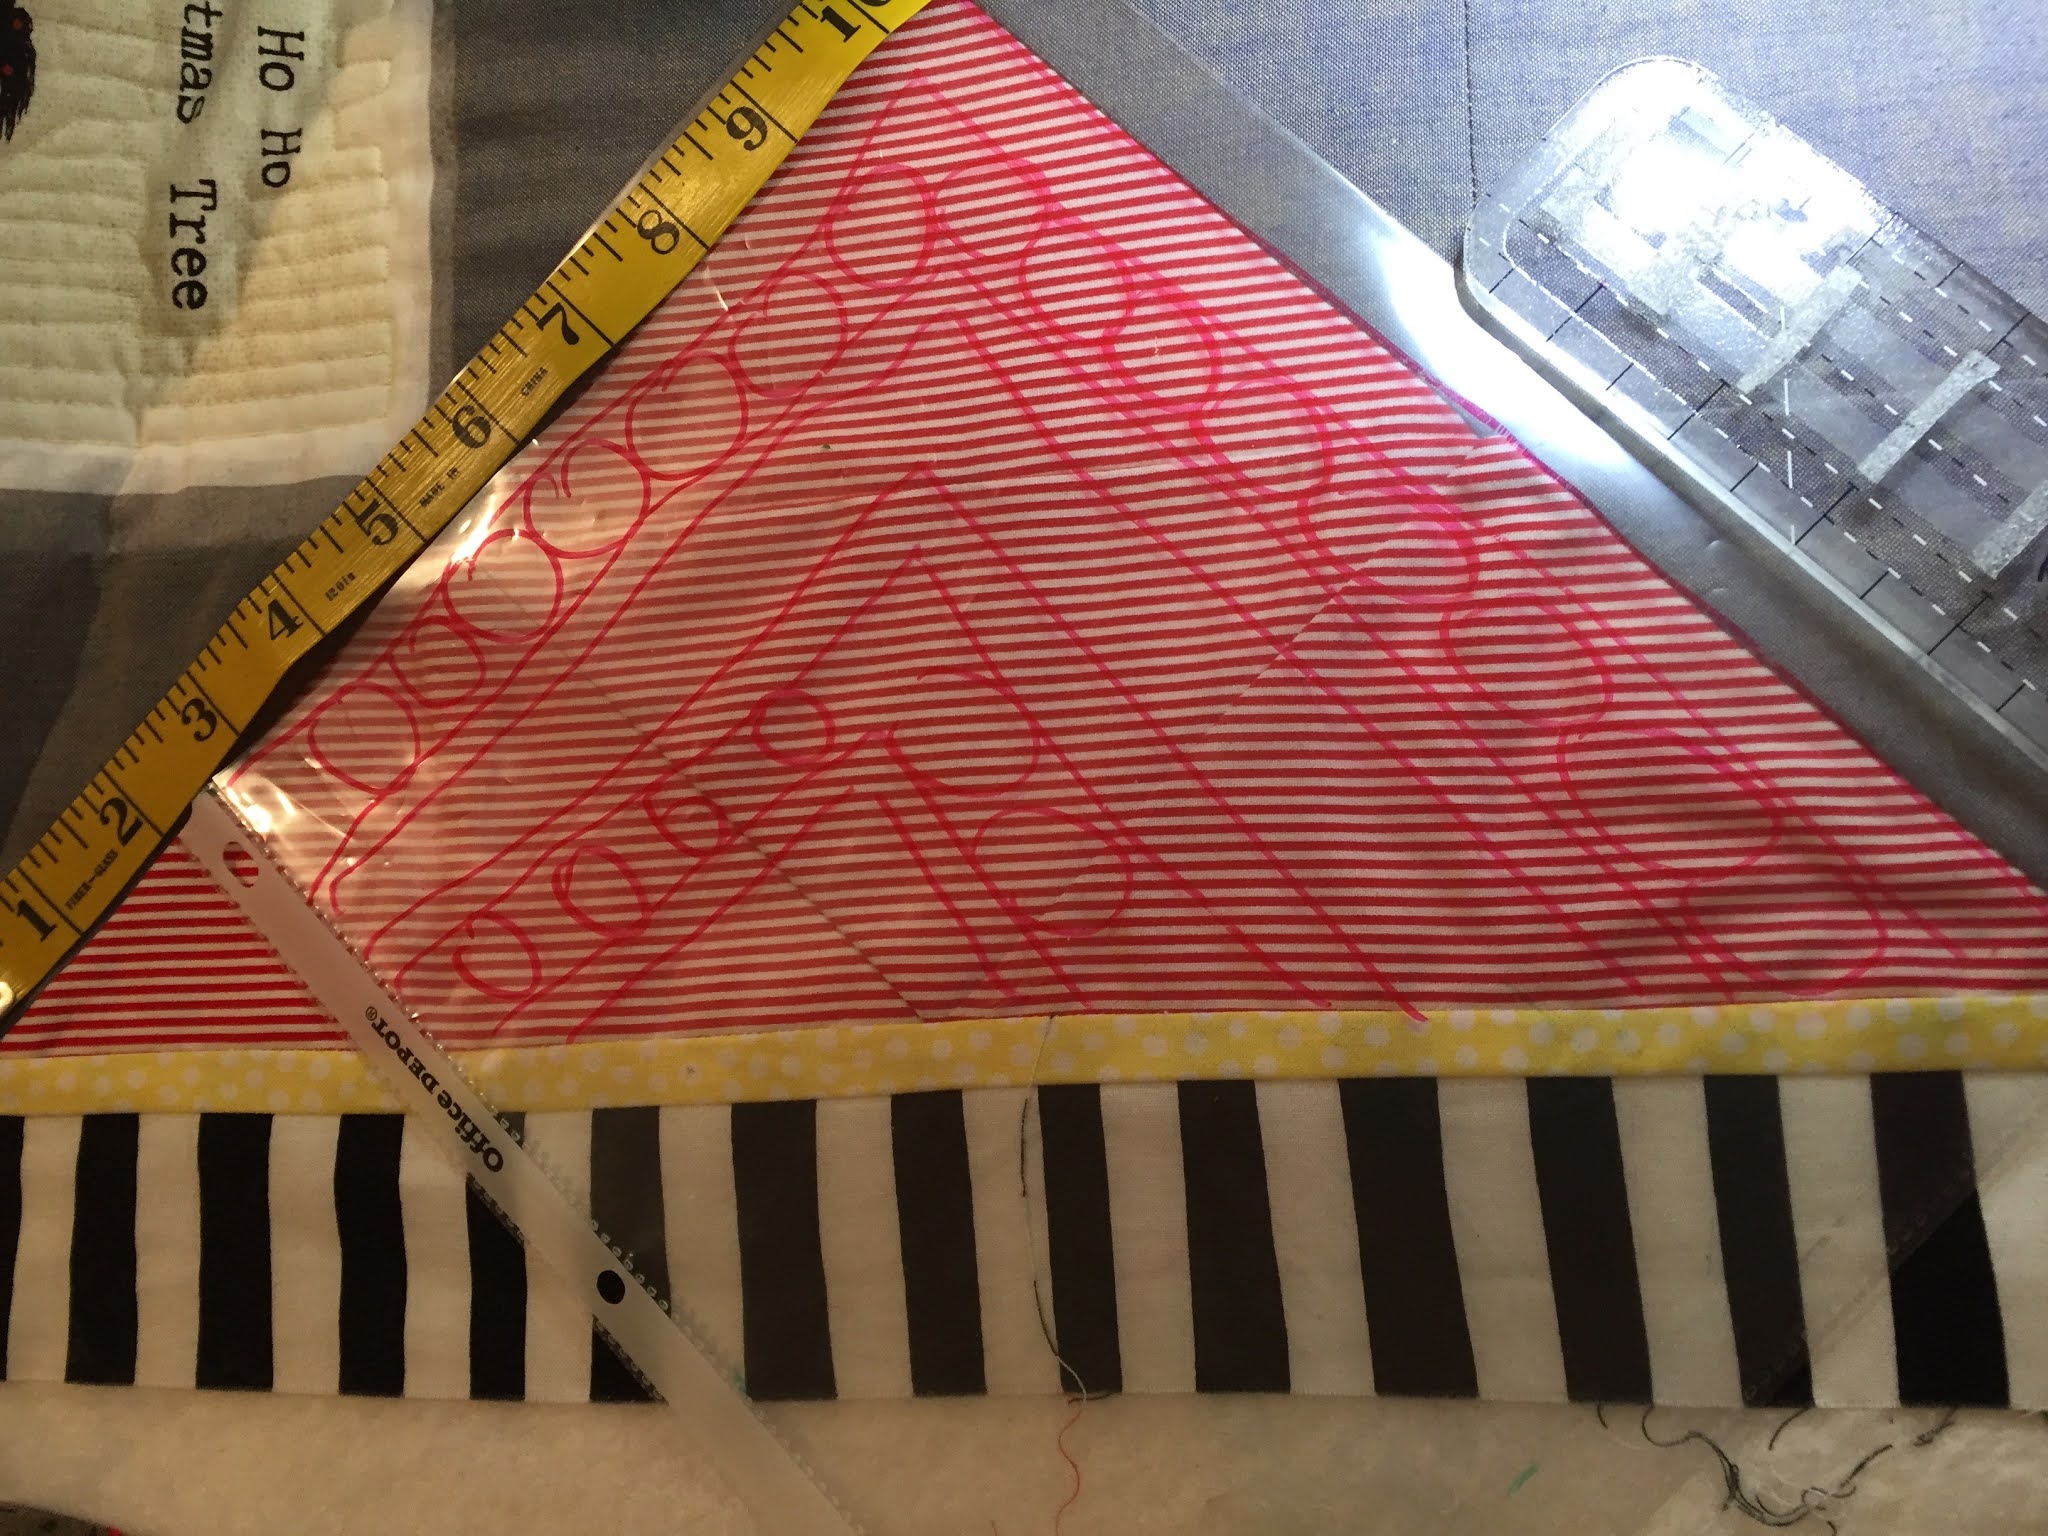
In watching a Handi-Quilter YouTube tutorial, I saw a teal-colored sampler I liked with channels inserted between rows of circles. The idea inspired me to draw my own design in those pesky red edge triangles. I learned that I needed to circle within the template one and a half times before moving on to the adjacent circle. Sandpaper grips are critical if I wanted the template to stay put enough so that I had any chance that my third half rotation of the circle would lie over the first half rotation.


For scale, on my first try, I used a ½" wide channel separating 1¼" diameter circles, the largest on the template. As luck would have it, they fit pretty well.


On my second try, I offset the straight ruler wrong and placed two channels too close to each other in error. Oh, well. I am getting over fear of FMQ; I am more relaxed because I realize that although time-consuming, wrong stitches can be picked out. In fact, by that reasoning, FMQ should be less scary than cutting out, where mistakes cannot be undone. I was willing to pick out two straight lines and re-stitch them to get a correct width channel for the circles.


On my third triangle, the circles fit within the channels width-wise, but the final half of the one-and-a-half rotations did not overlay with the first. Muscle memory was getting better but my muscles fatigue was getting worse at holding the ruler. With experience comes less effort exerted, and a better feel for when it is time to take a break.


Here is the combination of straight lines, scallops, and circles that remind me of tinsel, garlands, and spherical ornaments. I still have to figure out what I am going to do in the gray triangles – probably, whatever I do in the rest of the gray expanse.


Tuesday, July 21, 2020

Christmas (in July) Cars Bordering

Six months have passed since I have worked on my Christmas Cars quilt. I got hung up on deciding the borders and finishing and so needed to let it marinate a while. I loved the  main grey fabric with gold thread running through. Each car block is either surrounded on four sides by that special grey or on the sides by yellow and the top/bottom by red. I had used all of the grey up except for a few scraps; that is why, when I wanted to make the quilt wider, I added red pinstripe triangles on the vertical edges. (See post from 12/20/19). But when I stood back to survey my design, my eye kept zooming to those afterthought, glaring red triangles instead of focusing on the diamond shaped car blocks.


I needed to salvage my design. A border that would distract from those six rather large edge triangles might work. A graphic print would do the trick, so I cut a border sashing of black and white irregular Seussian stripes. Normally I take photo of the selvage to record what fabric I used but I forgot. I pieced together my scraps from trimming my bias seams before I found I did have some intact selvage left. You can still read it as Robert Kaufman ©1957 Dr. Suess Enterprises. Then I did find some selvage still intact.


I pieced my outer sashing strips along the diagonal as I was taught, to reduce bulk and make seams less noticeable. But with the stripe it was more noticeable so I cut it apart and seamed it parallel to the stripes. This meant I needed another strip since I lost several inches cutting apart each diagonal joint at each seam. I would show a comparison photo of seams parallel to the stripe but they do not show up!


I did not like the striped sashing butted up next to the grey however. It needed a buffer of sorts. Hmmm. Inserting a ½" wide thin band of red or yellow might do the trick. I added yellow before attaching the sashing on the side edges and added red before attaching it to the top/bottom edges. In keeping with the diamond block theme, the corners called out to be mitered. It had been along time since I had done a mitered border and I remember it took extra fabric. I bordered two long sides and, due to my miscalculation, I had to add more red pinstripe and more black/white stripe to do the two short sides. I wound up cutting off some excess at the corners but not more than I had added in so all was good. The stripes did not match at the corners but I was not expecting them to with a random, uneven stripe.  Overall I liked the effect and I am pleased to I see the mitering did lie flat, which can be tricky to achieve. 


I was going to make a binding out of a crisp black with red dots and fine red lines that went great with the Christmas trees and presents that were black with tiny red dots, carried in the vehicles. But I did not have quite enough to cut the strips so that a dot was centered in the binding. Yes, I could have done a flanged binding and stretched it to be enough, but I thought that was getting a bit too busy around the perimeter to have yet another line and it would have been difficult to change the flange color based on where the binding fell on the quilt edge. Besides, a black binding is a bit too funereal for me. I had a black/white/red mini plaid that I had bought specifically to use with the car panel but it did not appeal to me as the binding. I found a grey swirly dotted print in my stash so I am considering it instead. I also found a red with a grey grunge texture that went well, but I reminded myself I was trying to tone down the red. I auditioned them next to the black/white stripe.


Decisions, decisions. The leading contender is the grey swirls. It also goes well with the backing I am considering. Yes, Dalmatians are not a Christmas theme, but the colors go so well with the car panel colors of white/black/red/grey/cream. Plus, I have 5 yards of it! Hmm... to be continued. Gosh, working without a pattern or a kit takes so much longer. Stay tuned. Linking up with Main Crush Monday #184 at Cooking Up Quilts.


Wednesday, May 4, 2016

Isaiah's Turn

In all this frenzy to complete a quilt for Isaiah's cousin before she is born in May, my 8-month-old grandson's projects got set aside - and nearly forgotten.  I had completed the knitting on his sweater while visiting him and his sister in Oklahoma earlier this spring and wrote about it in my post for March 18, 2016, titled Knitting Queries, Quandaries, and Quiescence. All that remained to complete the garment was blocking the components and adding the bands on the two fronts and around the neck. The blocking task would not take long. I just had get over my inertia to start it. The ironing board was already out. The pressing cloth was hanging in readiness, pushed-pinned quite conspicuously on my bulletin board, as it had been for months.


I pinned the top and two fronts right side down. I had knit it in one piece to avoid side seams. It barely fit on the double thickness towel I'd placed on the ironing board.


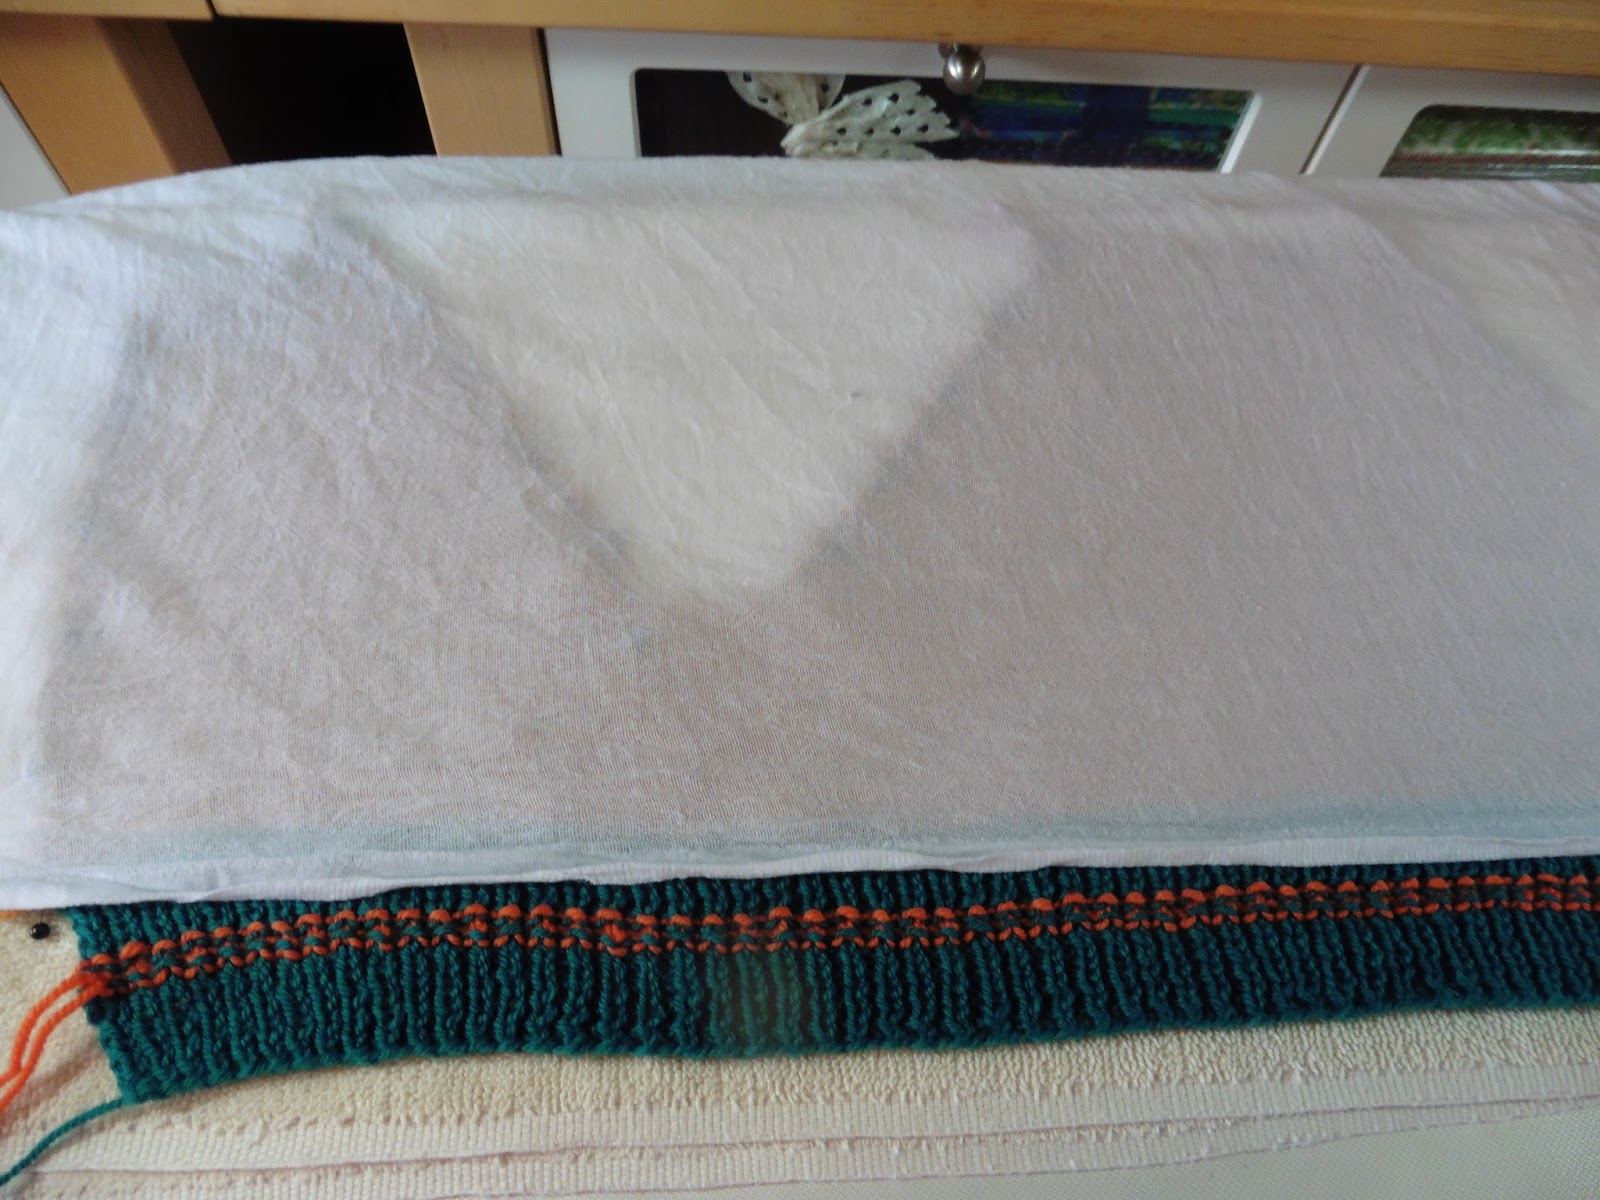
I saturated my pressing cloth and wrung it out. I laid it over the stockinette stitch portion avoiding flattening the ribbing. I steamed flat only the outer edges that were curling under along each front and along the raglan sleeve shoulder seams.


I repeated the process for each of the sleeves.


Here are all the pieces flat, right side up, and ready to be seamed. I will add the front and neck bands before seaming.


My next decision is in sizing the buttonholes. Because of the fine gauge of the yarn and the diameter of the shank buttons, I suspect a mere yarnover and a decrease will not be sufficient. I will need to knit up a trial swatch binding off and casting a few stitches. Two or three stitches is my best guess. Stay tuned.


So Isaiah is back in the running with Grandma projects. I need to finish his sweater real soon before it no longer fits him. Why do I so often underestimate how long something will take me? The weather in Oklahoma may already be approaching too hot to wear it but I am banking on him not having too big a growth spurt before fall. Am I being delusional?  I should learn my lesson and just aim for a bigger size. But then again you have to match the size with the season when the child will be that size. I guess a Grandma just needs a crystal ball. Sigh...

While I was on the topic of Isaiah, my daughter had seen my April 6, 2016 post about the sheet I'd sewn for a Pack 'n Play. I made it pillowcase style with no elastic needed. She thought it was a good use of my one yard size pieces of juvenile novelty prints in my stash. After all, I always claim that just about every  novelty print I cave on becomes a commitment to a quilt. Of course, there is the option of a pieced back but still, the colors are the colors, and the combination of them often presents a challenge to playing nice with others. My daughter asked for some covers for the pad on their changing table, giving its dimension as 34" long x 17"wide x 1" thick. It's girth calculates out as 2x17" + 2x1" = 36". I made two pad covers: one where the fabric's straight of grain ran parallel to the long dimension of the pad and one where the fabric's straight of grain ran parallel to the short dimension of the pad.

A fabric where the straight of grain runs parallel to the long dimension of the pad is the easier project. The first pad cover I made like this was straight forward. The striped pattern of zippy little cars runs along the straight of grain so the width of the fabric was plenty enough to circumvent the 36" girth with ease to spare. I cut off a 7"x36" band parallel to one of the selvages adn French seamed it as a tube. I only had a 1 yard length to use for the 34" long pad though so once I used ½" for seaming at the closed end on the left and used a ½" for a narrow hem at the open end on the right there was not much to overhang and tuck under. It is sufficient though.


The previous pad cover was certainly a simple approach but alas when fabrics are directional you need to follow their directions! On the second pad cover I made, the straight of grain ran parallel to the short dimension of the pad. I left the fabric at full width so there is plenty to tuck under at the open end on the right. I also left the selvages on and did not do any hemming on the open end. To calculate the girth around the pad I summed 2x17" + 2x1" and got exactly 36". There is no allowance for a seam in a one yard length of fabric. Especially if you figure the first time it is washed, it will shrink. With 3% shrinkage in cotton, that is about 1" per yard. I was quite fond of this whimsical doggie print but had to add side gussets since 36" was just not quite enough, I added a wide red and white stripe for the side edges. I made French seams that take ½" seam allowance and calculated (incorrectly) that I needed 1" side strips. The calculation was 2x17" (feature fabric), + 2x1" (inset gusset), plus an added 8x½" seam allowance, gives 40". I cut my side strips 2" wide. So far so good except when you take out the seam allowances I am back to 36" around and lose all ease. Note to self: with one yard of fabric I need to cut 2½" side strips even if they do creep up the side a bit when on the pad. This will give me 1" of ease for shrinkage during laundering. Second note to self: not to state the obvious but this project is even easier if I have 1⅛ yard of fabric so no side strips are needed at all!


The cover may fit now but it will be very snug when it shrinks! Perhaps when washed, my daughter can avoid a high heat setting on the dryer or take it out a bit damp. It seems like even with a changing table pad, where one size should fit all, I have trouble with making things too small. Sigh... Again...

Linking up with Let's Bee Social #123.

Wednesday, April 1, 2015

Pillowcase Methods and Burp Cloths

Pillowcases have three parts – main body, contrast band at the opening, and an accent strip inserted between the main body and the contrast band. There are two methods to make them A) where the side seam is sewn and then the contrast band is topstitched on as the final step and B) where a sandwich of all three parts, body, band and accent are sewn first and the side seam of the pillowcase is sewn last. Both methods result in pillowcases with no raw seam finishes showing. I made two pillowcases this week. For a pillowcase to coordinate with my Classic Cars quilt I used Method A. For a pirate pillowcase from a kit of coordinated pirate fabrics I used Method B. Although not intended to be illustrated tutorials, I've given shorthand abbreviated instructions for each method.

I have made many, many pillowcases by method A. It is a bit more fussy to do, but I like the smooth results at the band opening better and the look of topstitching.  The topstitching just below the accent strip is the part that requires a bit more care to look tidy.  Here is the pillowcase sized for an 18 x 24 small pillow. I did not have enough of the white and red grid fabric for a pillowcase but I thought the pale gray with small spirals was a good alternative. The entire Classic Cars quilt is shown in my post for March 9, 2015

  1. Fold accent strip in half wrong sides together and attach to opening end of main body
  2. Sew seams of main body as French seam
  3. Join short ends of contrast band to form loop, iron seam open
  4. Attach contrast band to opening of pillowcase, right side to wrong side
  5. Flip contrast band outward, turn under raw edge, and top stitch to outside of body
I folded back the end opening to show the detail of the inside near the edge using Method A. I like that the inside edge of the contrast band has no seam allowance showing.


This pirate pillowcase came as a pre-packaged kit and so I decided to follow its instructions which were method B. This method is definitely quick and if doing a charity project or last minute production gifting of several pillowcases in short order, this is the way to go. It is kind of fun to pull out a roll of fabric from the inside of a tube you've just sewn. If the proportions seems weird, that is because for the photo below I folded the pillowcase in half lengthwise and then in thirds the other way to get a closer look at the cute fabric. Ahoy, Mateys!

  1. Fold accent strip in half wrong sides together
  2. Sandwich and pin edges of band right side up, body right side up, and accent strip 
  3. Roll up main body, flip contrast band over roll, and repin
  4. Sew through five layers and pull out main body from center of tube
  5. Sew French seams of assembly 
I folded back the end opening to show the detail of the inside near the edge using Method B. The assembly seam allowance is visible and continues all the way to the edge of the opening.


I made a pair of burp cloths from some whale flannel I just bought. I just happened to have in my stash the minty green with different size dots to go with it. It kind of looks like bubbles to me. I made the two burp cloths complements of each other. After making these I cannot get the song Baby Beluga by the entertainer Raffi out of my head.


The full lyrics can be found at this link but here is the gist of it.


Baby Beluga in the deep blue sea 
Swim so wild and swim so free 
The heaven above and the sea below
See the little white whale on the go.
Baby Beluga, oh Baby Beluga... 

These small projects are interspersed with me starting the FMQ on my Simple Gifts Quilt. It has 30 blocks, one present each,  and so far I have stitched in the ditch and echo quilted around sixteen of them. It is slow going because I am using a ruler to help keep me on the straight and narrow and I am still a relative novice on my HQ Sweet 16.  I am undecided what to do in between the blocks. I may add another round of echo farther out and perhaps that may be enough. I need some practice and may add some swirly filler ,but not much since, I like my quilts to drape freely and sometimes too much stitching makes them a bit stiff.


The last time I posted my projects list was February 25, 2015.  Here are my stats since then. I figure giving my stats once a week is too often to show progress but once a month gives me a better sense of accomplishment. Granted they were small projects, but every new item I started since February 25, I finished!

Completed projects since February 25, 2015 (10):
    1. Classic Cars strip quilt (March 9, 2015 post)
    2. Two race car burp cloths (March 25, 2015 post)
    3. Two zoo animal burp cloths (March 25, 2015 post)
    4. One dahlia flower apron (March 25, 2015 post)
    5. Classic Cars pillowcase (April 1, 2015 post)
    6. One pirate pillowcase (April 1, 2015 post)
    7. Two whale burp cloths (April 1, 2015 post)
    Ongoing projects (3):
    1. Simple Gifts quilt - (February 18, 2015 post) FMQ in progress
    2. Overlapping square wall hanging - (March 4, 2015 post) awaiting FMQ
    3. Mask quilt (October 19, 2011 post) - packed away... again ... may abandon
    New projects since February 25, 2015 (9):
    1. Attended Sacramento Quilt show (3/21/15)
    2. Two race car burp cloths (3/25/15)
    3. Two zoo animal burp cloths (3/25/15)
    4. One dahlia flower apron (3/25/15)
    5. Classic Cars pillowcase (3/28/15)
    6. One pirate pillowcase (3/28/15)
    7. Two whale burp cloths (3/28/15)
    I am hooking up to today's Freshly Pieced post for WIP Wednesday.