Wednesday, June 24, 2015

What's Next?

I usually have several projects going at once - each at a different stage. This habit allows me to work on what suits my mood of the moment. There is often a backlog at the FMQ stage since that is where I am weakest and trying to skill build. Here is what is hanging ready to be quilted. On the left is my overlapping squares top, in the middle is my strip quilt of Barnyard Buddies fabric, and on the right is Bugs R Us. I will probably do the center one next since that is the one for which I have the clearest idea of a stitching pattern.


These sheep will get something with loop de loops to accent their curly coats.


This scenic section will get some long sweeping curves to echo the shapes of the hillsides.


While I am thinking I resort to my soothing and mindless production of burp cloths. Here I've cut the fabric for eight. The fabric will be paired as it is laid out from top to bottom; bubbles with plaid cats, elephants with giraffes, diagonal stripes with reindeer, and polka dots with hot air balloons. I plan to post pictures of the eight complementary pairs once I've sewn them.


When I set my camera down next to the tape measure on the countertop upstairs I accidentally snapped this photo. I thought it was cool enough to share. See where the mind wanders when I do not know what comes next?


I am also at the very beginning design stages of a new quilt for which I have no pattern. It will be made from a repurposed cloth book panel by John Butler, children's book illustrator, titled Who says Woof.


Here is my design wall. Background fabric will be a gray mini-print. Three pseudo-solid fabrics that echo colors in the page outlines and lettering will border the pages in some way. The colors have a softened tone to them, yet they are not pastel.


Here is my Power Point playing. I took screen shots of each page from online sales of the book fabric panel, inserted them into a Power Point file and drew triangles around them. I will group the pages rather than bordering each separately. I got the idea from a book I recently bought, Panel Play by Barbara Becker. I have not decided how big to make the points on the stars. I also do not know if I will use solid stripes and solid corner accents or if I will insert sawtooth-strips instead. It may depend on how far my fabric goes. I have only ½ yard each of the soft red, soft blue, and soft orange.


The last time I posted my projects status list was May 13, 2015. If I do not know where I am going, at least I can show where I've been.

Completed projects since May 13, 2015:
    1. Traveling Mandala (June 7, 2015)
    2. Simple Gifts (June 10, 2015)
    3. Fun Guys (June 17, 2015)
    4. Dinosaur Crib Sheet (June 22, 2015)
    Ongoing projects:
    1. Bugs R Us  (May 31, 2015) awaiting FMQ
    2. Barnyard Buddies strip quilt (April 15, 2015) awaiting FMQ
    3. Overlapping square wall hanging - (March 4, 2015 post) awaiting FMQ
    4. Mask quilt (October 19, 2011 post) - packed away... again ... may abandon
    New projects since May 13, 2015:
    1. Mandala
    2. Who says Woof?
    3. Crib Sheets
    4. Burp cloths
    I am hooking up to today's Freshly Pieced post for WIP Wednesday.

    Monday, June 22, 2015

    Dinosaur Crib Sheets

    After finishing two quilts recently Fun Guys and Simple Gifts I needed a quick project. My daughter requested crib sheets for their baby boy due in July and told me about this {Tutorial} Quilter's Crib Sheets by Stitched in Color. It requires two yards of fabric into which you add four box corners and a casing with elastic threaded through it. Please check it out. It was very well written and easy to follow. My post below focuses on adjustments I needed to make to those instructions because I chose to start out with less than a two-yard length of fabric, silly me.

    I had this adorable dinosaur fabric that I wanted to use but I only had 1½ yards of it. It is Timeless Treasures DINO-C 7152


    I had ½ yard of this pebbly fabric and decided to halve it and add ¼ yard at each end to reach the length I needed. Wasn't Pebbles the name of the little girl on the Flintstones? Aside from the color, maybe that is why it seemed to go with the dinosaurs. 


    The tutorial strongly recommends pre-washing the fabric since it is going into a sheet and will shrink. I did pre-wash it and it did shrink. The length loss was not just shrinkage – although granted 3% typical shrinkage of cotton works out to about 1" per yard – but loss of length was also due to fraying. Shrinkage and fraying and ⅝" seaming was significant enough that I had to add a third fabric at each end to reach a required 70" post laundering length.  I suspect a bit under 70" would have been ok but this was my first time with these instructions and I did not want to push it.

    I wanted the seams to be as flat as possible so there would be no "Prince and the Pea" issues. I used flat felled seams, something I have not done in a while. In a nutshell, flat felled seams, typically found on jeans, are made as follows: sew ⅝" seam wrong sides together, trim one side  of seam allowance to ¼", fold untrimmed seam edge over trimmed seam edge and sew again on right side. I avoided that "trim to ¼" part" by offsetting the fabric edges by ⅜" when I sewed the wrong sides together initially. It worked like a charm. I saved ½" of fabric (insert sarcastic "Whoop-dee-doo" here) but mainly I avoided an awkward trim step. After 1½ hours of effort I was now at square one with two yards of fabric. But I did get practice with flat felled seams four times and each one came out very well. Here are my added fabrics as seamed together. The bottom gold will be totally hidden beneath the mattress. The pebbles will only be visible along the vertical sides at the head and foot of the crib mattress.


    Now, I could finally start making those sheets per the tutorial! After cutting out a square from each of the four corners I seamed them with French seams and that went very smoothly. Pressing under the edge for the elastic casing was not difficult but a bit tedious - essentially two fabric widths (2x40"), and two ~2-yard lengths of fabric (2x70"), less corners (8x8"). This works out to 176" or almost 15 feet! Then, since elastic is 80" long, threading it through is pretty mindless but takes a bit of patience. A safety pin will do but these handy elastic threaders are well worth it. 


    But bummer! Halfway around my casing, my elastic pulled free of the slots in the threader. I had to pull all the length of elastic back out of the casing and start over. The second time, after threading the elastic through the two slots of the threader and doubling it back on itself, I used a very long stitch to sew the elastic to itself. It stayed in the threader while I pushed it through the entire casing this time. It was very easy to remove those long stitches and free the threader before I joined the two ends of the elastic. Last step was to stitch closed those final few inches of the casing access.

    I do not have a crib mattress but this is how it looks on one of my couch cushions. The dinosaur to pebble fabric seams do not fall where the baby would be. They are near the head and foot edges of the mattress. The pebble to gold fabric seams are under the mattress.


    Without a true crib mattress to fill this sheet out, it looks a bit wrinkled. But what I wanted to illustrate in this photo is that having only 1½  yards of a fabric you really want to use instead of 2 yards is not a show stopper. However, I would recommend using that the second fabric be ¾ yard to avoid having to add a third fabric due to shrinkage and fraying and seaming.


    I think this is a great use of fabric that is a large scale print or just too adorable to cut up. Here is the sheet all folded and ready to gift. It would have been an even quicker project if I hadn't felt the need to piece it from three fabrics first! Once a quilter, always a quilter, I guess.


    Those $24 sheet at Pottery Barn do not seem so pricey now when I think of the cost of two yards of good quality cotton fabric and elastic. But getting a custom look to match curtains or a quilt or a theme ...? Priceless! And suppose you got that feature fabric on sale or it was pining away to be used in your stash...? Even better!

    This is not a quilt but it is a Monday so I am linking up to Main Crush Monday at Cooking Up Quilts. I have a bit of a crush on those cute little dinosaurs you see.

    Wednesday, June 17, 2015

    Fun Guys

    One productive week mid-April, I had pieced a strip quilt from these fabrics from the Life in the Jungle fabric line. Then it hung in the room next to my sewing room for a few weeks awaiting attention.


    In my previous post I had just finished quilting feathers in the green polka dot and honeycomb bands and suspended spheres in the narrow orange and turquoise stripes. Next was picking a quilting pattern for wider focus fabric band. I went to Christina Cameli's second book Step-by-Step Free Motion Quilting and picked a pattern she named Leafy. I liked that it looked like hanging vines one might see in a jungle. On the left is how it is shown on page 141 of her book and on the right is my practicing of it on a clear sheet protector before quilting it. Left and right are not exact replicas of each other, but then neither is the penmanship of two people writing the same word over and over.


    Overlaying clear sheets on the quilt top and practicing drawing over and over again helped me get the scale right.


    Here is an overview of quilted band. I tried to drape it over a pillow and angle the camera to illustrate the stitching within the constraints of my lighting, and it just looks like my quilt is very, very crooked. It is not that bad. Really. I am pleased that I allowed myself the freedom to sew through the critters and not around every one.


    The kit binding fabric was a marbled turquoise which I originally cut to 2¼" for my standard ⅜" binding. Then, I decided that since this quilt had no edge points to nip off at the outer perimeter and, since there was no real border, I would use this opportunity to try out a binding technique Chris from my Handiquilter Club session had shown me. This technique requires no hand-stitching and finishes with a slim accent strip at the inner edge of the binding. It requires a second contrast color for the accent strip. From my stash, I picked an orange with the red hash marks so it would mimic the toucan's beak. Yes, it is a small detail barely visible but I know it's there and it tickles me. Besides with all the rage over "hashtag this" and "hashtag that" I can claim I am now "hashtag with it".


    There is a full tutorial on this binding technique at Susie's Magic Binding. Here it is in summary. I trimmed my main color turquoise strip down from 2¼" wide to 1½" wide. It was a bit squirmy to do so, not like when cutting from a larger yardage to start with, but I took my time and did it one fabric thickness at a time so that the strips would be uniform in width. I then cut the contrast orange into 1¾" wide strips and joined them end to end with a mitered joint. Next, when the orange and turquoise are sewn together lengthwise and pressed in half an ⅛" line remains at the fold that looks like piping peeking out. I attached the binding on the wrong side, contrast fabric facing up, with a ¼" seam, pressed outward, folded the binding over the edge, and then, from the right side, I stitched in the ditch at the orange-turquoise seam line. One of those red hashmarks just happened to fall right by the beak of one of the toucans. Serendipity!


    I think the toucan is my favorite animal on this fabric. It reminds me of Toucan Sam from Froot Loops cereal.


    One of the mitered seams in the binding just missed falling at a corner. Close call. It is barely visible in the upper left. This photo also gives a closer look at the leafy vines quilting from a straight-on perspective. I wanted the animals to appear as if they were peeking out from between hanging vines with leaves interspersed. This is my first time attempting a pattern so loosey-goosey and I kind of liked it!


    I picked the backing fabric for several reasons. It reminded of the shape and colors in the toucans beak. It also has the look of leaves on hanging vines. It also can be thought of as feathers. What a versatile print!


    Here are the labels. The quilt name (see previous post for name explanation) is on one lower corner...


    ... and my initials and the date completed is on other lower corner. That perimeter stitching line about ¼" in from the turquoise binding is the reverse side of where I stitched in the ditch at the binding interface between orange and turquoise.


    Here are two overall views of Fun Guys completed. It finished at 38" by 56". The first photo attempts to show the quilting...


    ... and the second photo proves it really is flat!


    All I have left to do now is wash it and Fun Guys will be ready for our little guy to have fun with!
    For now I am linking up to share at this week's Freshly Pieced's WIP Wednesday.

    Saturday, June 13, 2015

    Naming and Feathering

    What with finding a name and feathering a nest you'd think I was the one having a baby. Well, I am, sort of. This quilt is for my grandson to be. I pieced it from the 
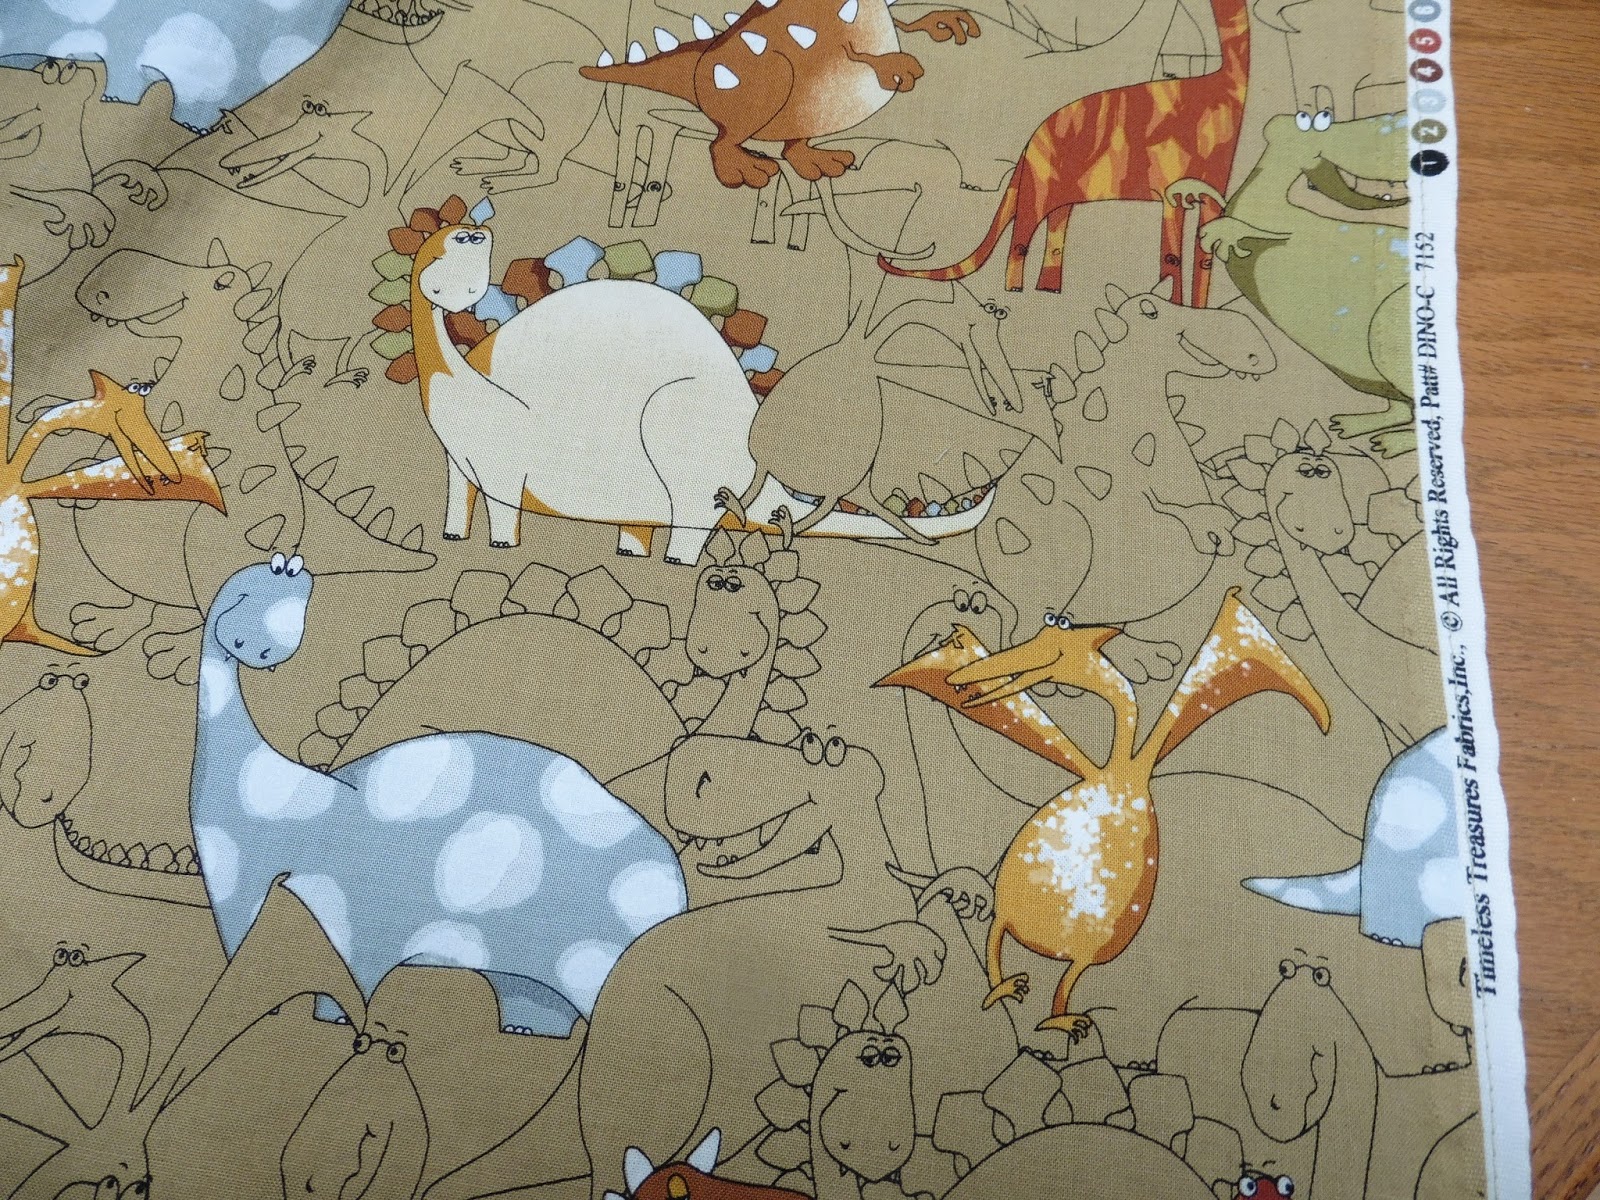
Life in the Jungle fabric line by Doohikey Design for Riley Blake Fabrics and this week I began pondering its name and planning its FMQ execution. Here is the main focus fabric with the gray background. The list of objects on the print is quite long. I spy with my little eye: mammals (hippos, hedgehogs, monkeys), birds (toucans, owls, and two other feathered species), amphibians (tree frogs), plant life (leafy trees, lollipop shaped trees, three kinds of toadstools or mushrooms), and shapes (stars and fireworks -like bursts). How does one come up with a name for quilt that has everything?


    I let my mind wander on ideas for a name. Oklahoma Quilt Works had assembled the kit and sold it under the title Life in the Jungle Baby Stripper. First, I prefer not to name my quilt after the fabric line and second, this did not have a very jungle feel to it. Tree frogs? Yes. Toucans? Yes. Lollipop shaped trees and hedgehogs? Not so much.

    Playing off the animal aspect, I considered but rejected the following names because they left out the trees and mushrooms, which were as prominent in the print as the animals:
    Critter Capers, Birds of a Feather, Band of Birds (play on Band of Brothers), or perhaps Furred and Feathered Friends, Fur and Feather Frolic, both of the final two being a bit of alliterative overkill.

    Playing off the location aspect, I thought of tropical venues being jungle-like and considered:
     Tropical Turf, Zany Zoo, Critterland,  or even Tiki Room. After all, everyone knows that, "in the Tiki-tiki-tiki-tiki-tiki room, all the birdies sing and the flowers croon..." Jungle Gym was a serious contender, but again, the feature fabric was not that strongly "jungle" to me,

    Concentrating on a mood avoids the issue of slighting some plants or animals in the name choice. The print has a very whimsical feel to it. The bright  orange, turquoise, and lime green that are partnered with the grays and browns give off a very happy vibe and suggest a name with happy in it:
    Happy Habitat, Happy HomesHappy Together?

    Happy Together immediately made me think of the 1967 song by The Turtles. I am dating myself here. I suspect a fair number of bloggers and younger quilters were not even born then. Here is a YouTube video of the song for the curious among the readers. The graphic black and white checkerboard set design and the leader singer's striped jacket is worth a peek at the video if nothing else.


    But did I really want to be reminded of a defunct singing group from decades ago when I thought of this quilt? Not really. But I liked the idea of happy. Synonyms for happy are glad, joyful, cheerful, merry, fun-filled.  Fun! Fun with Friends, maybe even  Fun, Fur, Feather, and Frond for the hyperbole of alliterative overkill and a booby prize for being too long. Once the word "fun" surfaced, though, I remembered an old (and very corny) joke:

    Q: Why did the Mushroom get invited to all the parties?


    A: 'Cuz he's a fungi!


    This quilt has found its name. Fun Guys. With three kinds of toadstools, Fun Guys is a cute play on words and it is easy to say. Ok, maybe some of the critters I am calling "guys" are not male, but this quilt is for a little boy so we can pretend that they are. Even the shapes of the stars and firework-like bursts fit into the name since they tend to represent parties and fun.

    With an owl, a toucan and two other birds in the print, I figured this was a good quilt on which to learn to quilt feathers. Plus, now that I had the name settled, I could concentrate on learning a new skill without being distracted. I practice my quilting pattern first with a dry erase marker on sheet protectors. This allows me to doodle at the same size that will go on the quilt, erase with a scrap of batting, and try again as many times as I want. Once I am finished experimenting or practicing, since it is a sheet protector, I can then slide a white sheet of paper inside and hang the design nearby to remind me or photocopy it to keep in a binder. One caution though – I am very careful with dry erase markers around quilts. The marker pigment will not wash out of the fabric so I am sure to label the front of the sheet protector where I have drawn so I do not flip it over and have the markings rub off on the quilt top. For the mildly paranoid quilter, snapping a picture of a section of the quilt top, printing it out and sliding it into the sheet protector involves a few extra steps but can keep those markers away from the quilt during drawing. Quilt shops do sell a clear plastic by the yard that can be placed across the quilt and drawn on, instead of drawing on the sheet protectors. Plastic by the yard requires the same precautions as the sheet protectors when using dry erase markers. Here are my practiced designs, set over the quilt top. I opted for feathers on an undulating spine in the wider bands and little spheres suspended on a string in the narrower strips.


    The suspended spheres on a line in the turquoise and orange strips were the first items I did and they were a bit wobbly in places. They were wobbly when I drew them, too! As to forming the feather pattern, I took the design from the book Hooked on Feathers by Sally Terry. I was very pleased and surprised at how well I did on my first attempt. I need lots of practice on uniform stitch size and getting my tension optimally adjusted, but that is outside the scope of this book and true of whatever pattern you pick. I did the camouflaging honeycomb bands first so that by the time I got to the less-forgiving green polka dot bands, I would have improved with a little muscle memory to help me out.


    Sally Terry's approach eliminates the need to backtrack along parts of the feather, a hard task to do well for a beginner. When I asked myself, "Why don't my feathers look like the sample?" she'd given concrete tips to help figure out what needed to be done differently to get the effect wanted.  Notice I said effect wanted. There is no right or wrong. Tips address the angle to depart from the spine, the relative height between the inner and outer portion of the feather base, the roundness of the hook itself, etc. I highly recommend this book. It's approach is teaching me how to analyze what makes something look good, a skill artistic people seem to benefit from innately, but can be taught. How does that saying go? "Give a man a fish and you feed him for a day; teach a man to fish and you feed him for a lifetime."


    In the narrow turquoise and orange strips, I pulled a simple design from Christina Cameli's book, Step-by-step Free-Motion Quilting. I liked that she uses color to show the sequence of creating a pattern. Here is a portion of the page showing the design I picked. It is flattened spheres staggered along a gently undulating line. Since my strip was so narrow I kept the main line fairly straight along the middle but I did not feel obligated to keep it rigidly straight. I also spaced my circles farther apart. I loosely used the black and brown honeycomb pattern to space them quasi-uniformly, chanting "black-up... brown-down... " as I alternated direction. If, when I am finished I can still find the places where I broke my "rule" I may pick them out and reverse them. On the other hand, left in they might make a good challenge for a little boy to hunt for as a game of hide and seek.


    When several lines are set side by side I think the overall effect reminds me of pussy willows. Although I only used a single line in Fun Guys, I will keep this in mind for a future quilt.


    I like that the majority of the designs in this book are fairly open. Since I prefer quilting that is not too dense, I can still get an openness without having to enlarge a pattern so big it is hard to execute smoothly. Christina Cameli's first book is project-focused, but this one has a wealth of FMQ inspiration to use on quilts or placemats or totes or whatever. This book stands very well on its own without the First Steps book of hers. I am glad I added it to my library


    These pink strips of paper are a good indicator of how many good ideas I have marked for future use. The Look inside feature on Amazon gives a very extensive sampling of the designs inside.


    Confidence in my FMQ is building slowly and I am having fun with Fun Guys! Now, what to FMQ in the wide-band, focus-fabric sections of Fun Guys'?

    Wednesday, June 10, 2015

    Simple Gifts Completed

    Ta-dah! I completed my Simple Gifts quilt a few days ago and here is it displayed artistically (my attempt at artistically, anyway) over the wing chair next to the fireplace. I can just imagine myself next Christmas curled up under its brightly-colored and cheerfully-wonky blocks. I used a bamboo batting because it drapes so gently. Simple Gifts has not yet been washed in this photo. It will get softer. My quilting is not very dense either so the quilt will be very flexible. I am looking forward to a cuddly Christmas, even in California.


    Any attempts to take pictures outdoors failed miserably in the wind. Also, quite frankly, since we are in a California drought area, the dead brown lawn was not a very attractive backdrop. For a better overall view of the quilt, I tried hanging it from our upstairs railing. The shot is fairly straight on but the bows of the top presents got nipped off.


    Here is Simple Gifts displayed on the upstairs hardwood floor so at least all of it is visible at once. It measures 49" x 68". Correction: almost all of it is visible. I just noticed the bottom right corner.  A photographer I am not.


    Upon completion of Simple Gifts I am feeling a mixture of... sadness... pride... sentimentality... relief... reflection...

    There is a line at the end of the 1998 movie Hope Floats where Sandra Bullock quotes her momma as saying

    ... beginnings are scary,
    endings are usually sad, 
    but it's the middle that counts the most.

    The middle counted a lot for me on this quilt. It was "nice" to "slice and splice" and stretch myself beyond my precision piecing norm and to play with the patchwork background in an unusual way. Working with that bright trio of red, lime green, and aqua successfully and repeatedly chased any blues away. That part being over is a bit of the cause for my sadness. It is hard to see something fun come to an end.

    And, as much as I fretted over the fabric selections being too busy, I think, in the end result, the presents popped just enough. I put the gifts that "popped" the most in the middle of the quilt. I think even though its print variations are extreme, the block in the lower right corner of the photo turned out to be my favorite. I love the little village houses and the very graphic red/white, that I worked so hard to segregate at the edges, does bring the eye to that part of the quilt... the better to explore those itty-bitty buildings.
    .

    Even the blocks with the green and aqua backgrounds turned out better than I was expecting. I think quilting the patchwork background, but not the gifts, helped. I started with the green background blocks since I was quilting with lime thread throughout and wanted to have my earliest work be in the least noticeable areas.


    The aqua background was the busiest and concerned me the most. I am withdrawing my previous misgivings and regrets about not going with a one fabric background. That choice would have given the quilt a bit more formality than the wonky blocks warranted. The echo quilting shows up just fine amid the patchwork aqua. The lime green quilt thread color that I used throughout contrasted more with the aqua background. I did these rightmost two columns of blocks last, so my skill level could be a bit higher when I worked on them. I also love the red binding bordering those red gifts.


    I am also proud that I ventured to do ruler work on my HQ-16. The stitching lines are not perfect but it is passable considering my inexperience. There are a few bobbles on the back and the stitch size is not uniform throughout, although it did become more consistent in parts of the quilt I did later. I suppose this shows some skill growth and bulk management improvement on my part. The ruler work was not simple for me and so the quilt's name is a bit ironic. It is also ironic because after my concentrated efforts, I am keeping this quilt, so it is not a gift either. I still like my reason for the name though. The wonky simplicity of the gifts are still there.

    Sometimes it is a battle to coax binding around the corners and join it ripple free at the end. I wanted the binding to be a mixture of reds to carry out the playfulness of the quilt. I knew I'd be taking a chance though because multiple seams in bindings increase the odds that a binding seam is go into fall right at a corner and create bulk issues. This one came close but it cooperated nicely. The binding went on like a dream. Along with the binding this photo offers a closer look at that cute little house fabric I so like and my straight line echo quilting around the gifts.


    I came to the realization that if I name a quilt, but the only record of its name is in my blog, then the name gets forgotten. Now I put two labels on my quilts, one with my initials and the date of completion  and one with the quilt's name.


     I picked a deep red for the type on the labels to go with the deer on the backing


    I am feeling a bit sentimental over this quilt, too. I bought the kit November 2011. The year 2011 was a busy one. My daughter got married in May and my son got married in September. After the second wedding, my husband and I enjoyed a weekend away at Cambria Pines Lodge, a gift from my son and daughter-in-law to thank us for our support and efforts on their wedding.  It was during that weekend away that I visited the quilt shop where I bought the kit for Simple Gifts.

    I did not sew up the quilt for Christmas 2011, 2012, 2013, nor 2014. So I think I am feeling relief that it will finally be complete and ready to be enjoyed Christmas 2015.

    As for the reflective part of my feelings... ? One of the very first questions someone asks the creator when they look at a quilt is "How long did it take you to make that?" The short answer is, "just under five months." I certainly do not want to count the nearly four years it sat dormant in my closet, but, once I began, I pretty much was excited enough with the project to keep at it. I started Simple Gifts in January of 2015 to be sure to have it by Christmas this year. January was spent in planning and piecing. Most of February was spent trimming, arranging, assembly and prep for quilting. March was spent being afraid to start quilting. April was spent FMQing. I finished the last bits of binding and label at the end of May and very first part of June. For my own reminiscence, rather than as an overload of information for the reader, here is the timeline for the Simple Gifts blog posts. This is my fifteenth post that mentions Simple Gifts.


    If I am pressed further and asked how many hours I have invested in making this quilt, that answer is not so clear. Counting time spent pleasurably is a paradox because part of the joy of creating is being drawn into "the zone" and losing a sense of time. Besides how should I add up the hours? It amounts to much more than cutting apart and sewing back together. Should I count the time spent...
    • dreaming and planning? 
    • picking the perfect fabrics?
    • learning a new tool or technique?
    • building up courage to start a new stage? 
    • thinking up a name? (I can take a while on this one.)
    • photographing the different stages?
    • writing blog posts about the quilt?
    I can not give a simple answer for the hours invested in creating Simple Gifts. But I do know I really enjoyed making this quilt and sharing my experiences with it! Enough said!

    Here are the clickable links to the listed posts about making Simple Gifts.

    http://dianeloves2quilt.blogspot.com/2015/01/a-few-of-my-favorite-things.html
    http://dianeloves2quilt.blogspot.com/2015/02/green-gifts-with-red-background.html
    http://dianeloves2quilt.blogspot.com/2015/02/simple-gifts-trim-tweak-time.html
    http://dianeloves2quilt.blogspot.com/2015/02/gifts-some-assembly-required.html
    http://dianeloves2quilt.blogspot.com/2015/02/simple-gifts-coming-together.html
    http://dianeloves2quilt.blogspot.com/2015/02/sandwich-making-some-nibbles.html
    http://dianeloves2quilt.blogspot.com/2015/04/pillowcase-methods-and-burp-cloths.html
    http://dianeloves2quilt.blogspot.com/2015/04/the-straight-and-narrow.html
    http://dianeloves2quilt.blogspot.com/2015/04/productivity-follows-inspiration.html
    http://dianeloves2quilt.blogspot.com/2015/04/a-learning-experience.html
    http://dianeloves2quilt.blogspot.com/2015/04/a-checkered-past-and-present.html
    http://dianeloves2quilt.blogspot.com/2015/05/a-bit-of-applique.html

    Technically Simple Gifts is no longer a work in progress but it has been for five months, so I am linking up to this Wednesday's Freshly Pieced's WIP to share its completion.

    Sunday, June 7, 2015

    Traveling Mandala

    Class Project Completion:
    Here is my mandala class project, completed within one week of taking the class last weekend. I like the background focus fabric on the outer edges but it gets a bit muddled in the center. Next time I make a mandala, I will have a better idea of the end effect and will choose fabrics more wisely. I do like the clear brightness of the four quadrants though, red, orange, blue, green.


    In my previous post I described the two-day class paper piecing the mandala and showed the four quadrants I'd completed. Here is the back of the mandala joined and quilted but not yet bound. I knew I would get to use that orange sky fabric someday! I did a low density minimal quilt pattern on my domestic, basically just a stitch in the ditch along the curved seams of the circles and along the larger compass like points at the outer most edges and in the very middle. I did not stitch in the ditch along all the paper pieced seams. That would have been like making a second mandala. Stitch in the ditch went well for me, no skipping off the seam line. Perhaps it was the practice from stitching along all those lines of the pattern during the paper piecing. The stitch lines look rather interesting on the back.


    I liked the boldly striped fabric with all its colors for the binding but it was so graphic I thought it had better be used in small doses so as not to dominate. I decided on a 1/4" narrow binding. I machine sewed it on from the front and hand stitched the back. This was meant to be just a quick project and so I suppose it would have been faster to machine sew it on the back and then flip to the front and machine sew there. But I like hand stitching the binding. It is an opportunity to reflect on the project and clip all those little snippets of thread that somehow get missed.


    And now, what to name it? I was bemused by the similarity to M&M colors in my last post but I think M&M Mandala, although alarmingly alliterative, is too flippant a title for a symbol purported to provide guidance on a journey or have a healing influence. The front background has images of travel stamps. The back looks like the view from up in an airplane at sunrise flying through the sherbet colored clouds. So I decided to name this Traveling Mandala. For this small wall hanging I labeled it with a pigment marker instead of my usual grosgrain embroidered tag.


    Class Packing:
    I wanted this class to encourage me to take others so I had two criteria - other than it being interesting, of course.
    1. I wanted to complete the project I started in the class soon so it did not hang around as another UFO. (Mission accomplished.)
    2. I wanted to streamline my packing so that would not be a deterrent from my taking classes in the future. (Did OK, worked at home between class days without too much hassle.)
    Prepping and hauling supplies to a class is a non-trivial expenditure of effort but it is usually worth it. The inconvenience of getting ready for a class should not deter me from taking one.  People who travel often get efficient at packing. Similarly, I am practicing a streamlined preparation routine. Here I am packed and ready to go. I have rearranged my sewing machine with an extension cord so that crawling behind my sewing table to unplug it is no longer a pain. I keep that inexpensive, reusable tote bag from T•J•Maxx packed with some basics between classes.


    The tote bag contains a pinning/pressing/cutting combination pad, a travel pressing pad like an ironing board cover, a mini-iron, an extension cord with a surge protector, and an extra lid. I do not remove these items from the tote bag between classes. I just need to add a bag of fabric and a containerized box of tools and I am ready to go. Since this class was small project, I removed my sew steady portable table from the bag and left it home, but it usually sits in there in the tote bag, too.


    I have a relatively painless routine for packing (other than the time-consuming fabric selection mentioned in my previous post). I put my tools and paperwork for the class in a square scrapbooking plastic container. In the classroom I take the lid off at it hinges and use it turned inside up as a tray. I pack an extra lid. I find in limited classroom space, it works well to have layers. The lids keep tools, fabric, and scraps separate from each other where table top space is often at a premium. I put my fabric in a zippered clear pouch. These both get added to the large partially pre-packed recyclable tote bag. This was a two-day class and I used these supplies the night in between without too much scatter or fuss to redeploy my sewing machine, fabric, and notions.


    Class Bonus:
    What class would be complete without some fabric purchases from the hosting shop? Since a grandson is on the way within the next several weeks, I could not pass up these two fabrics from the bargain bin at Wooden Gate Quilts in Danville, CA.  They were 50% off. At over 2 yards each, there is sufficient yardage to press them into service as crib sheets if quilt inspiration does not strike.

    Pirates ships! Aaargh, me mateys! There was 2⅝ yards of the pirate ships. Those striped sails just beg to be paired with some striped fabric. That central ship with the black and white sail is 3½" tall.


    Vikings are unique and unusual fare for a fabric theme. So far, my grandson-to-be is on the 85% percentile size wise. He takes after his blonde-haired mom who was the tallest kid in her preschool class by a head and was nicknamed "The Viking". I think this fabric was destined to come home with me, all 3⅝ yards of it. Each Viking with his name banner is about 5" tall.


    I could not forget the two granddaughters that already are here. One of them will get something made from this menagerie. I put a 2½" tall spool of red thread in the photo to give a sense of scale. Those elephants and llamas are big! I can get twelve 10" squares out of the one yard. Perhaps I shall share the cuteness between the two granddaughters and intersperse six squares with dots or stripes or simple pieced blocks of solids. I rarely work with solids and this may be just the incentive I need.


    On second thought, incentive to buy more fabric or to quilt and sew is rarely needed. Right?