Showing posts with label rulers. Show all posts

Monday, May 2, 2022

Quilt by the Numbers - Diamond FMQ begun

After a few days away, I am back to the FMQ on my Quilt by the Numbers quilt. I have officially exited the honeymoon phase of this quilt. Five blog posts later about this quilt, I only want to be finished. Having completed the circle FMQ on my quilt from the Zen Chic Figures fabric and Kira pattern from my FMQ planning post (4/5/22), I now moved on to the diamond FMQ on the other half of a block. What follows might not make sense if you have not read my FMQ post about the circular FMQ (4/9/22), so let me at least repeat my terminology and the quilting pattern for a diamond portion of a quadrant. After all, it has been four weeks since I posted about this quilt, although I have been plugging away at it, in sporadic sewing sessions. 


I reasoned that the diamond half of the block would be easier since the circles would be corralled between straight lines, not arcs. This time I used 1.25" diameter circles (20 in the outer diamond) and 1.0" diameter circles (8 in the inner diamond), fewer than in the circle quartets. The diamond quartets are not much speedier to FMQ, though. I learned one still takes me close to an hour to FMQ. With 16 diamonds total – 9 diamonds center + 12 x ½-diamonds edges + 4 x ¼-diamonds corners –  I could optimistically expect to be finished in 16 hours. It did take me longer, especially adding in some time for picking out serious goofs. When the FMQ completion was in sight, I was relieved. Closeups are intended to show the details at different stages of the work in progress.


I did get better as I pushed on and here is a closeup of two full diamonds in turquoise thread against a backdrop of two different color ways.


Now I have to pick out my goofs, if I can relocate them. Most are slips of the ruler where lines were crooked if you looked closely enough and can be ignored. In the following photo is an error that definitely needed to be repaired. I stitched a diagonal line in the wrong place not spaced far enough away from the previously line above it; then I mistakenly inserted 1" circles instead of a 1.25" circles. The straight lines on four sides were a breeze to pick out, but those circles where stitches overlay stitches are a real bear to pick out. As you can imagine, it takes much longer to remove them than it did to put them in. Fortunately I did not make many of those type errors.


Finally, as I tackled the remainder of the 12 half-diamonds along the edges and 4 quarter-diamonds in the corners, I made one more unique goof. Whoops! My paper guidance template for the circular FMQ was on the surface of the quilting table beneath the quilt and I accidentally sewed the paper sheet on to backside of one corner of the quilt. Fortunately I did not need to pick out any stitches; the paper tore away easily.


The FMQ of the edge  diamonds was easier since I did not have a bulky portion of the quilt in my lap and because access was easier than those in the center. I was, however, bored of diamonds by this time. To amuse myself I kept playing the tune in my head from the classic 1953 movie Gentlemen Prefer Blondes, in which Marilyn Monroe sings Diamonds Are A Girl's Best Friend. It helped me forge on with FMQ of partial edge diamonds with a renewed positive attitude. If you do not want to watch the YouTube video, here are the lyrics to the song. They are quite amusing.


The FMQ is not be perfect, but the saying "aim for excellence, not perfection" comforts me. I may not be ecstatically happy, but I will at least be content; aiming for "excellence" got me to "very good". Once I wash this quilt and it puffs up, camouflaging where the glitches are, my sense of accomplishment will grow. In retrospect, I believe my FMQ plan on this project was a bit more ambitious than my present skill level but I am proud that I stuck with it and learned some lessons and some skills.

These diamonds were NOT a girl's best friend!

Saturday, April 9, 2022

Quilt by the Numbers - Circle FMQ begun

I have worked finally up the courage and emerged from my analysis paralysis to begin the FMQ on my quilt from the Zen Chic Figures fabric and Kira pattern from my previous post (4/5/22). What follows might not make sense if you have not read my previous post so let me at least repeat my terminology and the quilting pattern for a circular half of a quadrant.

After having completed one concentric circles quartet and partially muddling through a second concentric circles quartet, I have already learned a lot. Fabric does not have the precision of lines on paper. My brain knows this, but in my heart of hearts, I guess I acted as if this were not true. As I suspected, it is difficult to hold the arc rulers in place, especially the larger ones, even though I covered them with loads of sandpaper grips. What I did not anticipate is that a little bit of slippage changes the gap between concentric circles enough that the smaller chain of circles sandwiched in between sometimes extends beyond the boundaries. The 12" diameter outermost circle and the next smaller 9" diameter circle, even though they enclose a 1.5" channel are not aligned well enough, to contain the chain of spheres more fully. As I get better at holding the large arcs more securely, I am hoping they will be more aligned. Fortunately, the problem of the circles overhanging the channel edges gets less severe toward the center of the quartet. The smaller arc rulers are easier to hold and there is less distance for the fabric to stretch. I was still, however, successful in fitting in 5½" circles per ¼ quadrant, 22 circles per quartet. Following are closeups of the top half and the bottom half of the outer ring of one quartet in process.


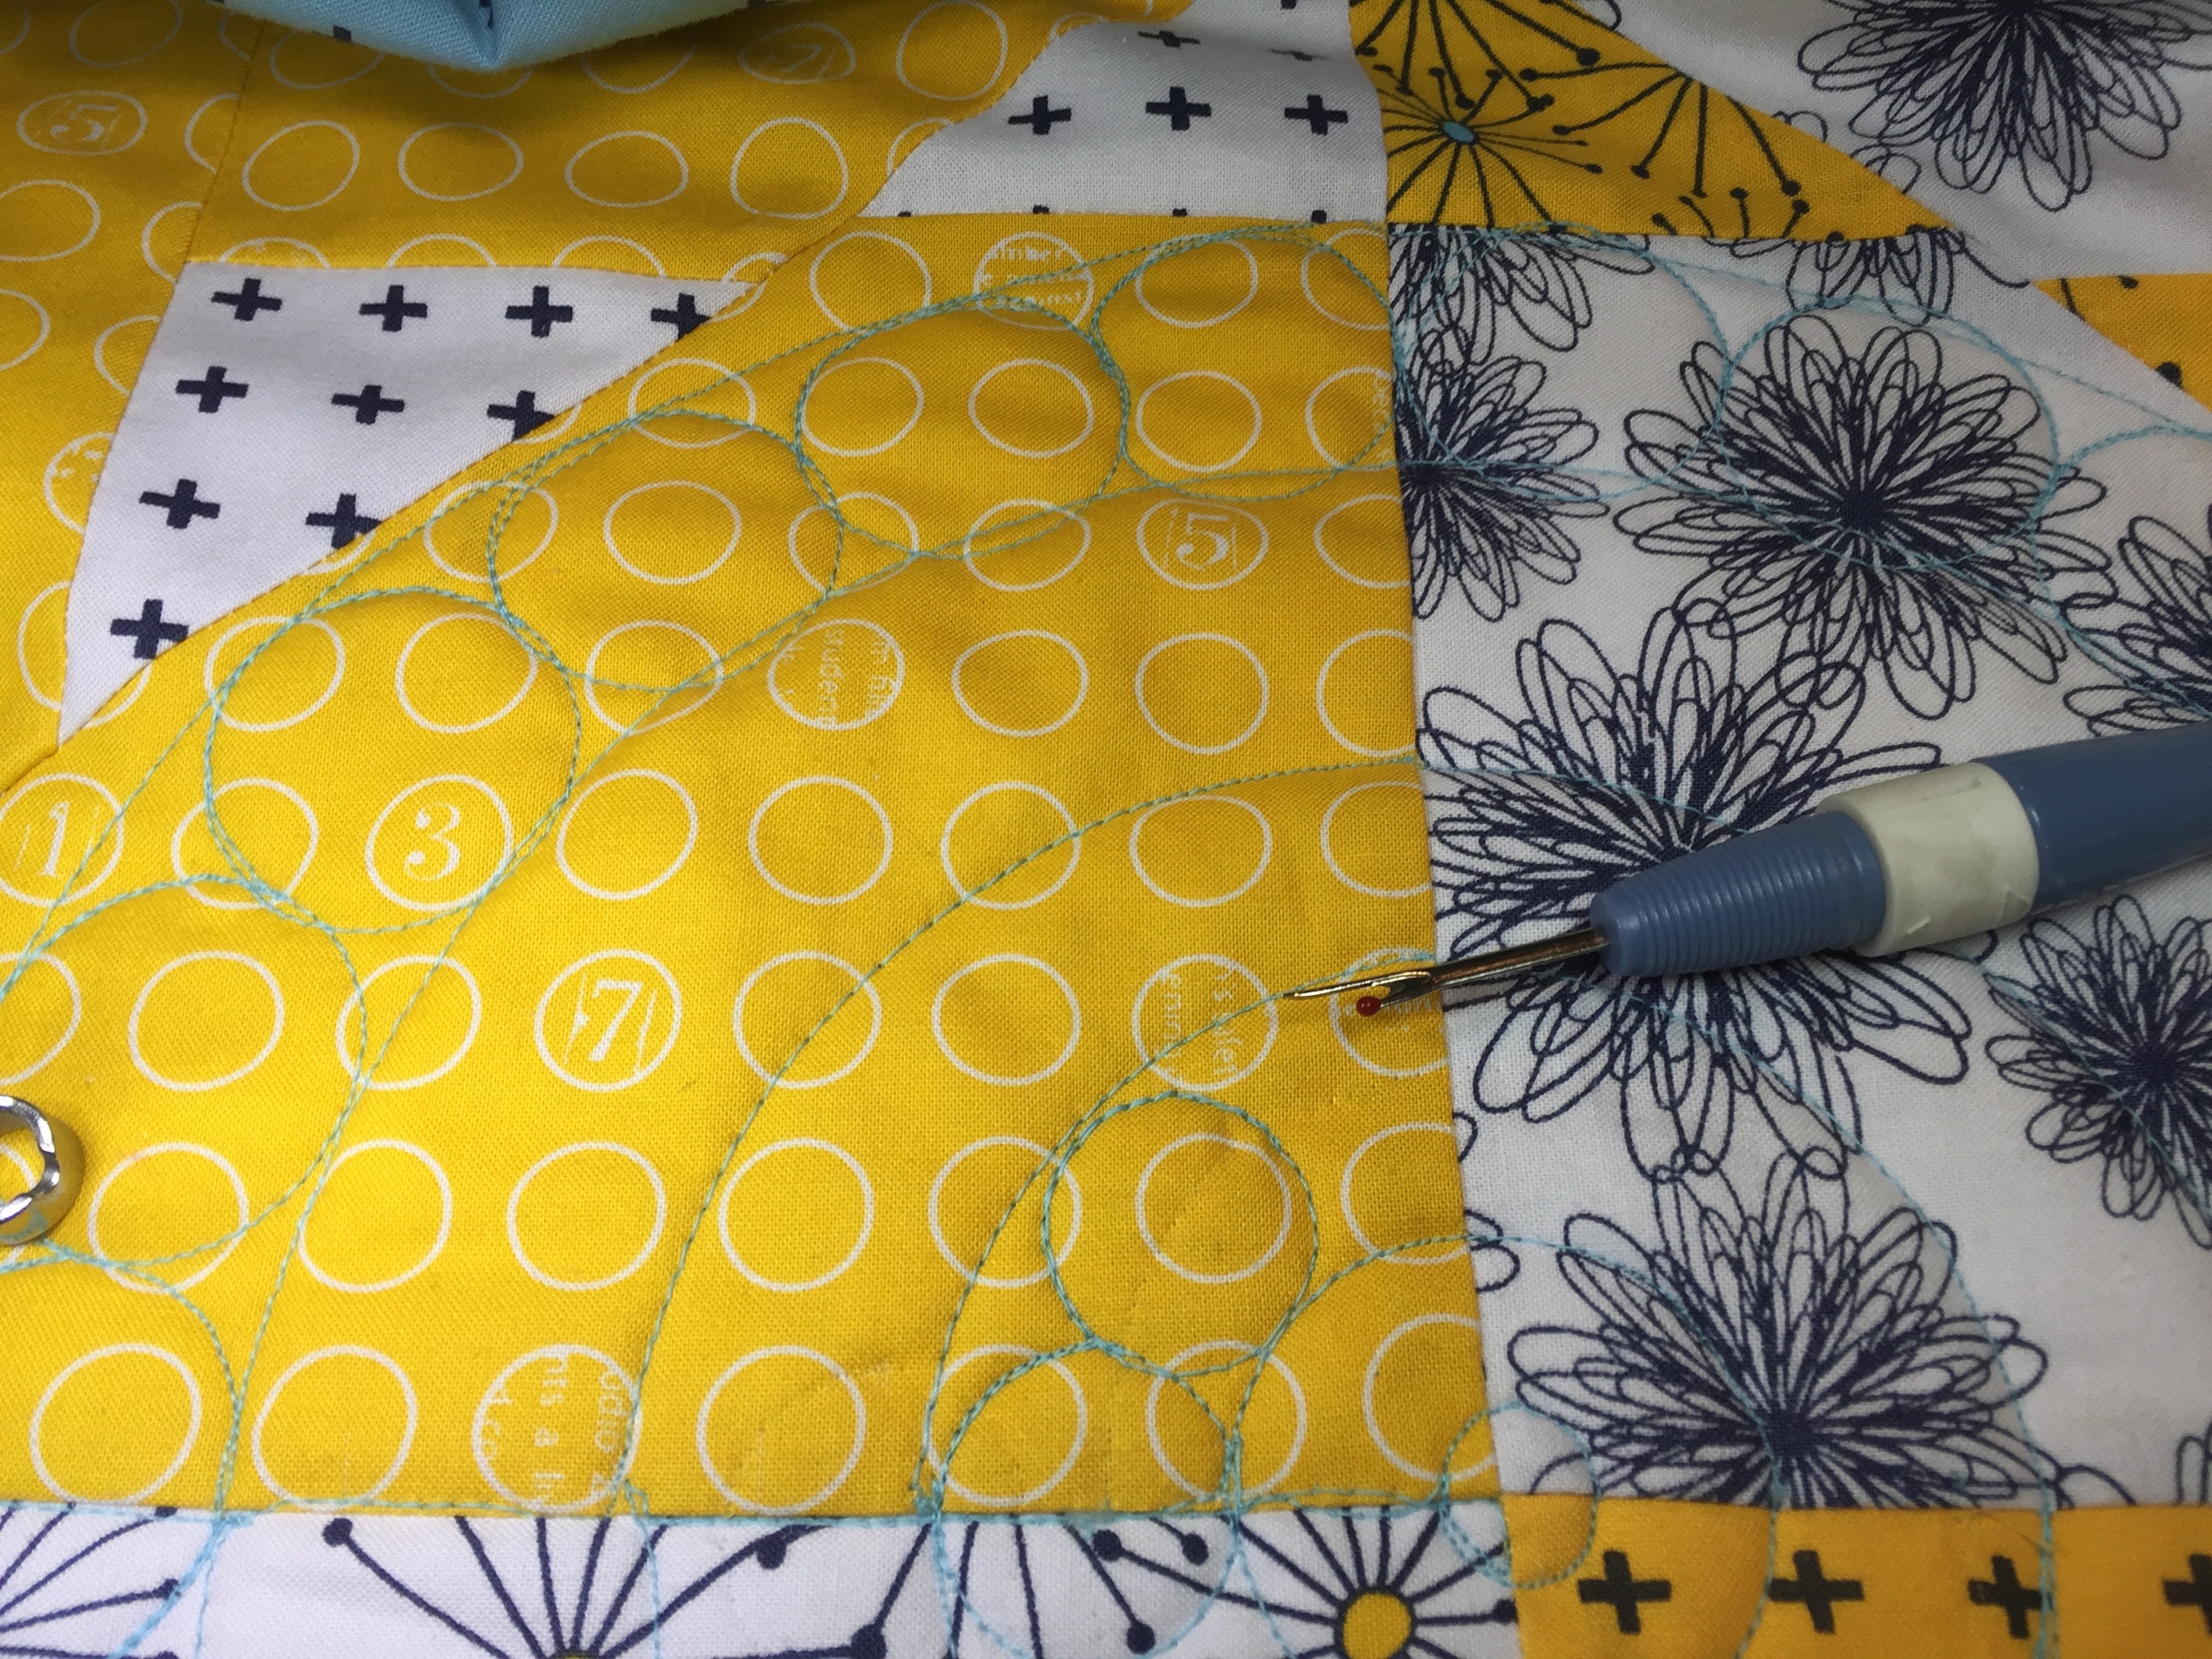
My second lesson learned is that I need to pay more attention and follow my diagrams. In the following photo the seam ripper points to a circle that is at 3" diameter when it should have been 4". Then I wrongly proceeded to place the 1" dimeter circles inward of the line instead of outward. They should be in the ring formed between the 6" diameter and a 4" diameter circle. I caught my error when I realized that sixteen 1" circles would not fit where I was putting them. As usual, it takes a lot more time and effort to pick out a stitching error than it does to create it. I goofed this way twice! But I persevered more carefully. I did have to spend time and effort picking out this goof since there was no way to recover from it and it was so obvious. I keep saying to my husband,  "I'm learning... I'm learning..." He replies, "Are you learning not to do this design again?" 


I want to capture what I have been learning. In stitching the large concentric circles I found that although the template is for half a circle, it is easier to just concentrate on a quarter of a circle at one time, in particular the center 90°. I concentrated on holding only half of the arc steady at a time, 90°,  and adjusting at four points on the completed circle. In the next two photos, I line up the registration scribe lines on the template (marked with orange tabs), with the central vertical and central  horizontal seams of the quarter. The unused section on either side provide good handles for holding the template in place, necessary even with all the radial strips of sandpaper grips I have added.  The first picture is for the 12" diameter, but even with the 6" diameter of the second photo I found this to be true. I could adjust the angle at four points and achieve a smooth transition at those junctures instead of trying to place a half where one size fits all perfectly. It doesn't. I've learned adjusting is not a crime nor an admission of failure; it is a sensible source of flexibility. 


One thing I have learned about that chain of twenty-two 1.5" circles sandwiched between the 12" and 10" diameter circles and that chain of sixteen 1.0" circles sandwiched between the 6" and 4" circles is that they do not always turn out to be exactly 22 or 16. Realistically, when I think about it, even if my spacing is off by only 1/16" per circle on that inner channel, with 16 circles that adds up to an inch or an entire circle! I have learned that fudging is my friend. At each seam line I adjust to enclose four 1" circles or five-and-a-half 1.5" circles per my diagram. If the circles within each channel overlap a tiny bit or space out a tiny bit, I keep telling myself it looks "organic" and that I like that look. I have complete all sixteen circle quartets and I did improve. Here are the tenth and eleventh quartets I sewed. I chose to photograph these particular two since the turquoise thread color contrasts enough to show the stitching. Also the blue quartet shows off the figures that I so like printed on the fabric. I succeeded in enclosing 22 circles in the outer ring and 16 circles in the inner ring on fifteen of the sixteen quartets. I am not revealing which of the sixteen quartets is amiss and I am not picking it out either. I'd rather spend my time learning get better at quilting and not better at picking out. It can remain a challenge for those looking at the quilt to find the anomaly.


I did improve my template wielding skill and my fudging capability. I decided to do all the circle quartets first before proceeding with the diamond quartets. I reasoned that the diamonds will be easier since they are straight lines rather than arcs. I am soon to learn if this is true.

Tuesday, April 5, 2022

Quilt by the Numbers - FMQ Decided

My current project is a quilt made from Zen Chic 10" fabric squares in the line Figures and a Kira pattern. Previous posts on it were 4/3/22 and 3/5/21 for piecing and FMQ planning respectively. Now I am ready to start quilting the assembled sandwich.

In my previous post where I was planning and working out the details of how I was to FMQ it, I used an Excel spreadsheet and did calculations ad nauseam. Then I got realistic. Once I understood the situation, I pretty much threw geometry and theory out the window to come up with a solution to get an integral number of small circles within two larger concentric circles. Certainly my Excel spreadsheet guided my guessing, but ultimately, I'd be restricted to using standard size templates and adjusting a bit. Now that I see my resulting diagram, it reminds me of a ball bearing with an inner race and an outer race, with ball bearings sandwiched in between. I am a retired mechanical engineer, so maybe that was my subconscious inspiration all along...? 


I had a set of Handi-Quilter templates for the 12", 9", 6", 4", and 2" diameter circles to use for the enclosing circles. All the even diameters use the outer edge of each template but the odd 9" diameter circle uses the inner edge of the 12" template. I used four out of the set of six for five diameters. I had to buy a Handi-Quilter mini-circles template for the 1.5" and 1.0" smaller circles for the inner chain of circles. I had other circle templates but not the exact diameters I needed. I was happy to purchase the mini-circles in other diameters to add to my repertoire.


So here are four blocks assembled in the circle quartet configuration and FMQ'd. I had to be careful and take it slow while stitching. The handling will surely be more difficult for a big quilt, but I think it will be manageable. I have a mid-arm Sweet-Sixteen so I need to move quilt and rulers in concert. Right now I plan to use turquoise thread although it does tend to blend into a few of the prints. Choosing a thread color is always difficult for me. As a relatively inexperienced FMQ'er, I fear a contrast will reveal my inadequacies; however, if it comes out good, I kick myself that the stitching does not show. It is true, though, that you cannot tell if you are improving, if you cannot see what you are doing while you are doing it, or how it came out once you've finished. This turquoise thread color choice remains an experiment and a challenge for me. Fingers crossed that my skilled performances show up in the contrasting regions (yellow below) and that my goofs get blended into the matching background (turquoise below). The design is clearly more visible on the white backing I used for my prototype. 


The straight lines in the diamond configuration quartets was easier to figure out. I did have to finagle to get half-circles to fall at the horizontal or vertical seams where the corners of the diamonds are formed. I was able use the HQ Swiss Cheese template for the 1.25 diameter circles. I got an additional use out of the HQ mini-circles template I had just bought for the circular quartets for the 1.0 diameter circles. I actually prefer the Angela Walters' straight rule Slim to the HQ equivalent straight ruler (which I own) because the lines are in black and white so they show up on light and dark fabrics both. HQ's registration marks are only printed in white.


The four blocks assembled with the central triangle pointing inward to form a diamond are FMQ'd below. I did manage to place the diagonal straight lines so that the small circles do fall in the corners. There are six per side on the larger diagonal and three per side on the smaller diamond. The stitching shows up better on the white backing. And so do my goofs!


Each block has circular FMQ on one half and straight FMQ on the other half. Below are two practice blocks. It was tricky fitting the circles evenly within an arc, as my multiple tries show in the left image. It also took a bit of measuring and a bit of fudging practice to get half circles on each end of a strait stretch so they would form full circles at the corners of the diamond. I did not succeed on the left. On the right is my second attempt: one circle and two half-circles in the smaller diagonal strip; four and two half-circles in the larger diagonal strip. In the circular quarter of the block, there are 5 ½ circles per larger quarter and four circles per smaller quarter.


Here is how the alternating circles and diamond quartets will nest. I am excited to try this on the real quilt. I will have sixteen times to get the concentric circles right and sixteen tries to get the concentric diamonds right. I think I will start with the circles.
 

Blocks: 64 = 8 x 8  = 16 quartets
Circles: 16
Diamonds: 16 = 9 diamonds (center) + 12 x ½-diamonds (edges) + 4 x ¼-diamonds (corners)


I am also pleased to have added to my growing circle template inventory. These are my rulers. Only the 1" and the ¾" have duplicates. I have used all but the 2 ½" circle; but I may use that on another project.

Friday, November 26, 2021

Gray Spiral Table Runner

I have made this pattern for a Spicy Spiral Table Runner several times before. It takes eight fat quarters and a wedge ruler, either 9° or 10°. In my first experience per my 11/4/2011 post (which was – yikes –  ten years ago) not only did I goof and need to add a ninth fat quarter, but "I bought the pattern twice and the ruler three times with trips to two quilt stores and a quilt festival." This time went much more smoothly. My daughter had just hung new dining room curtains and asked that I make her one of these spiral runners in shades of gray. These are the eight fat quarters I selected from my stash and cut each into four strips of the appropriate width per the pattern.


Since there is a range of lights to darks, I chose a variegated thread in grays. I know the thread does not really show in piecing but I still often do try to match. I then pieced together my strips in the dictated color/width order, until I had two light and two dark strata. 


I then cut these strata into wedges using a 10° ruler.  Sewing the wedges together, two at a time, then four at a time gradually formed one light and one dark half-spiral.


Joining the light and dark halves formed a full spiral. Those jagged edges would be trimmed off later to form a smooth curve.


Instead of binding, I stacked three layers in this order  – batting on the bottom, backing right side up, and pieced top right side down – pinned them together, and cut out the spiral shape. I splurged a few years ago at the 2017 Houston Quilt Festival and bought Handi Batting Scissors by HandiQuilter. They have a 5-inch straight-edge cutting blade and ergonomically designed handle for ease in cutting. When you have a tool you need to use it, right? These specialty scissors are offset enough that they cut around that unusual shape like a dream. I use them for every project that requires batting.


After sewing these three layers together I turned them right side out, pressed, and let the assembly mellow for a few days while I waited to be inspired by a stitching pattern for the quilting. I had quilted two quilts (Christmas Cars -12/18/20 in Dec 2020 and It's a Party - 2/19/21 in Feb 2021) with a circle template. They both had pleasing outcomes and so I wanted to get more practice with the larger BIG HQ Swiss Cheese Template. I chose the largest size circle, 2 ¼".


I had agonized over my stitching pattern decision and then tried to figure out how to space and line up those circles in a pleasing fashion. I inserted a photo of the spiral runner pieced top into PowerPoint and then overlaid circles to see how it would look. I wanted to follow the flow of the shape yet be reasonable about the work involved. Those jagged outcropping are ¾" before being trimmed off and I used them to scale my 2¼" circle diameter in PowerPoint. The blue line midway indicates where the light and the dark halves were joined.


Once I figured out a way to mark their placement by locating the center of each piece and then connecting the dots; the circles went in rather smoothly along the curve I had generated. The only problem was that those stitched circles did not show up! After minimal deliberation I chosen to quilt with the same gray variegated thread. All my stitching fretting had been for naught. I took a picture of each half in orthogonal lighting and with a good imagination you can see the circles. Wishful thinking, but perhaps they will puff up more after washing.


The circles show up slightly better on the back, which is the tape measure fabric. Following is a full runner photo followed by a closeup of those camouflaged circles.


These were the majority of my leftovers from cutting out those 10° wedges. Of course I could not bring myself to toss these out. I played with them and formed two "mini-somethings".


I quilted the "mini-somethings" from the back on my domestic along the lines of the tape measure print. I think this stitching pattern may very well be more effective than the circles; it was easier, too.


I do not plan to make a grosgrain ribbon label as is my habit for my quilts; instead I plan to write my initials and the year completed in fine-line fabric marker in an inconspicuous location on the back of the table runner itself and the two mini-somethings. The pseudo-labels will be short and to the point – DIC 2021.


I think picking out the fabrics was the messiest part. These are the options I spread out, considered and rejected, having to refold and put all of them away. Half-yard cuts are on the left and fat quarters are on the right.


Since the four strips cut from each fat quarter was 3" or less in width, there remains ~6" or more by ~22" or so half-fabric width from each fat quarter. Here those fat strips are folded neatly, ready for another study in gray. I suppose I could make a couple placemats but I am tired of these fabrics for now. My present challenge is to find an inventive place to store them so they are not forgotten. So for now my Eight Shades of Gray will be stashed away.