Wednesday, May 25, 2016

Flora and Fauna

I have been away from my online quilt family for the past couple weeks, being other wise occupied with my biological family – as it should be! I have a new granddaughter who was born to my son and daughter-in-law on May 11, 2016. She is the recipient of the Nestling Owls quilt from my previous post. I was busy helping to care for her two-year-old big sister.

I did manage to sneak in a quick trip to a fabric store in the area while I was away. I supplemented my stash of burp cloth flannels with these cute prints. 


When I returned I did a bit of FMQ practice. A simple fabric panel had a whimsical design and I outlined the shapes. It is more of a coloring book approach rather than a creative endeavor, but I liked the effect. I used an echo foot to parallel the wavy lines in the border.


The back turned out kind of cool, too. This quilt is destined for the Community Outreach Program of one of my quilt guilds so it is my custom not to display it in its entirety on my blog – just snippets to show technique. The endeavor did inspire me to do some other panel work.


I thought this sea creature panel was too cute to pass up. I purchased it while away, at the same time I bought the flannel. Lo and behold, when I got home I found two fabrics in my stash that I think coordinate very well. The striped one looks like the seaweed swaying at the sea horses tail. The dotted one makes me think of bubbles and reinforces the googly eyes of the ocean animals. I like that the dot and stripe fabrics are a bit different in that they play up the greens and oranges and play down deep blue typical of the sea themed fabrics. I would like to whip up something simple out of this combination. Maybe I will quilt it in an outline coloring book format like the previous panel. Hmm. Perhaps I can throw in some waves or seaweed between the blocks or in the border.


Now I would like to do some catch-up with other bloggers at Let's Bee Social #126.

Wednesday, May 11, 2016

Nestling Owls Completed

This quilt for my granddaughter was inspired by three things:
  1. a fabric in my stash I loved, Moda's Full Moon Owls by Tula Pink, 
  2. a pattern by Quilter's Dream I have been hankering to try, Square Root of Nine, and 
  3. a desire to expand my FMQ bravery with a stitching path from Angela Walters book Shape by Shape.


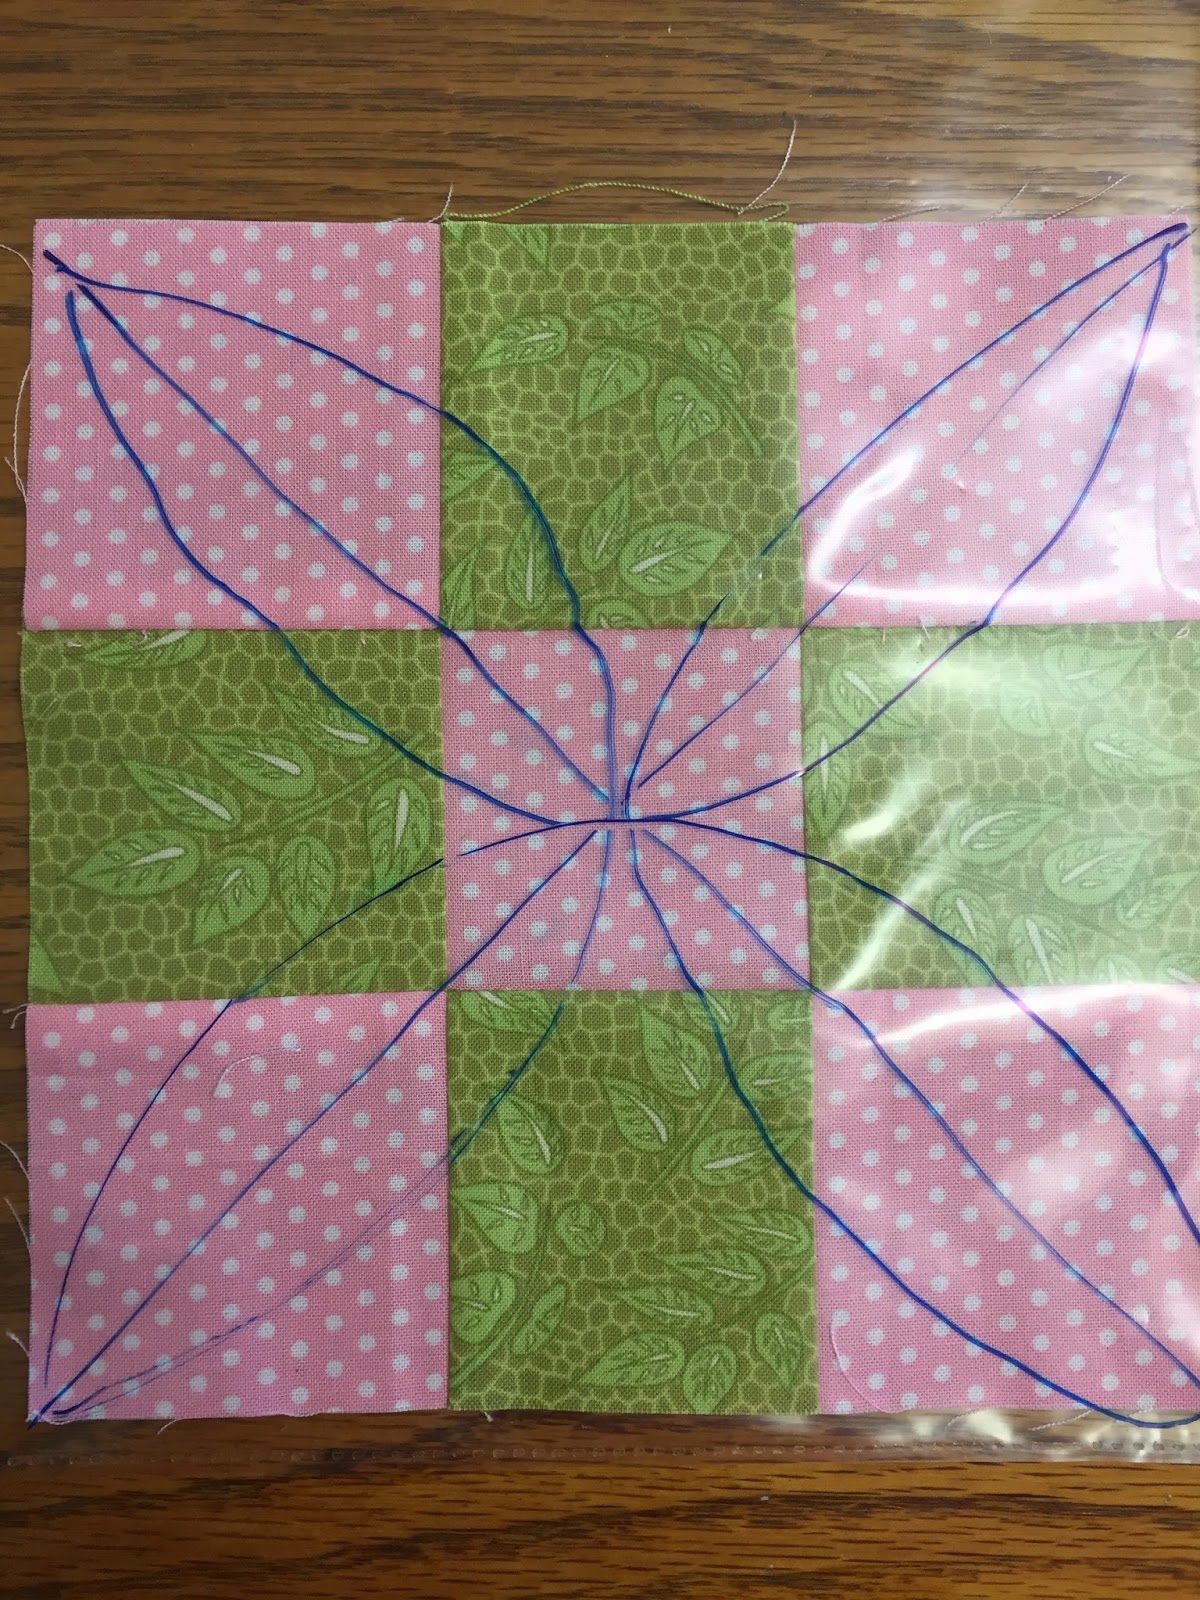
Previous posts discussed the color selections, block placements, and border. What was left was the layering, quilting, and binding. For the FMQ I chose an Angela Walters quilting suggestion for squares, a four petaled pattern based on two diagonals within the square. I drew it below on a plastic sheet protector with a same block inserted inside.


It shows up better on some blocks rather than others depending on the fabrics, but it fills the space nicely.


For the square within a square blocks I wanted to accentuated the offset diagonal nature and so only did a four petal pattern in the very center. I intentionally quilted down only one of the diagonals (not both) to add some interest but I did stitch in the ditch around each square. My original idea was to add loops along the diagonal but they looked more like a chain link fence rather than flower petal or leaf and were distracting so I omitted them in favor of a simpler approach.


I am glad I am getting enough braver to quilt in a non-matching thread color. It shows up so much better, adding visual interest as well as texture.


On the quilt top I mixed it up a bit and added the four lobed motif in different sizes throughout. This is my overall plan. I printed a photo of the assembled top and drew my proposed path on it. Note where there was not a complete nine patch I chose to break it up into a four patch and two singletons. This four lobe pattern scales well and easily.


I did the lobes free hand but I did use a ruler on my Handi-Quilter sit-down to get the diagonals straight and to help stitch in the ditch neatly.


I repeated the four lobe pattern in the border, keeping it the scale of three motifs to one block. For the square in a square blocks that did not have the natural seaming dividing it in thirds, I marked a piece of masking tape, using as a guide. It is low tack tape and I just peeled it and moved it to where I needed it. I do not mark my quilt tops, both because I am lazy and also because I fear I could be unsuccessful in removing the marking medium.


Having a border the same width as a third of a block helping in quilting around the corners. There were no cornerstone problems needing adjusting or fudging.


The motif blended very well from within the quilt top to along the borders


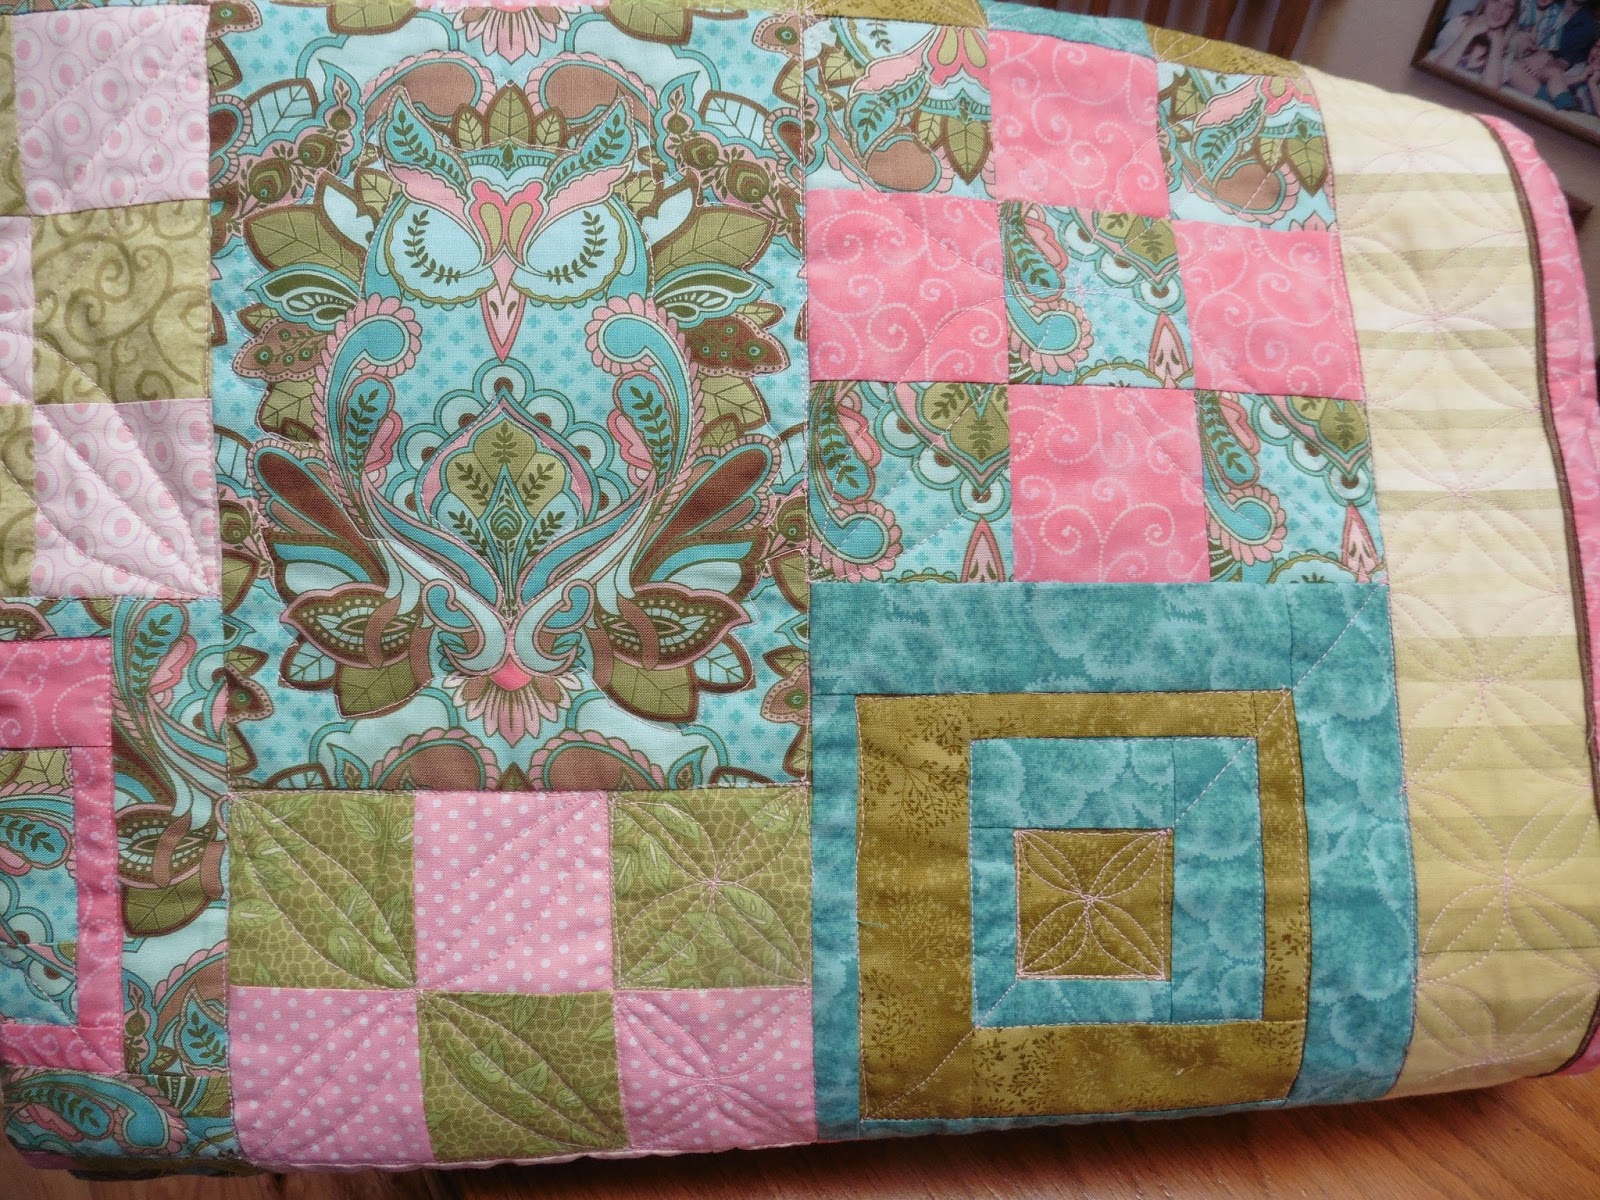
The following photo illustrates the six quilting regions, clockwise from top left.

  1. I sort of "winged" it on the owl blocks, pretty much echoing the owl's shape and the leaves surrounding. I was considering doing "feathers" but decided I wanted the owls to be puffier rather than flattened by excessive stitching.  
  2. Next is a large four lobed motif on a nine-patch block. 
  3. The border has a series of the motif lined up and scaled to one third the dimension of a block. 
  4. The two-tone magic binding has a stitching in the ditch along the chocolate accent flange. 
  5. A square in a square block has a diagonal, stitch in the ditch around the squares and a single small central motif. 
  6. Two-thirds of a nine-patch  block has a four patch medium size motif and two small individual motifs.


As the final touch I added labels to the quilt back. On the left is the quilt name Nestling Owls, and on the right, my initial and the year. I intentionally chose Nestling Owls not Nesting Owls because in my mind it conjures up images of cuddling.


Holding the quilt outdoors give a fair overall display, but colors are a bit muted in the shadows. Sunlight photos looked washed out. I keep gaining a growing appreciation for the photographers out there who can capture the essences of a quilt. Can you find the eight owls camouflaged in this quilt? I hope my granddaughter will enjoy looking for them.


Hanging the quilt indoors gives a bit more shadowed view that reveals the stitching. Yup. There are still eight owls there. Perhaps they are easier to spot now. Once you spot them will they be "spotted owls"? Groan...


Without seeing the stitching detail, the back side of the quilt looks quite flat and frankly, a tad boring, even though I do love this paisley-esque fabric.


Photographing in the sun at an angle show up more of the stitching and lends more interest.


I have washed it twice before gifting, and it did soften. I use 100% bamboo batting because I like its drape. Too much quilting makes for a quilt like flexible cardboard. Nestling Owls snuggles nicely into this chair.


The blog posts chronicling Nestling Owls creation and progress are as follows:

Pink and Green (March 31, 2016)
Paisley Owl Nesting (April 14, 2016)
Paisley Owl Rearranging (April 22, 2016)
Border Detail (April 27, 2016)
Nestling Owls Completed (May 11, 2016 - this post)

Now I will link up with Let's Bee Social #124 so I can share the good news of this quilt's completion.

Sunday, May 8, 2016

TA-DA! Isaiah's Sweater Is Completed

In my post for May 4th, titled Isaiah's Turn, I had blocked a knitted sweater for my grandson. The pattern was for a baseball jacket designed by Debbie Bliss and I "just" needed to add the neck and front edging and assemble it. "Just" is a four letter word in this context. There is a lot to do at this stage, taking much more time, and many more tools, than I truly appreciated or anticipated. Gaze upon the tools of the craft I used for this one sweater for a wee boy not yet one year of age.


I had decided to put buttonholes instead of snaps on the front, so I needed to figure out the buttonhole size and spacing and then tweak the front band and collar to accommodate the extra width. I thought that a yarn-over and decrease would create an insufficiently sized buttonhole, so I experimented on a swatch with casting off three (lowest opening), then casting off two, and then using a yarn-over only (topmost opening). There was not much difference visually, but when I inserted the button I down selected to the easiest route, pairing a yarn-over with a decrease which gave a snug enough fit yet allowed the button to pass through.


Then came the jumble of picking up stitches along the front edge (61 of them, evenly spaced), adding stitches from a front neck edge, sleeve, back neck edge, other sleeve, other front neck edge, and another 61 evenly spaced along the other front edge. When you consider that 61 is a prime number, evenly spacing those stitches and button hole locations requires a bit of head scratching and fudging. I managed to assemble one pretty full circular needle while accumulating in a pile the multitude of red, green, and blue safety pins and stitch holders as I removed them. I made sure I substituted those aqua and peach stitch markers to keep track of where I had been. I have quite an impressive mess on the table top of my sewing machine. I work there because it gives me a flat surface that is well lit by two arching Ott floor lamps I have. Although knitting is a portable craft, I needed to isolate myself to concentrate on picking up those stitches. The distraction of another person or TV would clearly be unacceptable during this intense process.


It is impressive how many knitting tools are out. Clockwise from 9 o'clock: plastic and makeshift yarn stitch markers, safety pins, large stitch holders (visible in previous photo), highlighted and annotated directions, size 2 and size 3 straight knitting needles, leftover yarn, notebook for calculations and reminder details, circular needle 2.75 mm size 2, the sweater in progress, buttons going for a test drive within the button hole.


To put on that striped collar, I had to reread the directions about a gazillion times until I grasped how it was embedded in the front neck area; but I finally got it. The Debbie Bliss Baseball Sweater pattern is rated as average difficulty on Ravelry. The sweater is easy except for the collar part and if you follow the instructions blindly without trying to understand them, they do work fine. Not only are my tools a shambles, but look at all those loose yarn ends that need to be discretely woven in! Yikes!


Slowly but surely I started assembling the sweater by joining the raglan sleeves. I find it best to work on a flat surface. I'd complicated this flat configuration to some extent because I'd opted for no side seams on the body, preferring instead to work it in one piece. I could flatten portions at a time to join one shoulder seam down to the armhole with the back support of a work surface.


Here is a wrong side view of one sleeve before being inset and the other sleeve after being inset. The photo is oriented with the striped neck collar down at the bottom. There are lots of yarn ends and knitted component twists, but they can be sorted out and beaten into submission.


The underarm seams were similarly squirrelly but here is an after shot and a before shot of the two sleeves, viewed from the inside. Note the taming of the loose yarn ends.


The final step was adding the buttons. They too had loose yarn ends that had to be dealt with.


TA DA! Here is Isaiah's completed sweater, both front and back views. I made a 9-12 month size and he is 9 months old. Let's hope for some cool spring weather or a stretchy sweater in the fall.


Earlier this week I had told my daughter, "I will have it in the mail tomorrow". It did not get mailed until two full days, after that promise; however, it is now completed and mailed. TA-DA! It is no longer on my To-Do list.*
(previous posts on this sweater are)
Knitting, Queries, Quandaries, and Quiescence posted March 18, 2016 
Isaiah's Turn posted May 4, 2016 

* Credit for the TA-DA versus To-Do concept belongs to creativity coach Katie Fowler.
You can read my review of her book An Artist's Journey through Wonderland at

Wednesday, May 4, 2016

Isaiah's Turn

In all this frenzy to complete a quilt for Isaiah's cousin before she is born in May, my 8-month-old grandson's projects got set aside - and nearly forgotten.  I had completed the knitting on his sweater while visiting him and his sister in Oklahoma earlier this spring and wrote about it in my post for March 18, 2016, titled Knitting Queries, Quandaries, and Quiescence. All that remained to complete the garment was blocking the components and adding the bands on the two fronts and around the neck. The blocking task would not take long. I just had get over my inertia to start it. The ironing board was already out. The pressing cloth was hanging in readiness, pushed-pinned quite conspicuously on my bulletin board, as it had been for months.


I pinned the top and two fronts right side down. I had knit it in one piece to avoid side seams. It barely fit on the double thickness towel I'd placed on the ironing board.


I saturated my pressing cloth and wrung it out. I laid it over the stockinette stitch portion avoiding flattening the ribbing. I steamed flat only the outer edges that were curling under along each front and along the raglan sleeve shoulder seams.


I repeated the process for each of the sleeves.


Here are all the pieces flat, right side up, and ready to be seamed. I will add the front and neck bands before seaming.


My next decision is in sizing the buttonholes. Because of the fine gauge of the yarn and the diameter of the shank buttons, I suspect a mere yarnover and a decrease will not be sufficient. I will need to knit up a trial swatch binding off and casting a few stitches. Two or three stitches is my best guess. Stay tuned.


So Isaiah is back in the running with Grandma projects. I need to finish his sweater real soon before it no longer fits him. Why do I so often underestimate how long something will take me? The weather in Oklahoma may already be approaching too hot to wear it but I am banking on him not having too big a growth spurt before fall. Am I being delusional?  I should learn my lesson and just aim for a bigger size. But then again you have to match the size with the season when the child will be that size. I guess a Grandma just needs a crystal ball. Sigh...

While I was on the topic of Isaiah, my daughter had seen my April 6, 2016 post about the sheet I'd sewn for a Pack 'n Play. I made it pillowcase style with no elastic needed. She thought it was a good use of my one yard size pieces of juvenile novelty prints in my stash. After all, I always claim that just about every  novelty print I cave on becomes a commitment to a quilt. Of course, there is the option of a pieced back but still, the colors are the colors, and the combination of them often presents a challenge to playing nice with others. My daughter asked for some covers for the pad on their changing table, giving its dimension as 34" long x 17"wide x 1" thick. It's girth calculates out as 2x17" + 2x1" = 36". I made two pad covers: one where the fabric's straight of grain ran parallel to the long dimension of the pad and one where the fabric's straight of grain ran parallel to the short dimension of the pad.

A fabric where the straight of grain runs parallel to the long dimension of the pad is the easier project. The first pad cover I made like this was straight forward. The striped pattern of zippy little cars runs along the straight of grain so the width of the fabric was plenty enough to circumvent the 36" girth with ease to spare. I cut off a 7"x36" band parallel to one of the selvages adn French seamed it as a tube. I only had a 1 yard length to use for the 34" long pad though so once I used ½" for seaming at the closed end on the left and used a ½" for a narrow hem at the open end on the right there was not much to overhang and tuck under. It is sufficient though.


The previous pad cover was certainly a simple approach but alas when fabrics are directional you need to follow their directions! On the second pad cover I made, the straight of grain ran parallel to the short dimension of the pad. I left the fabric at full width so there is plenty to tuck under at the open end on the right. I also left the selvages on and did not do any hemming on the open end. To calculate the girth around the pad I summed 2x17" + 2x1" and got exactly 36". There is no allowance for a seam in a one yard length of fabric. Especially if you figure the first time it is washed, it will shrink. With 3% shrinkage in cotton, that is about 1" per yard. I was quite fond of this whimsical doggie print but had to add side gussets since 36" was just not quite enough, I added a wide red and white stripe for the side edges. I made French seams that take ½" seam allowance and calculated (incorrectly) that I needed 1" side strips. The calculation was 2x17" (feature fabric), + 2x1" (inset gusset), plus an added 8x½" seam allowance, gives 40". I cut my side strips 2" wide. So far so good except when you take out the seam allowances I am back to 36" around and lose all ease. Note to self: with one yard of fabric I need to cut 2½" side strips even if they do creep up the side a bit when on the pad. This will give me 1" of ease for shrinkage during laundering. Second note to self: not to state the obvious but this project is even easier if I have 1⅛ yard of fabric so no side strips are needed at all!


The cover may fit now but it will be very snug when it shrinks! Perhaps when washed, my daughter can avoid a high heat setting on the dryer or take it out a bit damp. It seems like even with a changing table pad, where one size should fit all, I have trouble with making things too small. Sigh... Again...

Linking up with Let's Bee Social #123.