Wednesday, May 31, 2017

Storybook Charm Sparks Thought

After my frenzy of burp cloth production last week I was tidying the drawers in my sewing room and came across some charm packs of 5" x 5" squares. I had seen a tutorial from the Fat Quarter Shop to make a quilt with these charm packs which had been on sale. I had thought at the time that it might be fun to try these pre-cuts and the quick quilt made from them. I'd bought four charm packs, two prints from the Moda Storybook line and two solids. The print packs I could justify, in that I got a good variety of fabrics. However, I felt a bit decadent buying a pack of solid squares; but the convenience seemed worth the sale price. Maybe it was time to make up that quick quilt. (Doing so would also allow me to procrastinate in cutting and piecing my backing for a larger quilt in progress. This step of a quilt always bogs me down.)


This charm quilt may be quick to make, but my getting around to it most certainly was not. When I reviewed the Charm Pack Cherry video this week I noticed it was from slightly over three years ago. It and the free pdf of the associated pattern are still available. The pattern calls for an assembly line joining of squares, checker boarding between solid and random print. Nine-patch blocks are then sliced in half and rearranged. Random is very difficult for me but I thought I could handle this one. The pattern called for 72 solid and 72 print squares and each charm pack contained 42. This meant I would need remove six from each pack. Could I just pull out six at random from each print pack? No, of course not.


I laid out the pack contents in the order it had come in order to choose which six to remove. There are three columns of twelve and a rightmost column of six. I could have easily dropped that final yellow column but I wanted to keep in all the colorways.


I decide to pull out three 5" squares that were a sort of patchwork print that would have played more nicely in a large swatch. They are shown in the top row. Next I pulled out two squares of white with taupe gridlines since I felt they would have the least contrast with the solid white. Finally I pulled out the taupe dots since I had three of them one in the pack.


On a lark, I decided to check if the second pack was identical. I guessed it would be the same as the first since they were both factory assembled. That was an incorrect assumption. It took me a while but I ferreted out what was different. It seems instead of an extra taupe square I had a yellow square with a cute clothesline print that was not in the first pack. I certainly did not want to eliminate that little gem.


Instead I removed a bright yellow square. I loved the color but the grid was not as interesting as that clothes line print.


My quick random quilt is becoming less quick and less random. I cannot deny my true nature. Let's see if I can "let it go" during the assembly process. I allowed myself one concession. These are the large scale prints in the pack. I would not try to control their orientation within the block. But I would see that they fell only on corners so that they would not get sliced in half per a later step in the pattern instructions. There were only four of these squares so that is not too much interference with the random process, now is it?


To make a nine-patch block of prints and solid you make print-white-print rows and white-print-white rows.


As it turns out, it was quite simple to guard against slicing those large scale prints in half in a later step. In my subsection rows of three I made sure they were never in the middle. The castle and pirate ships were preserved, intact in one of the outer squares of the print-white-print rows. None would be in the white-print-white rows to be at risk.


I could proceed with chain piecing my white-print-white rows of three, ignoring what print square happened to surface next. I am two thirds there in the next photo, adding the second white square.


I sewed merrily along until I went to join the print-white-print rows on either side of the white-print-white row. 

I discovered there was a fifth large scale square, a second castle that I had missed. It was going to fall very close to an identical square in the same block. I interchanged that row with another print-white-print row so that did not happen. Yes, I interfered with randomness, but in my defense it was a minor readjustment.

Then when I was ironing my completed nine-patch blocks with corner prints I noticed that one had two of the same aqua grid adjacent diagonally to each other. I considered switching that row with the top row from another nine-patch block. Yes I would need to rip out the stitching along a 3-square row seam but that was not too bad. 


Then I got the idea to go back and see what squares I had rejected. Lo and behold there was that bright yellow I had given up. I swapped it for the upper left blue one and voila I am a happy camper, once again. It even picks up the color of those little birdies in the lower right.


After sewing my nine-patches into two sets of eight blocks each, the next instructions were to cut them in half into sixteen half-blocks. Eek! That was a bit scary but I did it and here are the two piles of half-blocks.


I placed them in position on my design wall according to the pattern specified sequence and orientation, but otherwise randomly. I even allowed some upside down ships and castles. I traded the positions of only two blocks where adjacent identical prints glared out at me. I am pleased with the simplicity and straight forward, well-explained directions for this quilt. I got this much completed in one day, even with my non-random interventions. I have begun joining the blocks now, but stopped for the day to reflect and blog. Sometimes I find it easier to get back into my sewing room the following day when there is something simple and straightforward to pick up and continue.


After finishing the joining, my next step is to find a backing and binding and decide on an FMQ pattern. My husband came in and looked at the blocks arranged on my design wall. "Very pastel-ly " he said. He then innocently added, "Not like what you usually do." Then he left leaving me alone with my thoughts. He did say he liked it but his casual comment sparked some soul searching on my part. He is right. I do not usually use solids. I rarely use pure white. I like brights. Is that all he meant? Probably. But I took it a step farther.

Of late I have been trying to stretch myself. I tried a bit of Kaffe Fassett fabrics in my post for April 20, 2017. I worked on Y-seam and hexagons in my post for Jan 11, 2017. I completed four quilts in 2016 pictured in my 2016 in review post - and none them seem to be what I "usually do". I no longer know what it is that I "usually do". It is a bit disconcerting that I may have lost my quilting identity. I often say that it is the "process" not the "product" of quilting that is the important part of my hobby. So maybe having a signature look is not that important. Madonna is often noted to be continually remaking herself. But I am no Madonna. Should I have an identity? Or is this thinking too deeply? Maybe I should just have fun. I will zot over to Let's Bee Social #179 and do just that for now at least! Like Scarlett O'Hara from Gone With the Wind, perhaps I will just think about it tomorrow.

Friday, May 26, 2017

Cheaper by the Dozen

Between friends of my adult kids and kids of my adult friends, I am in burp cloth mode production again. These are for baby girls #3 and #4 (twins), and baby girl #5, all born in May! Earlier post on May 9th was for baby girls #1 and #2. Since I generally like to give half a dozen birth cloths I had a goal to produce 18 of 'em. (I actually made 19.) Here they all are spread out on the upstairs counter outside my sewing room after they came off the DL2Q production line. By the way, that production line was in full swing until 2:30 am last night. Once I get on a roll I can really pump these out. The sewing repetition and ironing is calming and methodical. I get extra joy from selecting the fabric combinations and explaining my reasons for the choices. So here is how I pondered the pairings.


First off, what follows is the dozen for the twin girls. I have had that grey birch bark flannel for a while and could never quite find something to go with it. Associated with those Parisian looking kitties, the birch bark flannel looked like cat fur to me. Oo-la-lah! These kitties reminded me of the cat in the Disney movie The Aristocats.


See the likeness? For a lark you can listen to the song Scales and Arpeggios at this YouTube link.


This plaid flannel felt so soft, almost like a fluid wool weave. It was purely coincidence that the colors went so well with the pennant print. They are from totally unrelated fabric lines.

   
This perky stripe paired well with the dog, cat, and mouse print. Even some of the umbrellas and the band on the dogs' beanies are striped.


After a plaid and a stripe how about something diagonal? I paired an on point printed gingham with a pink background displaying flowers with bright turquoise hearts interspersed.  It is as if a garden sprung up right next to a turquoise trellis.


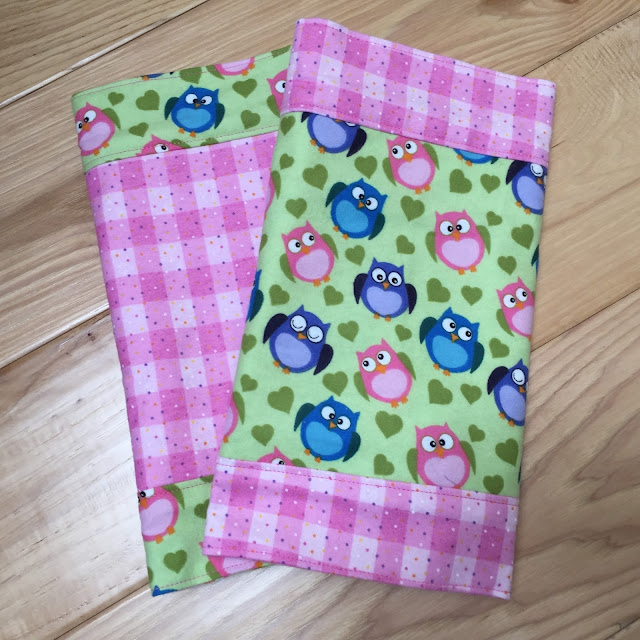
What other "basic" patterns could I find? How about another gingham. This larger scale selection, two-tone pink, picks up those pink owls and their tummies. Look closely and see that the purple speckles complement the purple owls, too.


There is no whimsical print with this pairing but I loved the soft colors of the stripe and the textural interest of the solid aqua I paired with it. This rounded out my dozen for these twin baby girls.


Now, on to baby girl #5. I really did like those owls so I'd bought a second half yard. But this time I paired it with a shocking pink stars and moon mini-print. Owls are nocturnal anyway, aren't they?


I have had this owl print in my stash for a while and finally I could no longer resist using it once I found this unlikely candidate of bright green and yellow plaid as its mate. The plaid makes their beaks and chest feathers pop. (I confess, I still have another ½ yard of the owl print in reserve, but I may pair that with a blue when I find the just the right shade. I am keeping an eye out for a blue gingham or plaid. The right color combination of stripe would work also.)


I have also been hanging on to this cat print flannel for a while, waiting for just the right pink or brown-and-pink combination. I liked the mini-print houndstooth; the saturation of the pink was perfect for the kitties' bows, collars and hats. Shhh. Do not tell those kitties they are so close to a hound even though these teeth do not bite.


Those previous six burp cloths completed my half dozen goal but I had one last fat quarter of this dog print. Again I was waiting for just the right blue or blue-and-brown combination, but this baby had a dog in her life and so she needed this print. In the following picture the back of the burp cloth is folded over to the front to show off the print better. I did not have enough fabric to make a complementary pair of burp cloths, only a singleton, so I decided to go rogue. I had a quarter yard skinny-cut, not a fat quarter, of the Dr. Seuss type spots; but I was able to fold the quarter yard along the grain rather than cross grain and use it down the center. My burp cloth tutorial dated June 18, 2014 explains how to accommodate using a quarter yard cut instead of a fat quarter. The blue background behind the spots matched the scarfs and jackets of the dogs and what canine does not like to chase after a red rubber ball? Granted however, these balls look like they have been chomped on and deflated a tad. It adds to the fun. And now this baby girl will have seven burp cloths - one for each day of the week, in theory anyway. As if a baby would only use one burp cloth a day ... Dream on.


I have emerged from my burp cloth detail and will be social at Let's Bee Social #178.

Tuesday, May 23, 2017

Coral Queen of the Sea No. 3

Yes, this is the third mermaid I have made. In my post for May 17, 2017, I admitted my chagrin at having so many panels in my stash. In my previous post on May 20, 2017, I decided to take action to remedy the situation and made up a red riding hood doll panel and a mermaid doll panel. Yesterday, since I was on a roll and did not want to lose my momentum I finished off that third mermaid doll panel. My second mermaid had been trimmed in pink rick-rack so I needed to chose a different color for this granddaughter. I laid out the options I had at home. I knew if I ran out to the local sewing store for a bigger selection I would get distracted. My at-home choices were dark green, white, lime green, and frosty blue. I displayed them against the blanket and pillow from the set.


I eliminated the dark green even though it was a near match to the fish on the pillow because it was medium size, not baby size. I did have a chuckle when I saw the price tag of 25 cents on it. This rick-rack package was inherited from my mother's stash and she passed away in 1979, nearly 40 years ago. The white would have certainly worked but I wanted something with a bit more pizazz. The frosty blue seemed "off" against the aqua tones of the mermaid collection. The lime green, although it was not an exact match with the little fishes, reminded of bright seaweed so I went with it. I edged the pillow with the baby lime green rick-rack.


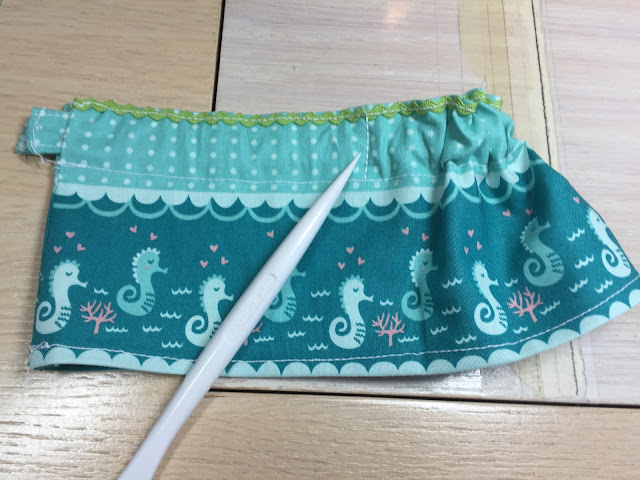
I also trimmed the top waist of the skirt. I did my now-standard trick of sewing sideways across the casing once the belt was in so the ends would not retract too far and be unreachable. The tip of my Clover Hera marker tool points to this stitching line. The central front section stays pre-gathered all the time and the back can be cinched tighter once on the doll.


I edged Coral Queen of the Sea's beach blanket with the signature green. I think it complements the fish even though it does not match them.


That lime green is on each of the doll's accessories, even Mr. Bubbles her sea horse pet. I used it as an identifier of ownership.


In her lounging position you can also see the bright green signature in her hair, on her bodice and on the waistline of her fin gown. She and her seahorse pet Mr. Bubbles are resting quietly. After my doll panel marathon of the past several days, I too will take a break.


Maybe I have learned my lesson. Perhaps in the future I will buy a different panel for each granddaughter and not make three of the same. Three red riding hoods and three mermaids got a bit repetitious. That's why I had to spice each one up a bit with rick-rack. One definite benefit though was that I did get quite proficient at those dolls after turning and stuffing 24 limbs! Now that I think of it, if I include my Lil' Super Heroes dolls from my post for April 14, 2017, my efforts total 32 limbs. Yikes! Perhaps now is a good time to check out Let's Bee Social #178.

Saturday, May 20, 2017

Lil' Red No.3 and Coral No.2

After shamefacedly admitting how many stuffed toy panels I had lingering in my stash (previous post) I got to worked diligently yesterday on two Stacy Iest Hsu doll panels. I completed a Lil' Red doll with her accessories, my third one of these, for my youngest of three granddaughters; she now will have her own doll to play with next to her older sister. I used white rick-rack trim. I had used pink rick-rack on her sister's Lil' Red.


I also completed my second of three Coral Queen of the Sea doll panels. Now I have only one mermaid doll panel with accessories remaining to complete. The third mermaid will be for my oldest granddaughter. Should I tackle that third one now while I am on a roll? The only thing delaying me is deciding on a color for the rick-rack trim. I'm thinking maybe green like the fish perhaps? I will at least cut it out to get me started. You know what they say ... "Once begun is halfway done".


I cannot overpraise the value of the Clover Hera tool for stuffing those dolls' long limbs. These last two dolls were a whiz with this handy gadget. I had previous struggled. See my post for March 8 2016 to learn what other gizmos I tried that did not work quite as well. Although its intended function is to mark with a crease, the paddle-like profile of the Hera Marker was great for nudging out seams and poking stuffing where I want it to be.

Wednesday, May 17, 2017

Can You Overbuy "Cute"?

Yes. You can. Really. I have. I confess I buy too much fabric. I get on a kick of some sort and overdo it. This post is an inventory of my not-really-intended-to-be-a-quilt purchases. I am acknowledging publicly this foible of mine and keeping the inventory in front of my nose so I use it up!

FLANNEL BURP CLOTHS
I was out of my flannel obsession but it has flared up again. In all fairness, however, it was instigated by the sudden appearance of four babies within the past month. I did a post on 5/9/17 about burp cloth for two of those babies and then bought more flannel for a pair of twin baby girls. I have yet to make these up but intend to do so this week. Twin baby girl flannels are mainly the stack on the right and just a few off the top of the left stack. Of course I also restocked a bit; stash purchases are the four on the bottom of the left stack. I bought a total of seven yards of flannel in ½-yard lengths Monday. That is enough to make 14 burp cloths. Each takes two fat quarters. (FYI, for those readers checking the count in each stack, I got two ½-yard lengths of the top left flannel owls just because they were so darn cute.)


STUFFED TOY PANELS
I did an inventory and I have way too many of these, also. I have yet to make the following stuffed toy panels.

Two more little mermaids: I completed my first mermaid by Stacy Iest Hsu last and blogged about it in my 5/12/17 post. I have three granddaughters so of course I bought three panels – two more to go.


One more Lil Red doll: I completed the first two of these Lil Red dolls and blogged about it in my post for 3/8/16. These are also by Stacy Iest Hsu. My youngest granddaughter still needs hers. Again. I'd bought three panels.


Those dolls really did come out cute and by that third doll I became an expert at stuffing those long legs and arms.


Mama and baby animals: These are by Stacy Iest Hsu, also. I really do like the work of this Moda designer. There are four animals so maybe I will take this one panel and share it among three granddaughters and a grandson. Or maybe I will buy a second panel and that way each household can have all four mama and baby choices. My husband, with a bit of an eye roll, advised me to "just make up the one you have first". That is probably very sound advice. But I better make it up soon before it sells out and I cannot get a second one. Just sayin'... Just in case...


Panel with two bunnies: Somehow Easter slipped by me on this one. I bought only one panel. Perhaps sanity is beginning to take hold.


CLOTH BOOK PANELS
I have way too many of these. Many I have made into books as they were intended. One I made into a graphic novel style quilt. I posted about The Mitten on 11/20/14.  It folds so you can read it in rows graphic novel style. Who says Woof? is on my design wall to be a quilt. I posted about my plan for that on 6/24/15. Yikes! See why I blog about what I do? By looking up the dates of these posts I realized that this potential quilt has been on my design wall for 2 years!


The From the Ground Up is great for my grandson but since he is approaching the age of two, I think I may have missed my window for it as a cloth book. Perhaps it could be another design wall project. Hah – like the previous one, which is two years old and still aging. The graphic novel approach I used on The Mittens book might also work well for the construction fabric panel. This approach has fewer decisions and so I could allow myself to make it up more quickly. Hmmm... I think I have some construction cone fabric somewhere that might go well. I have one-year-old granddaughter, though, whose daddy is a construction manger so she is another option as the recipient. Heaven forbid I should be sexist and assume construction is just for boys. As for the book on the right, the images in Whose Baby Am I are so soft and inviting I do want to see that go to a baby as a book.


I definitely overbought for a Christmas theme. Perhaps when I send off burp cloths I could include a cloth book. I would like to know some kiddo will be enjoying each of these. They really do not take long to sew once I get on a roll.


When I was buying my flannel Monday, I got an inspiration from a display at the Cotton Patch quilt shop in Lafayette. A cat and mouse stuffed toy panel was made up as placemats and coasters. I was strong and refrained from buying that panel; but I am still thinking about it... Two Christmas book panels, that I have in my stash, would lend themselves well to the placemat idea. I just might do that with my Twelve Dogs of Christmas and Twelve Cats of Christmas panels. Each page really does have too many words for a child young enough to like a cloth book. I could repurpose the panel to yield six placemats. That might be a fun use. I would frame each double page and add a backing. That would be good FMQ practice too and use up some batting scraps. If not FMQ, I could instead try out a quilt as you go method. The placemats would make for interesting meal time conversation, also. The pages would not even have to be in order. That way you would find a dinner companion who had the next "day" after yours. Yup. I just decided. That is what I am going to do with these panels. Eventually. Hopefully by this Christmas.


But first, I will link up to Let's Bee Social #177.

Sunday, May 14, 2017

Coral Queen of the Sea

I just sent off a mermaid doll to  granddaughter Lillian who just turned one. The doll is not the princess Ariel but rather Coral, Queen of the Sea.


Coral was created from a panel designed by Stacy Hsu for Moda.


I have gotten much better at making these stuffed toys that originate from a fabric panel. A Hera tool by Clover is just right for coaxing out the seams after turning and it is excellent for pushing the bits of polyester stuffing down those long narrow arms and legs. Be sure however to cover up the pointed non-paddle end with the cap to a seam ripper or something similar to avoid poking the palm of your hand.


Using a zipper foot, I stitched across her legs and arms where they join torso so they will be able to bend there.


The doll comes with the options of fins or a skirt, each gathered at the waist with a belt threaded though a casing.  For the fins, after centering the belt so about ¾" of each end protrudes, I sewed across the casing at the side seam, through the belt, to keep the ends from slipping inside the casing out of reach. It was not possible to do the same thing for the skirt. Being fuller, the skirt gathered more and the belt was too short. Instead I fixed each end of the belt to protrude about  ¾", gathered the middle section toward the center and sewed across the casing, through the belt, at two places. The middle section would be permanently gathered but at least the ends would be prevented from retreating into the casing.


Coral is posing here wearing her fins and accompanied by her sidekick friend Mr. Bubbles.


I took this picture of Coral at night. I like to think of her basking in the moonlight, wearing her skirt.


The next morning I photographed a face-on view of her basking in the sun, shining down through our skylight.


Coral, Queen of the Sea is shown here with her wardrobe and swimming buddy, Mr. Bubbles.


Coral also has a blanket and pillow. I quilted the blanket in a swirling water current style.


Linking up to Let's Bee Social #176. Her post is about birds up in the air while mine is set "Under the Sea".