Wednesday, September 30, 2015

Barstool Covers

My son and daughter-in-law bought some barstools from IKEA but the seat cover options were rather limited. My DIL asked if I would know how to make them different covers from a more exciting fabric. I had never done that before but I welcomed the challenge of trying to reverse engineer from a cover they had. My first step (I thought) would be to disassemble the cover to have a pattern to use to cut out a new one. Well those seats were so well sewn, taking them apart was a real battle! The raw edges of a ⅜" construction seam were overcast together and then the seam was pressed to one side and a decorative topstitch paralleled each seam. Ripping that out was very slow going since it was like ripping out three seams. I thought, "I have got to streamline this somehow." Then I got an idea. If I cut the seat cover in half I would only have to take out half the seams and I could cut the fabric out on a fold since it would be symmetric anyway.


The chair that these covers go on looks like this. The seat itself has side gussets but the seat back gets its contoured shape without gussets, just two fabric sections, the back one wrapping around toward the front and cleverly seamed. All four sides of the seat Velcro to the underside of the chair frame and the lower edge of the seat back also Velcros to the chair frame.


Here are the seam lines marked and some key alignment points for assembling the new covers. As is typical of IKEA's ingenuity, two curves in the upper corner are joined offset and this makes for a smoothly tapered and also sleekly curved design feature to the back to the chair. That is another BIG benefit of cutting the cover in half. I still have an intact model to look at when I go to sew the pieces together. It gets tricky where the seat back mates with the seat itself and tucks into that crevice where the two meet, while further contouring around the chair legs.


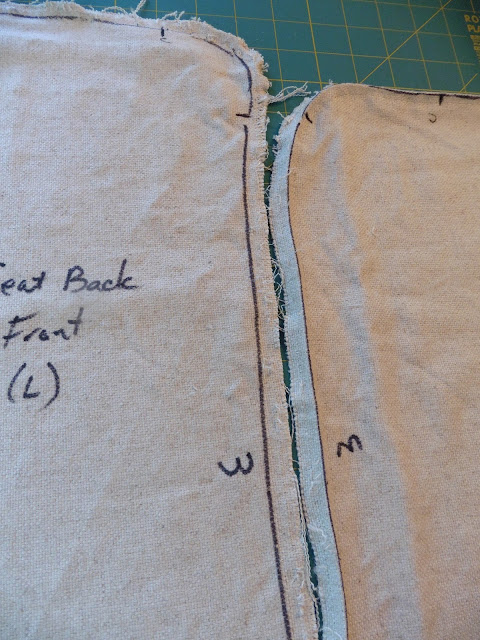
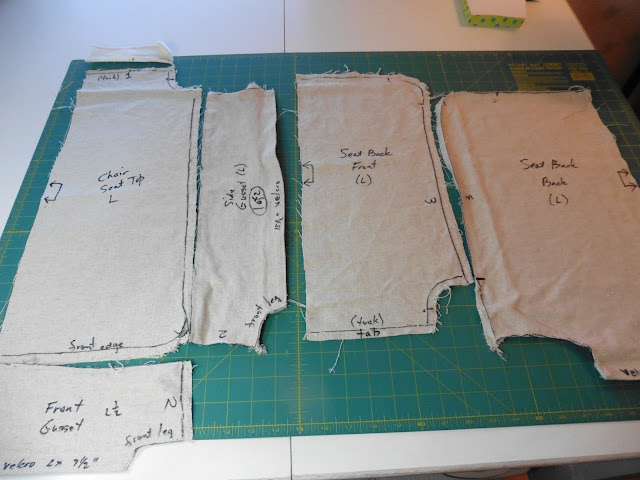
Then I truly got brave and realized I could mark boldly where the seams were by gliding a Sharpie pen along the seam lines before they were opened up. I could also use the Sharpie to label what the various pieces were. This technique seems obvious now but initially this approach did not occur to me. It probably never would have, had those seams cooperated more in coming apart. I am lucky that those covers were a light solid color so I could write directly on them and read it afterward. Here is half the cover disassembled and on my rotary mat. It was not until I got to this point that I answered the obvious question of just how many pattern pieces there would be. By arranging them on the gridded mat I also got a sense of how much fabric I would need. The mat size is 36" x 24".


Here is my DIL's fabric of choice. It was discontinued and my husband and I one day frequented five JoAnn's Stores to gather enough of it. I only have 4½ yards to make five covers, each with a seat and back support.  I know I have another 1½ yards that we bought when my DIL visited and selected it, but I cannot find that additional yardage. I have the receipt but not the yard goods. Very frustrating! I thought perhaps my DIL had taken it home to compare with the stone on her kitchen counter but she says no. Her house is half the size of ours and she is at least twice as organized as I am. She is also about half my age without any associated memory decline, too, so it is highly improbable that she does have that extra yard and a half. But I'll be danged if I can find it here.


The fabric is 54" wide so I may have enough. Perhaps I will run the fabric cross grain. The print does not look like it would appear odd to be run sideways. The tape measure shows a side width total of about 27" so I just might be able to eek out both sides of the seat back and the seat top itself from a single width of fabric. This allows for no shrinkage whatsoever. The fabric is 100% cotton so the covers could never be washed if my DIL wants them to fit again. With a toddler under two, non-washability is not a desirable trait. I am working to avoid cutting it so close if I can. I am blogging about this now so I can have these thoughts circulate in my brain for a bit and so I can procrastinate actually making any cuts.


My backup plan if I cannot fit all these pieces on the yardage I have is to make the side gussets in a different fabric. If I finally found the extra yard and a half after doing that, I would really, really be frustrated.


Here are some of my calculations and plans. I will need about 10 yards of Velcro.  I do not know how IKEA sells these covers as cheaply as they do - the lowest price plain white one is $10 and a beige linen-like one is $20. Even disregarding the time invested, home sewing these covers does not make economic sense. But the gauntlet has been thrown down and I am not backing down from the challenge. Truly, IKEA's fabric options really were kind of blah!


Making a bit oversized estimates for rectangle sizes for each of the pieces, I put the shapes into PowerPoint to see if they will all fit. The height h will run along the grain of the fabric (horizontal in the graphic) and the width w on the cross grain (vertical in the graphic). If I cut the gussets along the grain I think it will work; and in this orientation they will all be the same. The fabric repeat is such that I will not have enough fabric to make the five barstool covers identical. But since that detail did not occur to me until how, it will be OK. Breathe deep. Aim for excellence, not perfection. This is an experiment after all.


So, although not a quilt, these covers have been on my to-do list for a while and I am glad to be attacking the project and figuring it all out. "Well begun is half done," as the saying goes. Not that I am being philosophical, but that proverb was attributed to Aristotle. Now I am off to see what others are up to at this week's Freshly Pieced's Works in Progress.

Saturday, September 26, 2015

Alden Lane Quilting in the Garden

The last weekend in September, Alden Lane nursery hosts an outdoor quilt show where the quilts are hung on lines among the tall oak trees on Saturday and Sunday and classes are offered earlier in the week. The featured artist this year was Freddy Moran and the guest artist was Sally Collins. Here is the colorful array of mainly Freddy's quilts greeting the viewers at the nursery entrance. The central quilt here is titled Red & Black Village. Freddy Moran is renown for her wild, free-form use of a lot of clear colors and bold prints.


Wednesday I attended an all-day lecture/class taught by precision piecer Sally Collins. In stark contrast, Sally's exquisite work is painstakingly accurate and detailed. This Lotus Flower quilt of hers measures a mere 7¼" square so you can only imagine how tiny those HSTs are. All seams are still ¼". A few may be graded afterward to press well – mainly those of pieces that are less than ¼" in size – but initially seam allowances are all ¼"! Photos really do not do her work justice. I saw and could touch and handle a great number of her quilts at the class. I was in awe seeing, in person, the limits to which patient, dedicated workmanship can take the art of quilting.


I learned a fair amount of good techniques that I can apply to my own piecing, but miniatures are not my thing. Sally kept emphasizing she is in this for the process, not the product, so I can relate to that aspect of her specialty. I love to quilt but just how many bed covers or decorative throws can you use? She also advises, "Focus on how well, not how fast, you make your quilts." This resonates with me too. Piecing is my favorite part. Why race through it with an over abundance of speed methods and assembly techniques that randomize fabric placement?

I thought it ironic and amusing that these two quilters, so different in their artistry, were at the same show. I saw them talking with each other and I asked them to pose for a photo together. They agreed that I could pass this on. If you did not already know, could you guess by how they are dressed who is who?


As featured artist Freddy Moran had almost 150 quilts in the show. Sally Collins had about 30 or so. Quilts submitted by local quilters numbered on the order of 100 or so. The rest of this blog will take you on a tour of a few of the quilts that I caught my eye or displayed a creative idea I liked.

Also at the show entrance was this cheerful Chickadee quilt, a local entry titled Fat Chicks. It made me want to get better at appliqué. A bit of whimsical appliqué easily brightens up a quilt!


These next two are Freddy Moran quilts. I liked the concentric wonky squares but what I found amusing was that a few of them had an extra square tucked in somewhere (top leftmost block) or a square band perimeter was interrupted with a different fabric (bottom rightmost block). The very center block has two itty bitty squares tucked in on the diagonal. I studied this quilt quite a while trying to find these little surprises scattered throughout. (There are others.) Freddy titled it Gee's Bend Log Cabin.


I happen to have a fondness for flying geese. Having so many gathered in one spot was engaging, especially when you notice a few reverse the position of the geese and the sky just to mix it up and add interest. It is like the ornithological parallel to the proverbially black sheep. This quilt Freddy titled The Gee's Bend Triangles.


The Good, Bad, and Ugly (GBU) projects was a fun category for the local quilters. For $20 they could buy a pre-filled bag of two yards of "Ugly" fabrics from our shop in Livermore, In Between Stitches.  A portion of bag purchase price goes to breast cancer research (GOOD). Not all bags contain the same fabrics and quilters do not know the contents when they purchase it (BAD). I learned that over 40 bags were sold! Quilters were required to use at least 50% of those fabrics (UGLY) to make a quilt top with a minimum size of 32". Show-goers then voted on their favorite and the winner would get a gift certificate to the shop. No  – winners were not restricted to using the gift certificate to buy "ugly" fabric. (My husband came up with that tongue-in-cheek question.) The entrants did such a good job, I had a hard time telling which were the "ugly" fabrics. This quilt was my favorite. It reminded me of the It's A Small World attraction at Disneyland. I may try this next year just for kicks.


This quilt was again by a local. I liked how she shaded the arms of the stars and graduated the tones on the diagonal squares. It is called Saffron and Shimmering Arrows.


I like the way the flying geese in this quilt, again by a local, were bordered by HSTs. It gives the borders an ordered, tidy, and more substantial look and adds a third color of interest.


This quilt is remarkable in the 3D effect it projects through clever use of color placement. The local quilter who made this titled it A-MAZE-ING.


This quilt becomes more than just black, white, and red when the local quilter added a few light tan cats and some scattered light tan background. I also liked the way the felines are quilted with spirals on their hips. Their red bow ties add a touch of class, too. It was titled simply Cats.


This quilt caught my eye (any my husband's eye, too) maybe because the Singer Featherweight I just acquired is fresh in my mind. The seed packets and newspaper print border lend to its vintage feel. The technique in this one that appeals is the way the quilter incorporated different size panel prints into one cohesive unit.


Lastly, here is a closeup of the opportunity quilt for which the Diablo Valley Quilters guild is selling raffle tickets. Not only is the appliqué beautiful but this closeup shows off the wavy lined checkerboard quilting pattern. The texture it adds is terrific. I have got to try this!


Hope you were able to enjoy the mini-show. In blogging about it, I got to relive it.

On Saturday night all the quilts are taken down and then rehung on Sunday morning. My husband and I were volunteers that helped with the take-down. The nursery has a pulley system strung among the trees and each line is numbered and coded with the quilt numbers it holds. There is an organized method to lower the clothes line, remove the clothespins, fold the quilt, load into pre-number bags and stack onto waiting wagons. It ran as smooth as silk. Ladders are needed in only a smattering of special locations. Here is the tail end of the take down.


Sunday morning at 7:00 am the process to re-hang the quilts will begin for the second day of the show. I think the cow may get to leave her sweater on overnight. It does get chilly here after the sun sets.

Friday, September 25, 2015

Quilt, Craft, Sew Festival in Pleasanton

Yesterday I went to the Alameda County Fairgrounds to check out the Quilt, Craft, and Sew Festival that is there for three days. First thing in the door I bought a set of clear nesting zippered project bags. I have seen them at previous shows and passed but this time I purchased them because  – how does that song go again – they were  Always on My Mind? . I picked red to go with the soft travel case for my new Featherweight Fiona.


I went to the festival admonishing myself that I was absolutely forbidden to purchase any more kits. One of my 2015 quilting goals is to either make up or repurpose the fabric from the backlog of kits in my stash. I kept my resolution. It was hard, but I refrained. And I did rein myself in on fabric purchases. I avoided those stacks of fat quarters that blend oh-so nicely and are packed oh-so seductively with ribbon or clever folding. I did buy other items, though.


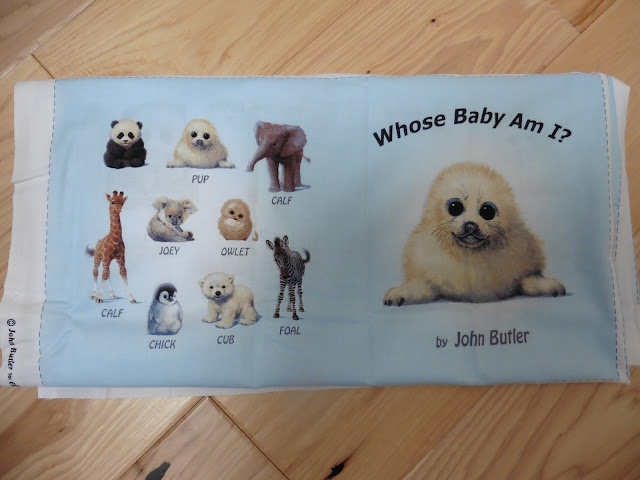
I bought two panels. One is a cloth book titled Whose Baby Am I? It is produced by Elizabeth's Studio and I love their prints. They are generally patterned off artists or authors; but, they seem hard to find. The vendor helped me understand why. Apparently Elizabeth's Studio requires a very large minimum order and so their selections are prohibitive for small local shops to stock. Panels by Elizabeth's Studio are not new to me.  Previously I've made Little Baby Signs and My Baby's Day into cloth books. The panel Who Says Woof is in progress to be a quilt instead .


The rest of the panel looks like this. I like that it has unique baby animal names for a young child to learn.


I also bought a cute Thanksgiving panel. How could anyone pass up this Lady Pilgrim Beaver?


The fabric line is Perfectly Seasoned by Moda. Here is the rest of the panel. I thought the center would make a cute table runner and perhaps the small squares would work as name cards or coasters. This project will be good FMQ practice on Heidi, my HQ-16.


I bought minimal off the bolt yardage. I bought one yard each of three fabrics. These Lazy Stripes in red and in aqua had a whimsical feel to them that called to me. They will be a good staple in my stash. My one impractical splurge was the sunglass fabric. There is no intention to group these together but seeing them next to each other, they would play nicely with each other.


Where I did go a bit overboard was on buttons. Aren't these adorable? Guess which ones will go with that sunglass fabric perhaps on some little girl's dress. With only one yard of the sunglass fabric however, the dress would need to have a companion print of some sort. The other choices from the same fabric line did not excite me so I passed on them. I also have fox fabric to go with the fox buttons. The owls may go on a little boy's sweater. Those ponies are not the truly trademarked My Little Ponies™ but I am sure my granddaughter will be pleased with them all the same.


I also bought more patterns than I probably should have. The left one is just so perky. The middle pattern uses a technique I have not tried called raw appliqué. I saw a quilt with this technique at the DVQ show last weekend and loved it. After washing several times the raw edges of the flower petals fluff up. The pattern on the right, for a tote bag, had some curved design features that were eye-catching to me. There is no way whatsoever that I need another tote bag but this looked fun to make. It has a ton of inner pockets and a zippered central divider section. I will enjoy pairing different fabrics from my stash to assemble it. The booth owner said it took her about four hours to make so I look forward to it as a small entertaining project. One drawback is that I suspect it calls for interfacing and stiffeners that I do not normally stock and will need to buy.


So that's it for my purchases. Window shopping vicariously on a blog post does have its benefits. Real life shopping is fun but now I have to find a place to put all this away. The real challenge will be to remember that I have it and to be able to find it again when I want it!

Wednesday, September 23, 2015

I Scored a Ribbon ... and More!

I won a third place ribbon in the seasonal category at my guild's quilt show this weekend for my quilt Simple Gifts!


These are viewer's choice awards decided by quilt show attendees voting for their favorites. They are not juried or judged ribbons.


This is the placard attached to my entry. There are more details about its completion in my DianeLoves2Quilt post for June 10, 2015.


I was surprised and pleased. I had struggled with making the presents stand out, given the scrappiness of the pattern and my fabric choices. I had fretted over my FMQ lines on this quilt being crooked and of uneven stitch length. I guess the overall effect was OK because folks liked it enough to vote for it. So yay! I am excited and encouraged.

But there is more. There is a vendor, Twice Nice Shoppe, who is present at many of the quilt shows and sewing festivals in the area. This business specializes in Singer Featherweight sewing machines, refurbishing them, leaving some with their original finish, painting others snazzy colors, and then selling them. I have been drooling over the machines in this booth for several years, since each has been rejuvenated so flamboyantly. This show my husband and I agreed I should finally buy one of the machines. "Consider it a 40th wedding anniversary present," he added. Seeing the machines on Saturday, I thought about it over night, the color-loving quilter in me pouring over the many paint options in my dreams... Candy Apple Red, Lipstick Red, Harley Blue, Purple... but never really able to be decisive about which was my favorite.


When I returned to the booth Sunday and looked at the machines again I just knew. I opted for a shiny brightly repainted model, spiffed up but not deviating from the original Singer. I chose classic black. It was a gut feeling that seemed atypical for me and my love of color, but the sewing machine is a personal item in a way. The classic black reminded me of my mother and her machine and what a Singer should be. It was made in New Jersey near where I was born and it is only one year older than I am. As my husband put it in his own inimitable way, "It was manufactured in the year you were conceived." It weighs only 11 pounds. I test drove it at the show and it is whisper smooth and quiet. My husband even commented on the gentle hum it produced. I intend to use it as a light weight, convenient option when I take classes, and for travel, when visiting my son's or my daughter's home. I can sew with my daughter in Oklahoma and sew for my daughter-in-law in Southern California. Here is my most recent addition to my sewing machine family. See how bright and shiny new she looks, reflecting her surroundings?


The gold scrollwork around the edges and in the center of the throat is just gorgeous.


Even her foot pedal glows. I don't look that good and I am a year younger!


She needed a name. Singer Featherweights are a stable, reliable workhorse machine, representative of an era. They are pretty special, but they are not rare. I realized that anyone, for a fee, can own a Singer Featherweight machine. I like alliteration so I decided to name my featherweight Fiona. Here is my trio of machines, my Handiquilter Heidi, my Featherweight Fiona, and my trusty Pfaff.


Hmmm, I never named my Pfaff. I never assigned a gender either. For some reason, being made in Germany, I think had I picked a name, it would have been a boy's name. Well, now the two lovely ladies, Heidi and Fiona, can keep him company in my sewing room.

This has been a busy week, prepping for, attending, and helping with take down of the Diablo Valley Quilters Show. One of my volunteer jobs was security at one of the exit doors. I had to sit for two hours, a very difficult task indeed, during which time I started to crochet a sweater for my granddaughter. That is my only active work in progress for this week and I have no photos of it yet. For now, I will see what others are up to at this week's Cooking Up Quilts Main Crush Monday and Freshly Pieced's Works in Progress.

Wednesday, September 16, 2015

Baby and Quilt Show Prep Modes

BABY MODE
Once again I am in baby mode, making burp cloths. They may be mundane but they do serve the purpose of getting me out of any quilting slump I may be in. These eight are for a couple who just had their second boy baby. I mailed them off a few days ago. Burp cloths are my go-to baby gift. Each burp cloth can be made from two fat quarters or from a fat quarter and 1/4 yard WOF. I general use a half yard each of two fabrics and make them in complementary pairs. Four pairs are shown in the following photos - whales, gears, owls, and argyle – each paired with either stripes or dots. Here is the June 18, 2014 tutorial I posted on how to make these burp cloths.


But now I have crib sheets to add to my repertoire. I have two cut out for use with a standard size crib mattress and have begun stitching them up. The four corners get joined with French seams and then elastic is run around in a casing along the outer edges. The original online tutorial for the sheets in the Stitched in Colors blog post for November 4, 2014. It is not under her tutorial tab for some reason.

This first crib sheet will coordinate with the quilt my daughter is finishing up. You can see its initial design in her July 29th post to her RobinLovesQuilting blog titled Quiltus Interruptus. Her son was born on July 16th. You can not keep a good quilter inactive for long! She has follow on posts to her blog on September 14th and 15th describing her design process in her posts Dinosaur Panel Play 1 and Dinosaur Panel Play 2. I was bemused to see that like mother, like daughter, she too convinces herself of her design choices by adding words to explain why she made those decisions.


The coordinating crib sheet fabric comes from the largest scale print from the Have You Seen My Dinosaur line.


Here is the completed crib sheet stretched over a furniture cushion since I did not have a standard crib mattress available.


This second crib sheet will coordinate with the Bugs R Us quilt I made and showed completed in my post for July 15, 2015.


I picked the largest scale bug fabric from the Backyard Safari line. I am not sure I would want to sleep on something like this but he is a boy after all.


And once again, here is the completed crib sheet stretched over a furniture cushion. The lush foliage looks inviting and I suppose those bright colors do make the beetles kinda friendly - sort of... I say better these bug images on his bed sheets than real ones in his pockets!


QUILT SHOW PREP MODE
I also spent time this week making and attaching hanging sleeves on two quilts I am entering in my local guild's show this coming weekend. This is a dull task that I managed to complicate by deciding to piece one of the sleeves out of five fabrics to coordinate with the quilt. I did not have enough remaining backing fabric, I did not like anything from my stash as a sleeve fabric, and none of the five leftovers from the quilt front were wide enough nor long enough to use alone. This photo only reveals three of the five fabrics. There are two more hidden pieced sections on the side of the sleeve next to the quilt top. Two, not just one, but two seams run the length of the sleeve. Anal, right? I know. This quilt is my Simple Gifts seen in my post for June 10, 2015.


For the other quilt I am displaying I added a sleeve out of all one fabric and it was much simpler and quicker. But then my husband said, "Aren't you going to put those labels on like you do?". Well, no. I wasn't going to invest the time. But he was right, and I should. So I did. Here is the quilt name label. On an opposite corner is a similar label with my name and year of completion. Sunny Spring Frost is pictured in my post for July 24, 2013. Stitching on the sleeves by hand, making and adding the grosgrain ribbon labels, and basting on the paper identification tabs to each quilt took me the better part of a day. Aargh! But I am ready now.


The Diablo Valley Quilters' guild show is this weekend in Walnut Creek, CA.  Check out the show if you are near the area. Here is the link.


I am linking up now with this week's Freshly Pieced Works in Progress. I am fairly confident that other folk are piecing quilts and not dribbling their time away piecing quilt sleeves! In my defense, I did make eight burp cloths and two crib sheets, too – just not a lot of quilts. Hmmm. What is the name of this blog again? DianeLoves2Quilt?