Showing posts with label chickens. Show all posts

Saturday, May 16, 2015

Burp Cloths for a Girl

It must be the season for babies. One of my daughter's close friends since high school just had a baby girl and named her Madeline Sofia. Madeline was born March 11, 2015 and weighed 5 lbs 13 oz.  I just learned about her arrival, so I of course went into burp cloth assembly line mode. Less than a week ago I'd whipped up a bunch for a boy and blogged about them in my post for May 9th.


When I make burp cloths for my daughter, she likes them in complementary pairs. So here is a pair with a kitties print and spotty dots print, in pink of course. The finished burp cloths measure about 12"x18" and are shown folded in thirds here. The back side is the same fabric as the outer bands. I top-stitched in white since I did not seem to have just the right pink - my pink options were too dark, too mauve, or too coral.


This complementary pair has a bit more modern look with the chickadee flannel and the linked circle graphic flannel. White top-stitching was my choice for this one too, since I did not have an exact pink to match the graphic circles background.


Then I remembered in my stash I had a couple yards of a whimsical chicken print. For the stripe, plaid, butterfly, and geometric-shape prints I had quarter yard strips strips, not fat quarters, so I used them folded for the double thickness center band. I also diverged from the complementary pair theme, both to use the quarter yard cuts to best advantage and to avoid cutting up those bold chickens. The top burp cloth has only one third of it flipped over to show the back side. The hen print is on the back of all of these.


I love turquoise on little girls and it was in all the prints, so I top-stitched these four in a bright turquoise thread. Those hens remind of the song from The Music Man musical where the ladies gather round chattering like old biddy birds, singing.

Pick a little, talk a little, pick a little, talk a little,
Cheep cheep cheep, talk a lot, pick a little more

And here is the happy mom as a bridesmaid at my daughter's wedding, four years ago.


As soon as I get these pre-washed, I will be dashing them off in the mail to Madeline. If any one is interested in making some of these burp cloths, I included instructions in my blog post for June 18, 2014.

Thursday, November 13, 2014

A Fowl Finish - Finally!

My interest in this project has severely waned ... as has that of my readers, too, I am sure, since my lengthy post on it yesterday. But, rather than move on to another project, I disciplined myself to just finish the tail feathers on those eight hens and be done with them. But those squawking birds did not go quietly. Twenty-four tail feathers, one half-inch long each, and I had to wind a fresh bobbin of the mustard gold. Then I forgot to change out the top thread color from the mustard gold to the bright yellow of the legs.


I did not notice my thread color oversight until the fifth bird. I finished the tail feathers of the other three hens in the mustard gold and was going to leave it at that. But it did not look right. The tail feathers faded into the background. The bright yellow legs seem to scream out that the tail feathers were wrong. I did not pick out the mustard gold stitching but zig-zagged over all the tail feathers ... again... in the bright yellow.


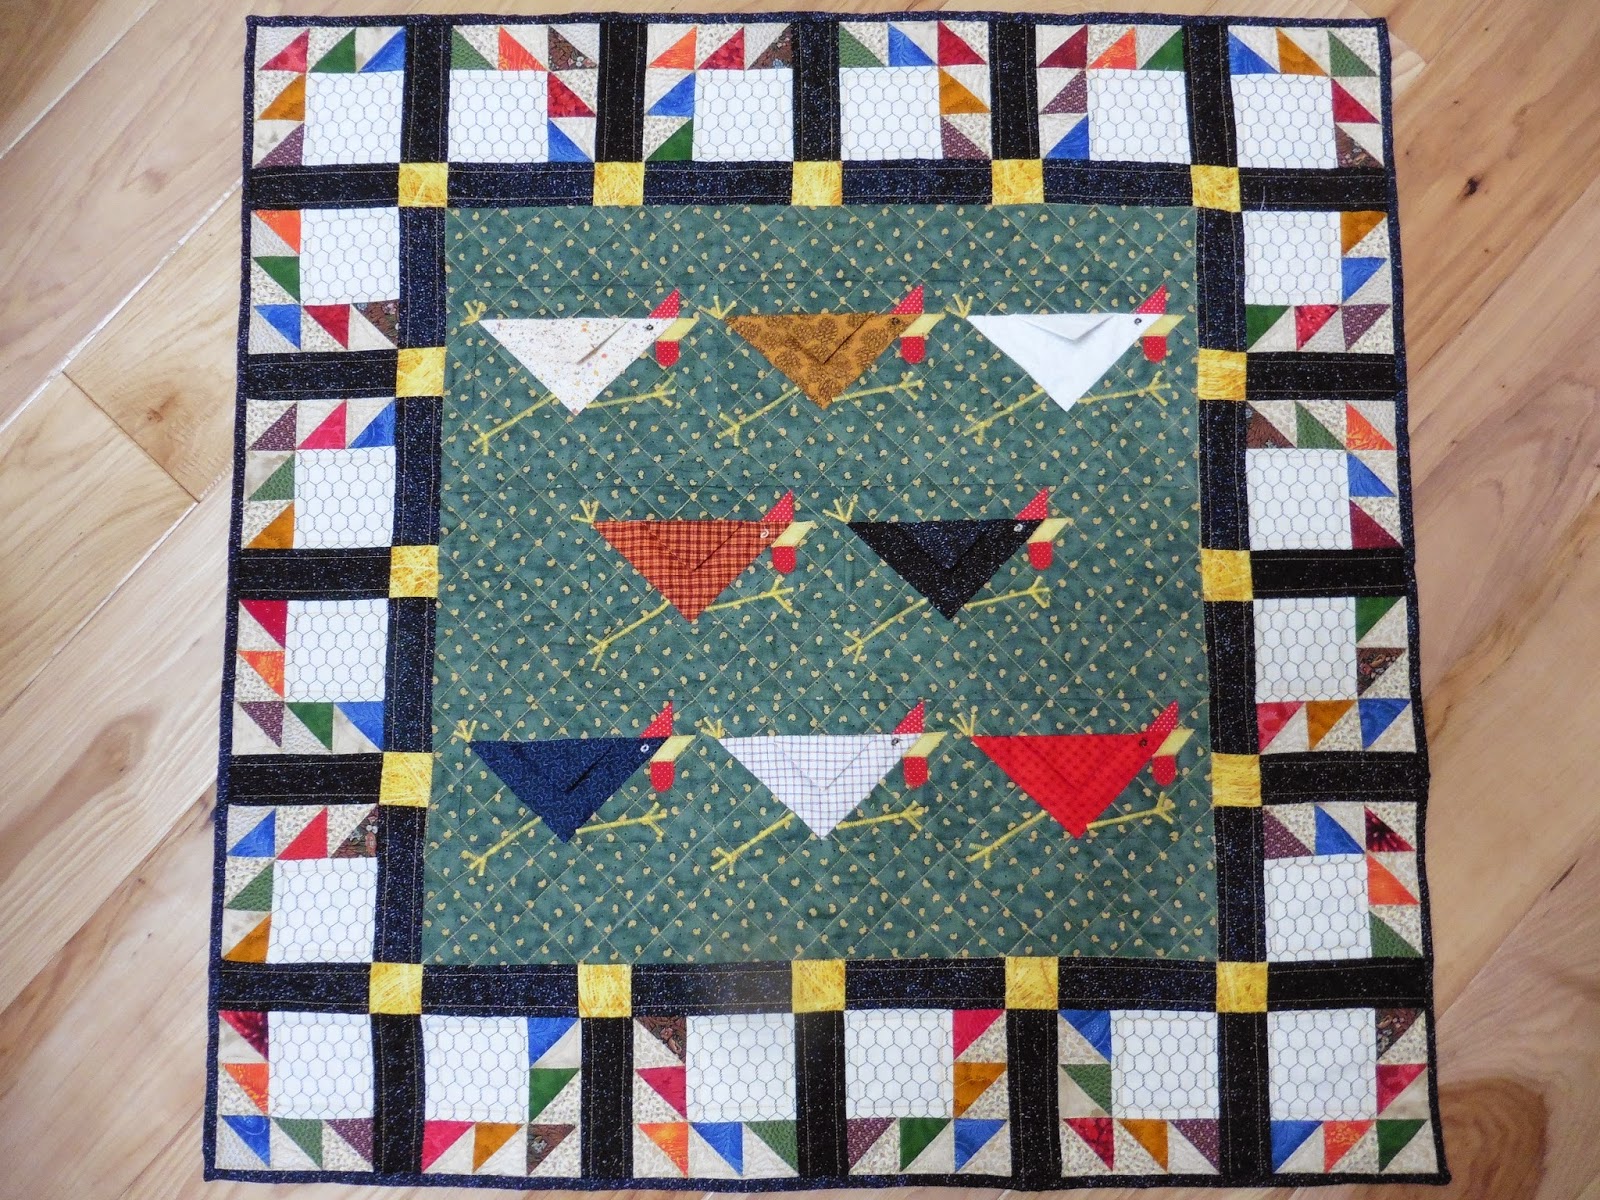
Here is the Chicken Quilt really finished. I wanted it to be a learning experience and it sure was one. Enough said.

Wednesday, November 12, 2014

WIP: Chickened Out

This is what my living looked like in spring of 2004, ten years ago. I started a chicken wall hanging to go with the farmhouse decor I had back then.


The love seat and a wing chair had been upholstered with a tapestry fabric woven with a farm scene.


I'd made the tab top curtains from a red barn country print. 


The pattern for the wall hanging is called We're Chicken and is copyrighted 1994. I thought if I made it up in green tones it would really go with the living room.


The outer border was built from variation of the Hen and Chickens block pattern – how appropriate.


I just finished the quilt this week  –  in 2014. Twenty years in the making is a pretty bad track record for a 35" x 35" wall hanging, especially for a room whose decor has long since changed. But I was dedicated to my UFO completion mission.

I thought a good use for this orphaned pieced top would be to practice my evolving quilting skills. I am in the process of taking a Craftsy class on using a walking foot to quilt on a domestic sewing machine and so last week I started the grid work in the center by that method. I was brave because I branched out and, instead of using a green thread that I knew would blend in and not show my quilting lines, I chose a contrasting mustardy yellow thread for the inner grid work, like the itty-bitty chicks in the mini-print background. The same thread color choice is in the bobbin and will show on the backing, too, since the backing is a deep red with again the same yellow itti-bitty chicks. The lines are not perfectly straight but I am relatively content with the outcome. In the Hen and Chicks block border I decided to do the outer black bands linearly, too, using my Integrated Dual Feed on my Pfaff and liked the way they came out looking like leather strapping on a cage.


Last to quilt were the Hen and Chicks variation blocks with largish chicken wire squares surrounded by five half-square triangles. I chose to do these by dropping the feed dogs and doing FMQ. I wanted an open feel to the chicken wire blocks and so just edged them ¼" in from the outer seam. The lines are not perfectly straight but tolerable. I wanted the feel of feathers in the HSTs and thought arcs would have that effect. This is where I need a lot of practice. My arcs in the triangles of the HSTs are very wobbly. Beside my low skill level, I did something very dumb – I trimmed the outer edges before I quilted it. In retrospect I think I trimmed it because I was going to bind it before quilting the outer border. I then changed my mind thinking I might overshoot the FMQ into the binding. Anyway, it was a dumb move. I remind myself, this was a learning experience to grow my quilting skills.

Because I trimmed, I had very little to hang on to for FMQing. Going toward the edge on the right I could grip and pull the quilt sandwich to the left, but going in from the edge toward the left, I just had to hold on in front of and in back of the needle and try to guide sideways by pushing. I did get better by the 20th block. My 20th block is on the left and my 1st block is on the right with the green safety pin. At least I had the foresight to quilt the arcs only in the beige triangles of the HSTs where the mustardy gold thread is less visible than if it had been in the boldly colored triangles of the HSTs. The stitches are not so tiny but that I could pick out the really awful ones, but I am choosing not to hone my picking out skills at this time.


And I am actually quite pleased that I figured out a continuous motion quilting pattern that only backtracked on itself a short distance in one place, near the heart symbol in the following photo.  I started at the star symbol. Straight lines 13 & 18 are the only ones that backtrack on themselves and they are short.
    1-6: I arced along the outside of the HSTs
  7-19: I sawtooth arced along the first inside of the HSTs
10-12: I surrounded the corner inner HST with arcs
13-18: I edged the chicken wire square by entering and exiting at the heart
19-21: I sawtooth arced along the other inside of the HSTs.

The gold thread shows up on the red backing and the difference between FMQ'd straight lines and the even motion feed-dog driven lines is noticeable but not horrendous. I made my label by using my alphabet decorative stitch on a length of grosgrain ribbon. I centered it diagonally in one corner, trimmed the edges at a 45° angle, and whipstitched it in place. I attached and then hand-sewed the binding after the label so the raw ends of the grosgrain ribbon are beneath the binding.


I thought "Aaah, complete at last". Then I remembered. I still had those eight chickens to embellish with eyes, beaks, wattles, both legs, and tails. Forty-eight body parts were left to go. Here are some of those eight beaks and eight wattles. They were pretty teeny-tiny and it only took me till the fifth chicken to get good at peeling off those wonder-under bits of paper in one piece.


Appliqueing them onto each chicken with a machine zig-zag stitch was a bit more challenging than it had to be since I'd spray basted the 35" x35" quilt sandwich first by mistake and had to rotate and manipulate the whole shebang in the throat of my domestic Pfaff. Then I zig-zagged the sixteen legs and decorative circle stitched the eight eyes.


Here is the completed wall hanging...


... with a bit closer looks at the top and bottom rows of chickens.


Aaaargh! I just noticed. I forgot to do their tails! At least it now truly qualifies as a work in progress so I can link up with this week's Freshly Pieced WIP Wednesday. How could such a small wall hanging take so long! And how could a blog post about it be so long? Those eight tails will just need to wait until later this week. I am chickened out by now.

Wednesday, November 5, 2014

WIP: Getting Back in the Groove

I gifted the Vintage Ornaments quilt to my son, daughter- in-law and granddaughter in Southern California last week when we were down there for her christening and for a Disney visit with my younger son. It was touch and go, but I did finish it in time for their holiday family photo shoot.


I am back now and trying to whittle down my list of UFOs. I began the quilting on my chicken quilt, a pattern from 1994. Yes, ten years ago. I'd forgotten to embellish the chickens before spray basting and was stalled deciding how to proceed. See my April 23, 2014 post. I decided to forge ahead on the quilting and deal later with their beaks, legs and wattles. Here is my start thus far using the integrated dual feed on my Pfaff for the center section. Some part of the grid is not yet sewn.  Progress is slowed down because I am back tacking and skipping over each chicken and it's 3-D wings. The outer border I will FMQ with a design TBD.


I have not yet sewn but have at least cut out and pinned a Jungle Alphabet book for my younger granddaughter. The crinkle paper in her Counting Monkey book (previous post) was such a hit I will put it the noisy stuff in this book too.


I long to start a new quilt and have given myself permission to do so even with my UFOs out there. The last time I posted this list was September 10, 2014 when I began Vintage Ornaments and worked on very little else other than minor projects. Here are my stats since then.

Completed projects (4):
    1. Jungle Alphabet book for Autumn (October 8, 2014 post)
    2. One 12" x 16" lion pillowcase for Autumn (October 8, 2014 post)
    3. Counting Monkey book for Vivian (October 21, 2014 post)
    4. Vintage Ornaments 60" x 70" quilt (October 21, 2014 post)
    Ongoing projects (4):
    1. Chicken quilt - quilting begun, embellish later (April 23, 2014 post)
    2. Classic Cars strip quilt (August 3, 2013 post) - need to back, quilt, and bind
    3. Overlapping square wall hanging - paired with thread, awaiting FMQ
    4. Mask quilt (October 19, 2011 post) - packed away... again
    New projects (0):
    1. TBD but I think it is one I will keep!
    I am hooking up to today's Freshly Pieced post for WIP Wednesday.

    Wednesday, October 1, 2014

    Crafty Weekend with My Daughter

    My daughter was here this past weekend visiting from Oklahoma and we had a great, fun-filled, crafty weekend: a quilt/craft/sewing festival, a tree sweater installation, a quilt show with over 200 quilts displayed, and a quilt class. For today's post, first up is the festival on Friday with scores of vendors and the purchases I made. There will be more about the other activities in future posts.


    We hit the ground running. Robin's flight got in at 12:05 pm on Friday, September 26th and we went directly from the airport to the Pleasanton festival. The show closed at 5:00 pm and I estimated we needed about four hours to take it all in. My husband usually accompanies me to these events. After all he is the CEO – Carries Everything Out. He came along this time too, with both of us, and said he thoroughly enjoyed watching my daughter and me interact and feed off each other's excitement.


    So here is a pictorial summary of what I bought. First, there are the impulse buys because of the bright, clear, whimsical color palettes I love. The little Volkswagon bugs were just too cute to resist. I bought them at the Laurel Leaf, which has such an extremely appealing way of packaging their fat quarters. I get drawn into buying at least one of their fat quarter bundles of six or eight coordinates every time they are at a show I attend. The bundles are not always pulled from the same fabric line, but the owners just have an eye for bundling fabrics pleasantly. Here is a peek at this cutie combo. I bought extra yardage of the stripes just because I thought they were so crisp and had such a tickle-your-fancy color combination.


    I bought this Kate Spain yardage at the Twisted Scissor Quilt Shoppe booth. The colors are luscious and seeing the bunny, bird, and humming bird silhouettes in scalloped stripes won me over.


    Switching from a spring palette to a Christmas one, here is my jolt of the holiday spirit. Who could resist Whimsy Santa hugging the tree in one pose and using it as wings in the next? I bought three fat quarters of those primary colored Christmas balls because they, too, called to me and there is just something about that triangle fold presentation that tips the scales toward the purchase direction. I also bought a Christmas train panel for my husband and a panel to make quilted Christmas stockings as wall decor, but I did not take photos of those items.


    There is another vendor, called Second Chance Fabrics, that is stocked from quilters who want to de-stash. I bought this 2¾ yard piece of flannel for baby burp cloths or the backing of a baby quilt. I just liked the offbeat print. It, too has a bit of a Christmas vibe to it.


    Next up were my purchases from the Fabric Chicks. Each vendor seems to have its own personality. Last year I bought some funky monster-colored orange, neon green, and eerie yellow graphic distorted spot and squiggles mini-prints at the Fabric Chicks booth. This year this wacky chicken fabric on the left just called to me, especially paired with those black spots on orange background in the upper right. I just plopped those lightning bolts from the Twisted Scissor Quilt Shoppe in the lower right portion of the photo because they were orange and black; but, I think they are destined for another quilt. Fabric Chicks are funky; Twisted Scissor is more whimsical. Each vendor has it personality – you won't find Civil War fabrics at either of these places.


    That fabric with the black spots on orange, because of the spots' irregular shape and spacing relative to each other, reminded me fondly of a book that was a childhood favorite of my kids, Put Me in the Zoo by Robert Lopshire. Can you see the spot similarity?


    Here is section of a black/white/red quilt I made with a stack and whack technique for my nephew. See those graphic black squares with the dominant white squiggles? I have some of that stylized chicken fabric left over. I plan for it to go with the preceding chicken print and black spotted orange. You can see the whole black/white/red quilt in my post for November 26, 2011. Some of its fabric leftovers also went into my Grinch Quilt.


    And by the way, here is the text of that Put Me in the Zoo book. Maybe it will spark some memories in you quilters out there with kids and grandkids. My daughter Robin loved it as a child. I think she can recite it almost by memory to her own daughter, who loves it too. As her Grandma, I have also read it to Autumn long distance over Skype. See what feelings a few splotches on a scrap of cloth can conjure up? Just one of the reasons I love quilting and fabric.


    My daughter did not escape the buying bug either. She may post about her purchases too in her blog Robin Loves Quilting. She does have a toddler, though, so her time is pretty limited.

    To rest up from my busy weekend, I plan to write more posts about it and visit other blog entries for this Wednesday's Work in Progress at Freshly Pieced. I will also begin to restore order in my sewing room that is now in shambles. I'd cleaned in preparation for my daughter's visit so we would have cleared surfaces available for displaying and considering our hodge-podge of ideas. While auditioning my stash and patterns for projects, she and I decimated the tidy fabric piles in my closet, scattering them throughout the room. Little girls play with dolls. Grown women with play with fabric. Both make for very merry messes. I loved the bedlam. I miss her already.

    Wednesday, April 23, 2014

    WIP: Bantams, Basting, and Books

    In working through my ongoing projects list, I prepped the backing for the monkey quilt and spray basted it for free motion quilting. While I was on a roll, I spray basted the chicken quilt as well. I have not shown the chicken quilt yet and here is a sneak peek of one section of it. 


    One small dilemma, though, is that I'd completely forgotten that those little chickens still needed their legs embroidered and their beaks and wattles sewn or appliqued on. Cutting myself a little bit of slack, I think my original intention was to send this quilt out to a long-armer and add the appliqued beaks and three dimensional wattles later since they would have gotten in the way. Realizing the wings were 3-D too, the 3-D wattles would not have been the only culprits; sending it out to be long arm quilted would still have been problematic. So I changed my mind and decided to FMQ it myself. This decision, however long ago it was made, does not explain how I also forgot to embroider the legs. Maybe I wanted them to be on top of the quilting lines... ? Here is the diagram for adding beaks, wattles, and legs  


    This is a pattern from 1994. Not remembering after a couple of decades is allowed – especially with three kids to care for back then. Having just spray basted it prior to embellishment, I now have two choices. I can do this embroidery and applique after it is quilted or I can peel the top away from the spray-basted batting and backing and work on the top alone. I use 505 spray and I tested it a bit. The top will peel off easily so I think I may go that route. I will need to see if the exposed surface is too tacky to work with though. At first blush it does not seem to be.

    While contemplating recovery from my premature basting episode, I sewed another cloth book titled My Baby's Day which has precious Joy Allen illustrations. You can see the inner pages of this book in my December 27, 2012 post.


    Thinking back to those three kids running around... when my middle child was growing up, one of his many aspired occupations was that of a marine biologist. I'd bought a fabric panel called Ocean Babies to make him a quilt since he was quite fond of dolphins and other sea life. As can happen to a young mother with other chores, priorities, emergencies, etc., I never did get around to making that quilt.  But this week I did sew the fabric as a book, the original intent for the printed panel. Seeing the clever rhymes in the poems and the bright colors in the pictures again reminded me just why I'd liked this panel so much.


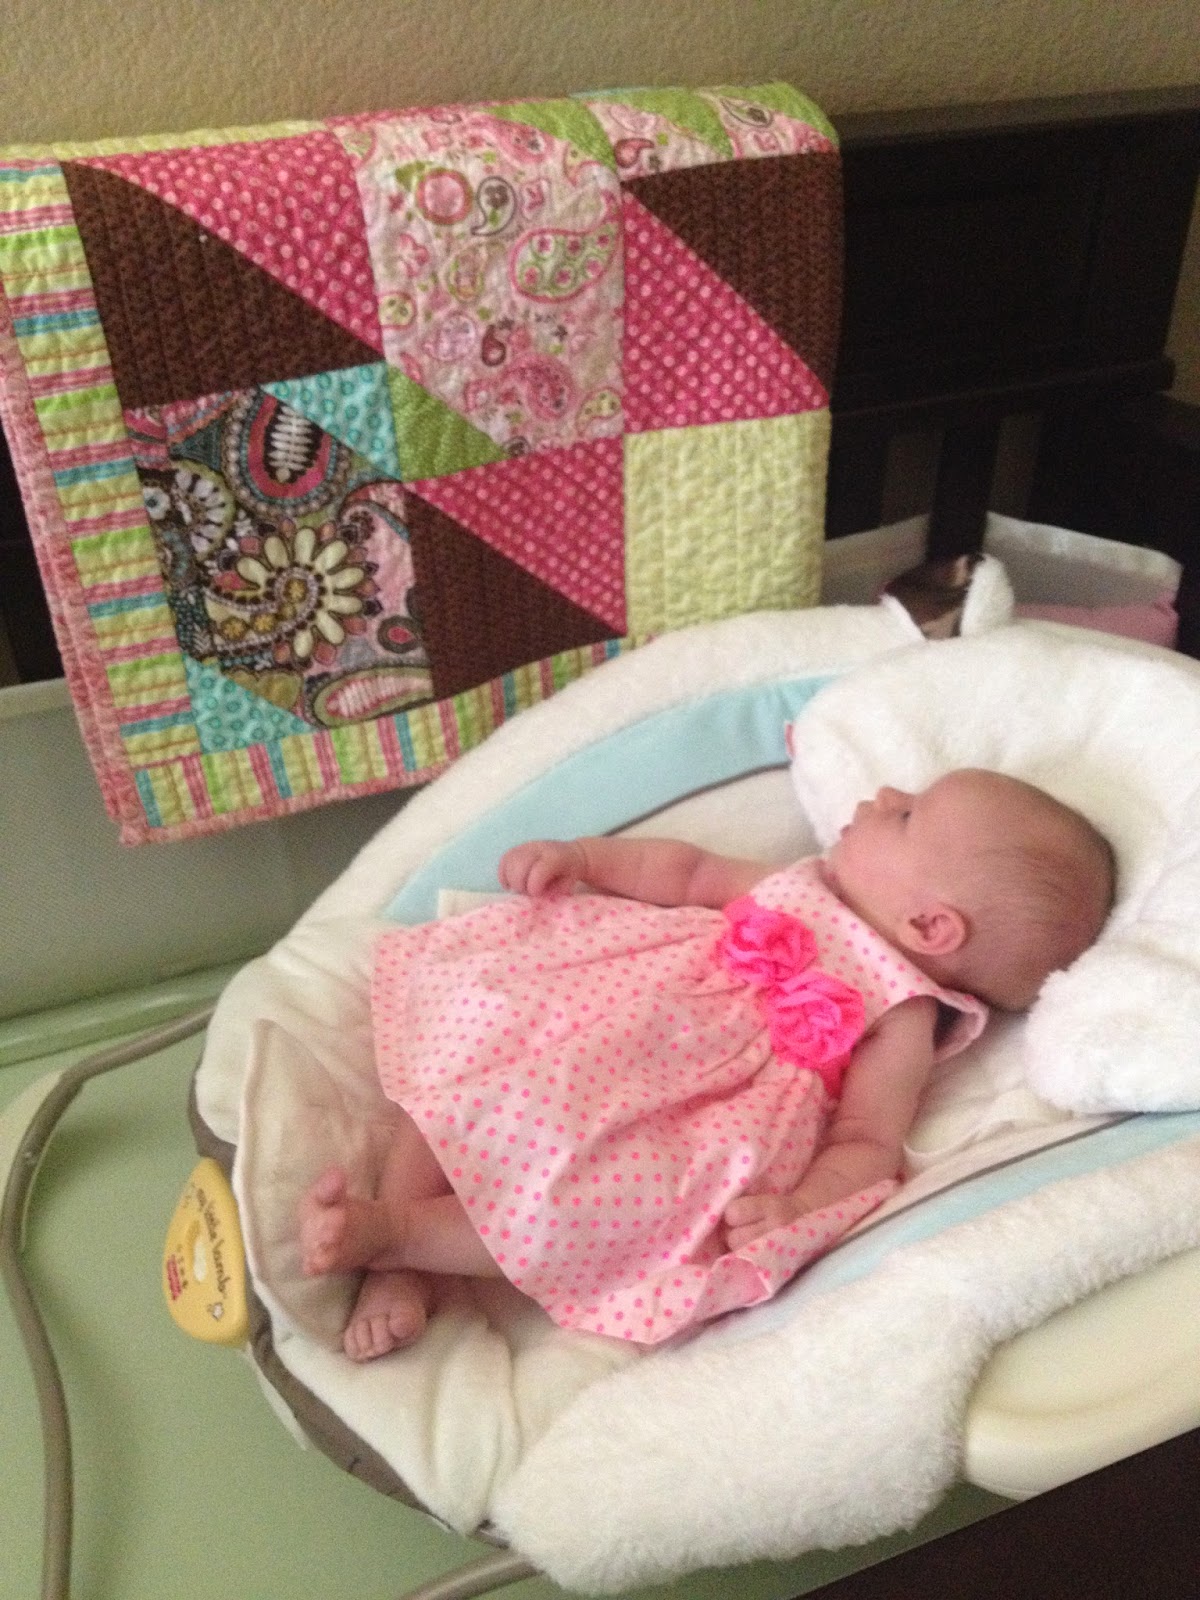
    My son did not pursue becoming a marine biologist. He did become certified as a scuba diver but chose the unrelated career path of a licensed architect and construction manager instead. Go figure. I guess land won out over sea. No matter what job choice he made, he is now an adult and a new father. Maybe I did not finish this book in time for his childhood, but at least he can read it to his baby daughter. I am traveling to visit her for the first time this week. She was just born April 6th, 2014. Here she is gazing at a quilt I made for her. (See post for February 8, 2014.) I can hardly wait to hold her!


    Enough reminiscing about recent decades! Here are my stats for the past week.

    Completed projects since 04/16/14 WIP post:
    1. Ocean Babies cloth book
    2. My Baby's Day cloth book
    Ongoing projects:
    1. Monkey on a bike quilt (April 2, 2014 post)  - spray basted awaiting FMQ
    2. Chicken quilt - spray basted, awaiting embellishment and FMQ
    3. Classic Cars strip quilt (August 3, 2013 post) - need to back, quilt, and bind
    4. Grinch quilt (May 22, 2013 post) - all borders added, need to back, quilt, and bind
    5. Overlapping square wall hanging - awaiting FMQ
    6. Mask quilt (October 19, 2011 post) - hidden away awaiting inspiration for arranging hexagons
    New projects since 04/16/14 WIP post:
    1. None.
    2. But I did buy fabric. Shame on me. (It was 50% off ...)
    Time to hop over to Freshly Pieced's WIP Wednesday and check out what has been keeping other folks busy this week.