Showing posts with label WIP. Show all posts

Thursday, February 4, 2016

Potpourri of Quiltiness

This week was a real potpourri for me of home decor, piecing, quilting, and blogging. This week is the final time Lee Heinrich of Freshly Pieced is hosting her Wednesday WIP link-up party so I did not want to miss inclusion in that, for Auld Lang Syne.

I made up a another color combination from my Sandy Klop Flying Circles pattern. I pieced only six triangles for this wall hanging this week and I accomplished that just today. Once again I chose a trio of fabrics with an intended orientation and then when I start flipping them around I become undecided. This combination of red on red dots, green on green swirl, and red/green stripe has the potential to look suspiciously Christmas-y. But then again so do the red chairs with apple green piping in my living room. The overarching question with this block for me is "Whirligig" or "Star". I originally intended the stripes in the interior to give a sense of whirling motion with the red on the outside. But the green swirl and the green stripe seemed to blend with each other too much so the inner section becomes a weak whirligig and an even flatter, non-3D star.


I tried moving the red in to be part of the star or whirligig. I like this better but it does give off a strong aroma of Christmas with those two basically solid fabrics strongly adjacent. The stripes give a sense of radiating rather that rotating.


On the third configuration, my only remaining option, I kept the stripe inside to give that rotating feel and used the red to contrast. The perimeter is a bit weak where the green swirl and green/red stripe are adjacent, but nevertheless, I think this arrangement is the front runner for me at the moment.


Actually I mis-spoke (mis-wrote?). I do have a fourth option. I could disperse these six triangles to be the spokes of a different interior hexagon like I did with a blue/green/red-white triangles in my Sandy Klop  class post of 1/23/16. The possibilities are endless. Well, to be precise, the number of possibilities is finite, but there are indeed a myriad to choose from.


On the home decor front, I was otherwise productive in that I finally did finish the barstool covers I'd been working on and mailed them off yesterday to my son and daughter-in-law. See my previous post.

This morning I attended a Handiquilter Sweet Sixteen Club at my semi-local quilt shop The Cotton Patch in Lafayette, CA. There, I practiced stitching two FMQ patterns from Lori Kennedy's blog. She has an entire collection of patterns and tutorials at theinboxjaunt.com/quilt/free-motion-quilting-tutorials/. Underneath each photo is the phrase I made up to chant to myself as I sew. The cute bows are much easier than they look. I chant, "sway down, sway up, sway down, figure 8 big, figure 8 little." "Practice make perfect," as the saying goes. I will settle for "Practice makes presentable."


That concludes my potpourri of quiltiness this week. Did I mention I also bought the yarn to knit my six-month-old grandson a baseball jacket style sweater? Aah, but that is the subject of another post. For now I am linking up to this week's WIP Wednesday.

Wednesday, January 27, 2016

Barstools, Whirligigs, Distractions

"Sometimes ya jus' gotta stop 'n think!" 


BARSTOOLS
I made good progress last week on those barstool covers, then lost a bit of momentum with having to stop and cut out more seat backs. I eventually located the misplaced cover fabric, cleared my cutting area – again –  and cut out the remaining backs.


Looking ahead, I started to think about adding the tabs for the Velcro. I realized their position is not as flexible as I initially thought. The Velcro from the Seat Back Back and the Seat Back Front both grip to the Velcro on the underside of the seat. I need to get the length just right so they can each reach and align with the mating strips of Velcro on the stool itself without interfering with each other. This is not a show stopper but, as I said "Sometimes ya jus' gotta stop 'n think!" Having to explain it by writing it here with photos helps.


There is a  lot of Velcro - 30 feet of it – so I need to think this through. I will measure the sewn barstool cover and compare it with the one I used as a model and use that dimension directly. That way I will not risk the two halves of Velcro failing to align due to accumulate offsets from the seam allowances.


While I was pondering the Velcro, I assembled the remaining four seat backs. The tricky part was rounding those upper corners and matching my registration marks but I went slowly and eased it in. Those red arrows in the next photo had to align. The top stitching took even more care to assure the seam allowance on the inside was directed toward the back while stitching around the compound curve on the two corners from the top on the outside.


All my top-stitching is complete and I next I need to joint the seat top to the seat back. The covers do not fit my dining room chairs at all, but I had to see what the five of them would look like. Since the amount of fabric was a limitation – as was the thinking capacity of my brain  – they are not identical in fabric matching. I  may play a few games with how I pair the seat tops with the seat backs before I sew the joining seams.


Even with a view from the back, I think the pattern is carefree enough in appearance that a formally aligned look is not necessary. Those dark starbursts and airy loopy circles look relaxed just scattered about. But I did pay attention so that all the dandelion heads on stems point up. Next to do are those four short seat-to-top seams and then the Velcro.


WHIRLIGIGS
My barstool progress was disrupted, although very pleasantly, by taking a class from Sandy Klop last Thursday. I could not resist cutting out a bit more of a grey neutral to lay out a whirligig block in dark on light versus my one in class that was light on dark. I call them whirligigs because to me a pinwheel has four arms and these have six. Besides whirligig is such a fun word! Here are the two whirligigs side by side. The left one has not been seamed yet and so looks larger. It really is bigger on the design wall and not just an optical illusion.


But this raises the question if both whirligigs should spin counter clockwise, if both should spin clockwise, or if there should be one of each? Here they are as one of each.


I like one of each better because the blocks that have non-neutral colors can be perceived as stars or whirligigs if you stare at them long enough. If viewed as whirligigs, color choice can make them appear to rotate either way. I am opting for similar variety in spin direction in the neutrals; but I had to think about that.


My fabric choices were directional so that leads me to more opportunities to think. This reminds me of a quote of anonymous origin, "You can lead a man to knowledge but you can't make him think". Directional fabric makes me think. (By the way, that barstool cover fabric was directional, too.) Both the white hearts and the grey crowns in this block are directional so I need to be careful how they are cut, stacked, and assembled. In the next photo all the crowns are consistent but two white heart fabric pieces in the lower left triad were cut with the hearts pointing away from the triad center and so must be swapped out before I sew this block.


The crown fabric was cut from a fat quarter and so I did not get as many pieces as I would have from a full width strip. Never the less, I layered three strips in the same orientation, stacked the cut pieces in like oriented piles, and at least will aim to be consistent within a block.


DISTRACTIONS
While I am thinking about sewing, and preparing to sew, I am also distracted by what I would love to to knit.  My daughter wants this Debbie Bliss designed jacket for her son, now six months old. I haven't started yet. I have not yet succeeded in finding the right weight, machine washable, yarn in a color combination that wows me.


I also just bought a book of baby knits and discovered this set of book buddies when I cleared my cutting table. These little sticky note are just too cute for words. You can write notes right on them and pretend those chubby, chatty kitties are whispering to you. In case you can not read their names in the photo, they are Benny, Henrietta, and Milo!


This trio makes it so easy to mark way too many items for future projects. I have a granddaughter due in May, so the wheels are turning and my fingers are itching.


Have you heard the phrase "His eyes are bigger than his stomach?" There ought to be a similar phrase and sentiment for wanting to quilt and sew and knit and crochet too many other things. I guess I will nurture that craving by cruising on over to this week's Works In Progress at Freshly Pieced and look at the work of others.

Wednesday, January 20, 2016

Prototype Barstool Cover

After some serious sewing room cleaning earlier, I was determined to get some Pfaff-time in this week. First on my list is those barstool covers I have been promising my daughter-in-law since... well, so long ago I do not remember since when. The blog post for cutting them out was posted September 30, 2015 but I think she picked out the fabric back in July. I guess I have been chicken to do them in case they do not fit.  But this week I finally forged ahead. I have spent more time fretting about this than I think it will take me to make the set of five. At least I hope I have fretted longer than it will take me.

THE PIECES
  • Front Gusset 
  • Side Gusset
  • Chair Seat Top
  • Seat Back Front
  • Seat Back Back 
This is half of one cover which I left intact as a reference. The other half I disassembled to make my pattern pieces. As a reminder here are the pieces defined. The Seat Back Back is not shown but it is behind the Seat Back Front.


I want this project to go smoothly. Here is my assembly sequence written down for my benefit as much as any one else's who wants to tackle a project like this. The prototype is always more time-consuming as I figure things out.

CUTTING TO SHAPE
  • Trim each piece to shape, ½" beyond the seam line as marked by a Sharpie black line, using a ruler and rotary cutter. Cut one layer at a time except for the pieces that require symmetry and cutting through two layers.
  • Looking back at the cutting out post I see I had planned for ⅜" seams. It does not matter since I added the seam allowance based on the black Sharpie seam line I had drawn.
SEAT ASSEMBLY
  • Join Side Gussets to either side of Front Gusset. Finger press seams away from Front Gusset and then top stitch. Turn under raw edges at leg openings and stitch.
  • Join gusset assembly to Chair Seat Top. Press seam toward gussets and top stitch.
This seam between the joined gussets and the seat has a straight edge joined to a curve at front corners of the barstool seat. Yes, I want to get good at curved seams in my quilting but this has 3-D effect and involves a heavier weight fabric, so I struggled with it a bit. I've set in sleeves in garments before, but this was a much tighter curve with less pliable fabric - and I am out of practice. But I succeeded. Here is one corner. The seams are finger pressed before top stitching. Topstitching is more than decorative. The second row of stitching should add strength to the seam.


CHAIR BACK ASSEMBLY
  • Join Seat Back Back to Seat Back Front along the sides of the seat back and across the top of the seat back. 
  • This is the trickiest seam. It has two curvatures at the top corners that need to be eased in and the centers of curvatures are offset from each other as can be seen from the black registry marks. 
  • Remember to disengage the dual integrated even feed from the Pfaff to avoid fighting the ease-in process. 
  • Press seam toward Seat Back Back and top stitch along the Seat Back Back side of the seam.

Here is the serpentine seam line on the original beige linen.


And here is that serpentine seam on my print prototype, not yet top stitched. It will be interesting and challenging maneuvering into those two corners for the top  stitching. I think I will need to turn the pillowcase-like construction inside out to do it and just creep my way around those corners.


I think I illustrated the top right corner as you sit in the chair on the solid linen, and the top left on the print. The seat back wraps toward the front so the solid is looking from the front and the print is viewing from the back. Perhaps the catalog picture makes it clearer.


Then again, maybe not. By now I am so turned around from thinking in three dimensions and getting the lighting tolerable for a photo, that I am no longer sure. I am relieved that I did not introduce any tucks or pleats in that curvy seam that looks deceptively straight on the seat. When I take my technique class on curved flat seams in quilts it will be a piece of cake by comparison. I took my time and just eased my way along this portion of the seam matching the registry points I'd made on the pattern. My seam turned out smooth. Alleluia. I have a whole new respect for those factory workers somewhere who probably zip dozens of these out in a day.

JOINING CHAIR SEAT TO CHAIR BACK
  • Join Seat Back Front to Chair Seat Top, an easy straight short seam. 
  • Overcast or zig zag three edges of 2"x11" lightweight fabric tab that will hold a strip of Velcro. Remember to switch out needle plate to one that accommodates specialty stitches and not just straight stitches.
  • Add this tab to the Seat Back Front to Chair Seat Top seam on Chair Seat Top side. 
Here is the prototype thus far, draped over an ordinary chair from my sewing room. I decided to leave adding the Velcro tabs that are on all four edges of the chair seat until last. Sometimes sewing through that thick Velcro requires a different tension setting and heavier duty machine needle and I wanted to get all the covers assembled and top stitched before messing with machine settings or dealing with a dulling needle.


The next four after the prototype should go faster now that I know what I am doing (sort of ) and have these notes to look back on. I have four chair seats completed, except for the addition of Velcro, and I have four more seat backs to assemble. I will lose a bit of momentum because I goofed up cutting out and was able to cut out only four of five seat backs because I was short of fabric. I discuss my cutting slip in my post for October 7, 2015. Luckily I have the additional fabric now though, so I will need to go back and do that. I am sure glad I posted on the cutting out part of the process, too, to help jog my memory. I will link up now to view others works in progress at this week's Freshly Pieced.

Wednesday, January 13, 2016

Today, I'll Crochet

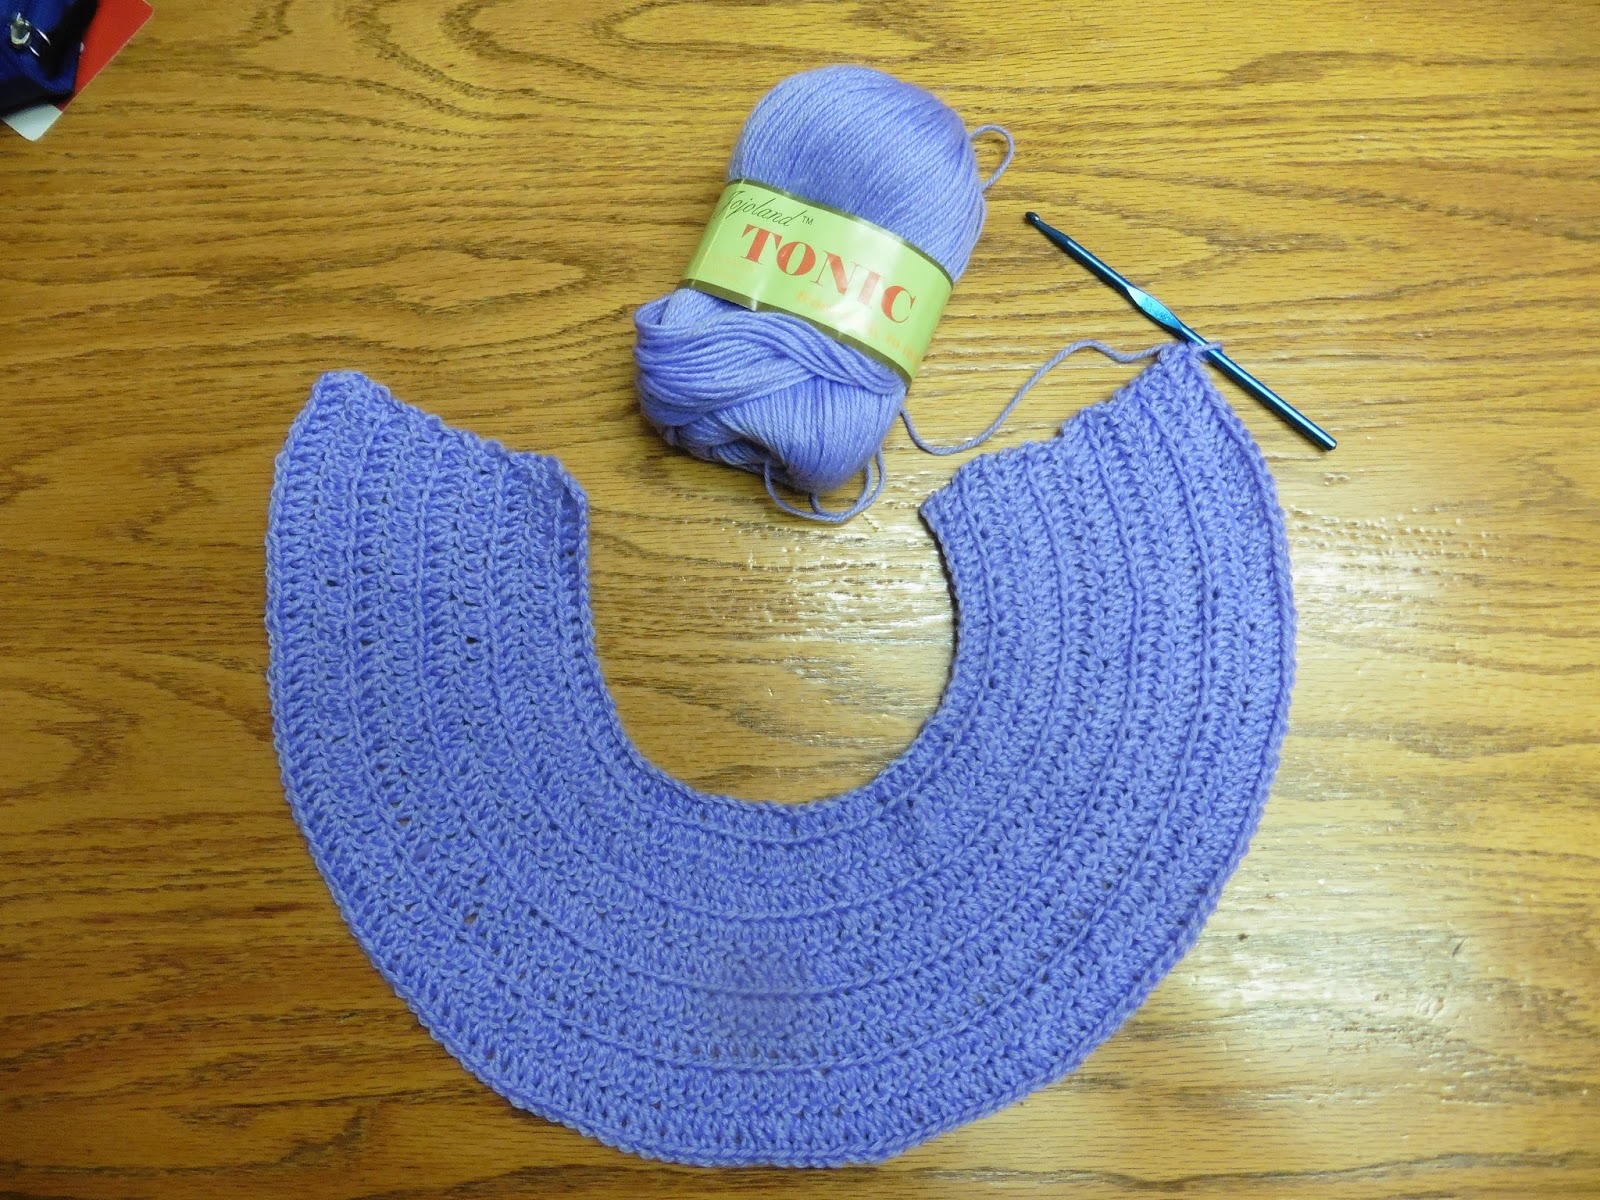
I just re-read my 2016 quilting goals. Whew! Whatever was I thinking? Instead of starting on them I decided to revolt and started a crocheting project. Why not! My daughter had seen this 2014 pattern by Sylvie Damey on Etsy and had requested I make it for her daughter.


The pattern reads well. Rather than just typing out a rote set of directions, the designer explains in general what is happening at each certain stage. I like this approach of giving an overview. It helps to orient me. The yarn I am using is Jojoland™ TONIC a 85% acrylic 15% wool blend in a lovely lilac color. The hand of the yarn is very soft. I am working with a U.S. size H crochet hook.

Sunday, January 10th
I started crocheting this Roseline cardigan and was surprised how quickly it worked up – or worked down rather since it starts at the neckline. The rows of double crochet have the increases spaced so evenly the piece forms a smooth semi-circle and lies flat.


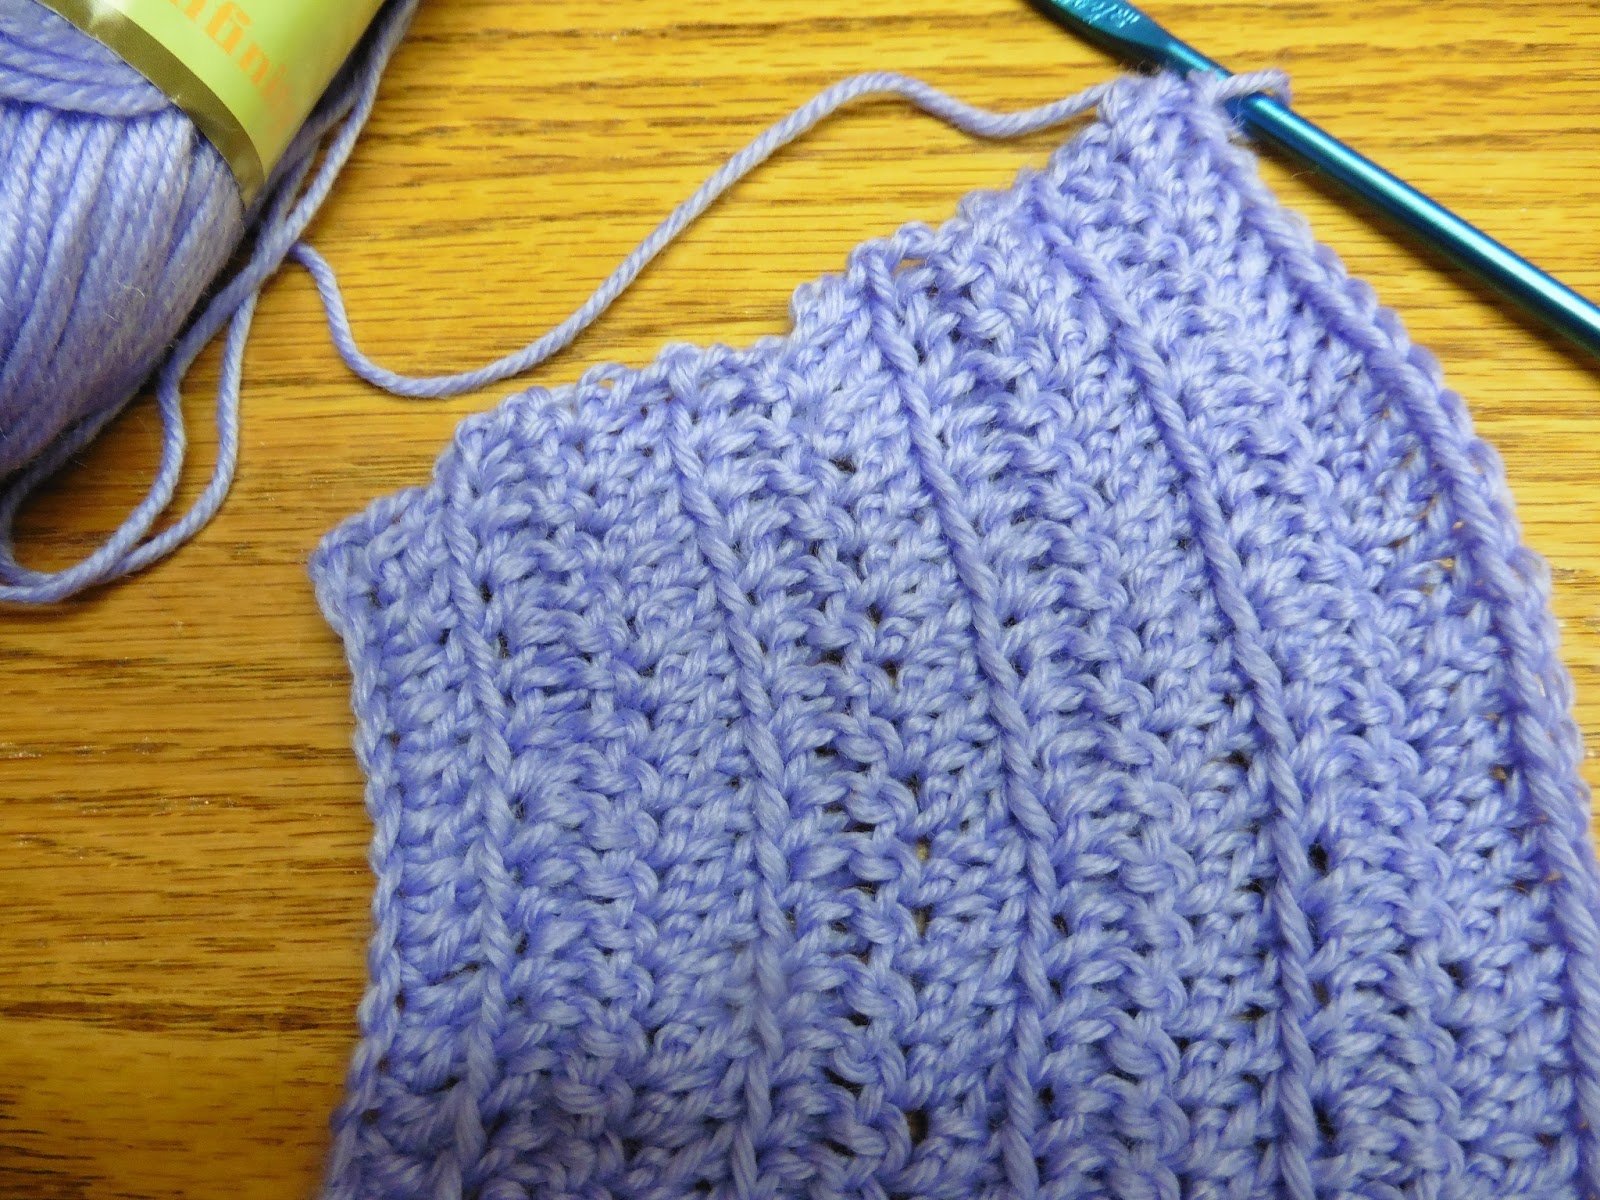
These double crochets are worked in the front loop only of each stitch and I found out this variation really gives a softness and nice drape to the yoke of the sweater, better than when crocheting within both loops of the stitch. I'd learned more from the designer's Chez Plum blog post for February 21, 2014, a link provided within the pdf pattern.


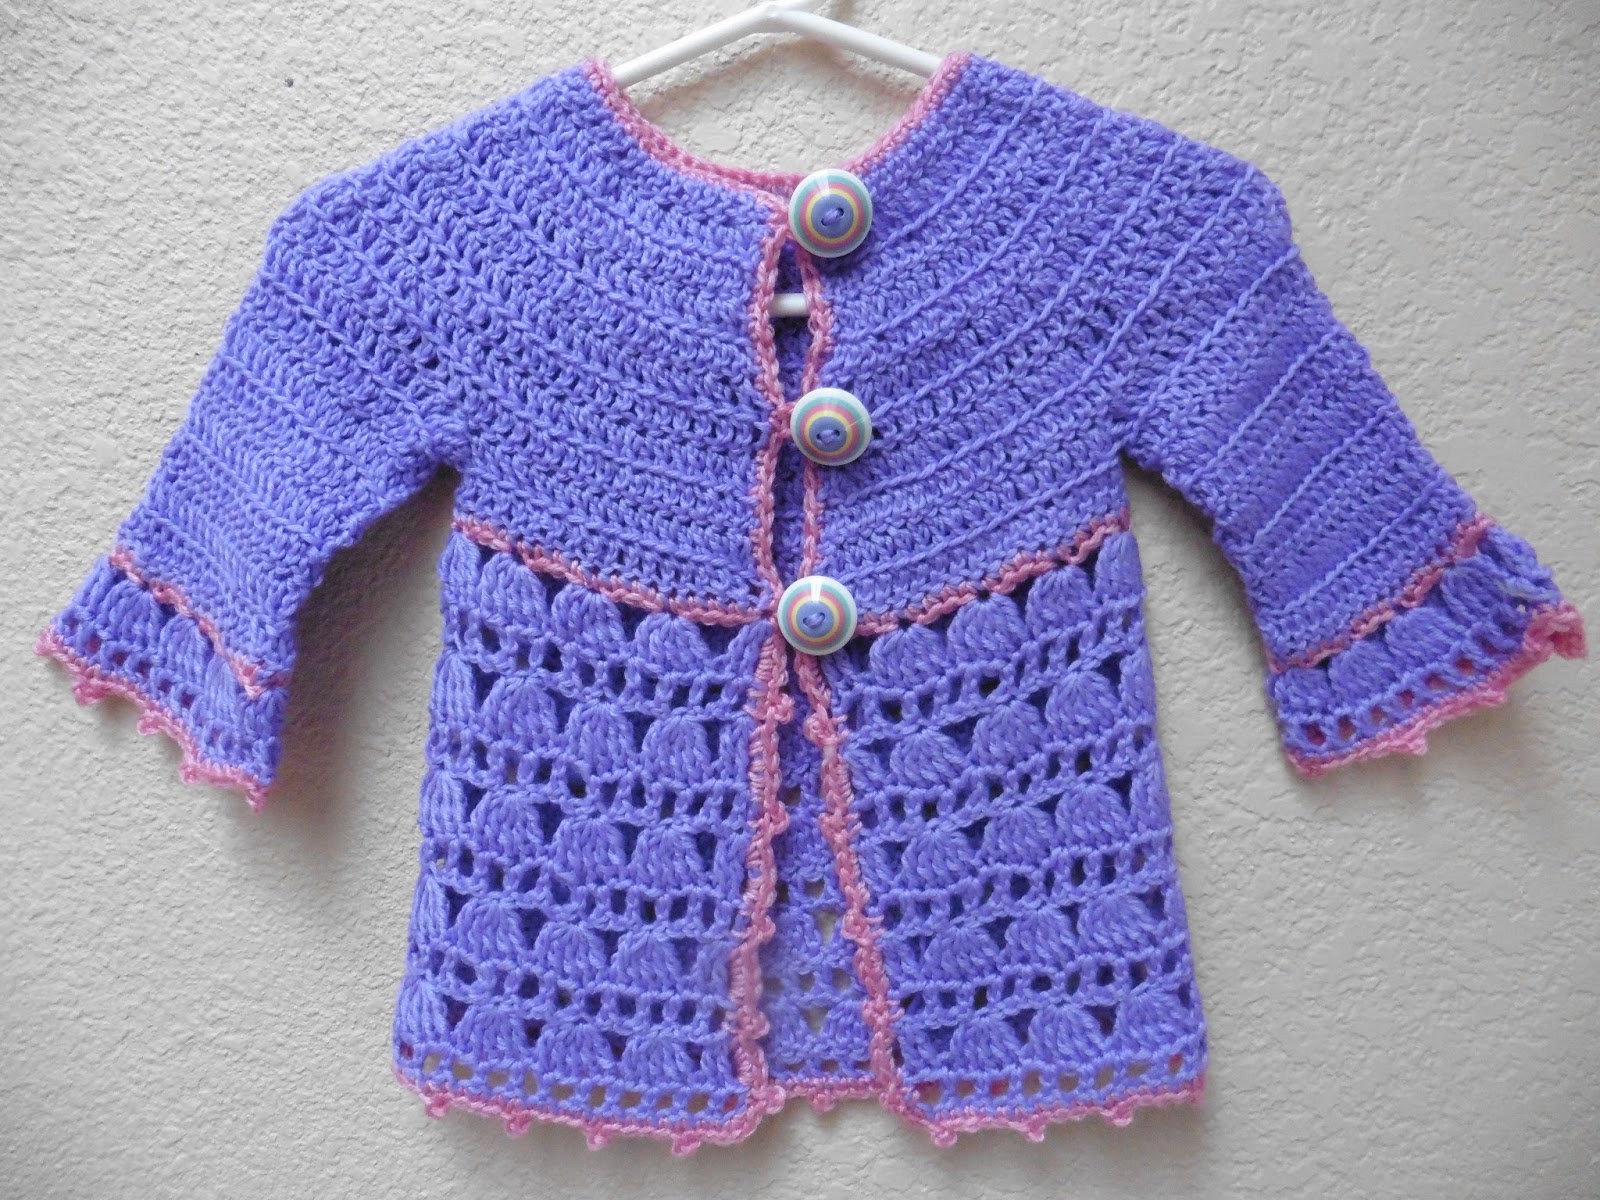
Below the waist are alternating rows of a shell pattern and a mesh pattern. I completed the top, minus the sleeves, and three row pairs of the follow on shell portion below the waist. It went smoothly and was very engaging. Here is a closeup of that pretty shell and mesh sequence.


Monday, January 11th
I finished the final two pair of the shell and mesh sequence rows below the waistline. I like the spark of interest that the one row of single crochet in a contrasting color  gives at the waistline. I was quite pleased that I'd knitted this whole torso and skirt without a break in yarn. All that I had left from the 3.5 ounce (100g) skein is pictured at the left.


Before I crocheted the contrast trim border I needed to pick my button size, because loop closures for the buttons on the bodice are integral to the trim and need to be sized accordingly by adjusting the number of chain stitches in the loop. I had some buttons in my personal stock that I thought would go quite well but just wanted to check out if there was a better option at my local JoAnn's Fabric and Craft Store. There was not. I must admit that this is not rare. I think I have a collection of buttons that rivals the stores. When my mother passed away in 1979, my sister and I inherited all her sewing notions, fabric, and yarn.

When I buy fabric or notions now, I buy what appeals at the moment and often do not use them right away. Since colors change with the seasons, I can usually do better relying on my personal supply since I have several years' range of featured colors. The lilac in the stores now is much more of a pinkish orchid than in the yarn I am using. The lilac center and pink stripe of the button that I already had were spot on color-wise. The store had nothing even close to the hue of the yarn. My husband questioned if I was going to add aqua to the sweater because of the stripe in the button. I said no. There is yellow in the button also, but that just means there will be a wider range of outfits that will be able to be worn with this sweater. The conically shaped buttons feel very smooth and streamlined. Things have to have tactile appeal to me, too. I think these buttons were just waiting for this sweater. The scale may be a bit large but they make a statement!


I found the sales slip in with these buttons There were purchased in 2009 at a small yarn shop in Lake Forest, CA – a shop approximately 4 miles away I'd googled and sought out while visiting my son in Aliso Viejo. Sometimes nowadays I cannot remember what I went into the next room for; but, oddly enough I knew I had these buttons somewhere and I recall pawing through a bin of loose (and very unique) buttons seven years ago in that yarn store. Apparently I paid $1.00 for a "handful" of buttons. I'd saved the receipt in case I ever wanted to find the shop again when I was in the area. Coincidentally, my son just moved to Lake Forest in January 2015. Sadly, when I checked for the Yarn Lady, I learned this particular store had gone online in 2010 and is now out of business. It had been the premiere yarn source in Orange County. I'd only been there once but it had made an impression on me.


Here are some other buttons I bought that day. Those are little red cars that are zipping along the circular roadway on those blue buttons.


I also bought a clever collapsing yarn/knitting basket.


I use it to this day and it is one of my favorites. It is very flexible and with being as smooth as it is on the inside, nothing snags.


Dashing out to the store and reminiscing about buttons broke a bit of my crocheting momentum. I finished the contrasting trim border and broke into a second ball of lilac yarn to begin one sleeve. I think I could have completed the project that day but I have learned that pursuing late evening needle crafts, especially with a distraction of TV viewing, can lead to mistakes. There is always the following day to start afresh.


Tuesday January12th
I finished the sleeves and added the picot border edge to them, too. I sewed in the stray yarn ends. The way this garment was constructed there were no side or sleeve seams to slow me down and there were few yarn ends to weave in. And miracle of miracles! I did not procrastinate on the blocking. I was able to spread the body out flat to block it, but the sleeve shells were a bit tricker since they were double layered. I steamed one side of each sleeve, then flipped the two sleeves and steamed the other side of each. That seemed to work. After blocking, I sewed on those three buttons and here is the completed cardigan. I sure hope it fits!


Wednesday January13th
After adding a few photos and editing this blog post a bit I am linking up to this week's Freshly Pieced Works in Progress to explore other bloggers' efforts.

Wednesday, December 2, 2015

FMQing the Barnyard Quilt

Deciding and Executing the FMQ Patterns
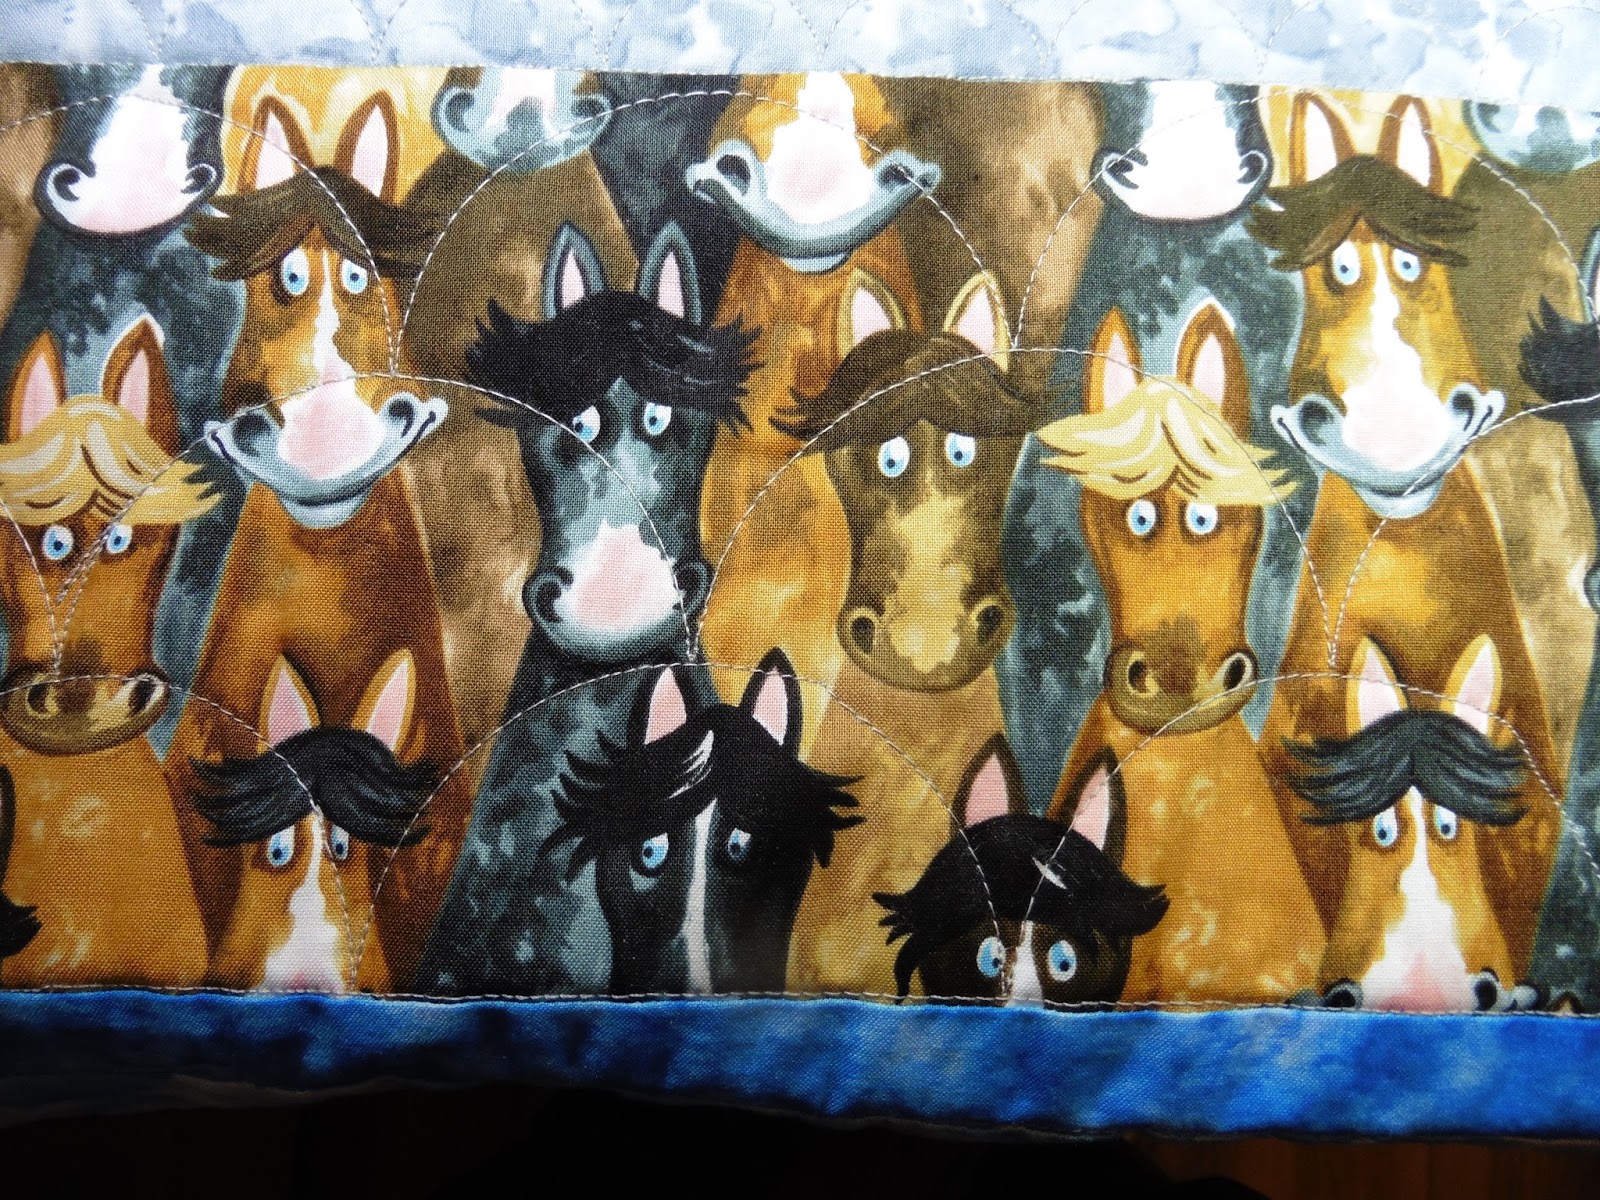
I have been staring at a strip quilt from Barnyard Buddies fabric for months to get inspired as to what to quilt on it and then to get the courage to do it. I just love the fabric collection with its horses, pigs, sheep, and cows, all with those egg-shaped, blue, cartoonishly intense eyes. Here is one of the fabrics in the line that happens to feature all of the barnyard buddies congregated with each other.


At a club meeting sponsored by a local quilt shop  HQ-16 sitdown owners, one quilter suggested that a clamshell pattern would look good among those faces and I agreed. It would sure beat stitching around each animals head and still give the effect. Last spring I took a ruler class by Megan Best and described it in my post for June 24, 2015. Earlier this week I practiced my clamshells on a quilt for my guild and recorded some tips in my post for November 28, 2015. I was finally ready. It was a simple strip quilt for goodness sake. It was about time that I stopped stalling! I did the horse section first. No more "stall"ing. With a band that was 6 inches tall and 40 inches wide, I'd planned to fit in three rows of ten 4" clamshells each. I carefully laid out two strips of masking tape spaced so that I'd be aware of where 40 inches fell.


Despite my reasonably successful practice with the clamshell ruler just a couple days ago, the ruler kept slipping badly on my first three or so clamshells on this quilt. So much for those accurate 4" wide clamshells. I discovered I was placing the ruler upside down, sandpaper grippers up and not against the fabric. Duh! So much for my even distribution and those carefully placed tape borders at the two edges. I continued with the remainder of the row, which went well now that the ruler was staying put. The row ended in  fraction of a clamshell though because of my accumulated slips at the beginning. On the way back in the row above I had to fudge the placement to land centered between the irregularly sized clamshells. I chose not to rip out the first few that were wrong. I need to practice FMQ more than I need to practice ripping out so my time was better spent forging ahead and improving my recovery skills. Those three rows came pretty close to filling the vertical space.


Here is the mixed crowd of barnyard buddies. There are four rows of 4" clamshells here. I am not sure if I am getting better at controlling the ruler while moving the fabric or just getting better at compensating when I mess up and stitch lines do not wind up quite where I intended. I am getting braver at doing and more accepting of the results so that counts for something. That band was 8" tall but I guess I squooshed them a bit because the top row did not quite reach the seam line beneath the chicken strip.


For clamshells on the pigs I used a smaller, 3" clamshell size and inserted three rows. There are narrow strips in between some of the wider bands and I needed to decide how to treat those. Since the pigs were FMQ'd with smaller clamshells I chose one row of small scallops in the two gray bands bordering the pigs. I am actually getting confident enough to put a pattern in an area that reads like a solid! I am glad those bigger clamshells are in a busy pattern area. It allows me to practice without glitches being too obvious. Once washed, those mounds should pop up and give a gingerbread house roof kind of texture.


The scenic pasture bands called for long wavy lines and I followed the hill contours for those. Then I used my newly purchase echo feet and stitched parallel to those contours.


The Echo Feet provide a 3/8-inch, a 1/2-inch, and a 3/4-inch distance from the needle to the edge of the hopping foot. Without them there is only a 1/4-inch option from the edge of the hopper foot. The visibility was a bit less than desirable. I peeked between the shafts of the hopper foot and the needle foot to see where I was going. In retrospect, I probably could have sewn sideways with the line I was echoing in front instead of to the left. I tried orienting the quilt horizontally for the other scenic band and it did work out better visibility wise. I am better at stitching forward and backward, rather than side to side, but improvement will come with practice.


Even though the lines passed through the bodies of the animals, I fought back my urge to strictly follow the fabric print. I did deviate in two to three places because I felt those few tree pairs that jutted up into the sky, needed to be accented a bit. I chose to make the contour lines about 1/2 inch apart. That spacing looked just about right. On the scenic pastures, I wanted to accent the landscape, not the dotting of barnyard animals. Once washed I think the channels will puff up like furrows. I still have some more FMQ-ing to do. The pattern in the sky is still up for grabs. Maybe clouds?


Having just practiced pebbles in my post for November 28, 2015, I am considering placings "eggs" instead of pebbles amongst the chickens. There is a also sheep band much like the pig band. I want to throw some curlicues in for the sheep but I am doubtful I can manage loopy clamshells. Should I instead 1) do straight clamshells and fill some with loops or 2) free form loops around the sheep's bodies and forget the clamshell ruler entirely?


Inspiration has not struck yet either for the strip of straw - or is it hay? I do not think this distinction will matter when I pick an FMQ pattern but I have been told that if it is hay, it is food and the animals eat it and if it is straw, it is bedding and they lie on it. Every other FMQ on this quilt is curly and rounded but this strip calls for something a bit straighter and more attuned to the wisps of hay/straw. Tune in later for my final choices.

Mini-retrospective on Strip Quilts
Assembling a strip quilt is a snap and a great beginner project. I have made a few strip quilts, mainly from assembled kits where the fabrics have been pre-selected from a particular fabric line. I made Duck and Cover, FMQ'd in my post for September 12, 2012, and shown completed in my post for October 24, 2012.  There was Fun Guys, FMQ'd in my post for June 17, 2015. I also made the Ghastlies, shown in my post for March 17, 2014, but that one was not a kit. I took some feature fabrics and supplemented with my own strips pieced from other fabrics. So it was no surprise that I bought yet another strip quilt kit. This one gave me pause for thought, but not until after I'd assembled it and proceeded to trim it and start FMQ ruler work on it.

I bought this farm animals quilt top as a kit several years ago in OKC because the fabrics was just so stinkin' cute. The fabric line is Barnyard II by Blank Quilting circa 2009. Those googly eyes of these animals have been staring me in the face for a fair amount of time before I assembled it. Once inspired to get moving I assembled it in a of couple hours as described in my post for April 15, 2015. I followed the suggested sequencing layout for the horizontal bands. I was careful to alternate the sewing direction of the seams, aware that I could create a curving rainbow effect if I did not do so, especially for the narrower strips.

Several months later when I went to add the batting and backing – yes, it sat again for weeks between stages – I began to trim the edges. I learned something else I should have done. I should have carefully trimmed the top and bottom edges of each strip to be parallel and squared to the selvages before I ever started stitching. I used the strips from the kit straight out of the package. There were no cutting or trimming references in the kit instructions, and it just simply did not occur to me to do otherwise. Perhaps because there were no square or rectangular or triangular pieces to prepare, I was lulled into a false sense of security. Whatever the reason, I did not pre-trim the strips to assure that the upper and lower edges were parallel. The following diagram is exaggerated but I think it illustrates the concept.


I assumed, if I even thought about it at all, that the bands had been rotary cut straight and square by the kit compiler, or if slightly off, that the angle would be random and average out in the end. That was not my experience. And when I contemplated it some more, it kind of makes sense that the angle would not be random about zero. Imagine that the clerk who prepares the kits veers slightly off to one side when she cuts.  She will most likely be consistently biased to the same side. She may periodically stop and square up the fabric coming from the bolt occasionally but that means the amount being "off" was an accumulation from the cuts that was distributed among the previous kit components. It may be a little amount but each time a new fabric is introduced to the kit, a new cluster of accumulations occurs. In all fairness, the preparer is in production mode, not precision cutting mode, slicing off pieces of fabric rapidly to fold into bags or boxes and sell as a kit.

Sewing these strip "wedges" together I had a challenge to trim and a challenge to FMQ, especially since I chose a linear pattern, like the regimented rows of clamshells. That topmost strip may look cattywampus. Trimming it to true horizontal after assembly can make some prints look crooked or like they are traveling uphill or downhill. Trimming after FMQing can have its own idiosyncracies. Lesson learned: I will square up those strips from that strip quilt kit my local quilt shop or show vendor prepared for my convenience. I'll invest a small bit of time to avoid the headaches that will creep in later. If the fabric is printed off grain so that it drifts up or down across the width of the fabric, perhaps I'll reconsider that a strip quilt may not be the optimum choice for its use. If I had been doing free form FMQ instead of attempting more precise ruler work the slants would not have been as much a concern. So when selecting a pattern to FMQ I now can add another criterion. Would freeform or precision ruler work be better suited to the piecing style of the quilt?

I will link up now to this week's Freshly Pieced's Works in Progress since this week I have a work that I have actually made some progress on.

Wednesday, November 25, 2015

Pre-Thanksgiving Color and Stitchery

What are you thankful for at Thanksgiving? Many things of course. But for me, from the vantage point of my quilting world perspective, I need to add to that list the rich colors and textures of the holiday. I love pumpkins in many shapes and types and here is the variety I have on my hearth for tomorrow. From left to right there is the rough woven straw, the crisp plaid cotton fabric, the nubby cable knit, the gathered silky smooth velvet, and bright, slick, hammered copper.


My younger son Alex absolutely loves a lighted tree so yesterday I assembled our 6' tall pre-lit Walmart tree and placed just a few gold ornaments on it to represent the tones of Thanksgiving. Last year was the first time we did not have a freshly cut live tree and I was a bit wistful that purchasing an artificial tree would signal us letting go of a "real" tree tradition. However, being able to erect this tree in less than 30 minutes, when the inspiration struck me, has a lot of benefits. Alex can double his holiday enjoyment. Alex is a special needs adult, but one of the perks of his situation is that he continues to enjoy typical childlike pleasures. (You can see Alex enjoying his birthday quilt in my post for May 26, 2014.) I do not want to rush Christmas, so I will wait to add the red and other bright ornaments later, in a week or so. For now, we have lights and golden hues for Thanksgiving.


For the Thanksgiving holiday, I enjoy setting a pretty table more than I enjoy the cooking part of things – and much, much, more than dealing with the cleanup and all those turkey leftovers. Here are some plates I bought at T.J.Maxx several years ago. The pattern is Royal Turkey by Maxcera but I did not know that was anything special at the time. I just liked them with their scrolls and ripply edges and bright orange-reds. I love that although there is a turkey, the colors are not just browns. The painted fruits brighten up the plates, too, as if that striking border were not enough!


The burgundy tablecloth underneath that plate was also a discount store find many years ago, but this is the first time I have used it.The quilters out there may enjoy the embroidered and appliquéd leaves at the edges and corners. Those leaves are what attracted me to it when I bought it. The low price for such detail was a pretty good incentive, also.


Since there will be only four of us tomorrow at a table big enough for six or eight, I draped a table runner crosswise at one end. I'd picked up the leaves runner at an antique store. Again I was drawn in by appreciation for the stitchery. Those tea light holders shaped like leaves were a random find at a dollar store. My son will have a blast blowing out the tea lights and having us relight them repeatedly for him. It is gratifying to watch that such a small thing gives him such great pleasure.


I love dragging bits of items from my closets, collected a various random times, and putting them together in a fun way. After gathering it all together, this is what the table will look like, pre-food. Tomorrow I will add a few red carnations in the individual mini-vases or tuck them  in with the gold utensils at each place. Those mini-vases hold pumpkins, leaves, and candy corn stick decorations within.


Shortly after taking a quilting class in fall 2014 at Alden Lane's Quilting in the Garden I bought those stick decorations at their Christmas shop. The whimsical candy corns make me smile. The pumpkins may have faces on them making them Jack O'Lanterns but I still think they add to the ambience and friendly tone of the Thanksgiving table.


My son's mini-vase is customized more to his taste. Those Tootsie Rolls pops remain true to the red, orange, and brown color scheme.


There is no food yet, but our dog Daphne is practicing for her food coma tomorrow.


Hopefully there will be moderation for us, and not a food coma. This is the first time ever that for a Thanksgiving at home, I will not be cooking. We are buying a holiday feast from a local restaurant. A single adult friend will be joining my husband and son and me. Not cooking gave me time to do this fussy table decor stuff that I love.

I am thankful that tomorrow promises to be a low-key day for us to relax and count our blessings; catch the Macy's Day parade on TV... watch a little football... blow out a few candles... do a jigsaw puzzle. I am blogging today instead of frantically baking. Whooo, knows? Maybe we will do it again this way next year.