Showing posts with label BOM. Show all posts

Monday, October 27, 2025

Make It Merry Month Six

At last, the sixth and final month of my Block of the Month commitment is here and I have completed Block #10 and Block #11.  Only one of each bock was required. The first five months had eight blocks each and this month had only two blocks. I still have the assembly and quilting of 42 blocks ahead of me, but 100% block completion is still a milestone I wanted to acknowledge. 


Theses are the two blocks, each measures 6½ "


In make the HSTs for these blocks I wound up with these four extras. They would make a nice pinwheel block although I do need to decide if I want the same red blades opposite each other or the same white blades opposite each other. I cannot have both. That is unless I make more HSTs and I certainly have enough leftover fabric to do so.


Can you locate Block #10 and Block #11 from Month Six? That is not very hard since they are each part of the bow.


I am super happy to have reached this block assembly phase on time and under budget. I purchased no more fabric nor tools. Assembling, adding borders, and FMQing will be the topics of future blog posts. My goal is to complete this quilt for Christmas Season 2025.

Friday, October 24, 2025

Make It Merry Month Five

In Month Five, the Make It Merry assignment was to make four Block #8's and four Block #9's. I just got a notice that my Month Six installment is due to arrive in the mail this weekend, so I better started on Month Five so as not to get behind. I am reminded of a saying by Karen Brown of Get It Done Quilts that, "My main goal for myself this year is to stop feeling like I am behind." A large part of the truth in that sentiment is attitude. But also, part of it is staying aware of those " _____ of the Month" things I signed up for. 


Block #8 had a lot of cream/tan and very little red. The cream/tan has subtleness in the use of three varied "white" fabrics. I liked that difference from past blocks. Variety is the spice of life. (As a bit of irrelevant trivia, per Wikipedia, Variety is the Spice of Life is also the name of 1939 comedy film. The plot is that when her composer husband loses interest in her, an ordinary housewife turns into a seductive vamp to try and win back his affections.Also there were only four HSTs per block which is a relief. Making them a bit oversize is great for accuracy, but the trimming them to size can become tedious.  Here are the four 6½ " blocks, rotated as they will appear in the quilt.


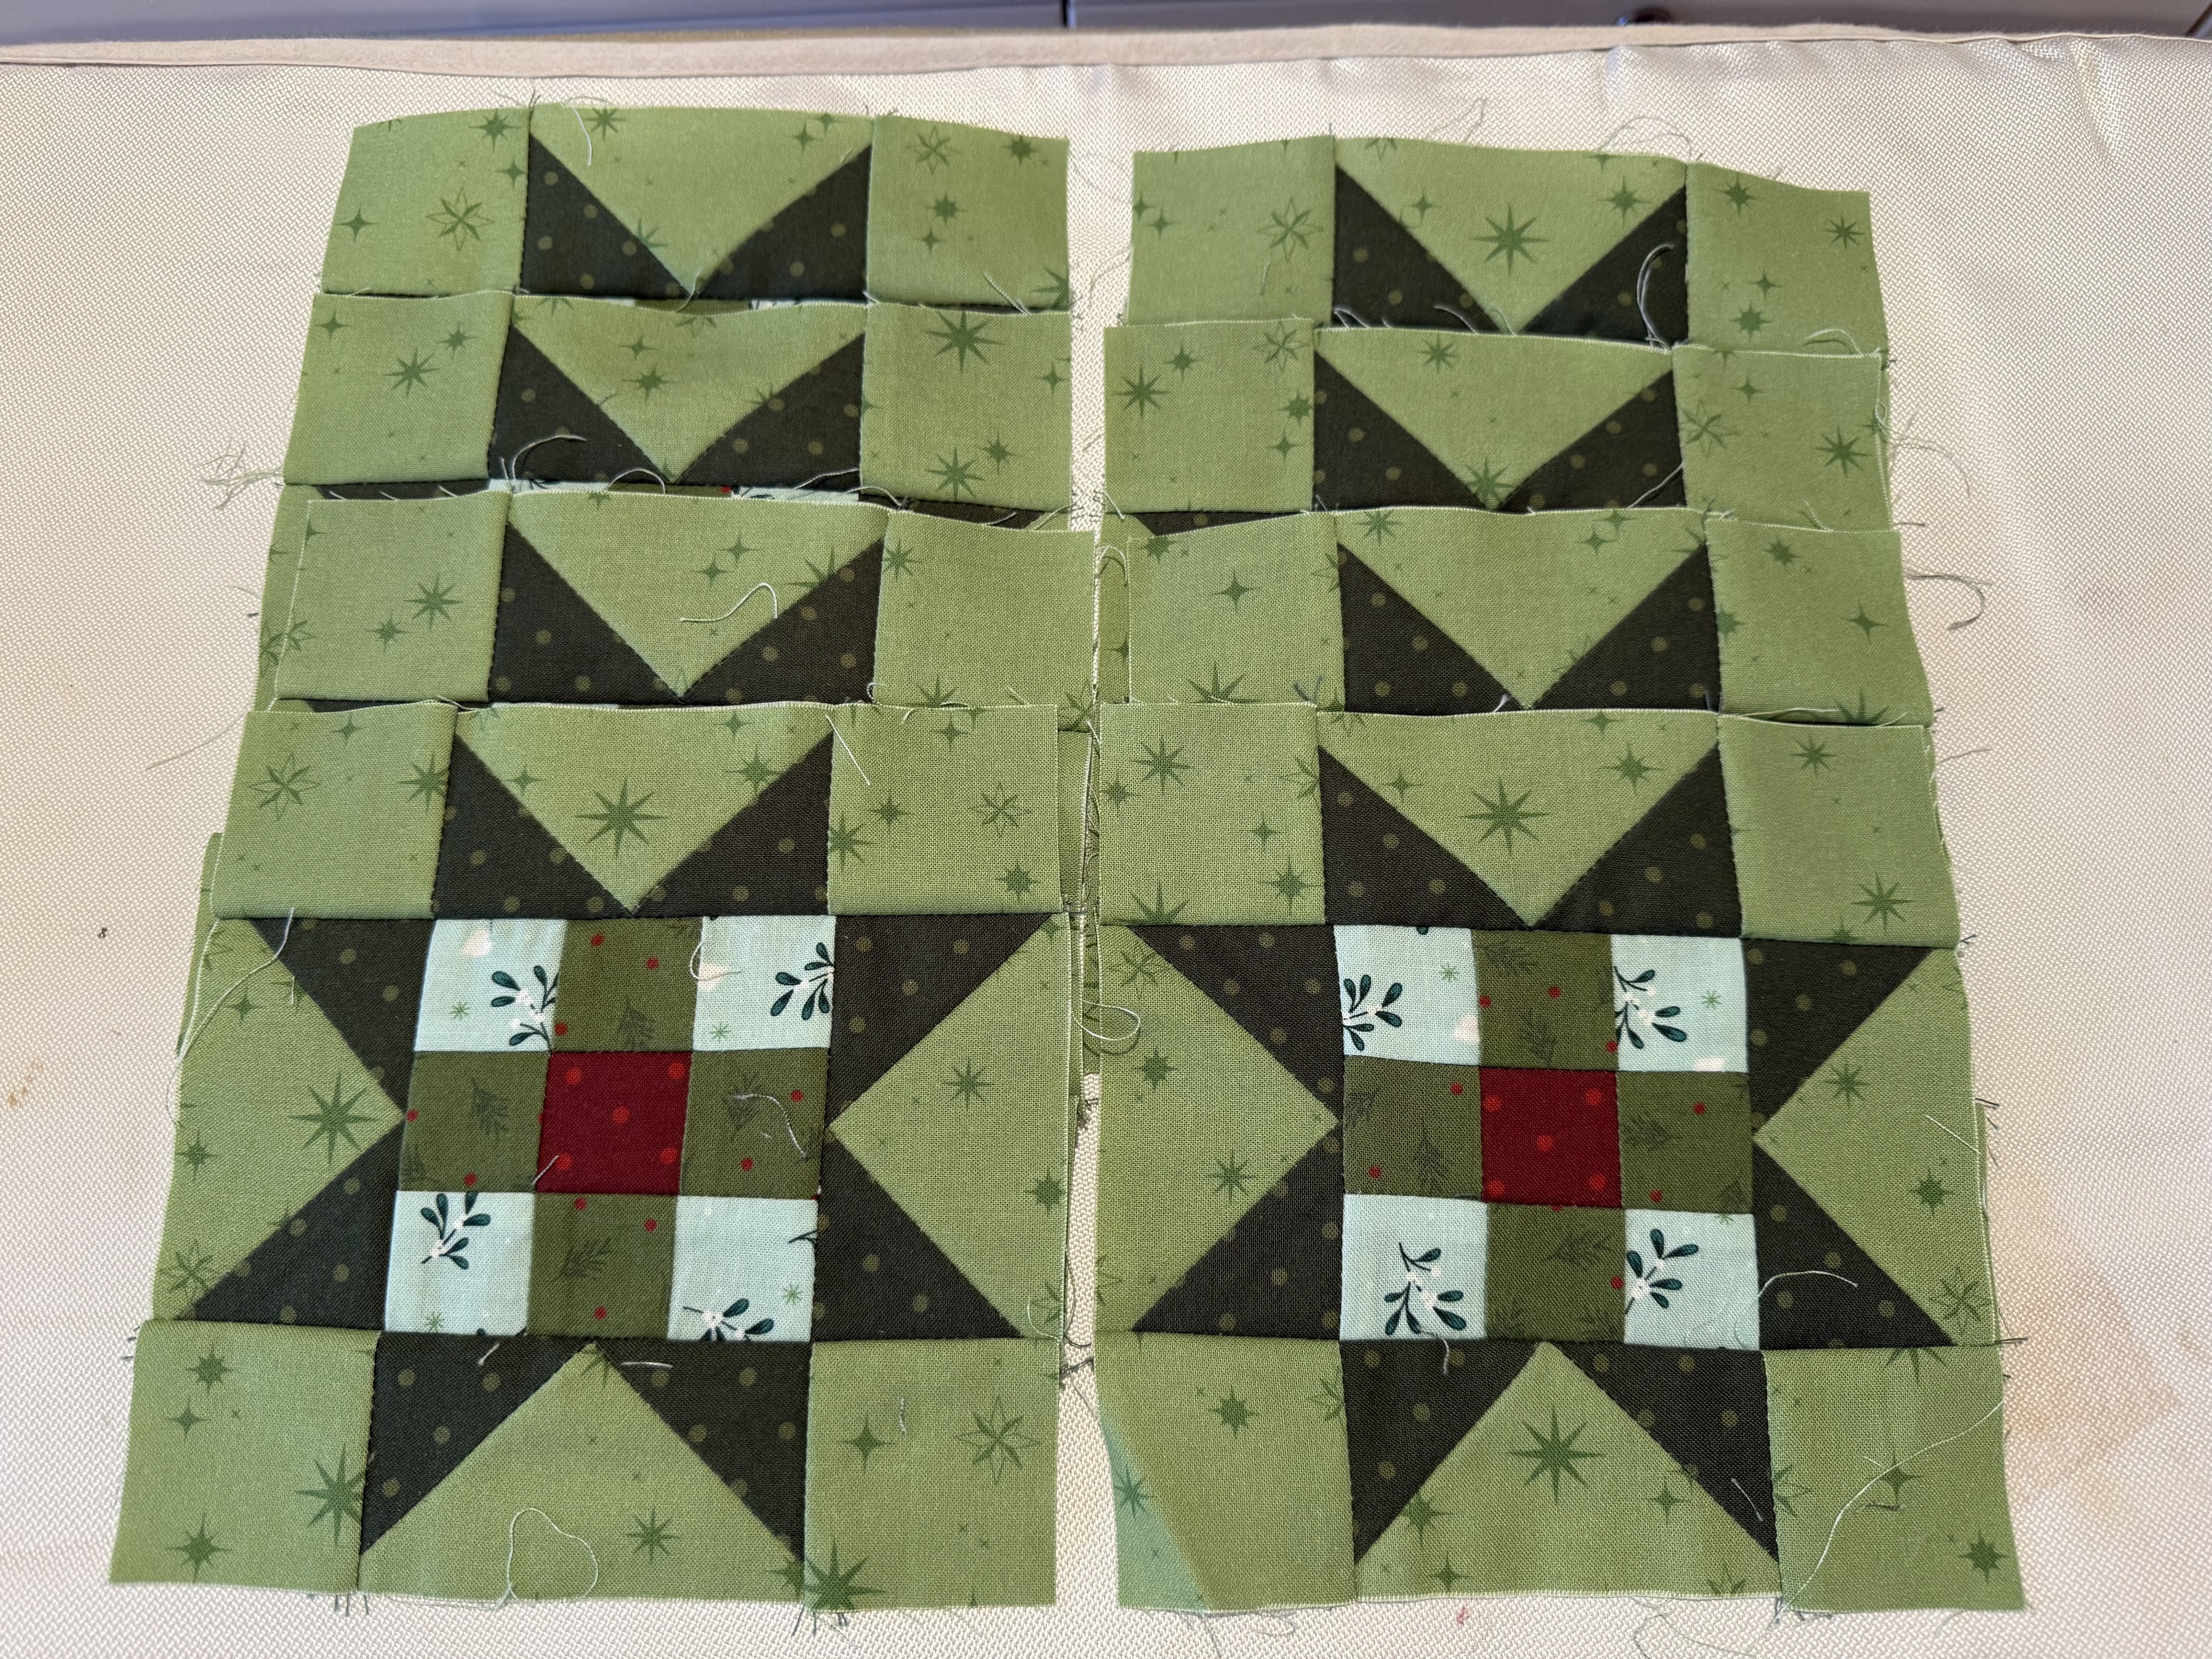
Block #9 had a lots of greens and was overall dark, in stark contrast to Block #8. Once again, variety is the spice of life and an aspect of this project that kept it interesting.  This block had A thru G to cut out and so went a little more quickly than Block #8 which had A thru I. If you noticed there is an "0" instead of a "D" in this tray you are very observant. My "D" went AWOL. I am not concerned. My "C" had been gone for a couple weeks before showing up between two stacked trays. I could have used the "D" from my blue Alphabitties but I rationalized that "0" looks somewhat like a "D" but with the sharp edges smoothed over. 


These are the components of the basic nine-patch layout of Block #9 followed by an image of the four blocks assembled. This was an interesting approach to getting a square (red), within a square (mint), within a square (medium green) look. I've photos for this intermediate step for Block #9 but not for Block #8. Different stages of my step-by-step my assembly process for earlier blocks can be found in my posts for Month One (6/14/25), Month Two (6/21/25), Month Three (8/16/25) and Month Four (9/1/25).


Can you locate the four Block #8's and the four Block #9's from Month Five? Hint: Four blocks are central and four blocks are on diagonals. I kind of gave it away the way I photographed the Block #8's all gathered together; but you will still have to hunt some to find the Block #9's. And YAY! I finished Month Five before Month Six arrived!

Monday, September 1, 2025

Make It Merry Month Four

Well, the honeymoon is officially over. In Month Four the assignment was to make six Block #6's and two Block #7's. I had problems with Block #6.


Mistake number one: I thought I was cutting out the fabric for the Block #6's but goofed by having my binder page open to Block #5 from Month Three. I was very lucky and very happy that the Fat Quarter Shop had provided me enough fabric that I could still cut out the correct components for Block #6. I was able to salvage some squares by trimming them down and by cutting some Block #5 mint squares on the diagonal. The large green triangles I had to cut anew but, hopefully, some of the green squares I could not use I can save for future use. The three trays in the next photo contain, from left to right: duplicate cut Block #5 pieces, correctly cut Block #6 pieces, leftover squares from duplicate cut  Block #5.


Mistake number two: I began making the Block #6's in a chain piece fashion all at once. I should have made just one to check out the pattern because there was an error in it. I checked the Fat Quarter Shop and the internet in general for any errata but found none so I emailed the Fat Quarter Shop with the following information.
    corresponding to figure on the left.
    1. Directions are to attach triangle Ds (PinePines and Berries fabric) to edge where there is the corner of Red squares A (Red Tossed Berries Fabric)
    2. Directions continue to attach triangle Fs (Green Polka Dots fabric) to edge where there is the corner of Green Squares B (Green Stars Fabric)
    corresponding to figure on the right
    3. The diagram  says to add Triangles G (Green Polka Dots Fabric) and Triangles E (Pine Pine Berries Fabric) next
    4. The adjacency of the D and E triangles and the F and G triangles can not be met if D and F had been attached as previously instructed.
    5. A squares should point to outer FG combo and B squares should point to outer DE combo.

    proposed error correction
    6. Perhaps the addition of D and F was interchanged?
    7. Alternatively I could interchange the G and E final corner additions but this would not match final product.
    8. I found no place where the resolution of this errata was discussed.
 

Here was the prompt response from the Fat Quarter Shop
Thank you for choosing Fat Quarter Shop!
Yes, we are aware of this discrepancy in the pattern. I'm sorry about that!
The directions are correct but the image at the bottom is wrong. The other images on the page are correct!
I'm sorry for the confusion this has probably caused-I hope this helps!
Have a great day!

I have seen this kit and its accompanying pattern available from other vendors, not necessarily in a six-month BOM format, yet it is very disappointing that not one vendor has seen fit to post errata data for a known discrepancy! 

I took off the first round of triangles and corrected their order of attachment by interchanging the D and F pieces so as to duplicate the final configuration. Removing bias pieces however is tricky and I may have stretched them a bit when trying to detach and re-attach. This is my worst block and it really is quite sloppy.  Yuck ... center four patch is not square and not uniformly centered. I will most definitely make a new block for this one.


So far, in previous months, cutting pieces oversize and trimming them to size has worked well. That is not so true with adding oversize triangles. The directions warn that the points of the four patches may not fall exactly at the seam line but assure that that is OK. They also repeatedly iterate at each step "Do not trim". I can accept if the mint background four patches float uniformly centered within the four corner triangles but that does not turn out to be the case. The blocks did not finish as precisely at 6½" as I would have liked, a few even less that 6¼" in one direction. Unacceptable! Wisely though, all the outer edges are either on the straight of grain or on the cross grain. I plan to revisit my extra fabric situation and remake all six of these blocks — the one in the upper right for which I showed a close-up, at the very least.

The Block #7's, two of them, went much more smoothly. Here are those two blocks. I have oriented them as they will appear as the bow loops in the completed quilt. The six Block #6's go on the outer edges of the wreath on the left, top, and right.


Despite this setback, I am still looking forward to receiving Month Five. Month Five provides me with the added incentive that I can procrastinate remaking those Block #6's.

Saturday, August 16, 2025

Make It Merry Month Three

I anxiously awaited my Month Three installment to Make it Merry. I was having fun with this ongoing kit assembly and vowed I would not get behind. Wouldn't you know it, though. I was on travel to my daughter's family in Oklahoma from July 16th to July 25th. Month Three arrived two days after I left.  When I returned I had less than a week to prepare before I had a visit from my son's family of six from Denver. My sewing room would be commandeered for an extra bedroom.  I basically had a three week forced hiatus and would have to scrambled to make up that time.  A couple days after the last visitor left I got the notice that Month Four was about to be shipped. Life can sometimes get in the way of quilting. I really had to hustle to stay on top of this. But I did. Doggedly.


In Month Three the assignment was to make six Block #4's and two Block #5's. I cut out the fabric for the Block #4's and assembled them before cutting out the fabrics for the Block #5's. I will admit making 24 HSTs for six Block #4's was getting a bit tedious but I loved the fabrics, prints, and colors so much I forged on. Perhaps I felt the pressure of the soon-to-arrive Month Four breathing down my neck... ? The method of making the HSTs a tad oversized and then trimming them down, does take a bit more time but they come out so crisp and precise. The night before last, when I could not fall asleep, I got back out of bed, crept quietly into my sewing room, and trimmed down some more of those 24 HSTs. Around 3:30AM, the soothing, repetitive motion did lull me back into a zone where I could go back to my bed and succeed in falling asleep. I finished the remainder the next morning and lined them up on my Fat Quarter Shop trays. I just love those trays for organizing and prepping pieces.


Assembling the Block #4's was rewarding since they came together so exactly. All the points were where they should be and did not get nipped off. I also love the subtly of two very similar greens and two very similar reds. Dual colors add depth to the block and are worth the need to be alert and careful during assembly. I religiously followed the pattern's instruction for pressing direction for each seam. Some seam preferences were not as obvious to me, but I stayed the path, having faith it would make sense in the final assembly. 


Making 16 HSTs for the Block #5's went far more quickly than making those 48 HSTs for the Block #4's. That there were only two Block #5's as opposed to the six Block #4's was clearly the source of the relief. Here is a Block #5.


And here are the eight blocks from Month Three.


The six Block #4's and the two Block #5's from Month Three are near but not quite at the corners of the wreath. Can you locate them? Hint: The two Block #5's are on either side of the bow.


Note to the Grammar Police out there:
I realize that using an apostrophe with the Block # notations is incorrect since it shows a possession rather than a plural. Block #4s and Block #5s did not look right since it seemed to designation the block number ID as 4s or 5s. I suppose for consistency I could have also used the apostrophe with the HSTs, but in that instance, I decided for grammatical correctness over consistency. HST's had no plausible excuse to be wrong. If I can defy the Quilt Police, I can also defy the Grammar Police. Hmmm. I never considered quilting as a rebellious hobby.

Saturday, June 21, 2025

Make it Merry Month Two

In Month Two the assignment was to make four Block #2's and four Block #3's and once again I enjoyed every minute of it. I cut out the fabric for the Block #2's and assembled them before cutting out the fabrics for the Block #3's. This divide and conquer method was soothing and not at all stressful or confusing.


These are my four Block #2's. Making flying geese is not onerous when sewn orderly eight at a time.


Here are my four Block #3's. The method of making those QST's for the star points worked out really well. They were made a bit oversized and then trimmed down symmetrically, carefully centering the mid point.


Block #2's and Block #3's are both stars but look how different in shape they appear, side by side.


The eight blocks from Month Two, similar to the eight blocks from Month One, are not at the very center of the quilt. Can you find the location of those eight Month Two blocks? Hint: each set of four is positioned at corners.


Month Three will have the fabric for eight more blocks. I am still excited about this project and looking forward to the arrival of the next installment. Happily, the novelty has not worn off.

Saturday, June 14, 2025

Make it Merry Month One

I have been hesitant to participate in any Block of the Month quilt programs because of my fear of getting hopelessly behind. But this Make it Merry wreath quilt really caught my eye and the Fat Quarter Shop program ran for only 6 months, not twelve. I decided to chance it. With the first installment I got the instructions for the entire quilt, so I could see where I was going. Setting up a binder of all the instructions in plastic sleeves made me feel very organized and well prepared. This aspect also appealed to me. Yes, I could have gotten the entire yardage of quilt fabric at once as a kit. I would have guiltily stored it in my closet, next to my other kits, overwhelmed and finding the act of opening the package too daunting. The Block of the Month format avoids this trauma. In Month One the assignment was to make eight blocks and I enjoyed every minute of it. 


Interesting enough the eight blocks from Month One are not at the very center of the quilt. Can you find the location of those eight blocks?


These are my eight Block #1's and this is my binder.


Month Two is to arrive at my box the day after tomorrow and I am excited to watch for it and make it. I already know there will be two designs: four Block #2's and four Block #3's. See? Knowledge is power!

Friday, July 16, 2021

Sunflower Quilt

Having just come off a one year tour doing Block of the Month for my guild, my co-chair and I had a dozen leftover unsold kits for a sunflower block for April. Twelve were was a few too many to add as giveaways to the winners, so I bought them myself to "quickly whip up" into a bright wall hanging.


Each block consists of a modified nine-patch block made from a central snowball block surrounded by four truncated QSTs and four corner squares. The original block pattern came from the Quilting Daily website and called sunrise star. Here is a summary of the basic construction steps from a sample practice block I made. First I made a central snowball block in brown and orange for the sunflower center.


Next I made four QSTs from the green background color, the orange of the inner sunflower petals, and the yellow of the outer petals.

Then I offset cut the four QSTs and assembled them about the central snowball, filling in the corners with four background squares. I saved the truncated edges of the QSTs to make a border later.


The kits for the monthly BOM were made up with stronger, more vibrant colors instead of the more subdues one of the sample. Once I pieced the 12 kits, I planned to assemble them in a 3 x 4 arrangement.

To add a bit of visual relief between the main body and the border, I added some striped fabric inserts. By varying the width of the inserts on the sides from those on the top/bottom I was able to make the corners come out "right", meaning I forced the border to be symmetric rounding the corners.

Since I wanted to keep the FMQ simple without fastidious ruler work, I used my favorite square-fill from the Shape by Shape free motion quilting book by Angela Walters (square #7) in the teal/green spaces with a King Tut 40 wt 3-ply variegated Fahl Green (an Egyptian clover) and then stitched free-form arcs around the four sided yellow "petals" of the sunflower with 3-ply 40 wt Essential cotton thread in Marigold #21171.


Hmmm... what to do in the brown centers of the sunflowers? I used my Coats & Clark Star 100% cotton thread in a matching brown. Ideally I wanted the bumpy texture of pebbles but I am not very skilled at that FMQ pattern. That meant I needed the practice. So I did one center in pebbles and decided it was too much work and did not show up very much anyway. I did the second center with a spiral pattern and a third center with a wavy grid. I decided I would do different centers in the sunflowers, four of each pattern. I did six sunflower centers one evening. They turned out fine (even if the dark brown thread barely showed up) and I returned to do the following six the next day.


The tension gremlins or lint goblins invaded my Sweet Sixteen overnight, or else the desire for perfection bug infected me. When stitching the remaining six sunflower centers, I saw some tiny dots of the pale thread peaking up to the front surface from the back and tweaked my tension, just a bit to eliminate them. Big Whoops! Four of my sunflower centers wound up with a huge mess on the back with lines of loopy brown thread snarls. So dismayed, I did not think to take a photo before I sheared off the bulk of the brown loopy "fur"; these photos show my progress as I snipped and picked at the pebbles, spiral, and wavy grid, in that photo order, to remove the remaining brown top thread remnants. My counter top was covered with those brown thread "hair" clippings much like the floor of a barber shop. The dark fuzz reminded me of my Wooly Willy magnetic hair toy from when I was a kid. Even more discouraging was the fact that I would need to FMQ that spiral and wavy line grid once again. I am considering leaving in that two pebbles ones on the back. They do not look so bad, perhaps... just like a scattering of poppy seeds. Oh, wait this is a sunflower, not a poppy. Eh, close enough.


I have lost my initial fear of free-motion quilting because I have learned from experience that most any errors can be plucked out. That does not imply however, that it is not painstaking to do so. After shearing off those brown thread loops, it took me longer to remove their remains with curved-blade snips and tweezers than it did to FMQ 12 brown centers, 96 yellow petals, and the green background, combined.  So much for "quickly whip up".  I am reminded of the saying "Man plans and God laughs". In honor of my Wooly Willy adventure, I considered naming this quilt SUNFLOWER SAM where SAM is an acronym for Such A Mess. It has a nice alliterate sound to it, like Sunbonnet Sue, and the name source could be my secret – except to those of you who read this post. Do I really need such a reminder though? Nah. I chickened out and named this quilt simply SUNFLOWERS.

I stitched scallops in the orange border and stitched parallel white lines piano-border-style in the striped inserted bands. I did use a scalloped ruler and a straight ruler for those border details. 


With my domestic Pfaff, I embroidered the labels on of grosgrain ribbon and then bound SUNFLOWERS in orange fabric that matched the outer peaked border.


The consistent thread color on the back of the quilt is a putty-colored, blah color called Stone that my Block of the Month co-chair gave me as a gift. She told me it blends in with everything. She was so right! It is 50 wt 2-ply Aurifil 100% cotton and it flowed like a dream in my bobbin thread. Thanks Liz! You have expanded my repertoire of favored threads. The two round shadowy regions are where my tension drifted on the pebbles.  I suspect the brownish area can be detected in the galloping horse test; i.e., if you can’t see the mistake when riding by on a horse at full gallop, then do not attempt to fix the "error".  I think those areas would be visible – I did not actually test from a galloping horse – but still I chose not to re-do those them, warning myself not to let perfect be the enemy of good. 


SUNFLOWERS finished 38½" wide by 53½" tall and the back is not visible unless you turn it over to look. This quilt was never intended as a county fair entry, anyway. It still makes me think of a field of cheery sunflowers and those brown spots are pockets of earth peeking through.