Showing posts with label completed. Show all posts

Wednesday, April 9, 2025

O's (with X's) Completion

My previous post about this quilt was dated 3/30/2025. The blocks had been a joint venture in piecing with the ladies of my Cut-Ups Group from our September get together. Each member made one or two blocks with red or gray or black fabric from their stash. This way there was a nice variety of the O colors. I asked the ladies to send along the O blocks intact without the four outer right angle corners trimmed. I trimmed those stray right triangles uniformly and made them into pinwheels to brighten the mood and give the quilt a whimsical tone. I assembled the eighteen blocks into five columns. The completed size of the O blocks quilt is 45" wide by 53" tall.


Since the quilt top was slightly wider than one usable WOF, I needed to piece the back. Three grays in an offset arrangement added interest. I thought a red, gray, and black combination would be too garish as a backing. I used the Handi GADGETS Swish Template to FMQ the quilt sandwich, creating a kind of mustache motif. This Handi-Quilter video shows the template being used and other variations possible with it. The swish portion of the video begins one minute in.


The binding is alternating red, gray, and black fabrics joined to echo the colors of the O's. All that is left to do before donating O's to community quilts is to add an AVQ label. Yay! I am happy and proud with this one.

Monday, December 30, 2024

Final Fireman Finish

My son-in-law was gifted this wallhanging for Christmas (previous 12/17/24 post) even though I had only completed about 90%. The remaining portions to FMQ were the fireman silhouette and a wide red border framing it. These last areas had remained non-quilted since I had been incapable of deciding the pattern. I vacillated back and forth on the fireman portion and finally opted to take a chance on simple echo-quilting. Echo-quilting internal parallel curves was a lucky call since this approach accentuated the shape and enabled me to be vague about where the edge of the coat sleeve was.


I usually name my quilts but this one I documented for the giver and receiver instead. I made two corner labels, one label embroidered with DIC_2024 and the other label embroidered with FOR_JEREMY. The fireman wallhanging is my final completion for 2024. It took only five years to start it after the panel purchase in 2019.


I planned to stitch stars with my new star template in the upper and lower sections of the red border framing the fireman. Red thread for the stars would minimize the visibility of a goof should there be template shift; black thread would make the "oops" obvious. I made two red stars and decided they did not show up at all! Foregoing more stars while I rethought what to do instead, I stitched wavy lines in the vertical red borders. Those lines barely showed up also, but at least they added more texture. Plus, I could convince myself that those waves were symbolic of fire hoses. I painstakingly picked out the teeny tiny stitches of the two nearly invisible stars, and instead stitched nearly invisible spirals freehand in the upper and lower bands of the red frame. I convinced myself that spirals were symbolic of coiled hoses. These symbolic artistic interpretations are surely a stretch of my poetic license. Jeremy interpreted the swirls as the water entering into or coming from the ends of the fire hoses.  Looks like I am not the only one with a good imagination.


Here is my son-in-law Jeremy posed with his now fully completed fireman wall hanging, front and back views.


On the back side, Jeremy further interpreted the straight lines between the outlines of the Maltese Crosses as the skyline of the city buildings through which the firetrucks wind their way, or even the network of the roads themselves.  See? Active imagination! I am so glad he likes the quilt.

Monday, December 2, 2024

Oh, Deer Completion

Piecing this quilt is described in my previous post dated 11/26/24. The next step, selecting my FMQ pattern for the quilting, is always a challenge for me. Doing an allover meander is probably the simplest approach except that I am terrible at meandering smoothly and not getting stuck in a corner. I generally opt for ruler work instead which is time-consuming but provides me with guidance. I compromised by doing free-hand arcs in the two bands of stars at the top and bottom of the quilt to give a tufted pillow effect. For the major section of the deer head I did something more controlled.


I used my Handi Quilter multi clamshell template for the deer portion. Orienting the clamshell "upside-down" gave the effect of the roof on a gingerbread house or draped garlands.


A portion of the deer section quilted in clamshells gives the nice effect that I was seeking.


Now, what to do in the narrow white bands on either side of the inserted blue stripe? I have a Handi Quilter wave template with an 4" wavelength and two different depths of the waves. I used the shallower 0.75" wave in the inner border and the deeper 1.5" wave in the larger outside border. I attempted to line them up relative to each other and centered on each side. I started in the middle of each edge and worked my way toward each corner. The quilting lines on the corners will fall where they may but at least they will look similar among the corners. A black and white pinstripe binds the outer edges of the quilt and relates back to the deer's antlers.


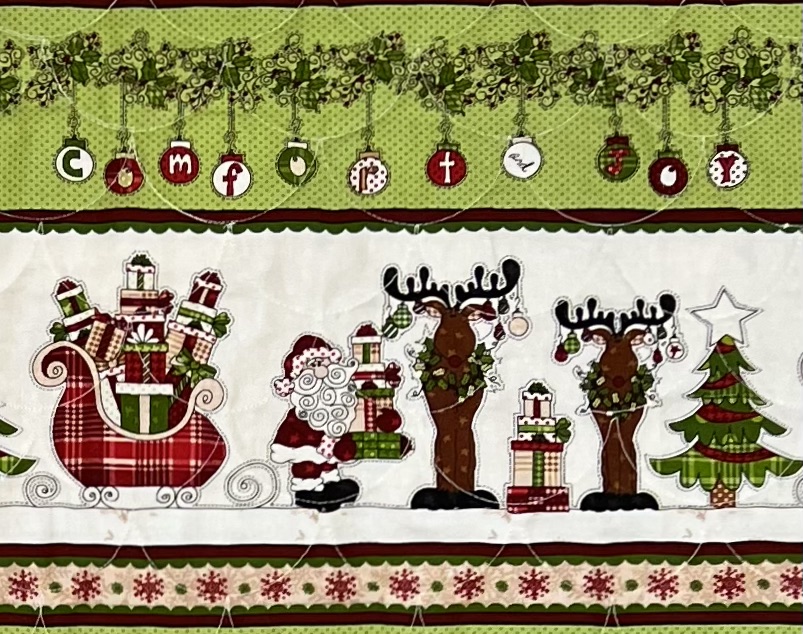
The backing was from a  fabric called Glad Tidings by the Whole Country Caboodle for Henry Glass. I thought the fabric title of Glad Tidings was clever since the hanging ornaments say "comfort and joy". I knew it would be perfect paired with the Deerly Loved pattern because of the Christmas balls hanging from the antlers. The following image is a closeup of the backing fabric. 


I made cranberry colored labels with white embroidery out of grosgrain ribbon for the two lower corners. Cranberry blended with the backing fabric better than a bright Christmas red would have. The quilt name, my name, and the year completed are recorded on the labels. The pattern by Coriander Quilts was called Deerly Loved but I have named this quilt Oh Deer


The back side of the quilt is also fun. The stripe on the backing ran parallel to the selvage. The height was adequate since it was the width of fabric. But, because I'd bought the remnant at a craft show already cut to a one yard length, I did not have enough width. Hence, I added the white edges. 


Here is the front view of the completed quilt. Oh Deer measures 41" wide x 40" tall. I plan to hang it on the wall of our stairwell next to the Christmas Moose canvas shown after. The canvas measure 20" wide x 16" tall. The moose is half as wide as the deer so I will have to see how they look side by side. No matter where they are placed, each will add to the festive "Deck the Halls" mood of the season.


Monday, September 4, 2023

Tipus and Treetops - Completion

This is my completed quilt from Lotta Jansdotter feature modern fabric in a teal and gray colorway and a 5 x 5 block array. I've titled it Tipus and Treetops. Tipus and Treetops'  predecessor and inspiration, made for the same Lotta Jansdotter fabric line and titled uncreatively Orange and Grey, had been  presented in my post published 8/10/2016 and is shown after its teal and gray cousin.


My Tipus and Treetops post for 6/30/2023 displayed fabric choices and construction. The main focal fabric choices from Lotta Jansdotter were a teal mesh and white background fabrics with tipus (little chicks), treetops, and balls and leaves. My post for 7/4/2023 showed the block arrangement, pieced backing, and striped binding. To FMQ, I chose a light gray rather that a white thread which really pops on the dark grays, does show up a bit on the whites, but still is fairly hidden on the really busy mesh and critter fabrics. These next photos show the different FMQ patterns I chose in order of inner rectangles and outer borders. The patterns include: 1) echo quilting + clamshells, 2) curved grid +  parallel piano keyboard stripes, 3) wavy lines + echo quilting, 4) diamond grid +  diagonals to match tipu angle, 5) dot-to-dot four-leaf clusters + straight lines, and 6) echo quilting + dot-to-dot four-leaf clusters. I am most pleased with the curved grid because I have been wanting to do this for quite some time and I finally figured out how to do it.

1. echo quilting + clamshells
2. curved grid +  parallel piano keyboard stripes
3. wavy lines + echo quilting 
4. diamond grid +  diagonals to match tipu angle
5. dot-to-dot four leaf clusters+ straight lines
 6. echo quilting + dot-to-dot four leaf clusters

I finished off with my standard labels of grosgrain ribbon with lettering from my Pfaff domestic. 


Tipus and Treetops measures 48" x 48". Here are the front and back of Tipus and Treetops and my attempt to display it an aesthetically pleasing way. My FMQ is improving (as long as it is planned and not too freeform) but I need to work on the artistic part for my draped displays. 


Saturday, May 6, 2023

Dan's T-Shirt Quilt

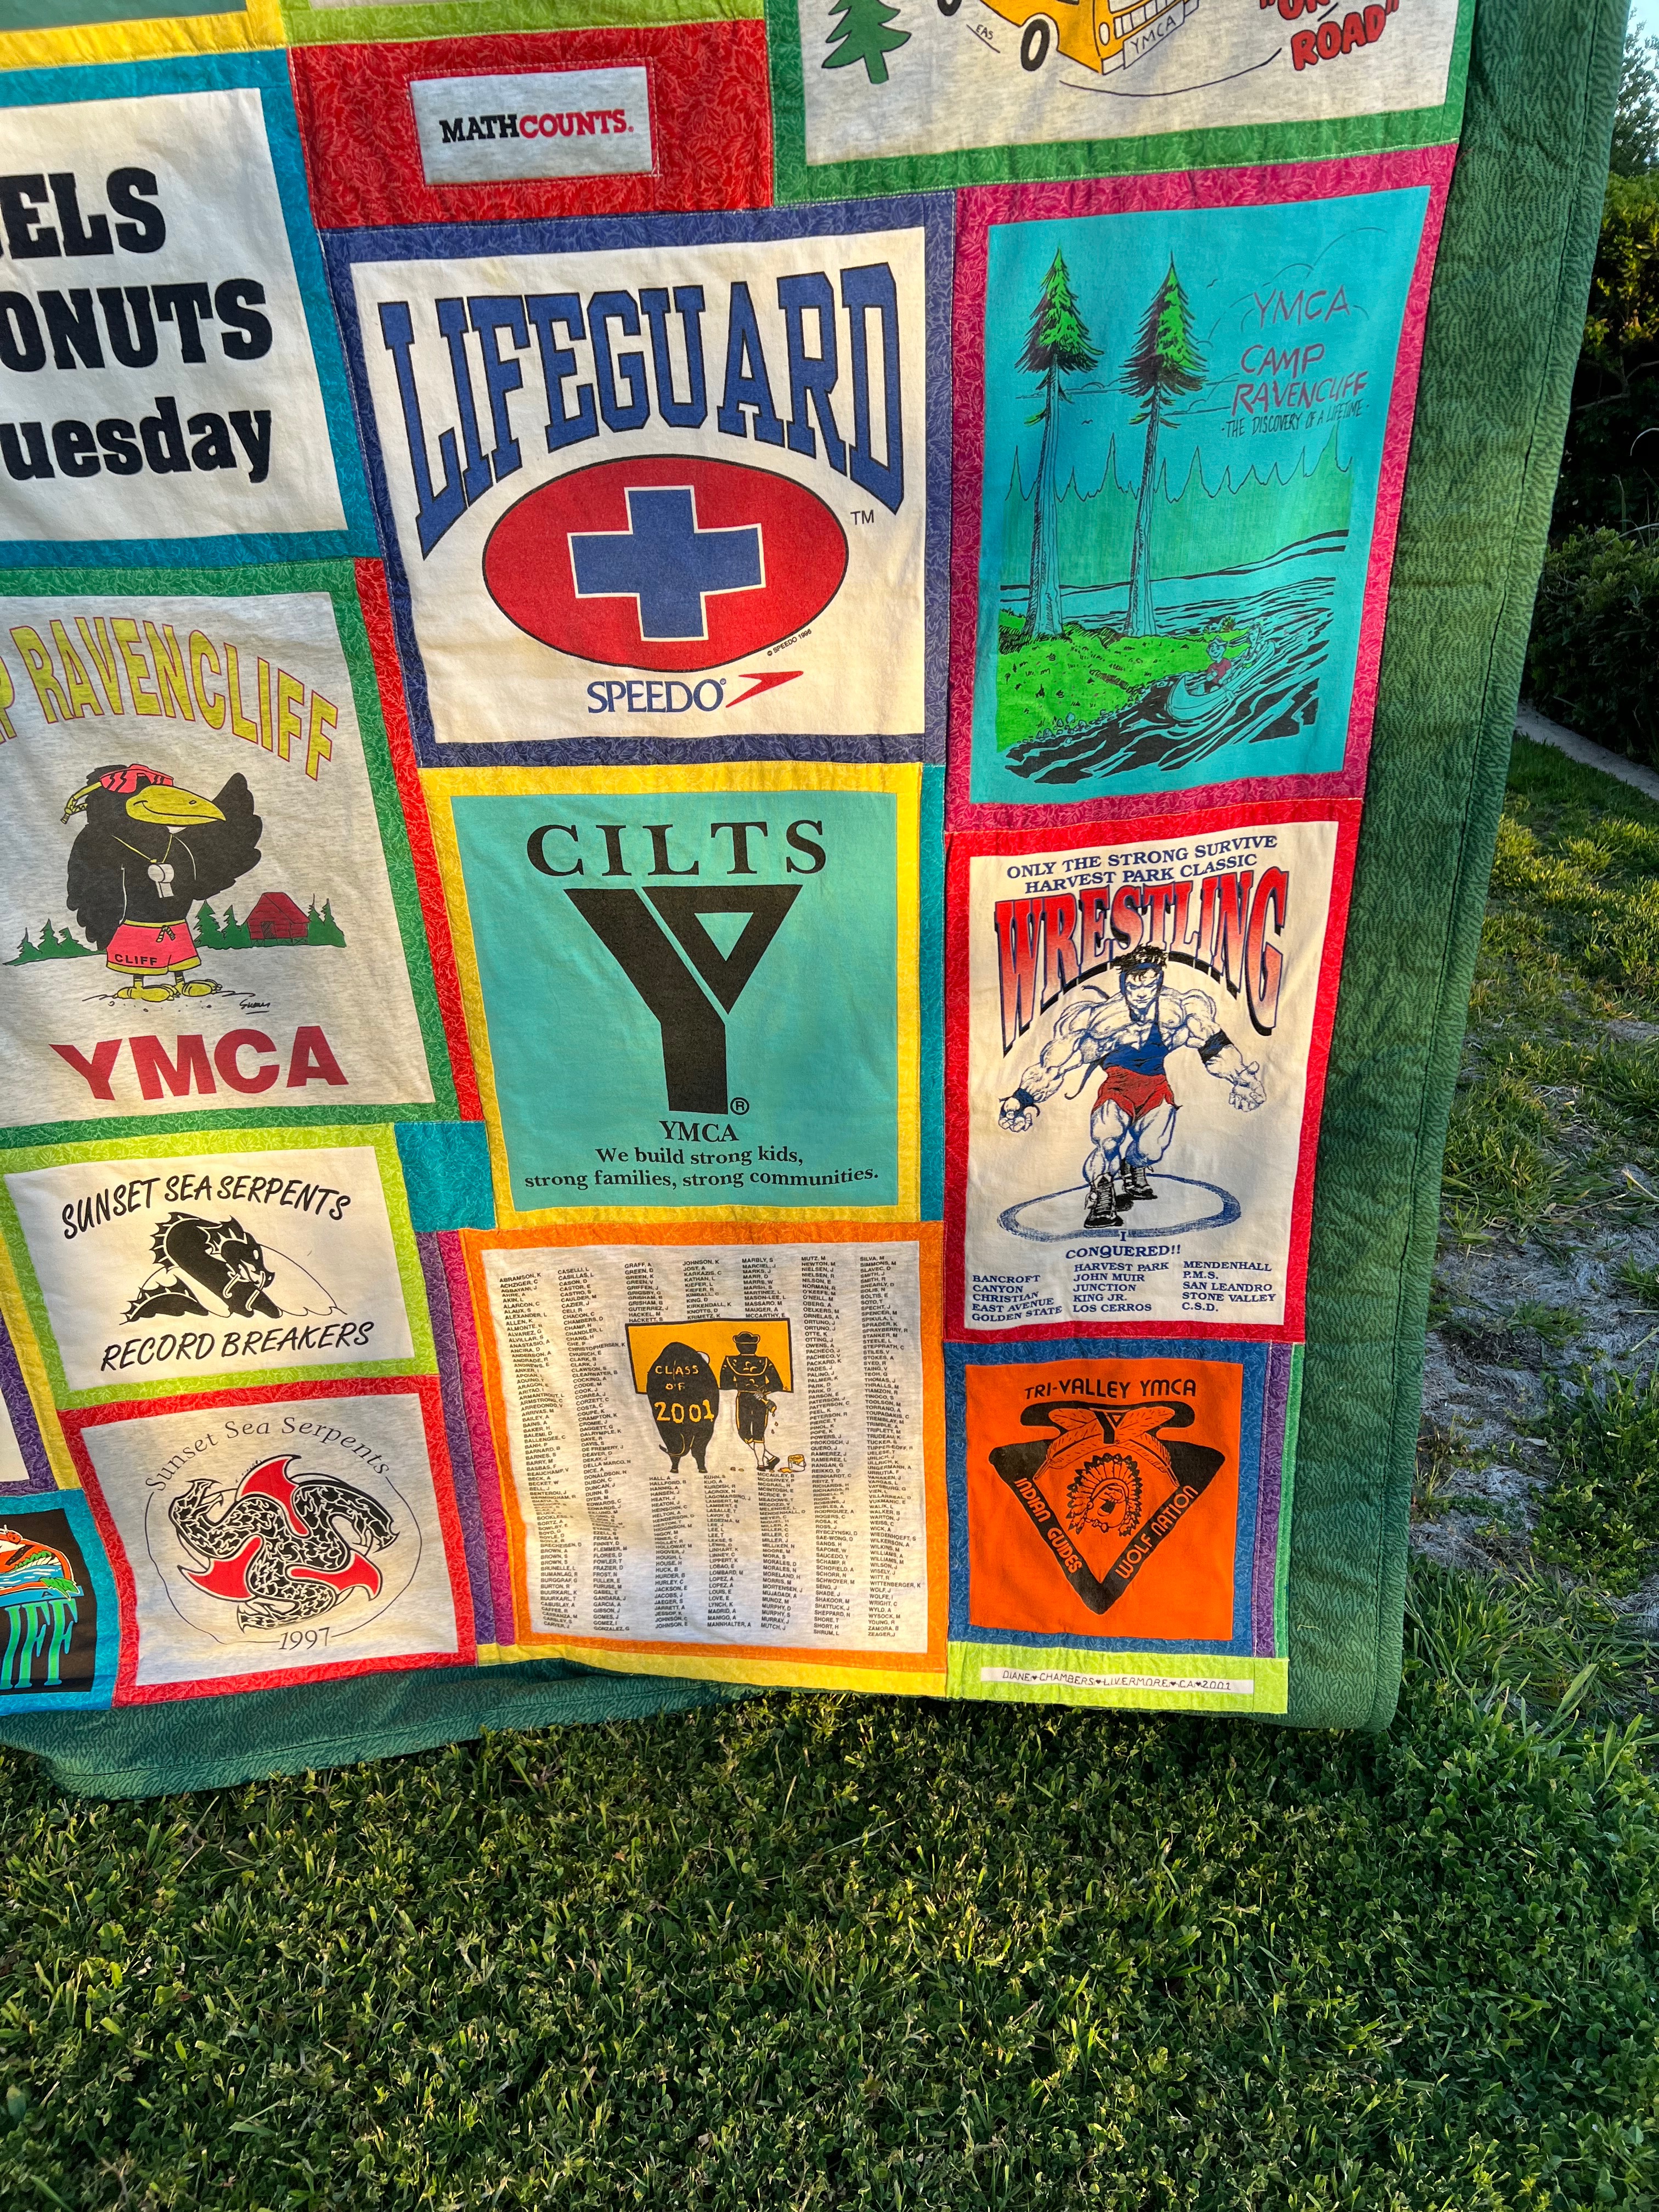
My son turned 40 and so I thought it was time to send him the T-shirt memory quilt I'd made him from when he graduated high school, class of 2001. The main categories were 

SPORTS: swimming Sunset Sea Serpents, water polo, life guarding, wrestling, baseball buddy
ACADEMICS: Mendenhall Middle School, Granada High School, MathCounts
CAMPING: as camper, as a CILT (camper in leadership training), at Ravencliff, at Loma Mar


Most T-shirt quilt patterns I have seen cut all the T-shirts the same size and then add uniform sashing in between. This was my first time and I cut out each shirt with minimum border around the image. This made it difficult to assemble with all the varying sizes. I scratched my head a lot with the math for the sashing sizes, colors, and quantities. Also for my first time, the quilting is minimal.

Most images are easily interpreted as sports, academics or camping. One block in the lower portion of the upper left quadrant stands out though – "BAGELS are DONUTS on Tuesday". What does that mean? That shirt commemorates when Dan was in leadership training at a camp. A truck had gotten stuck in the mud and Dan stood at the back pushing to get it free while someone else rev'd the motor to rock it out. One rear wheel kicked up a stone that flew up and hit Dan on the forehead. Although never unconscious he was being watched for a possible concussion. He did babble a bit and one of the phrases he uttered was, "BAGELS are DONUTS on Tuesday". The staff, once the concern had evolved to amusement, had a T-shirt made up for him to remember the incident.


Here are closeups of the remaining three quadrants of the quilt in clockwise order: upper right, lower right, lower left.


When it came to choosing a color for the backing, I left the choice up to Dan. Since he would be going off to Cal Poly, San Luis Obispo, he chose green because the college's school colors were green and gold. The backing fabric also has gold stars scattered throughout.


The quilt never went off to college. At the time, Dan hedged that he did not want to risk it on his bed. Maybe he was just headed off for bigger and better pursuits. But the T-shirt quilt is a good retrospective gift for a special 40th birthday. A wife and four kids later, he is smiling for both the past and the present.


Monday, April 17, 2023

Popsicles

Today I finished a small project that had been hanging in my closet for three years. In 2020 I co-chaired a Block of the Month committee for my quilt guild. In July, all the block kits for a popsicle theme had not sold, so I purchased the eight remaining, pieced them myself, and assembled them to be a table topper or wall hanging. A closeup of the quilting shows my experimentation. I got practice with a wavy ruler with a ± 0.75 inch amplitude that nicely filled in the 1.5" wide vertical sashing. I practiced my horizontal undulating FMQ to look like water beneath each popsicle to represent the drips as each melts. Small projects require less bravery to try something new and mean less to quilt.


The backing was a patriotic stripe and, even though it was a small project, I made my customary grosgrain ribbon labels for the back corners.


My co-chair and I had picked a color scheme that reminded us of the rocket pops sold on the roving ice cream trucks of the summer days of our youth. Each popsicle had a sashing added to the top or bottom so when joined together they sat at varying angles as if they were dancing across the quilt.


Reluctant to hand stitch the binding onto the back, I used a flange binding that I could attach on the back, bring to the front, and stitch in the ditch of the ⅛" wide white flange, all on my Pfaff.


The joined blocks had hung on a hanger in my closet paired with a length of fabric to be used as a backing. This project took a little over two days to complete after cluttering up a rod in my closet for close to ~1000 days. Popsicles is nearly square, measuring 19" wide by 18" tall. Completing it was fun and satisfying. Although I have made no progress so far this year on several large bed-size quilts, listed in my goals for 2023, small victories, like this one, do make me happy.

Here are the instruction that went out with the block kits in case any of you readers want to share a bit of the joy and satisfaction that accompanies a small project quickly made.


Monday, April 10, 2023

Unanticipated Project Completion

In the spring of 2020, twenty-four ladies from the Amador Valley Quilters guild formed a small group called Pieces of Blue. Each quilters contributed six fat quarters each in a different shade of blue. These fat quarters were intermingled and then each quilter randomly drew six blues, different from her own original six, and added a background fabric of her own. A pattern was introduced each month and the quilters gathered in small groups to complete it. The patterns were Jacob's Ladder (Feb), Snail's Trail (Mar), Bear's Paw (Apr), Capital T (May), and Flying Geese (Jun). 


I had made seven of these blocks when COVID-19 made an appearance and a lockdown ensued. The get-togethers were discontinued and I packed away the blocks and fabrics in a 12" x 12" storage bin. I typically store the components – pattern, fabric, specialty rulers, magazines, etc. – for my ongoing-projects or dream projects-to-be in these 12"x12" plastic bins designed mainly for scrapbookers. I own fifteen of these bins, as many that will store five across and three high on one of my shelves. The following photo shows nine bins. I have a self imposed limit of fifteen on this number of bins. If I need another for a new project, I constrain myself to 1) finishing a project in one of the bins or 2) giving up on a dream project and disseminating  the components to free a bin. Hence I decided to finish up the Pieces of Blue exercise. I needed an empty bin.


I joined six of the blocks to form a center area of a quilt and disassembled the Flying Geese block to use on corners. From the remaining fabrics I formed four-patch or nine-patch blocks depending on the remnant sizes of the blues, pairing the colors for contrast. From some cut off corners I formed HSTs that I made into a couple of pinwheel blocks. This is not exactly innovative quilting but I really did not have a plan; so, for me, this activity was innovative and a bit freeing. Here is the result showing the overall assembly.


Next are two closeups of 1) two central blocks Capital T and Bear's Paw and 2) the edging of four and nine patches with the corner-rounding Flying Geese. I had already sandwiched and quilting these before thinking to take the assembly photos. I gained a lot of practice on my go-to four petal quilting motif. It was also a reasonable use of my variegated thread. I sometimes find it hard to find an appropriate use for variegated thread.


I made sure the quilt top was narrower than a WOF so there would no backing seams would be needed. I chose a fabric from my stash with skiffs floating since the shades of blue throughout the water complimented the front while the red of the skiffs added a bit of interest. I used the same fabric for the binding and used red thread to embroider the turquoise labels for the bottom corners with my name and date. For the year I put 2020, 2023.


Here is the completed quilt, front and back being held by my helpful and willing husband. Pieces of Blue measures 38" x 49". The bright sunny day was great for lighting, but a bit of wind made capturing the perfect straight-on photo slightly challenging.


Here is what I have left of the scraps. I succeeded in emptying a bin for my next project. Yay. This "distraction" took several days, actually almost two non-continuous weeks, to complete. But I had fun. Drats –  this completion was not even on my list of goals for 2023! And my next project is... Oh, wait. I've forgotten. But I now have an empty bin awaiting it when I remember/decide.