Thursday, September 25, 2014

Cleaning and Remembering

My daughter arrives tomorrow and we plan to spend a quilt-y weekend together, sewing, attending a couple of quilt shows, and taking a class. I was on a mission to clean up my sewing room so that she and I could both work in there. Clean up to me means recovering from past projects and beginning some sort of cohesive approach to managing my scraps. I came across my guild's block of the month and so sewed that up. I will turn that in next month.


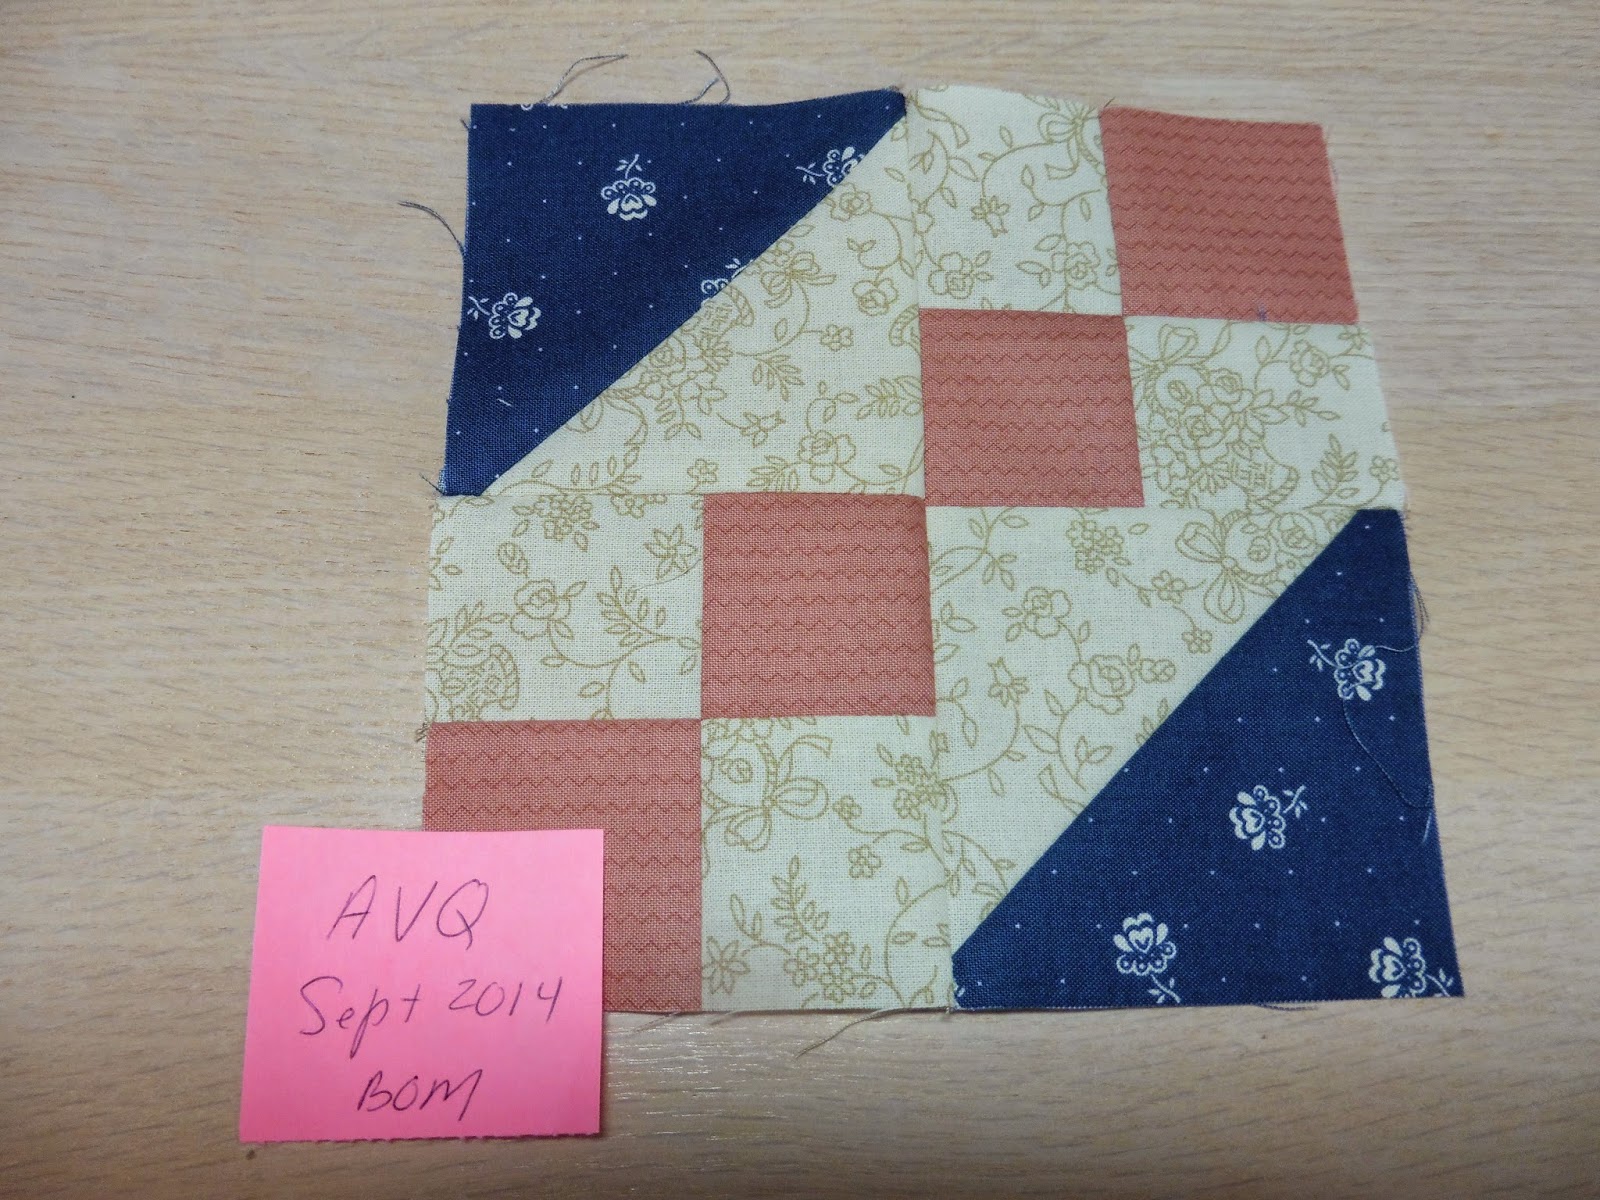
I also found a block from many, many years ago, from another small quilt group at my work. When I began to assemble it, I discovered that the strip of the paisley print fabric that was provided was not long enough to cut out the four corners squares. Perhaps that it why I never did the block. Anyway, I substituted something in the blue-violet family from my stash for the four corners. The pattern is called broken dishes. I like the feature where the square in the center of the edge spans a seam instead of mating at a seam. Three blocks on the middle of the perimeter mate with two in the central section. This is kind of unusual and I will keep it in mind for a future quilt. The perimeter is based on a 2" grid while the center is based on a 3" grid; yielding a 10" finished block. 


I suspect the block looks better in multiple repetitions when the corners are the same as the large HSTs. But this is a singleton and the date to turn it in has long since passed. I will add it to my box of blocks designated for future use somewhere, sometime. This orphan will eventually get incorporated into my "glorious scrap quilt of the undefined future". The broken dishes pattern may live on in another quilt of a more planned, rather than random scrap colorway.

Something else surfaced during my cleaning efforts – remnants of some coral colored fabric. Last week we'd had a couple over for dinner and I'd bought flowers for the table, a dozen roses from the grocery store that I could not pass up because of their luscious color. I'd put three each in a bud vase by each person's plate. Then my quilter's brain recalled I had a fabric almost identical in color to the flowers. With guest arrival two hours away, I set out to find that fabric and make some matching napkins. I allowed myself an hour and, if unsuccessful in finding the fabric and making those napkins, I would settle for classic, but ho-hum, white napkins. I found the fabric I'd remembered having and had time to make just four napkins to use at dinner. I took the photo below during my sewing room cleanup when the roses are nine days old – and they still look pretty. What a color match!


Without my hemmer foot I doubt that I could have churned out those four napkins in so short a time. I'd had two yards of fabric, enough for six 20" napkins, but I'd set aside the remaining fabric to make more another time. That other time was during this clean-up when I unearthed the remnant. I finished the other two napkins then. I am so glad that I took the time a few months ago to learn how to use my hemmer foot. (I have an April 8, 2013 post on it.) It can do such a tidy, quick job once I mastered the trickiness of getting it started. See the edges in the following photo.


I still have three trays of recent leftovers to sort. During a project, I cannot bear to toss all but the tiniest pieces of fabric, and so the remains pile up. So here is the counter top stuff I need to deal with. (There is lots more in my closet, this is just the recent visible stuff.) I plan to tame the mess while my daughter sits and sews. It will recall memories of past quilts. I see flannel strips from burp cloths, the remains of the Ghastlies Quilt, and the baby Nautical Quilt, and the Owl and Pussycat quilt, and the newly made napkins, and I am sure others will surface. Yep. There is a piece of backing from the my son's Monkey quilt and some cloth books, too.


For inspiration I keep referring back to the QuiltingIsMoreFunThanHouseworkBlog and all her Scrap-A-Palooza tips. Be sure to check out the Scrap-A-Palooza Quilt Gallery tab to see what marvels can be made of all those scraps! I am impressed.

Wednesday, September 24, 2014

WIP: Wooden Quilt

Sometimes a burst of energy is followed by a period of lull in sewing. My most pressing tasks to do next were to wash the completed Nautical Baby quilt (August 27, 2014 post) before gifting and to piece the backing for the Vintage Ornaments quilt now that I have gathered the side border fabrics (September 18, 2104 post). But neither of those happened this week. The only time I spent in my sewing room was doing clean up and scrap management after those two projects. Here are the HSTs I salvaged, pressed, and trimmed from the Nautical Baby quilt. I will make something out of them someday after they have "ripened" in my scrap stash for a while. My quilting time this week was spent elsewhere – in the creation of a wooden quilt.


We are putting down hardwood floors in the master bedroom and my husband, Frank,  wanted it to be a DIY project. He expended a large effort in locating the flooring (distressed hickory - same as in the hallway), purchasing a sufficient supply of the expendables (paper, staples, tape), and assembling the tools (Father's Day gift compressor, nail gun, staple gun, table saw). Although, interestingly enough, despite the extent of my husband's arsenal of tools, we discovered that my large rotary cutter was the best choice for slicing through the foam underlayment of the carpeting. You can see the big yellow Olfa cutter on my husband's surgical table of tools near the foreground of the following photo. I have donated it to the cause. Like formerly dedicated fabric scissors, it will not grace the walls of my sewing room again, even with a fresh blade.


The demo before hand (removing baseboard, carpet, and pad) was nothing to sneeze at but I was not doing the hard labor. I fetched and stuffed trash bags, provided drinks and food, and pointed out obscure, but potentially troublesome, remaining nails, staples, etc. My husband enlisted the help of a friend Al for the first part of the demo and most of the actual lay down so far. Granted, most of the time is spent down on their knees. But power tools? A loud thundering compressor? Male bonding? What guy would not jump at an opportunity like that?


There is not much glory in doing the demo but somebody's got to do it. The HGTV design shows make it look like fun. Not! This is the quilter's equivalent of picking out free motion quilting gone awry. It is time consuming and there is little to show for it. But Frank forged ahead. Note the drop cloth on the bed. It makes for a very dull, rumpled quilt.


I have been drawn in to this new flooring undertaking with the role as the official "placer of planks person" so that the hickory boards look balanced and random in color and pattern. Joint placement is important too, since each wooden "seam" must be staggered at least six inches from an adjacent one. My husband called these my quilting talents. That is why I am tongue-in-cheek claiming that we are making a wooden quilt! I have moved or repositioned these planks pretty much as I would quilt blocks on a design wall. The guys then pounded them in and stapled them down. The photo below shows the status of this week's Work In Progress.


Color selection is another quilter's skill. This week I picked paint color for the walls. The bright aqua there now is just a tinted primer. We will probably go with a softer blue with a bit of a violet undertone like one of these samples. We will start with the lower down, bolder, darker one, and paint the wall behind the bed. But my husband agrees that if I think it is too strong to paint all over, we can go paler on the remaining walls. I just want to assure myself that there is sufficient contrast with the pale furniture to avoid a washed out feeling.


Enough of this room. Even if I did not quilt this week, I am sure others did and I can share vicariously in their progress. Setting aside the wooden quilt work and color selection, I am now linking up to view other works in progress at this week's Freshly Pieced.

Thursday, September 18, 2014

Vintage Ornaments Backing

Yay! Success! I went to my semi-local quilt store, Wooden Gates Quilts in Danville (19 miles away) and they were able to match both Grunge fabrics that I wanted. In my previous post, I could not figure out the correct fabrics to buy out of the Moda Grunge line to extend the da Vinci fabric that I wanted to use as backing fabric for the Vintage Ornaments quilt. It turns out the matching Grunge fabrics are 30150-226, called Pool, for the light green one and 30150-228, called Ocean, for the deeper turquoise one.


They really do look so different on a computer screen than in real life. In person they have such visual texture and depth they really do not deserve the connotatively dirty name grunge. Although when I researched it, grunge has come to mean a distressed look, which certainly is popular in flooring and furniture. I guess it is kind of natural to extend the trend to textiles.


But I digress. I am excited that I will get to use that da Vinci print that I think is so awesome. I especially like the Vitruvian Man on it (sometimes called the proportions of man). Leonardo da Vinci drew that based on the works of an architect Vitruvius. My  son has his degree in architecture so I am proudly a bit biased and partial to this fabric.


I plan to widen the backing of the da Vinci fabric with the deeper colored grunge on either long edge. That color picks up the turquoise accents like the pocket watch, above the up arrow in the next photo. I also like how the burgundy color in the grunge echos the color of the man of proportions, to the left of the left arrow, and the feather, to the right of the left arrow. I did buy some extra of both the Ocean and Pool Grunge colors and may use one of them for the binding.


By the way, aren't those neat pins with the directional heads? I bought them from Fons and Porter quite a few years ago for those of you who are interested. They are kind of on the long side, but I find them great toward the end of quilt contruction when I want to note block orientation or the direction to press the seams in a row. Yes, I realize that pins with all four directions are somewhat redundant but I indulged myself the frivolity a few Christmases ago. And ya gotta admit... the storage tins they came in are kinda cute, too.


I am looking back at my photos now. Dang it! Someday I will figure out how to take a good picture straight on, without parallax, in the well-sunlit spot under my skylights, without the shadow of my head or the camera falling on what I am photographing. I guess that is why the professional photographers have all those white parasols that bounce the light around. I am not going to go to that extreme, though, for just my little ol' blog.

Wednesday, September 17, 2014

WIP: Vintage Ornaments Top Pieced

This week I finished the piecing on the Vintage Ornaments quilt top. It drove me a bit crazy, but I got all the ornaments to face upright! I only had to remove the two outer strips from two blocks out of thirty to correct the handedness. Here is the six-block high by five block wide top.


I have some unusual fabric selected from my stash that I would love to use for the back. It has a Renaissance time Leonardo da Vinci kind of feel to it and, although the colors are not an exact match, I like how they play off the Vintage Ornaments colorway.


I need 3¾ yard and I have only 3. The quilt is 70" long so I can run it the length with no problem but then I'll need fabric for the long edges since the top is 60" wide. Alas, running it crosswise has insufficient yardage too, even though the print could tolerate being turned crosswise. Here is a closeup of the fabric. It portrays the sense of time travel with the pocket watch and old fashioned luggage. And those plum feathers just tickle me... pun not intended.


I went to my local shop to try to get more of the aqua or deeper bluish grunge for the long edges of the back but they did not have any.  I really do not want to order on line since I am not quite sure of the color name without holding it next to the backing fabric. My selvage gives the pattern number 30150 but not the -xx afterward that defines the color.


My local quilt shop did not have any appropriate Moda Marble either, which could be a possibility to widen the da Vinci fabric. They did have this option which sort of goes with my da Vinci print. But it has a gold overlay that I am not really keen on since there is just a tad of silver in the da Vinci. The background green is compatible so I bought a fat quarter to have at home while I mull it over.


Considering a radically different alternative to the da Vinci fabric I'm not ruling out using this Wintergraphix by Jason Yester. I have 2 yards each of the two prints and would not need to buy any more fabric for the backing. I think if I went this route I would put the stripe down the center and spread the more vibrant red out along the two long edges.


I still think my first choice is to try to hunt down a bit more of that paler Grunge Basic or a blending Moda Marble to widen the da Vinci fabric. It just seems so perfect for the Vintage Ornaments.


I have no new or completed projects for this week and have only managed to add to the list of projects in progress I posted last week. But I enjoyed piecing the Vintage ornaments top and that is the point of quilting! I am hooking up to today's Freshly Pieced post for WIP Wednesday.

Wednesday, September 10, 2014

WIP: Vintage Ornaments Begun

OK. I caved. I decided to start one of the many kits I have in my stash instead of an item on my list of UFOs. As I start a kit I want to remind myself why I bought it. I bought this kit, assembled at my local quilt shop, In Between Stitches, mainly because of the muted fabric colors. It seemed to be a softer Christmas tonality than I am used to and I thought the color palette would stretch me. It came with this set of ten Xmas fabrics. The kit price was less than the sum of the fabric prices and included a pattern, too.


Another reason I bought the kit was because it contained a the layer cake pattern and I had none. The Thimble Blossom pattern in the kit calls for thirty different 10" x 10" layer cake squares grouping the squares in pairs to make the blocks, each the complement of the other. Instead this kit came with 10 cuts of fabric, 1/3 yard each. I can get four 10" squares out of each 1/3 yard and so only need to use eight of the cuts. I will have 32 10" squares just not as much variety as in layer cake pre-cut.


I initially laid out these pairings but realized that unless I want several duplicate blocks I need to partner the fabric duos in other ways as well. I will hold out the leftmost pair for binding; I am thinking that the diagonal stripe would be a good choice but I do not think 1/3 yard is quite enough unless I go with a narrower binding than usual. The other four pairs have an upper fabric that reads like a solid and a lower, larger scale print. By always pairing an upper solid-like fabric with a lower bigger print fabric and switching them around I can still get 32 different blocks, with a nice fabric contrast in each. I can set aside the two with the least likable pairing.


Here are the selvages off the eight fabrics, giving enough clues to determine that this fabric collection is Moda Christmas Fabric Fruitcake Vintage Ornaments by Basic Grey. I think using bells instead of just dots as the color calibration marks is a merry touch. Sixteen different dye colors! No wonder the fabric looks so rich.


I cut out my 32 10" blocks and sorted them into solid/print pairs. Here is my first set of eight blocks, spring-boarded from using the solid like fabric that looks like colored Cheerios with each of the four large scale prints. Since ultimately half the blocks will be rotated 90° in the quilt, on half the pairings, I made the two slices horizontal instead of vertical. Then I am always able to have my directional fabric be up and down and not sideways. This way there will always be a block I can rotate and still keep the directional fabric upright. As you can see, randomness is veryvery hard for me.

Here is one set each of four horizontally and four vertically sliced blocks. They have not yet been trimmed into squares.


Whoops! It looks like the lower left block in the vertically sliced set is upside down – but only in the photo. I can right it in the quilt. There will be three other similar sets of eight from the other solid-like prints. I made another set of eight last night and will do the other two sets of eight today or later this week.

I had one completion for this week but it was knitting. I finished the tree sweater. You can read about that in my post for yesterday. Here are my stats for the week.


Completed projects (1):
  1. Tree Sweater (August 19, 2014 post and September 9, 2104 post)
Ongoing projects (4):
  1. Mask quilt (October 19, 2011 post) - packed away... again
  2. Chicken quilt - spray basted, awaiting embellishment (April 24, 2014 post)
  3. Overlapping square wall hanging - paired with thread, awaiting FMQ
  4. Classic Cars strip quilt (August 3, 2013 post) - need to back, quilt, and bind
New projects (1):
  1. Vintage Ornaments -  started in this post
I am hooking up to today's Freshly Pieced post for WIP Wednesday.

Tuesday, September 9, 2014

Tree Sweater Pre-Installation

This week I finished off the knitting on the tree sweater for my town's main street fall display. I blogged about this in my post for August 19, 2014. Here I tacked the sweater up on a tree in my backyard just to get a sense of how it would look. Here are some closeups of the top, middle, and bottom sections. I think I will save a full view for when it is wrapped around its designated downtown tree.


My husband and I did a fitting for it today before turning it in to City Hall. I think I made it a tad too long because I really wanted to get in that final green variegated stripe at the top. It was yarn left over from the first baby cap I made for my first granddaughter (who is named Autumn, by the way). I also wanted to add a bit of ribbing for a snug fit at the top, conforming to the vee from spreading branches. Oh, well. The good thing about knitting is that the sweater can get shorter by wrapping it a bit tighter. I really need to have the lower edge at least 24" from the ground in case passer-by doggies like it too much.

The installation is September 27th, when I will crochet closed a back seam to have it encase the tree trunk. My daughter will  happen to be visiting from Oklahoma then and she will help. This will make it a four generational tree sweater – green yarn from my granddaughter, installation help from my daughter, knitting by me, and red and beige yarn from my mom. I will have a final post on the tree sweater after the installation.

Wednesday, September 3, 2014

WIP: Visits and Kits

This past week my husband and I spent visiting our daughter, son-in-law, and eldest granddaughter in Oklahoma. I did not work on any projects at home but it still was a very quilt-y weekend. Since the weather was hot, and of course since mom and daughter wanted to bond and chat away over fabric, we looked at her stash and discussed her plans and looked at her WIPs. Lots of fun!

Even when not looking at fabric there was color inspiration throughout the weekend. While plant shopping at a local nursery, my granddaughter, who is six weeks shy of turning two, had a mini-lesson in color theory with these ceramic kitties.


Like her grandma, red may just be one of her favorite colors. Of course Grandma caved and we left the nursery with that kitty statuette in tow.


At Distinctive Decor, a kitchen, table, and home decor store in downtown historic Duncan, OK, I saw these rooster dishes whose saturated colors made me want to stitch up a quilt in that burgundy, pumpkin, blue, and lime colorway. Those speckled bowls and salad plates are just too cute! For those of you who have money left over after fabric purchases, these dishes are Vietri Galletto Dinnerware. They are made in Italy where the rooster has long been a symbol of good luck.


All these quilt ideas made me remember that I have not only yardage cuts of fabric but also several kits in my stash. I was trying to create from memory a list of them while in Oklahoma. My daughter suggested I dedicate 2015 to be "The Year of the Kit".  I liked the idea. Of course when I got home from the airport last night I had to go to my closet(s) to revisit those I remembered and refresh my memory on those I had forgotten until I saw them once again. Here is that embarrassingly-long list. They are in no particular order.
  1. Zig-Zag Tessellations bought at a California quilt show
  2. Harvest Home bargain bought at a California quilt show
  3. Backyard Safari in bright primary colors bought at California quilt show
  4. Nuances in browns and turquoises ^
  5. Cupcake Cottage from The Savage Quilter in OK ^
  6. Hungry Caterpillar x2 for Autumn and for Vivian from Fons and Porter
  7. Piece O' Cake in muted greens/brown from In Between Stitches, CA 
  8. Poppy Bella's Bird Quilt Fat Quarter Shop ^
  9. Barnyard Buddies Baby Stripper bought at Oklahoma Quilt Works, OK *
  10. Life in the Jungle Baby Stripper bought at an Oklahoma quilt show *
  11. Blue Skies in Storybook taupes and aquas from Fat Quarter Shop *
  12. Christmas presents in aquas and limes from Quilters' Cupboard, CA *
  13. Scary Night Stripper from Cotton Patch, CA * ^
  14. Barrels of Fun in beige, red, brown Fat Quarter Shop *
  15. Odds and Ends in taupe, cream, and black Fat Quarter Shop * ^
                * not shown        ^ it once was lost but now it's found

Today, I spread some of the kits out on the bed and snapped an overall picture. There are pictures for the first half of the list only. Sprawling them out like this, I surprised myself with the wide variety in what captured my fancy. Each kit also had "metadata" associated with it: where it was bought, memories associated with its purchase, and possibly why it was bought – colors, theme, technique, bargain price, to repurpose fabric. In my feeble defense, all were bought on sale or with a percent off coupon.


The queen-size bed my husband and I slept in at our daughter's was covered with a tri-toned bed cover. My daughter said she loved that quilt and it had been a wedding present, but she'd moved it to the guest room in their larger home since her and her husband's bed was now a king. Hmm. Maybe this is quilt inspiration for her or me to make in the future. Seems pretty straightforward, right? Just squares and 45° angles, right? Just three solids, right? Pretty large pieces so should assemble quickly, right? Just need to add wider or more borders, right? The gridded quilting pattern is pretty straight-forward or as a king it could send out to be quilted, right? See how easy it is to expand that quilts-to-make list?


My stats for the week lack any completed or new projects and I made no progress on ongoing projects. But, a lot of planning, thinking, and fabric and family hugging went on this week and that's what it's really all about.

I am hooking up to today's Freshly Pieced post for WIP Wednesday. In case you missed it, her previous post about her new studio was awesome.