Tuesday, April 30, 2013

WIP: Scarecrow and Grinch

This scarecrow wall hanging has been hanging around in my ongoing projects list for months now. I finally finished it this week. All I needed to do was sew up the small opening on his leg where I stuffed him and attach the three leaves, two crows, and pumpkin. It was intended to be a door decoration for fall. My sister gave me the panel years and years ago. You know the drill. You get 80%-90% done and it just sits there, ripening. Well now I have an intended purpose.  Since my six-month-old granddaughter's name is Autumn I plan to give it to her and maybe her parents will deploy it as decor for the door to the nursery. Everything is stitched on really tight by hand or attached by multiple passes of machine stitching to be safe.


With that in mind, I made a little stuffed toy to match. The fabric panels for these type of stuffed novelties come with instructions and a picture of the finished product.  I used a blue mini-print fabric for the back and made a small scarecrow from the instructions illustration that is just the right size for a little hand to hold and fully washable for after it has been stuffed in her mouth. The little guy is about 7 inches tall.


I checked the selvage to try to find the year this was printed but could not find it.  I did find that the panel is still available on ebay by googling VIP country scarecrow. Here is the panel and the small illustration in the upper right is what I used to make the matching toy.


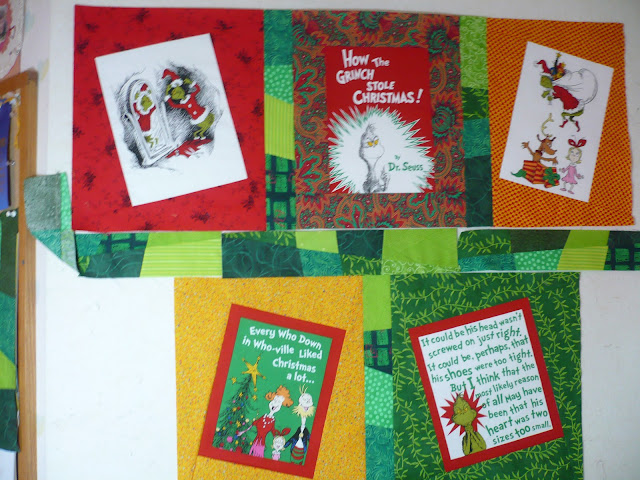
Since this is Work In Progress Wednesday I report that I am continuing to work on the Grinch.  I got all the vertical short sashings joined to make rows. I also joined the rows with horizontal stack and whack sashings in between.  I still want to surround the assembled top with more stack and whack sashings around the perimeter and I will post another picture of a larger portion of the quilt when that stage is completed. Here is one of the blocks  bordered with what I refer to my "banana with a greasy black peel" fabric and then surrounded by the stack and whack sashings.


As crooked as it looks. I have still been successful in always seaming a bias edge with a straight of grain or cross grain edge. I have my fingers crossed that the quilt with end up pretty square. The outer sashings may be tricky since I know how "piano keyboard" type outer edges can be hard to control and keep even in length. I may need to cave and use a simple fabric edge before binding. Stay tuned!

Here are my stats for this week.

Completed projects:
  1. Scarecrow wall hanging
  2. Bonus scarecrow toy
Ongoing projects:  
  1. Grinch quilt (see 2013/04)- sashings have been added
  2. Color Play of the Day (see 2013/01) - awaiting binding
  3. Sunny Spring Frost (see small insert 2013/02) - awaiting binding
  4. Jack O'Lantern Trio (see 2013/02) - awaiting FMQ
  5. Chicken quilt - awaiting FMQ
  6. Overlapping square wall hanging - awaiting FMQ
  7. Mask quilt (see 2011/10) - hidden away awaiting inspiration for arranging hexagons
  8. Paper pieced block of the month (see quietplay's BOM)- downloaded/ready to print
New projects:  
  1. Bonus scarecrow toy
Stats since last WIP:
     Completed  projects - 2
     New projects - 1
     Currently in progress - 8

Now I am off for inspiration at:

Tuesday, April 23, 2013

Saturday... and Back to Quilting

I got up Saturday morning and went straight to my sewing room.  I have missed being there, the last couple weeks being so hectic what with travel and jury duty.  I was inspired to revisit and assemble my Grinch Quilt. My last post on it was 2011/12. The filler blocks, made with a stack and whack technique were competing for attention with the Grinch panels and overwhelming them. I wanted the filler rectangles to look random and catawampus like Suess's illustrations but I think I went too far. Here are some of my stack and whack filler blocks.


After having been away from the quilt for 15 months, I took a fresh look and decided to scale back the overall size by narrowing the filler blocks. I chopped each into rough thirds. Here is the revised proposed layout where I sliced off each long edge of the filler block to use for vertical sashing and kept a wider middle section of each filler block to use as horizontal sashings. I will still use my leftover stack and whack rectangles to fill out the sides of the shorter rows.


I am going to let it sit overnight. It still seems a bit busy but it may grow on me.  With different colored blocks of different sizes I need something to unify it all without being too precise. Not only would the precision drive me crazy but the spirit would not be in keeping with the Suessical feel of things. Here are my leftover long edge strips pinned to the bulletin board next to my design wall.


I think I will put them around the assembled top as an outer sashing. Not randomly. I do not want two of the same fabrics to touch and I want to put darks by light blocks and light by dark blocks. I will probably end up placing each one and shifting it around about a half dozen times- just like the did the vertical and horizontal sashing dividers. I have a problem that I work too hard on randomness. Then again, handling and gazing at fabric is hardly work.

I took a break mid-day and went to the quilt show of my local guild. Here is what I had laid out before taking a break.  When I returned, the breeze had blown about half the strips off my design wall. Yikes! I had to start again.  I usually take a photo, too, but this time I had not. Oh, well. I like to think it will be better the second time around.


At the quilt show of my local guild there was a big display of the Quilts of Valor, quilts made by volunteers who then donate them to those who have served in our armed services.  There were lots of red/white/blue quilts.  I also admired the occasional smattering of beige/grey/camouflage quilts spiked with orange - probably for Desert Storm I guess. I made a point of noticing the quilting patterns on the various quilts as inspiration for my determination to better my FMQ and got some neat ideas for triangles and flying geese.  I was in awe of one pattern someone quilted. I am pretty sure that this particular pattern was done on a long arm but just look at the intricacy of this stitchery.


Here is the whole quilt it came from.


There were just a few vendors and I picked up these fabrics.  I indulged my weakness for polka dots with the top two fabrics and I might incorporate one of the bottom two white/red and white/black into accent strips of the Grinch.


I also bought a template set for Storm at Sea. I really love that pattern and yet struggle with aligning those non-45 degree angled blocks.  I made one batik quilt from a Fons and Porter kit once where the pieces had been previously laser die cut.  This is the last quilt shown at the bottom of my side bar at the right. Having the little corners nipped off really helped in the alignment so I am hoping this template is worth the investment. I have been wanting to make a variation of Storm at Sea that I saw on the wall in a Quilt store in Oklahoma last April when visiting my daughter. Here is that quilt. The picture is kind of blurry but I an sure you can get the idea.


Lastly I changed the look of my blog.  I had been using a blogger designer template where the background was a deep magenta and the text was white, the side bars a yellow and peach paisley design.  It was difficult to read.  I learned to play around with the customization and came up with this new color scheme. I hope this new fresh look is easier on the eyes.  I will stick with this for a while till I get bored with it and change again.


Completed projects:
  1. Redesigned blog layout.
Ongoing projects:  
  1. Grinch quilt (see 2011/12) - being assembled with smaller sashing options
  2. Color Play of the Day (see 2013/01) - back from long arm quilter, ready for binding
  3. Sunny Spring Frost - back from long arm quilter, ready for binding
  4. Jack O'Lantern Trio (see 2013/02) - awaiting FMQ
  5. Chicken quilt - awaiting FMQ
  6. Overlapping square wall hanging - awaiting FMQ
  7. Mask quilt (see 2011/10) - hidden away in a container awaiting inspiration for arranging hexagons
  8. Scarecrow (see 2013/01) - just add his doo-dads and be done with him!
  9. Paper pieced block of the month - downloaded and ready to print
New projects:  
  1. None
Stats since last WIP:
     Completed  projects - 1
     New projects - 0
     Currently in progress - 9 

Now I am off to check out what the rest of you have been up to at:


Wednesday, April 17, 2013

WIP: Review of My Blog Book

Good News
The blog book that I ordered on 3/16/13 was delivered on 3/23/13 so the turn-around time is faster than they say on the website.  I had to wait until I visited my sister in NC last week to see it, since I had a copy for her and a copy for me shipped directly there. I was really pleased with the quality. Here are images of the front and back of the hard cover book I ordered. The book is 11 1/4" tall and 8 3/4" wide and about 3/4" thick. The title is repeated on the spine.

Book Front Cover
Book Back Cover

Blog Book Readers
Although my sister can use a computer it is not her first choice of communication. Now she can sit back in a comfy chair anywhere and read my posts at her leisure instead of being confined to being in front of a computer screen. I think it makes a great gift for someone who would enjoy reading about your craft but is not quite so comfortable with computer or does not have ready access to one. I optimistically added Volume 1 to the title of my blog book in anticipation of making one every year or so.  I am also considering ordering a smaller version and including only the posts that relate to a specific gift quilt. That way when I give someone a quilt I have made for them, they can see the history of its construction, even if they are not a quilter themselves. You can order a less expensive version than I did by having a softcover or by selecting an option than rearranges photos to conserve space, thereby reducing your page number count since it is priced by the page. Also you have enough control that you can choose to include only certain blog entries. Including only those relevant to the quilt being gifted would also reduce the cost since it would be fewer pages.

Lessons Learned for Next Time
Next time I do this (and I plan for there to be a next time) I will keep some things in mind as I write my posts.
1) Since links cannot be clicked in a paper copy (duh) I will try to  spell out the link instead of substituting phrases like "click here" for the sometimes lengthy url entry. If the reader wants to visit a url I reference, it will then be available for them to type in when they do go to a computer. Also I can substitute the year and month of a past post for "see this post" without much extra effort and then the reader can flip back in the book to my reference.
2) I will be more judicious in my use of buttons as links and possibly just substitute the text of the url link. That way I will not see the same button appearing over and over again throughout the book. In the overall cost scheme of things, the buttons are relatively small and even repeating them multiple times probably adds only 2-4 pages of extra cost.  Even though the buttons are cute, I felt seeing them repeatedly was distracting from my own personal images and seemed to give the buttons an exaggerated sense of importance.

Surprises
The pictures in the blog book were smaller than I expected.  I usually select the extra large size option for pictures in my posts and the ones in the book were printed much more like the default medium size. I do not know if this was a resolution issue or if there was a option that I could have selected and did not when I was creating the book. I have a call in to the company to find this out.  My husband did point out to me that had the  pictures been printed at the extra large size, my page count and subsequent cost would have risen appreciably.  It is a trade off.  I was not disappointed at the pictures within, just surprised. And I should also mention that my blog is white text on a bright magenta background.  The book is printed white on black, which actually looks better, is easier to read, and definitely uses less ink. Again, this was a surprise but it really looked crisp and sharp. I am considering changing my on-line blog layout so maybe next time you look at my posts they will have a different look and be easier to read.  I plan to play with that in the next few days.

Source
Here is the url I used to order the book archiving my blog posts  http://blog2print.sharedbook.com/blogworld/printmyblog/index.html.
There may be other vendors out there that offer a similar service but I did not do extensive research and comparison. I was quite happy with the product I received. This company's interface for creating and viewing the book online was easy to use. I am on a Mac so I can attest it was Mac friendly, too. You get to preview the book on line so I should not have been "surprised" by those items I commented on in the last paragraph. Maybe just chalk it up to a short memory...?

Since I was traveling last week and have been on jury duty this week (I was actually selected as a juror and served for the very first time) I've had very time to sew. But here is my list of projects. I hope to get back to some of them this weekend.

Completed projects:
  1. None
Ongoing projects:  
  1. Color Play of the Day (see 2013/01) - back from long arm quilter, ready for binding
  2. Sunny Spring Frost - back from long arm quilter, ready for binding
  3. Jack O'Lantern Trio (see 2013/02) - awaiting FMQ
  4. Chicken quilt - awaiting FMQ
  5. Overlapping square wall hanging - awaiting FMQ
  6. Grinch quilt (see 2011/12) - on design wall for assembly and creative sashing solution
  7. Mask quilt (see 2011/10) - hidden away in a container awaiting inspiration for arranging hexagons
  8. Scarecrow (see 2013/01) - just add his doo-dads and be done with him!
  9. Paper pieced block of the month - downloaded and ready to print
New projects:  
  1. Redesign blog layout.
Stats since last WIP:
     Completed  projects - 0
     New projects - 1
     Currently in progress - 9 (can hardly wait to get  back to my sewing room!)

Now I am off to check out what the rest of you have been up to at:


Wednesday, April 10, 2013

WIP: My Father's Stash

As quilters we all have strong feelings for our "stash" of fabric. Some of us love it. Some of us are apologetic about it. Some of us are overwhelmed with organizing it. Most of us are continually expanding it. My father, though not a quilter but still a craftsman in his own right, had his own "stash". My father passed away a couple years age, just short of turning 98 and he never stopped increasing his "stash". Here is his highly diversified and expansive collection of all things needed to build or repair. The picture shows just one wall in one of three rooms in his basement.  


My father has been a carpenter and man of very many trades for his whole life.  He has built entire houses, painted and shaped neon tubing for commercial signs, lined entire blast furnaces with bricks, and always repaired all his own vehicles. He knew framing, plumbing, electrical, masonry, tiling, glasswork, car-repair, and with no degree in higher education, could figure out just about any thing mechanical. His "stash" contained hand tools, power tools, taps, drill bits, router bits, screws, washers, nuts, bolts, pipe fittings, pipes, valves, a bathroom sink, sink stoppers, plywood, other lumber, a pull-down folding staircase to be installed for attic access, and many more items for which I could not begin to identify the function. I visited my sister in North Carolina this weekend and she and I, enlisting the much needed help of our husbands and one of his local grandsons, began dispersing his "stash".

We were very fortunate that just a couple miles away was a "ReStore" run by the "Habitat for Humanity" charity.  They were gracious and grateful, accepting all of our dad's treasures.  Although this collection could look like trash to many, the personnel at this store understood and appreciated the value and usefulness of all the items we donated. It make me feel good that these products and tools may give those who have no home the means to build one. Also our dad's "stash" may provide access to some age appropriate hardware and fixtures to those who are lovingly restoring an old home to its former glory. Our dad also had also kept several trunks of upholstery and drapery type fabrics from our mom's time which we also donated.  I am hopeful a good portion of these cloth goods will appeal to those pursuing that "retro look".  My husband brought back to California with us a few of my dad's micrometers and calipers. I kept this belt buckle of his.  I think it sums up his accomplishments.


All of my dad's "stash" has not been yet distributed.  There is more work ahead and that is why I thought it appropriate that it be listed as a Work In Progress. Here is my dad wearing one of his favorite hats that quips "Built for Speed" and proudly carrying one of his huge home grown hydrangeas.  It is more the size of a basketball that a mere snowball. Those craftsman hands of his also had very green thumbs!

DAD
1913 – 2011

If you are searching for quilting "works in progress" in this post, there are none since I was otherwise occupied this week. I picked up two quilts from my long arm quilter before I left for North Carolina but I have had not time to bind them. Anyway, that is the subject of another post. I did knit the back and part of the front of this sweater while on the plane, though.


This is what it should look like when finished. It has a shawl color and single button closure.


Now I am linking up and checking out other posts at:

WIP Wednesday at Freshly Pieced