I was fortunate to be able to attend the 2017 Houston Quilt Festival for two days last week with my daughter. I flew out from Oakland, California and my daughter flew down from Oklahoma City and on Thursday, November 2nd and we got to spend Friday and Saturday in a mother/daughter bonding feast amid gorgeous quilts and myriads of vendors. Hotels at the George R. Brown Convention Center were booked (and expensive) so we stayed very near Hobby airport and drove in both days. This is going to be be a long post so hang in there and scroll ahead as you please. Family comes before fabric, maybe not in the dictionary but in real life and even in the quilting world, so I will post pictures in the following order:
- Robin and Me – photos of my daughter and me, travel pics, convention center orientation
- Quilts – photos of a handful of the many quilts that caught my eye
- Purchases – photos of the purchases I made
- Travels Home – tales of leaving the International Quilting Festival
Robin and Me
My first inkling I was in the Houston airport was signage pointing me to the baggage claim area.
Robin had arrived three hours earlier so she took the shuttle to the hotel upon her arrival. She returned to the airport on the shuttle to meet me just outside the secure area and waited with me for my luggage.
We decided to eat at the airport. Our restaurant displayed a marquee congratulating the Astros on their World Series win. It was the first World Series win for the baseball team in 51 year in franchise history. The celebratory welcoming home parade for the baseball team was actually at 2:00 pm on our Friday at the show. It was only a half mile away from the convention center so we could have walked to it but we opted to continue our trek throughout quilts and vendors instead. During our break for a late lunch though we did view people in various team apparel strolling back in good spirits from the parade.

Friday morning came and we got up in time to get to the quilt festival when it opened at 10:00 am. Unfortunately parking at the convention center garage was already full. We went to a Toyoto Parking garage a couple blocks away and waiting in long line of cars to file in. Just as we were about to enter the structure one of the attendants called out it was full. We could not back up because there was a line behind us. We could not continue down the road because we were already in the driveway entering the structure. So we sat. And we waited. The attendant told us to inch forward and they lowered the steel mesh garage gate after us, barely a fraction of an inch form the rear bumper of teh rental car. Yikes!.We were the last car allowed in. How is that for luck? At first they told us to park in a handicapped spot. We were hesitant about getting a ticket but if no one else would be entering it would probably be safe and not be denying the space to anyone. But apparently they were filled, also. Instead they directed us to a very narrow valet parking spot. Robin let me out before pulling in.

Then she squeezed herself out of the car.
I took our first symbolic photo that we had arrived. It was of our feet outside the convention center.
After buying tickets we were in! Yay! Robin assumed the "Ta-Da" pose under the International Quilt Festival sign.
Soon after we went in the Hall D entrance, on the quilt side rather than vendor side of the center, I noticed a sign off to the right that my husband would have appreciated. I texted him the next four photos.
When he and I go into a quilt shop together he immediately asks where they have their husband's chair so this was such a kick to see.
It was nicely outfitted, too, with lounge type seating and a TV.
There was a table off to the side stocked with magazines that would typically appeal to most men. Notice the titles: WWII History, NBA, Texas Salt Water Fishing, Field and Stream, cigar aficionado. Men's Journal, and Golf Digest. Lest the men feel they were being stereotyped, there was also Texas Monthly, National Geographic, and Fortune which were a bit more generic. Someone at that convention was being very thoughtful.
When people asked me what I thought about the International Quilt Festival the first word that popped into my head was HUGE! Here is Robin standing near the floor plan. The arrow is pointing at Hall D. Hall D and Hall E were for quilt displays. Halls A, B, and C were for vendors.
This view through a second floor portal gives a better feeling for the size when compared to the people milling about looking at the quilts. This photo shows aisles A through D.
This photo shows Aisle C through Aisle J at the far, far right. The aisle labeling ran beyond the right edge of the photo, up through Aisle T.
The quilts were organized in regions of display. Realizing we could not see it all in detail, Robin and I gradually figure out which areas interested us most and lingered there, skimming through others that were not quite our cup of tea.
The vendor section ran almost half again as large. It was housed in Hall A, Hall B and Hall C. Here I am pointing to where we would go next in the afternoon. We did some quilts and some vendors each day to mix it up a bit. All in all I think we time managed very well. Energy management? Well, that could have used some improvement. We tuckered ourselves out.
Robin and I posed into front of the Stitchin' Heaven steer. I am wearing my bobbin necklace and she is wearing her Super SewerT-shirt. This photo got texted back to hubbies.
We each had to have our own up close and person shots, Robin first. Doesn't that steer look like it adores her and is nuzzling up for attention?
I took my turn with the steer. Looks like vice versa, me adoring the steer!
Here is that glorious steer alone, view not obscured by any quilters hamming it up in the photo.
As Robin and I were leaving the show on our final Saturday, we had one of the staff take a photo of the two of us under a sign with rotating advertising. She was very patient and indulgent with us. We had to time the shot and our smiles to synchronize with when the sign said Quilt Festival and not other ads. It took several cycles of the sign and several bouts of giggling but we prevailed!
Our second day, Saturday, we had been wise enough to get before the show opened to score a parking spot in the garage across from the convention center. As we were leaving it occurred to me to take a photo of the convention center itself. This is the best I got. Oh well, there are probably better ones online. The quilts were more important and I have several photos of them coming up next.
The Quilts
The rules at the show stated that photography was allowed only as long as credit was give to the artist who made the quilt. Here were a few of my favorites.
I liked the cheerful colors and simple lines of Eichler Homes by Mickey Beebe from Santa Cruz, California. These style homes are prevalent in the San Francisco Peninsula and Silicon Valley area.
My preferences lean toward traditional quilts over modern but I love the modern colors and ombre looks.
A Splash of Lime by Susan Garrity of Wilson Wyoming combines both of these with her pairing of Snail's Trail and Ohio Star blocks for a stunning result.
On the left is
Family Celebration by Becky Grover of Ann Arbor, Michigan. On the right is
My Inner Yoga by Debbie Schulze of Taos, New Mexico. The poses of that skeleton guy really cracked me up. Both of these quilts were associated with the
A Celebration of Color category.
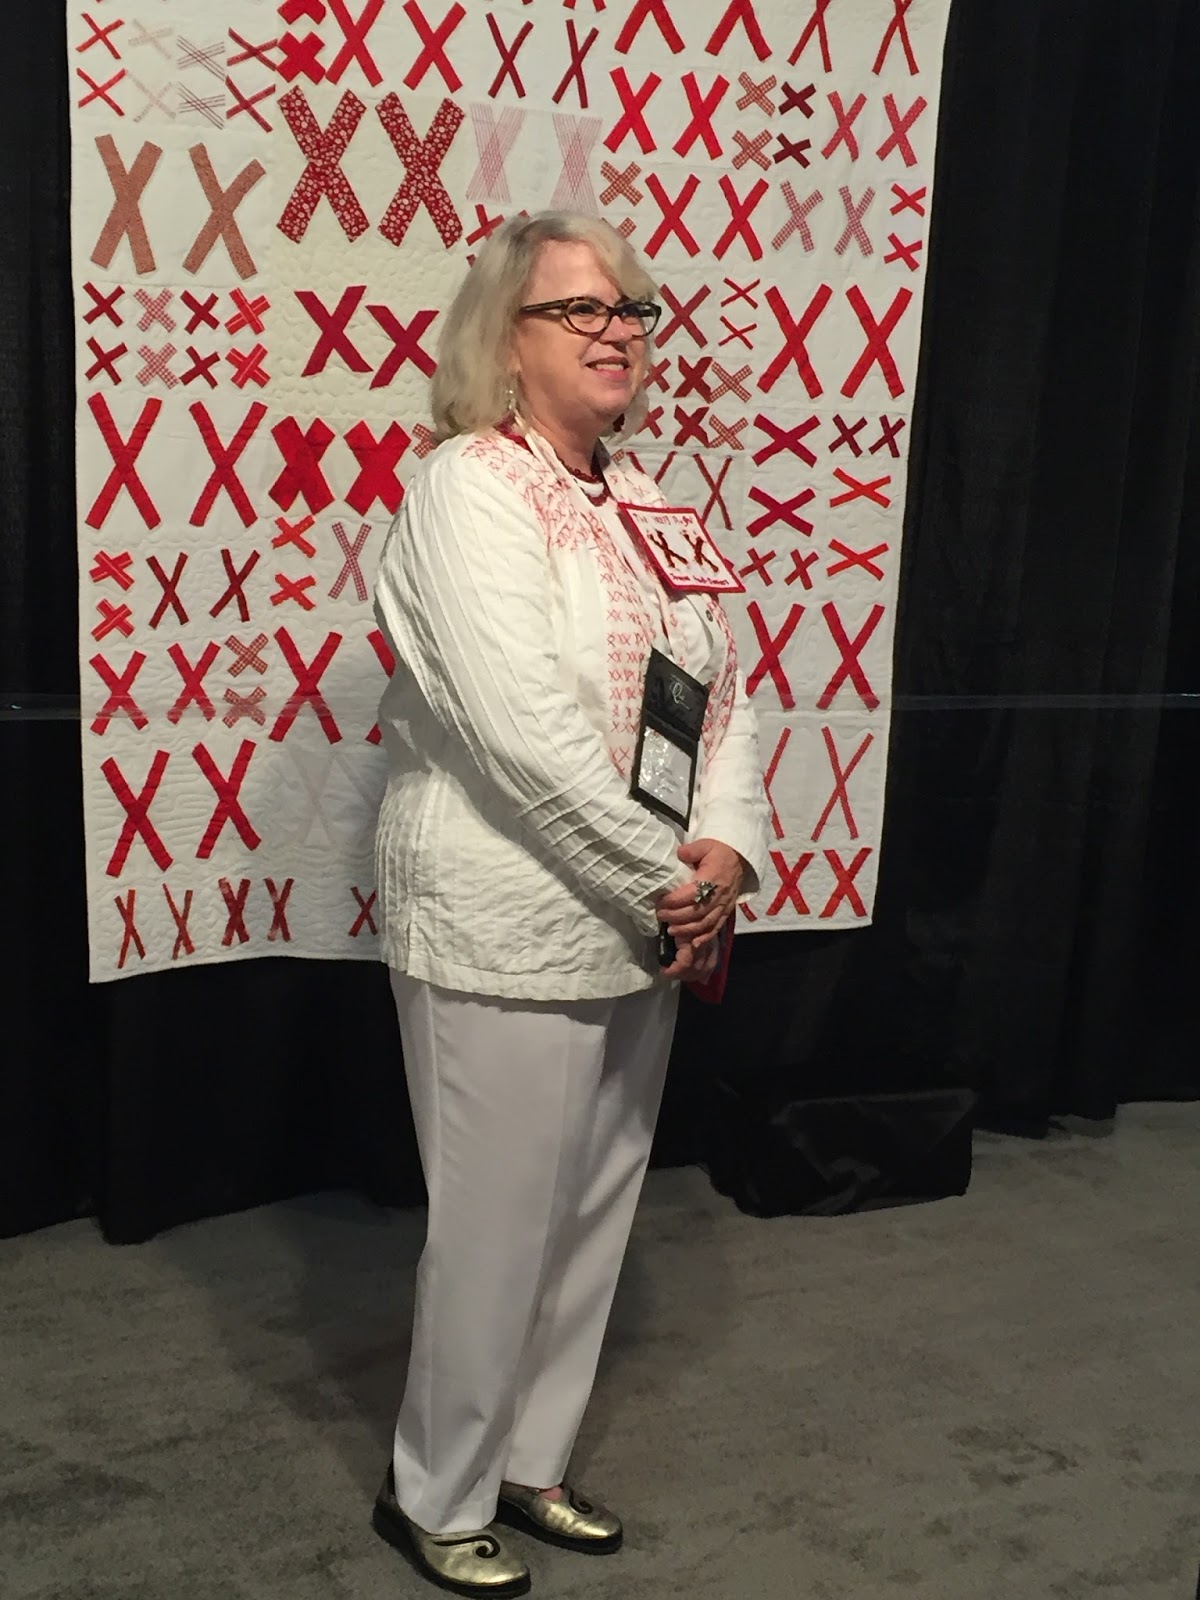
This series of quilts, each with pairs of red X's of varying sizes and styles across them, has a very sombre story behind it. Called
the 70273 project they commemorate the murder of 70273 physically and mentally disable persons of all ages and genders by the Nazi regime between January 1940 and August 1941, before the Holocaust began. The double red X's represent the signature of two physicians authorizing their deaths. Jeanne Hewell-Chambers is the founder and leader of The 70273 Project. She is shown here in front of the one of many quilts of all sizes in the display. Check out
the 70273 project link if you want to get involved.
Red Hot was by Deborah Ross from Tulsa, Oklahoma. I loved the color gradation in this string quilt.
The swirls and color gradation are what drew me in to
It All Comes Around by Karlyn Lohrenz.
Happy Alps, original design by Enid Weichselbaum from Minnesota. Looking at it did indeed make me happy. It has a sort of Charles Wysocki feel to me.
The swirling tools and cheerful green background of
Wind in the Workshop by Shirley Gisi of Colorado Springs, Colorado appealed to me and I thought it might evoke a woodworking mood for my husband.
This dress by Gilbert Muniz of Houston Texas was titled Zapped! The font on the front reminded me of the annotations of POW or BANG in the comic books of my youth. My daughter 's family is into the heroes of Marvel and DC graphic novels and movies so I had her pose by this dress.
This jacket, also by George Muniz of Houston, Texas is titled
Color Theory. The embroidered circles are his adaptation of
shisha embroidery, which typically entails mirrors within the circular medallions.
Six blocks were combined to form Mystery Quilt by Yoko Saito of Japan. She was inspired to add random staircases going nowhere to the border, giving the quilt a magical feel. Normally I am not a fan of gray or muted tones but this quilt seems to speak color to me from within its neutral tones. Maybe that is the magic?
These United States by Carol Price measures 12 feet by 14 feet and contains fun facts and details about every state plus Washington, D.C. The letters U S A and two other block were added to fill in the configuration to seven blocks wide by 8 blocks tall.
I am originally from New Jersey so I photographed the block for my birth state.
My daughter now lives in Oklahoma so here is her block.
My husband hails from Washington, D.C.
My home state now is California. It was so high up on the quilt I had to zoom in to get a photo so its resolution is a bit lower.
My sister now lives in North Carolina so here is her state.
In the handmade category was Marchen (Fairy Tales) by Kayoko Hibino of Japan. I thought it was exquisite.
Purchases
My husband said that after spending money on air fare and hotel and making the time and effort to travel, I'd better purchase a lot to make it all worthwhile. There are suitcase capacity limitations however. What did I buy from the vendor half? Here is a quick (I hope) rundown.
This is a small paper pieced pattern for a birthday celebration that came with the fabric to make a present and a piece of cake. I plan to make it up as is and possibly enlarge it for a couple of birthday banners to be made with my own stash fabrics.
I love colorways like this and they are often present in Me and My Sister fabrics. My daughter loves those designers also so we made a point of visiting their booth. I bought two 1 yard pieces of Christmas flannel that will make four burp cloths.
I also bought a blue bunny print that was too adorable to leave behind. It was the last one left, too so I didn't dare wait to decide and come back later! What if it was gone? It was from their new line so I could have waited and gotten it elsewhere but that logic never prevails during a fabric fixation moment.
We both bought Me and My Sister's new book and specialty Double Wide Dresden Ruler.
We then had some one take out picture with the sisters. During the shuffling about for position, we all heard something drop to the floor. Had one of us dropped our ruler? We searched and could not find it. They said never mind, they would find it later and handed us another ruler. Back in the calm of the hotel that night we found three rulers. We returned the third, first thing the next morning but never did figure out what had fallen.

I came across a vendor selling quick-make baby blankets made up of a 30" square of printed cotton and a 40" square of plush Minky. This would make up very quickly, placing right sides together, sewing around and turning right side out with self mitering corners. Hey, this could be my next burp cloth alternative. I'd never worked with Minky before so I thought this could be a new experience. I really was initially attracted only to the grey Mickey print fabric that claimed "oh, boy" but yardage from this booth was not an option They were set up to sell only 30" squares or 40" squares. I decided to try the Minky pair option but was still reluctant to leave behind the "oh boy" fabric and its lovely coordinating coral mini-print. I got both.
Also in the boy vein I found some fabric at another booth that went with a collection of houndstooth basics in soft muted yet masculine colors.
The coordinating print fabric had a soft look to it and was printed with kind sayings – be generous, be brave, be humble, be grateful, be gentle, etc. The critters were exceptionally cute and detailed, also.
I picked up a couple of patterns that appealed to me. This one for a girl's skirt was sold out but will be shipped free to me. I am anxiously watching for it. I have three granddaughters so it will definitely get used.
These two fabrics, llamas and birds, are strong candidates for that skirt pattern.
This other pattern is for a quilt with pockets to hold items. I thought it would be cute for a nursery school or for Christmas time.
These barns came as a kit but I liked only the barns themselves. The vendor had several purchasing options, one of which was flexible enough to let me buy only the barn panels and they came with a free pattern.
Speaking of kits, I have a goal of not to buy any more. Well, I caved. This makes up into a small wall hanging and I'd had a pleasant experience once before sewing up a set of laser cut pieces into a storm at sea pattern. These colors and design caught my eye and there will be no leftovers. Yes, there are curves but the pieces are all pre-notched and all dog ears have been lobbed off ahead of time requiring little guesswork in alignment. I am looking forward to starting this with no cutting out first!

Of course there was an assortment of random fabric purchases I could not resist. Probably the most random was this collection of fat quarters of barbecue fabrics. The bundle was missing a fat quarter per the vendor's consternation so he added for free extra a 1/3 yard end of bolt cut of the Campbell's tomato soup red fabric in the upper right corner and the aqua one in the middle of the bottom row. I think this collection of nine fat quarters will make whimsical placemats. I am already contemplating what pairings I will make.
These three half-yard cuts of the identical Kaffe Fasset dotted stripes will make a quick quilt on their own merit. I can run the stripes alternate up and down or sideways to create a rail fence design with very little effort. It will stand on its own just due to the colors. I love polka dots – the crookeder the better.
I bought a collection of six one-yard cuts of floral fabric from a vender from Hawaii in rose, orange, yellow, purple, aqua, and blue – luscious colors I just drooled over.
Another random item that called to me was this zebra panel. It is printed from a photograph on really plush feeling fabric like velour. I have slated it for a fun pillow in my living room where I have a scattering of zebra stripe accents in my lamp shades and coat hooks. I need to find a cream colored soft stretchy backing fabric. I want the look of wale-less corduroy but I think it needs to have some give and not be rigid. Maybe not. I need to rethink the rigid versus stretchy aspect. I kind of want that wale-less or pinwale corduroy or velour or washable velvet.
This random one yard cut of wing-tip shoe fabric was just too funky to leave behind. I think I might make a living room pillow from it. I suppose it could also be a pillow case. It's fate is to be determined. I want it to be something simple so I make it up quick. The fabric is too unique to be stuffed away in my stash and not be enjoyed.
There was also this one yard piece of wonky green check on sale for 50% off. It is a nondescript basic so, unlike the shoes, it may very well linger in my stash for a while.
Oh, I also bought a package of basic threads. I do always seem to run low on these tones. This is a brand I normally use and I am quite happy with it, even in my Handi-Quilter Sweet Sixteen.
Travels Home
After Houston I went back with my daughter to Oklahoma City for a few days to visit the grandkids before flying home to California. She of course knew I would have brought gifts for her kids and be cramped for fabric space. Bless her heart, she packed a large bag of lightweight packing peanuts taking up space in her suitcase so she could ditch them in Houston and create space to carry my fabric to Oklahoma for me. There was one hitch to the plan. When Robin and I arrived at Hobby airport in Houston to fly to Oklahoma City there were signs on each of the check in terminals. Apparently something about the Commemorative Quilting Program was setting off security alarms in the checked luggage so programs had to be carried on only. We had packed our programs. Fortunately the majority of all our quilt show purchases were in one suitcase – hers. She found a space behind one of the unmanned ticket counters, sprawled herself out across the floor and dug through her suitcase, essentially dumpster diving amongst the dirty laundry and show purchases to find those two programs. We were glad we were early and that she only had to go through one suitcase. I wish I'd taken a picture of that!

For my Oklahoma to California return trip four days later she told me I was I was on my own but could borrow an extra suitcase. It was not needed. I had planned ahead and packed few clothes. I'd wore items multiple times to conserve on space. I had also gained space once I distributed the kids presents. Here is my suitcase upon opening it once at home and removing the clothes I had crammed in around the fabric. Except for the small cosmetic bag and slippers peeking out from underneath the purple sack, this is all quilt show purchases. I have my priorities.
One more thing. My commemorative program was not in there. I knew not to pack it in my checked luggage.
I am down to the wire with this post, but I am linking up now to
Let's Bee Social #202. I'll catch and fix any typos later.