Wednesday, May 22, 2013

WIP: It Started in Low. Then It Started to Grow...

Remember the words near the end of  How the Grinch Stole Christmas?

     It started in low. Then it started to grow... 
     But the sound wasn't sad! Why, this sound sounded merry! 
     It couldn't be so! But it WAS merry! VERY! 

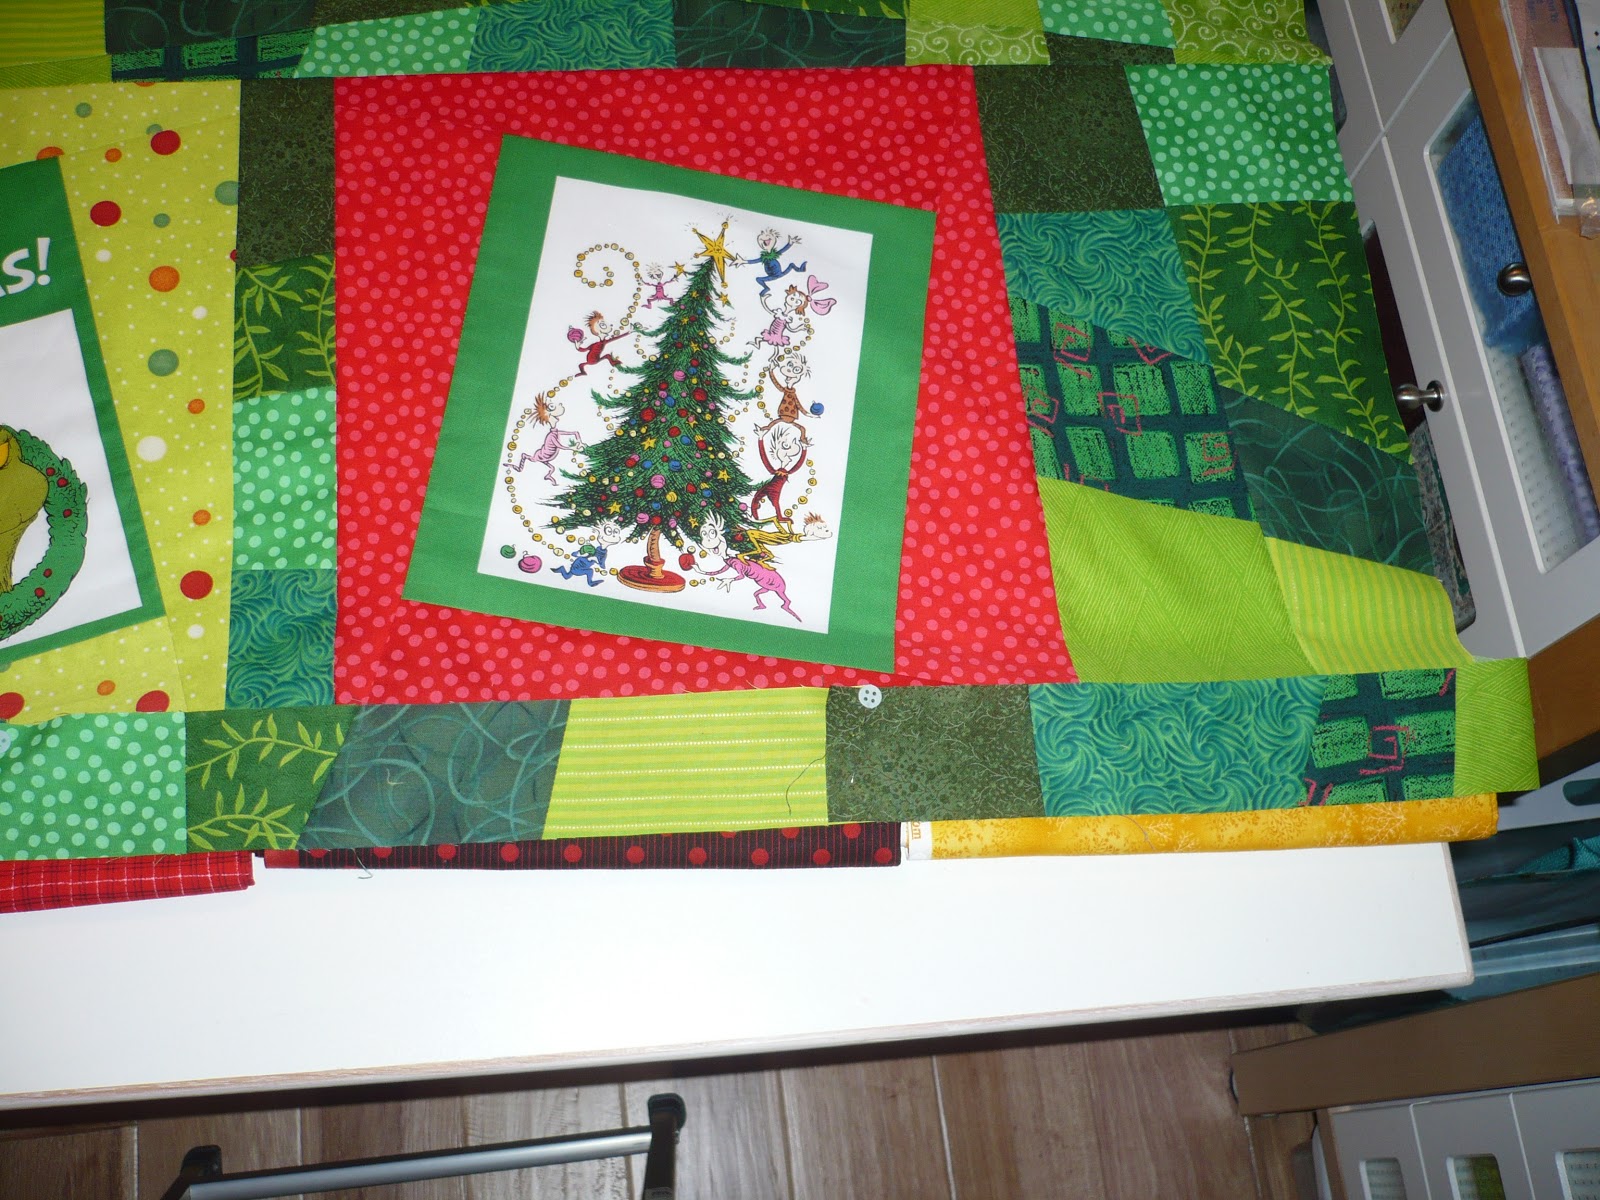
Well, my simple ~1/2 yard Grinch panel sure has grown. Just by adding those triangles to set each block on a tilt, I increased the quilt size quite a bit.  Then I added those pieced filler sashings, too. In doing all this I gave my self a real assembly challenge. I am a precision kind of gal.  How I much prefer cutting my pieces exactly to size and seaming them together precisely. This wonky, random, stuff is hard for me.

I attached filler pieces and the outer side sashings to the Grinch quilt this week and trimmed them all even.  Aligning the large top on the cutting table and cutting off the edges square was difficult. I had to be very careful to smooth out those multi-seamed although, well-pressed (or so I thought) wonky filler blocks and very careful not to stretch those bias outer edges for the Grinch panels.  In 20-20 hindsight, I should have cut those surrounding triangles for each Grinch panel so that the long edge was on the straight of grain. Ah, live and learn.


Also, since the sashing are made from strips cut off the stack and whack rectangles they are like a keyboard border (pieced border) and all those little seams allowance add up.


I am used to measuring the center of my quilt vertically and horizontally and cutting two pair of sashings exactly those lengths either on the straight of grain or on the cross grain. Then I ease the quilt to fit those pre-cut sashings. Those sashings are stable and not at all stretchy like my pieced one above. I just hope that when I sew the pieced edges on, the quilt remains square.

And so far so good.  After adding pieced filler pieces and pieced strips in about three side edge locations, I held my breath while trimming the two long vertical edges even and square. Now I just have the top and bottom sashings to piece and add. See where the pins are below.


I started auditioning binding for fabrics, narrowing it down to four choices. In the following two enlarged photos they are green or red (1st photo),  then black or yellow (2nd photo).  


The green swirls are quirky and do not compete or distract. I am leaning toward the red plaid with fine black lines but it may be a bit too precise looking for this quilt and so I have not ruled out the others. 


The black striped dots kind of echo the line drawings and central fireplace block. The yellow seems a bit of a surprise and picks up on the two yellow bordered blocks near the top, making them appear not so out of place. Guess with quilting I am always thinking one step ahead.  Gotta learn to be more in the moment! Opinions on binding choice are welcome!

After I get those top and bottom borders on, I am going to switch to something easy.  I will attach the binding to those two quilts I recently got back from my longarm quilter. Relaxing while doing the hand stitching on those will give me plenty of time to ponder my choice for binding fabric for the Grinch. My ongoing statistics are changing very slowly but here they are...

Completed projects:
  1. Hemmed dress (see 2013/05)
Ongoing projects:  
  1. Grinch quilt (see 2013/04) - just need to add top and bottom borders
  2. Color Play of the Day (see 2013/01) - awaiting binding
  3. Sunny Spring Frost (see small insert 2013/02) - awaiting binding
  4. Jack O'Lantern Trio (see 2013/02) - awaiting FMQ
  5. Chicken quilt - awaiting FMQ
  6. Overlapping square wall hanging - awaiting FMQ
  7. Mask quilt (see 2011/10) - hidden away awaiting inspiration for arranging hexagons
  8. Paper pieced block of the month (see quietplay's BOM)- downloaded/ready to print
New projects:  
  1. Hemmed dress
Stats since last WIP:
     Completed  projects - 1
     New projects - 1
     Currently in progress - 8

I am off to check other folk's progress this week at:


Monday, May 20, 2013

How Not to Hem a Dress

The following is obvious when viewed with 20-20 hindsight:
  1. Buy a dress made of a slippery fabric.
  2. Buy a dress with an overlay so you double the hems you need to alter.
  3. Procrastinate till the last moment to hem it.
  4. Use a specialty foot you have not used in years.
  5. Decide at the eleventh hour to add a scarf.
Friday morning, before I went to work, I began to hem a long dress to wear to a dance my husband and I were to attend Friday night. (Nothing like procrastination... ) It had a slippery under-layer and a sheer overlay so it was a double hem but I was doing it by machine and not by hand.

Boy, am I ever out of practice!  I have been sewing on cotton fabric for quilts for so long I have lost my knack for how to work with the slippery and sheer stuff.  Plus I was going to use my specialty foot that scrolls the fabric as you feed it through a spiral tube at the toe of the foot.


I cut off the length of fabric with my rotary cutter on my Olfa mat with relatively little difficulty- once I weighted down the dress with my heavy magnetic pin holder to keep it from sliding off the cutting table. I changed my needle to the size appropriate for sheers and light weight fabrics. I wound fresh bobbins of the royal blue thread color I planned to use. I found (alleluia) and installed my specialty pressure foot. I coiled the edge of the fabric into the inlet of the toe of the foot. The fabric would not cooperate. I could not it get to spiral into the toe of the foot for the life of me no matter how I prodded and coaxed that fabric edge into that funnel opening. I wound up running a stitch all around the edge with my trusty old quarter inch foot and then just turning the edge over twice by hand a couple inches at a time as I fed it under the normal pressure foot.  It was slow going but at least it was going and went well. The dress hem was not an item of beauty but luckily it was down there by my feet and not subject to close scrutiny.

Since I had to cut off about six inches of length I had this strip of pretty Monet-like sheer left over that I had discarded.  I looked at it in the trash and fished it out again to make a scarf. Besides, I was going to conquer that rolled hem foot and this was opportunity for practice. Then, and only then, did I remember the trick of running just a short length of stitching on the edge you want to hem, leaving the long trails of thread at the beginning.  You then feed those long strands through the spiral tube and tug gently from the back until the hem begins to feed and scroll on its own.  The scarf edge came out great - a nice fine rolled edge. Here is the dress hem on the left and the scarf edge on the right, both viewed from the wrong side.


The theme of the dance was spring flowers. I have no full length picture of me in the dress (drats) but here is a face view of Frank and me and a picture of the dress hanging on a hanger. Though the stitching may have been a bit untidy, at least the fabric was cut off at an even length. I changed my mind and never did wear the scarf.  But now I remember how to use that pressure foot! And all's well that ends well.  We had a good time at the dance. Several folks marveled at how my necklace matched my dress. This was purely coincidence, they were bought several years apart. Nobody noticed my hem.  Even I forgot about it. 


Wednesday, May 8, 2013

WIP: Color Inspiration from Disneyland

Last Thursday I flew to Southern California with my husband, Frank and son, Alex to brave three days at Disneyland.  Our other son Dan joined us for a bit on Saturday and Sunday. We just returned Monday and, although I had Tuesday at home, I was so exhausted I spent no time at my sewing machine since my last post.  Correction. I did repair an underarm tear on one of Alex's jackets, despite that old saying, "asking a quilter to mend is like asking a chef to do dishes."

Even though not quilting you can still get color inspiration from wherever you are, especially anything with the design hand of Disney in it. We were waiting to ride the Casey Jr. train in Fantasyland and these dainty little unique flowers were blooming right along side the pathway as we waited on line to board. I love the purple tones and delicacy.


Contrast this with the purple on the Screamin' Roller Coaster car Frank, Alex, and Dan rode in. Alex (front left) loved the ride! Somehow the look on Frank's face (second row) does not indicate that he is feeling the same pastoral ambience as portrayed by the dainty purple flowers nor the same jubilation as on Alex's grinning face.


Alex was a bit surprised by the section where the coaster goes upside down within the head portion of Micky Mouse, but was soon cool with it all. You can see the route of the coaster in the photo below.


The newest ride in Cars Land of California Adventure is the Radiator Springs Racers. What a fun ride! First you tool along a scenic route, then careen through a dark tunnel, then get outfitted with new tires or new paint job in preparation to race. The shiny bright finishes on these cars were very impressive and I loved the vividness of the red, aqua, and blue cars we rode. There were cars in yellow and deep green and an even wider variety of colors. Even down to the detail of the eye color they were a barrel of fun. We rode three times and won the race twice... two out of three ain't bad! Alex is the happiest of the bunch all times. Neither Alex nor I was driving the time we came in second... like we had any control...


We stayed at the Paradise Pier Hotel in a room with a view of the California Adventure Park. Here is the view from our room on the 10th floor. It was fascinating watching the workings in the park and seeing the festive, glowing, white lights that remained on all through the night.


We got to watch the World of Color Show with its high shooting jets stream of water in various patterns and a myriad of ever-changing colors while listening to the accompanying sound track from the TV in our room.


I liked the bed runners that were draped across the foot of the beds. They added a nice spark of color. Notice the hidden Mickey icons of the white on green graphic. I am inspired to do something similar as some mini-quilts to drape across the end of our beds. They would require less work and less fabric than a standard quilt and less bulk to store so I could make several and change them out regularly for variety. The pillows on the beds were brightly colored beach balls.


A note was left on the bed regarding these beach balls stating that they should not be allowed to bounce into your luggage upon departure.


I was packing to leave and I guess my son Alex did not get the memo. Here is how he "helped" me pack. He did not want me to forget his back pack nor those beach balls!


So although I did not quilt much this week, I sure gathered inspiration. Here are my statistics of a different kind for this week.

Completed projects:

DISNEYLAND
  1. It's a Small World – 3x
  2. Indiana Jones Adventure – 3x
  3. Matterhorn Bobsleds – 1x ( Alex and me)
  4. Fireworks Show – 1x in person ~0.25 times form hotel rooftop
  5. Splash Mountain – 2x
  6. Haunted Mansion – 1x
  7. Pirates of the Carribbean – 2x
  8. Jungle Cruise – 1x
  9. Tiki Room – 1x
  10. Disneyland Parade – 2x
  11. Mr Toad's Wild Ride – 1x
  12. Winnie the Pooh – 2x
  13. Mark Twain Paddle Wheeler – 1x
  14. Casey Jr. Circus Train – 1x
  15. Storybook Boat – 1x
  16. Autopia – 1x (just Alex and me)
  17. Finding Nemo Submarine Voyage – 1x
  18. Disney Railroad – 1x
CALIFORNIA ADVENTURE
  1. Soarin' Over California – 1x
  2. Radiator Springs Racers – 3x
  3. Aladdin Show – 1x
  4. California Adventure parade – 1x
  5. World of Color Show – 1x in person 2.5 x from room window
  6. Mickey's Fun Wheel – 1x
  7. Ariel's Undersea Adventure – 3x
  8. Monster's Inc. – 1x
  9. Toy Story Mania – 1x
  10. California Screamin' Roller Coaster  – 1x ( Frank, Alex, Dan - no way for me!)
  11. Red Car Trolley Line – 1x
  12. Luigi's Flying Tires – 1x
  13. Mater's Junkyard Jamboree – 1x
  14. Goofy's Sky School – 1x (Frank and Alex)
Ongoing projects (unchanged since last WIP):  
  1. Grinch quilt (see 2013/04)- sashings have been added
  2. Color Play of the Day (see 2013/01) - awaiting binding
  3. Sunny Spring Frost (see small insert 2013/02) - awaiting binding
  4. Jack O'Lantern Trio (see 2013/02) - awaiting FMQ
  5. Chicken quilt - awaiting FMQ
  6. Overlapping square wall hanging - awaiting FMQ
  7. Mask quilt (see 2011/10) - hidden away awaiting inspiration for arranging hexagons
  8. Paper pieced block of the month (see quietplay's BOM)- downloaded/ready to print
New projects:  
  1. None
Stats since last WIP:
     Completed  projects - 44 (26 at Disneyland and 18 at California Adventure)
     New projects - 0
     Currently in progress - 8

Now I am off to relax and rest while looking at what everyone else is doing at: