Tuesday, February 28, 2017

Diversion from the Doldrums

The Doldrums are not only an ocean region around the equator loathed by sailors because of its low winds or a place in the quirky kid's book The Phantom Toll Booth. The doldrums are also making their presence known in my sewing room. Sitting at my Pfaff I am definitely tiring of inserting triads between stars and pinwheel blocks and having to work so hard to match twelve pieces all in one point. The yellow highlight area  in the next photo illustrates two triads and the exasperating intersection of twelve points where their tips meet with a hexagon star above and a pinwheel hexagon below. This is definitely not a mindless chain piecing operation.


Although assembling Whirligiggles is going well, the process of aligning all those seams before stitching is a bit nerve wracking. Taking care to adhere stringently to seam pressing direction while safeguarding my fingertips is stressful and time consuming. I made myself rules. The left half-column gets pressed up at both the upper and lower edge of the triad insert. The right half-column gets pressed down at both the upper and lower edge of the triad insert. But only at the insert points - not at the pinwheel centers or star centers that fall where the half columns meet. See what I mean?

I was beginning to long for a simple Y-seam with its clever central swirl of seams on the back and the absence of that big central lump of accumulated seam allowances. Down the hall from my sewing room, the buzzer on the dryer sounded. I thought to myself, "Great – I get to go fold some laundry!" Clearly it was time to take a break. Whirligiggles was sinking down in its fun level and not living up to its name.

I glanced half-heartedly over at my table of leftover pieces for a distraction. I had squatty triangles in bright colors but not enough groups of three to make more triads – not that I needed any more of them.


I also had some pre-made grey/white  triads and some squatty neutral triangles leftover. Hmmm. What could they be used for? I distract very easily.


I made two more triads from the squatty triangles and joined them into a white star. I was lucky that the white on white heart print fabric also all pointed consistently as I would have planned, had this been planned. Heart points are directed to the center of each triad.


And I made up a grey star from an assortment of leftover triads. Again I got lucky. All the white on white heart tips point outward.


Then I realized I could have made those triads up as pinwheels. All the grey/white hexagons in Whirligiggles were pinwheels not stars. Perhaps I should "un-sew" them and reassemble them "correctly"? Then I shook some sense into myself. These were leftovers. These were just a temporary distraction from struggling with those column joins. Besides, when I had experimented for a partial pinwheel with an assortment of fabrics for the blades, I had not liked it. See my February 8, 2017 post for this quilt. These grey/white hexagons could remain different. Maybe they could become star pillows. Point to point they measure ~13" across; flat to flat they measure ~11.5" across so maybe an outside border of some sort can enlarge them. 

Even if they became nothing but an orphaned block, they served their intended purpose. They were a pleasant temporary diversion between joining columns 4 and 5. When I was refreshed and engaged again the next day, I finished off the final two columns. My next step is deciding what, if anything, to appliqué but I think this quilt top needs to marinate on my design wall for a while, first. For now I will join up with Let's Bee Social #166.

Wednesday, February 22, 2017

Changing and Rearranging

There is a tune running through my head. It contains a line from the classic 1966 song Georgy Girl by the Seekers:
Don't be so scared of changing and rearranging yourself
It's time for jumping down from the shelf, a little bit

That is what I have been trying to do with this quilt. When I last left off in my previous post I was attempting to arrange the triads on my design wall into a cohesive and eye-pleasing setting. There were a multitude of options and I finally printed out all my hexagon alternatives, taped them together into one big sheet, and then posted that up to remind me how different orientations would look as hexagons. Each trio of options was annotated as to which had no red, no blue, no green, etc. and those which would contribute light on the outer edges and then sorted accordingly. I know this seems anal, but it really helped. My arms were aching from "changing and rearranging" the different possibilities on my design wall.


When I was satisfied with the straw man composition I had for my color blocks I asked my husband to come in and look at them and see if any one block jumped out at him. He immediately said "Too much grey". That was not the point here but, to his credit, in my previous post I had been waffling between consolidating white and grey blocks or scattering them. His unsolicited comment on the neutrals however did convince me that putting greys at the bottom and white at the top was not the way to go. I redistributed the greys and whites back to their balanced, scattered positions and left the colored blocks undisturbed from their trial positions. Apparently none of them stood out like a sore thumb. A bold grey and white plaid pinwheel near the bottom right may resemble the black sheep in the family, but I left him there intentionally to assert that neutrals can be fun, too! Those greys are from Moda's line Putting on the Ritz and I view him as the easy-going lumberjack amidst stodgy royalty. I let the entire composition marinate on the wall for a few days and then took a photo of my decided arrangement. I kept a printout of my "Rosetta Stone" sheet by my side at the sewing machine and referred to it constantly as I assembled those blocks.


This following photo is of the assembly process - nearest completion on the far left and least assembled on the far right. First I inserted those lone triads among the hexagons (open triangle at the far right in the photo). I initially found it difficult to align the two pieces that made up that angled seam so that the vertical edges would wind up even. I eventually got the hang of where to overhang the seam allowances and how to offset the triad so the column edges did not wobble in and out. In the center are two of those columns assembled and ready to be joined in a long vertical seam. See how straight those two outer vertical edges are? I think when I first started out, I unsewed every other one until I got the knack of it. On the far left are two columns joined so those half hexagons eventually become whole.


Per the American Jane pattern Flying Circles, while still in manageable column size, the neutral hexagons are intended to get small neutral- toned button-size circles appliquéd between the blades of the pinwheels and a colored dot in the center. My points met nicely in the center so I am hesitant to cover that up. Some of the colored star hexagons get appliquéd rings on them, like a bull's eye target. I think my prints are so busy that doing this could add too much distraction. These are issues I need to decide while I am assembling the columns and before I join them. Appliquéing is not my strength but I wanted to stretch myself with this quilt and certainly some stitched on embellishments would add a bit of flair and whimsy. I think those rings and round dots may have been part of the reason for naming the pattern Flying Circles.

Although I like to name my quilts fairly early on so I can refer to them, I need to see them nearly completed to decide what name fits. This conundrum creates a naming dilemma that I am now ready to resolve. I have been working pretty exclusively in January and February on this colorful, cacophonous quilt. The quilt's name has emerged and it is Whirligiggles. Per the Wikipedia entry on a whirligig it is defined as "an object that spins or whirls, or has at least one part that spins or whirls". The grey and white neutral pinwheels make me think of a whirligig so the term is appropriate. But why the giggles? The brightly colored stripes, checks, swirls, polka dots, and squiggles fabrics that I chose for the star hexagons are frivolous enough they make me giggle. Hence Whirligiggles.


This pattern does not lend itself to high speed chain piecing. I am taking my time and can really only do one column in a day without getting sloppy. It is time now for me to take a break and check out Let's Bee Social #165 before returning to my column of the day.

Wednesday, February 15, 2017

Kaleidoscope of Triads Continues

In my previous post I presented my completion of pinwheel hexagons in grey and my status in assembling star hexagons in vivid colors from tri-colored equilateral triangle units. I call these units triads for short.


I went into production mode on making those triads. I cut out a lot of the squatty triangles in sets of six and grouped the sets into triplets. Then I could chain sew one hexagon's worth of triads at a time without pausing for the distraction of choosing a color combination. I tweaked and twiddled until I felt I had a quasi-balanced assortment of squatty triangles to start with.


It continues to amaze me how these versatile little triads can form such different patterns. I pushed on making these hexagon of six triads each and viewing them in each of three orientations to discover my favorite which I marked with a leading asterisk. In general I was going for a star look in the center rather than a pinwheel look. I reserve the pinwheels for the grey blocks. I also like when a directional fabric (such as the blue diamonds) points radially outward. When it points sideways it tends to lead the eye around and encourage a pinwheel interpretation. Here are the combinations with my notes beneath. Warning - this is photo heavy but how else can I gather and remember my thoughts? Remember, each triplet of hexagons in the following photos is really just one hexagon in three alternative configurations. The following series of strip photos are only eight blocks in total once assembled.

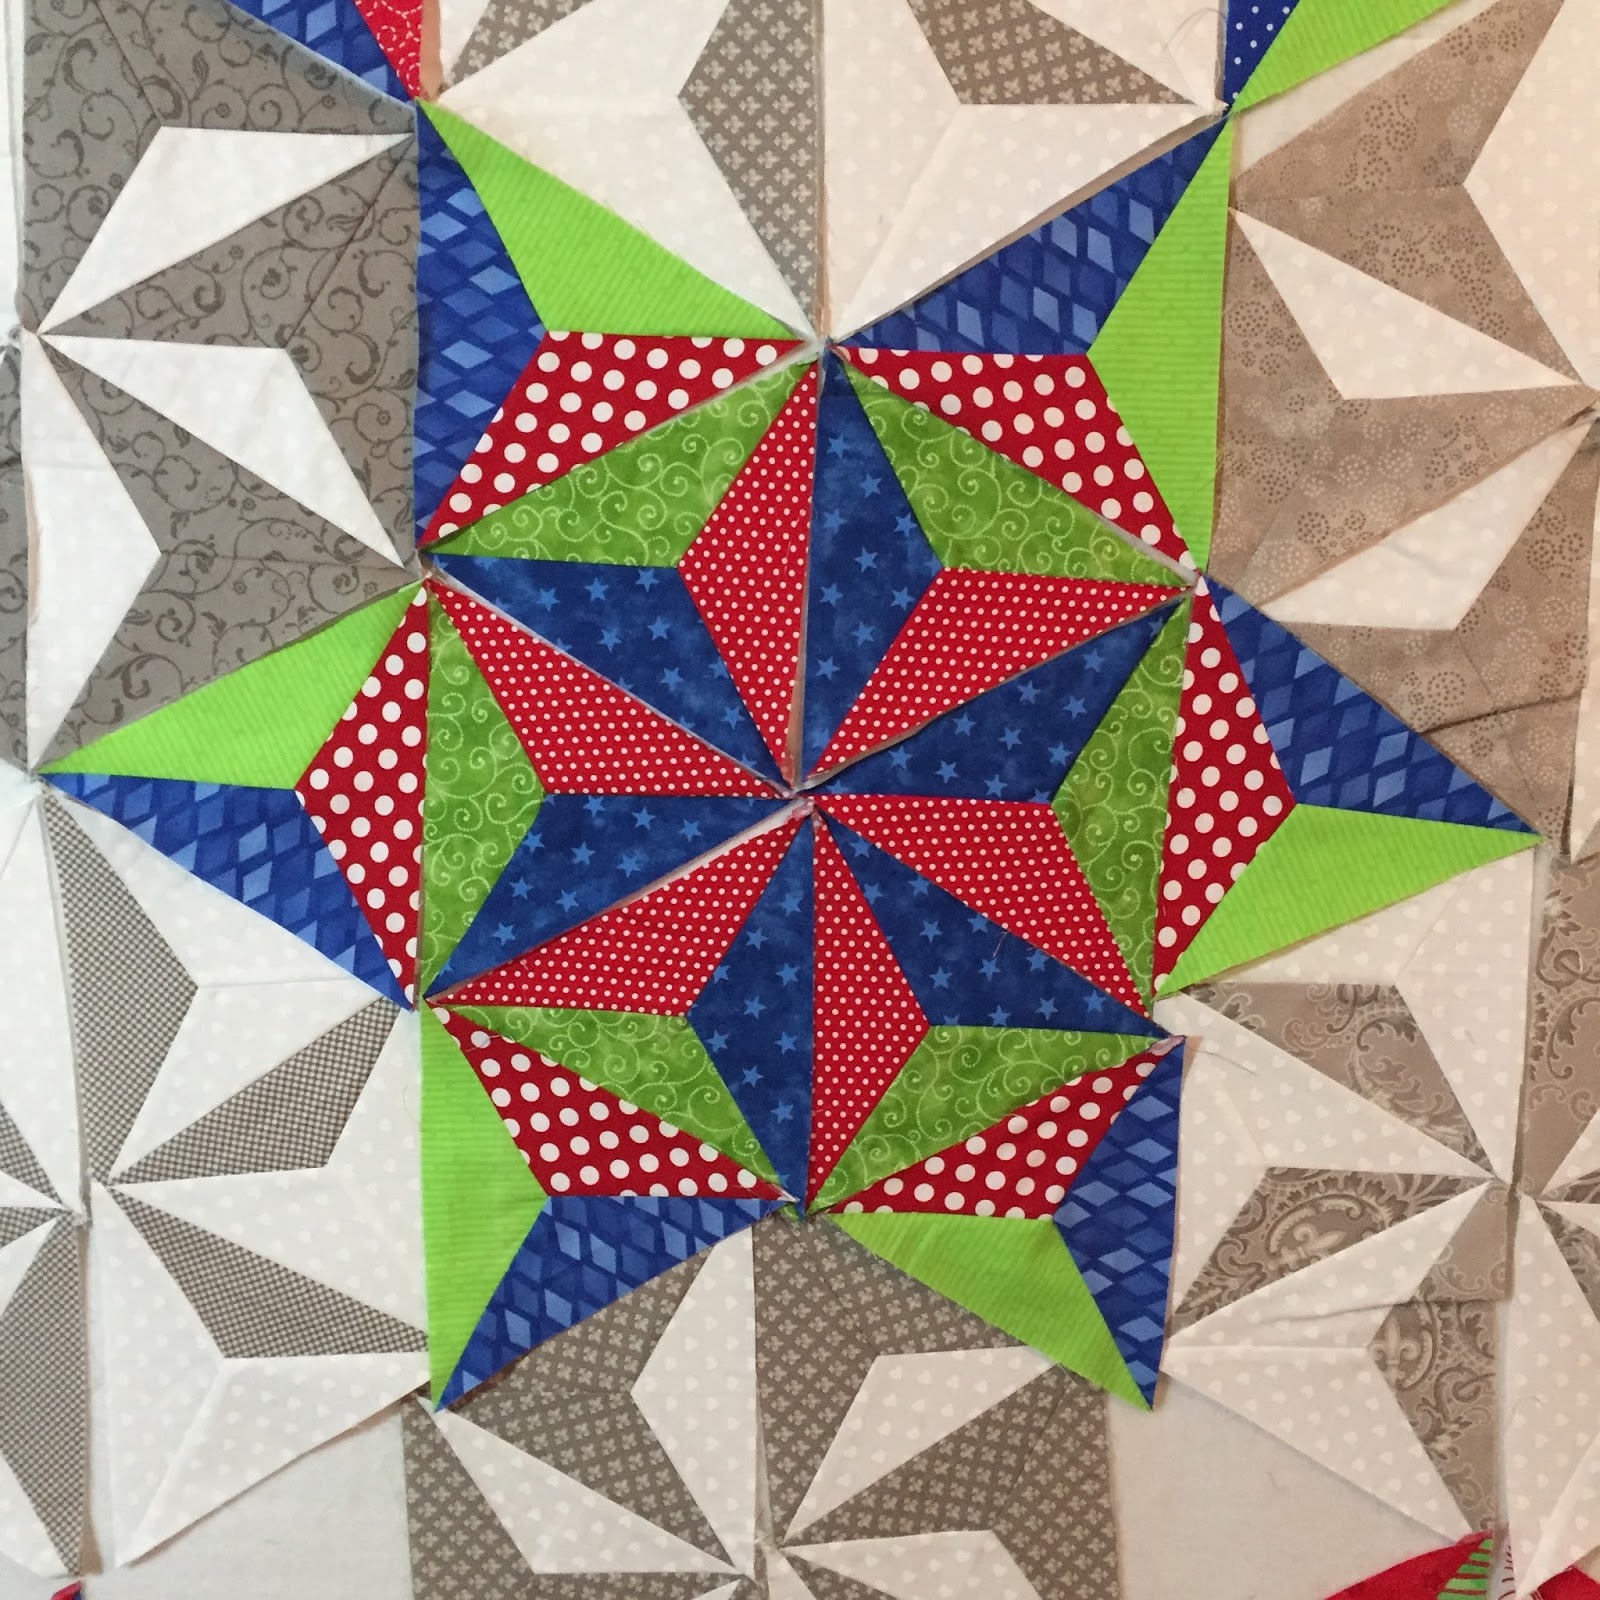
Fabrics are red swirls, blue diamonds, pale green checks.   
     definitive star in center     blue diamonds radiate out     * light is brought to outer edge

Fabrics are lime lines, blue pin dots, pale green checks. 
  too much a pinwheel       still strong blue pinwheel         * different at outer edge

Fabrics are lime lines, blue diamonds, red polka dots
diamonds at edge pointing out         mediocre       * polka dots accentuating perimeter

Fabrics are lime lines, blue diamonds, red squiggles
    *squiggles work well outside            busy center               mediocre center

Fabrics are red/green stripes, pale green checks, red swirls
 none of these thrill me - perhaps break up center option for outer points

Fabrics are blue pin dot, pale blue checks, red polka dots
definitive inner star            * use for outer points             strong polka dot for outer edge

Fabrics are red pezzy, lime lines, blue diamonds
these all seem to garish for inner stars but could make definitive outer points

Fabrics are red swirls, pale blue checks, blue pin dot
 love those checks but need to find where to use them to best advantage

Keeping my "star in the center" guideline in mind, I found that I liked the most different fabric – often the lightest – falling along that hexagonal ring interface between inner star hexagon and outer extended points. It may wind up being flipped outward as the base of outer star points (see defining diagram in previous post). I also found my preference to be that the most different of the three fabrics go on the outer edge or, if it is a directional pattern, that it point radially outward. Here are three examples each from the first three of the above eight photo strips. The six triads are auditioning as contenders for those extended star point having been flipped outward. In the first two the light green checks fall on the hex ring and in the third, the red polka dots fill that role.

Red swirls, blue diamonds, pale green checks flipped to make up outer points. 

Lime lines, blue pin dots, pale green checks flipped to make up outer points. 

Lime lines, blue diamonds, red polka dots flipped to make up outer points. 

Obviously I have a lot more work (play?) ahead of me before I am content. Here is my filled design wall with all of my triads pieced but not satisfactorily placed just yet. I am reminded of my daughter's voice telling me. "Mom, remember balanced and symmetric are not the same thing." I am an engineer. I can do symmetry. But since I have drawn from such a variety of fabrics, logical symmetry flew out the window, and I am left struggling with artistic balance. At least I am proud to brag that every one of these fabrics on that wall came from my stash; I did not buy even one additional fat quarter for this quilt. I did buy the pattern though – which I have deviated from and will probably continue to to do so.


I am striving for balance here with an even distribution of colors. I want those big twelve-triad stars (there are seven of them) to pop out at the viewer. Maybe it would help if those pinwheels were gathered by light and dark and not alternated...?


Hmmm. Helps with the white pinwheels hexagons but not so much with the darker ones. This is, however, a viable alternative arrangement under consideration for the grey hexagons. There are advantages to grouping by value rather than intermixing.
  1. Putting lights up high and darks down low may make the selection of star tips easier since I can pre-decide if they go best adjacent to a light pinwheel or a dark pinwheel.
  2. This arrangement might make focusing on the twelve-triad big stars more natural since one does not have to filter them out from the two tones of white/grey. 
  3. Although not true balance, this arrangement does give the bottom portion of the quilt a weightier feel - just like gravity would behave.
  4. This segregation of light and dark calls attention to the fact that all dark pinwheels spin clockwise and all light pinwheels spin counterclockwise. Keeping that little detail straight had me scratching my head quite a bit as I seamed them.
Does consolidation rather than intermingling of the light and dark pinwheels truly look better or is it just another instance where my logical left brain is beating down the artist trying to be heard from within my right brain? The battle rages on; though actually it is more of an ongoing friendly skirmish.

Ahh... decisions, decisions... I am deciding to clear my brain for a bit by visiting Let's Bee Social #164.

Wednesday, February 8, 2017

Progress Resumed: Grey to Color

BACKGROUND:
I am plugging away on my version of the quilt made from the American Jane Pattern Flying Colors. Mine will be smaller, 60"x 75" than the pattern, 72"x90".  I find this size more usable when relaxing on the couch, long enough to cover the body but manageable enough to fold. Inspiration came from a class I took in January 2016 where I posted about the pattern, the class and my fabric choices. Where the pattern uses a solid cream and solid taupe the neutrals of for its groupings of pinwheels, I chose instead a white on white print paired with a variety of grey tone subtle prints. The colors I picked, bright red, royal blue and an apple green, were selected to coordinated with decor fabrics in my living room.


I worked a bit on the quilt in February 2016 and then it sat fallow almost an entire year until January 2017. That is sometimes the way it goes with projects. Links to past background posts are

http://dianeloves2quilt.blogspot.com/2016/01/flying-high-in-my-sandy-klop-class.html
http://dianeloves2quilt.blogspot.com/2016/02/potpourri-of-quiltiness.html
http://dianeloves2quilt.blogspot.com/2016/02/whirligig-tip-bits.html
http://dianeloves2quilt.blogspot.com/2017/01/y-seams-y-certainly.html

TONAL GREYS:
With renewed energy, I finished my pinwheel hexagons in grey - 8 full light ones, 8 full dark ones, 2 light and 2 dark partial ones for the top and bottom edges. Without the distraction of color decisions, working the greys enabled me to master my Y-seam technique. Cropping and manipulating the pattern photo, here is the chart of rows I made to keep me straight on where and how many of those grey options I needed.


At first I tried to make the partial dark ⅔ pinwheel on the bottom edge out of an assortment of grey prints left over but I just did not like the scrappy look. I would need to add another grey fabric to have enough of those squatty triangles for ⅔ of a pinwheel hexagon.


I dug into my stash and found I had a grey dotted swirls print in two grey colorways - one a beige grey show in the next photo and one in a darker charcoal grey.


Ah, much better. I prefer the uniformity of keeping the edge hexagon in all the same print. When I lined the partial hexagons up along the edge though, I was reluctant to put two similar prints so close to each other, even if the colorway was different. Plus I liked these swirls and so wanted them to be in a full hexagon.


I decided to try taking my least favorite print, a brownish-grey, teeny-tiny, gingham-like check, and making that a ⅔ pinwheel along the edge instead. It is also darker and makes a crisper appearance on the perimeter. I turned two equilateral triangles under along the seams in order to preview. I will need to pick out those two seams once I am convinced this is the way I want to go.


All in all, the neutral portion of this quilt took 112 grey equilateral triangles and the piecing for neutral is 100% completed now. The colored portion will take slightly fewer – 98 tri-colored equilateral triangles. So I forged ahead.

BOLD COLORS:
Now on to the distraction of color. I have progressed to starting the color equilateral triangles that make up hexagon "stars". I kept them as six individual equilateral triangles and not seamed in groups of three as half hexagons. I will leave that until later once I decide my favorite configuration and which should be inner hexagon stars and which should be outer "filler" points. For now I am looking at these combinations as if there were all "inner stars".


In this red/blue/squiggle combination I think I like best the one on the left, with the blue on the perimeter.


In this color blue/green/stripe combination, I liked the stripe on the perimeter radiating outward. The center looks most like a star to me this way, having the contrast greatest in the center.  The middle one looks more like a pinwheel than a star to me but if I blur my view I can switch back and forth between star and pinwheel. The one on the far right lacks central contrast and the center seems somewhat dull.


Since I liked the squiggles and the stripe prints, I tried combining them with each other, adding a less graphic red. Here are the resulting three configurations for a hexagon made from those six equilateral triangles. Actually these three results each make me a bit dizzy. They may be good candidates for spacing out and using at the outer extended star points.


I do not have a preference among these three variations. Each fabric has equal weight color intensity wise, so nothing in particular jumps out at me.


This is my design wall at this stage with the neutral grey pinwheels and the colored stars interspersed. There are lots of blank spaces where filler triangles still need to be added and enlarge those colored stars. Now I am entering the phase of quilt construction when I really doubt my choices.


I am beginning to mutter to myself "Whatever was I thinking? Those greys were looking pretty snazzy until I mucked 'em up with a muddle of too many bright colors and too aggressively graphic prints." Then I would switch self-talk strategy and say,  "Keep going, Diane. You can still snatch victory from the jaws of defeat!"

I have completed 48 colored equilateral triangles and have 50 colored equilateral triangles to go. Now is my chance to adjust the number of graphic prints I toss in (or toss out) and balance the red/green/blue distribution. Each of those seven complete "inner stars" can easily flip to become "outer points" that fill those empty triangular spaces on the design wall. If not, I see a few pillows and doll blankets and placemats in my future for repurposing unused triangles.

Now it is time to take a break and see what others are up to at Let's Bee Social #163.

Sunday, February 5, 2017

Purchases at American Jane Open House

Last Friday February 3rd. I went with a quilting friend to an open house by Sandy Klop of American Jane Fabrics which she hosts quarterly at her home. It is fun to see her new fabric lines and see in person the sample quilts she has made from her fabrics designed for and manufactured by Moda. I was very restrained this trip in keeping with my 2017 quilting goals. I bought ½ yard each of these six blenders, an acceptable purchase, I rationalize, because it will go with and help me reduce my stash of oddball novelties.


I also bought a package of twelve 2½ inch strips in an orange colorway. For some reason orange has been calling to me of late and I have tentatively planned to use these strips in making another Mandala wall hanging this year (another 2017 goal) as I did in June 2015.


Lastly I loved a quilt Sandy Klop had made called the Americas. The yellow in particular had such a maize corn Aztec flavor.  This stye would never fit in with my home decor but the tiny piecing and detail drew me in and I purchased the pattern to experiment with it in a different colorway. Also buying this pattern also inspired me to renew my efforts on my quilt from her Flying Circles pattern. My most recent post on this ongoing endeavor was January 11th.


I think I showed restraint this visit. I got to socialize and immerse myself among tables and baskets laden with fabrics. AND... in keeping with another 2017 quilting goal, I did not buy one single kit! I am very proud of me!