Wednesday, November 26, 2014

WIP: Many Projects, No Quilts

In preparation for the holidays I did a lot of things but none were quilts. Aside from the cleaning and food shopping in preparation for a Thanksgiving visit from my son, daughter-in-law, and granddaughter, I also purchased and assembled our first non-real Christmas tree ever. It was an inexpensive selection from Walmart. The artificial tree cost is about the same or maybe less than the real cut one we would have bought and then discarded.


This tree is an experiment and I do not consider buying it as taking an irreversible path down the artificial tree fork in the Christmas Tree Lane. I will not feel too bad if I abandon it or give it away after the holidays and go back to a real one next year. (My husband may not agree.) Here are two out of the three sections assembled. This is a work in progress post, right? The fully decorated tree will appear in a December post I suspect. So far the assembly is not bad at all.  The box it came in was a reasonable size and I was able to save and store it in the attic.


In terms of sewing I did a couple simple projects. I made a Jungle Alphabet book for my 7½ month old granddaughter. I'd made one for her older cousin, Autumn, a few weeks ago. See my post for October 8th for photos of inner pages. Vivian's book is a bit different in that I added crinkly paper in the pages and in the little animals so they make sound. The critters are backed in a polka dot print that coordinates with the stripes on the inside centerfold scenery panel.


Here are the fronts of the other three of the six animals shown at the center scenery pocket panel. I did not use an iron-on interfacing or a Wonder-Under-like product in the animals as I did the last time. I was not sure if it would deaden the sound of the crinkly paper or if the heat to adhere it would change or melt the crinkly stuff, even though the crinkly paper is washer and dryer safe. The animals are printed very close to each other on the book panel. There is insufficient margin between them for a seam allowance. I pinked the edges outside an stitching line but wanted to assure the layers did not peel apart.


I did a fair amount of squiggly quilting around the outer edge of the animals just within the pinked perimeter. I left the animals somewhat puffy - and crinkly. Though not the tidiest, like the Christmas tree, it was an experiment. The monkey and the toucan are my favorites.


Today, I also began sewing on the two gusseted seat cushions for the window seat in our master bedroom that we are updating. I thought the rope images on the fabric I bought from IKEA were a real kick. I got the zippers inserted in the back gusset for one of the cushions and then realized this was too ambitious a project to take on with company due by the end of the day. It, too, will be continued later.


I am linking up to this week's Works in Progress at Freshly Pieced. I have to finish baking now so I will check others' posts later in the holiday weekend. Happy Thanksgiving!

Thursday, November 20, 2014

Mitten Graphic Novel Completed

In the previous post, I'd finished piecing the top for a comic book style quilt by converting a cloth book panel. That panel had been based on the artistic drawings of Jan Brett in her book The Mitten. I'd prepared my quilt sandwich of top, batting, and backing and had left off to decide a quilting pattern.


First off, I did a stitch in the ditch around each page and decided to leave the page itself quilt-line free. Then I chose a loop quilting pattern for the sashings to coordinate with the yarn tangles of fabric. So far I had only done straight line FMQ, meanders, or tracing whatever pattern was on the fabric. I overlayed a sheet protector on one block and practiced the loops with a dry erase marker. The sheet protector is shown by itself and overlaid on a block in the following photo. The numbers 7 and 11 were to remind me how many patterns I wanted to fit in per section of sashing but that number approach fell by the wayside once I started FMQing.

 
I'd taken a FMQ class from Megan Best, a HandiQuilter educator, and she'd suggested visualizing something in your mind to keep your sizes relatively uniform – a nickel, a golfball, etc. For the short sashing loop sizes and shapes I kept thinking watermelon seeds. For the wider sashing I kept picturing in my mind pumpkin seeds. The loops came out fairly uniform, although with the green thread on green background I had a lot of leeway before awful would be obvious. Until I get better at FMQ, I am sticking to matching thread.


I had a fabric in my stash for the back that was a close color palette and supported the critter and forest theme of the book. The backing fabric has chipmunks, chickadees, winter foliage, and cardinals (not shown).


Here are a few closeup views of the backing showing the critters and the stitching a bit better.


Normally I bind my quilts in a color darker or brighter than the outermost border. Here I did not want the binding to be distracting as something like a bright red would be and, although I had enough of the tangle fabric to make matching binding, that option just seemed to fall flat. The beige mini-print seemed to echo the page borders nicely so I went with it.


Here is a closeup of the binding and how it goes with the backing fabric, also.


Now this graphic novel is folded over and all set to be read, one row or "strip" at a time. The final size is 29" wide by 42" high. I hope my granddaughter likes it. If not, with its snow theme, it can double as a Christmas or winter wallhanging.


After all, I may be in California, but they do get snow in Oklahoma. Certainly a white mitten would get lost in this.
At first his grandmother, Baba, did not want to knit white mittens. "if you drop one in the snow," she warned, "you'll never find it." 

Wednesday, November 19, 2014

Cloth Book - Graphic Novel Style

No one ever overbuys fabric, right?  I think I may have overbought cloth books for my two granddaughters. For a while there I was buying two of almost every cloth book panel I saw. So far in 2014 I have made twelve cloth books. I have these four more to go and four others not shown in the photo.


If I sew fast and diligently, I can whittle down my supply by gifting them for Thanksgiving and Christmas. These books are still age appropriate for the six-month old, especially since I have started spicing them up by inserting crinkly paper inside so they make noise. But, since the two-year old granddaughter had an eighteen month head start on her cousin, my supply for her is too high for her level of interest. She has the attention span for much longer and more involved books now. I thought I could stretch her interest by making a variation on a cloth book by sewing it into one flat panel, each page like a quilt block, so it is a book blanket of sorts. This might be a "novel" configuration for the two-year old. She can hold it across her lap or lay it out on the floor and follow along from one page to the next like a comic strip. It will be her first graphic novel! Her dad enjoys graphic novels and she adores her daddy! I set out to do make her a graphic novel based on a panel for the book The Mitten by Jan Brett.


I picked this cloth book to make into a graphic novel because it showcased the beautiful illustrations by Jan Brett. The fabric panel also has a lot of text, showing it is meant to be read. As I worked on it, I wanted to document a few mildly tricky points in case when I do this again.
  1. Page sequence
  2. Larger cover panels and page borders
  3. Not square
  4. Sashing widths for overall size and reading sequence

Page sequence: Cloth books have twelve pages so a three-block-wide by four-block-tall quilt with sashings separating the blocks is a natural arrangement. These twelve pages are printed as pairs on six double-page-width panels. Pages are grouped and sequenced on these double panels such that they are in the correct order when the panels are placed back to back and the book is assembled as intended.


For quilt block format the panels need to be split in half and the pages re-sequenced. I rough cut the double pages apart, leaving sufficient margin around each page to be able to square it up in a later step. At this step I was careful to leave a page number on. Then I cut each into two single pages along a centerline between the pair. This vertical cut decided that the blue borders on the panel had to go since they could not be on all four sides of the block. But abandoning the blue gave me greater freedom in my choices for sashing fabric.

Larger cover panels: Most cloth books have a larger cover, so two of the six double panels are larger. I needed to decide whether to have a consistent block size by trimming down the larger panels or make custom narrower sashings to accommodate them full size. I chose to trim down the larger pages even though it meant the decorative gray lashing frame on the cover page was closer to the edge. Although pages 1 and 10 in the previous photo are larger, the gray lashing frame is consistent in size with the other pages and the larger size is accommodated in the outer edges.


In the long run I thought it was the less noticeable of the two options and the simpler to implement. The insides of the front and back covers, pages 1 and 10, had border sizes consistent with inner pages. The back cover page conveniently had no borders. 


Not square: Most panels are not printed on the grain or at right angles so I needed to be creative here. I measured the pages and decided a consistent width and consistent height and fussy cut all pages the same dimensions squared up. In some cases this involved including more contrasting edge or a cutting line and hiding it in a seam allowance. The following photo shows some of the blue crept into the seam allowance so it was a good thing I did not trim if off first.


The squaring up step cut off the page numbers, so I made sure I knew the order in which pages were meant to be read. For some cloth books the page numbers are more inboard and would not get trimmed off.

Sashing widths: I wanted this quilt to remain relatively small so a toddler could manage it within her arm span but I also wanted the pages to be distinct from each other. I chose a vertical sashing width about one third the block width. I made my horizontal sashings taller because I wanted to space the pages to indicate one row at a time reading sequence, a left to right. Here is my Power Point worksheet to figure out my cutting sizes. My hand notations show how I added seam allowances and adjusted on the fly while cutting.


Fabric choices: For my sashing fabric I chose a print that reminded me of tangles of yarn. I thought this fit in with the fact that the Grandma knitted the mittens. I did make the outer borders a bit wider that the sashings. I had to resist the urge to add an additional, wide, outer border of another fabric, pieces F and G in the previous diagram,  reminding myself I wanted the finished quilt to be within a toddler's arm span. I had an outer border fabric that I thought would be perfect with chipmunks and cardinals and pretty much in keeping with the critters in the mitten story. I contented myself with using it on the back.


From this point on, the graphic novel sandwiching, quilting, and binding is pretty much like any other quilt. Now I need to decide the quilting pattern and binding color. Stay tuned to see the backing I picked. I plan to post about this finished graphic novel later this week.

For now, I am hooking up to today's Freshly Pieced post for WIP Wednesday.

Thursday, November 13, 2014

A Fowl Finish - Finally!

My interest in this project has severely waned ... as has that of my readers, too, I am sure, since my lengthy post on it yesterday. But, rather than move on to another project, I disciplined myself to just finish the tail feathers on those eight hens and be done with them. But those squawking birds did not go quietly. Twenty-four tail feathers, one half-inch long each, and I had to wind a fresh bobbin of the mustard gold. Then I forgot to change out the top thread color from the mustard gold to the bright yellow of the legs.


I did not notice my thread color oversight until the fifth bird. I finished the tail feathers of the other three hens in the mustard gold and was going to leave it at that. But it did not look right. The tail feathers faded into the background. The bright yellow legs seem to scream out that the tail feathers were wrong. I did not pick out the mustard gold stitching but zig-zagged over all the tail feathers ... again... in the bright yellow.


Here is the Chicken Quilt really finished. I wanted it to be a learning experience and it sure was one. Enough said.

Wednesday, November 12, 2014

WIP: Chickened Out

This is what my living looked like in spring of 2004, ten years ago. I started a chicken wall hanging to go with the farmhouse decor I had back then.


The love seat and a wing chair had been upholstered with a tapestry fabric woven with a farm scene.


I'd made the tab top curtains from a red barn country print. 


The pattern for the wall hanging is called We're Chicken and is copyrighted 1994. I thought if I made it up in green tones it would really go with the living room.


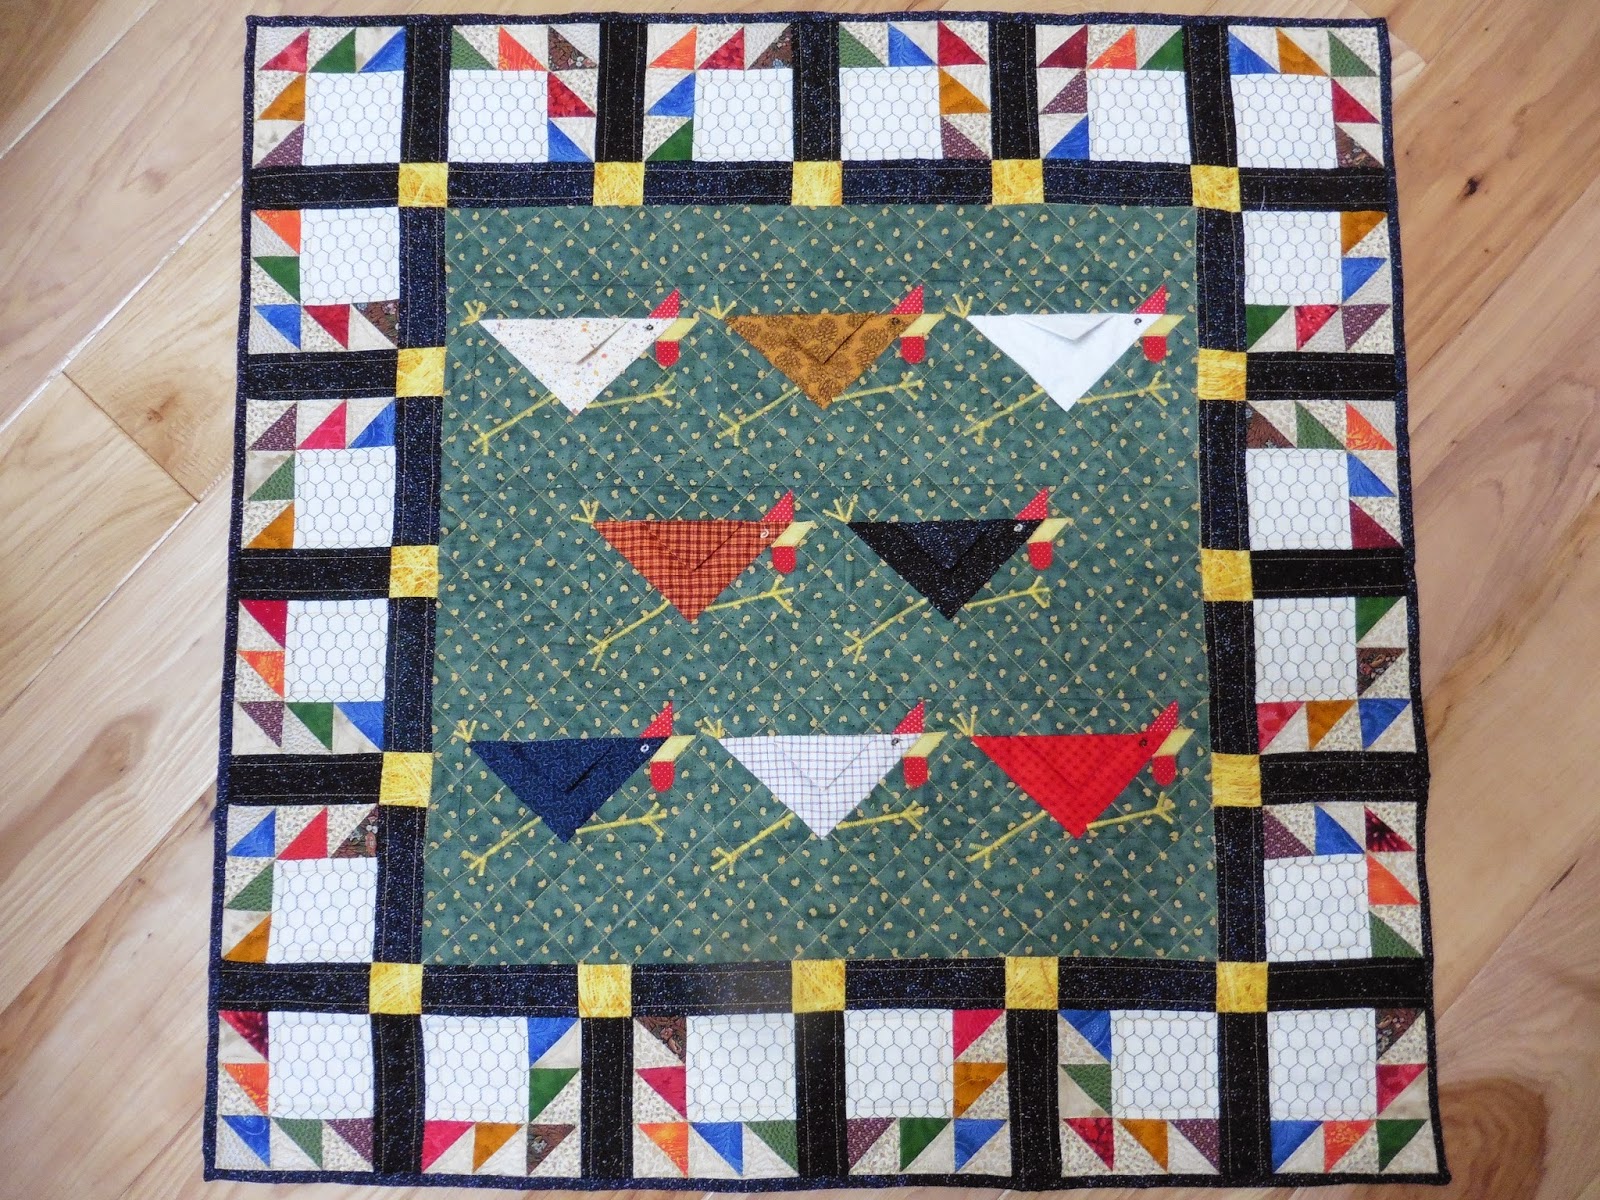
The outer border was built from variation of the Hen and Chickens block pattern – how appropriate.


I just finished the quilt this week  –  in 2014. Twenty years in the making is a pretty bad track record for a 35" x 35" wall hanging, especially for a room whose decor has long since changed. But I was dedicated to my UFO completion mission.

I thought a good use for this orphaned pieced top would be to practice my evolving quilting skills. I am in the process of taking a Craftsy class on using a walking foot to quilt on a domestic sewing machine and so last week I started the grid work in the center by that method. I was brave because I branched out and, instead of using a green thread that I knew would blend in and not show my quilting lines, I chose a contrasting mustardy yellow thread for the inner grid work, like the itty-bitty chicks in the mini-print background. The same thread color choice is in the bobbin and will show on the backing, too, since the backing is a deep red with again the same yellow itti-bitty chicks. The lines are not perfectly straight but I am relatively content with the outcome. In the Hen and Chicks block border I decided to do the outer black bands linearly, too, using my Integrated Dual Feed on my Pfaff and liked the way they came out looking like leather strapping on a cage.


Last to quilt were the Hen and Chicks variation blocks with largish chicken wire squares surrounded by five half-square triangles. I chose to do these by dropping the feed dogs and doing FMQ. I wanted an open feel to the chicken wire blocks and so just edged them ¼" in from the outer seam. The lines are not perfectly straight but tolerable. I wanted the feel of feathers in the HSTs and thought arcs would have that effect. This is where I need a lot of practice. My arcs in the triangles of the HSTs are very wobbly. Beside my low skill level, I did something very dumb – I trimmed the outer edges before I quilted it. In retrospect I think I trimmed it because I was going to bind it before quilting the outer border. I then changed my mind thinking I might overshoot the FMQ into the binding. Anyway, it was a dumb move. I remind myself, this was a learning experience to grow my quilting skills.

Because I trimmed, I had very little to hang on to for FMQing. Going toward the edge on the right I could grip and pull the quilt sandwich to the left, but going in from the edge toward the left, I just had to hold on in front of and in back of the needle and try to guide sideways by pushing. I did get better by the 20th block. My 20th block is on the left and my 1st block is on the right with the green safety pin. At least I had the foresight to quilt the arcs only in the beige triangles of the HSTs where the mustardy gold thread is less visible than if it had been in the boldly colored triangles of the HSTs. The stitches are not so tiny but that I could pick out the really awful ones, but I am choosing not to hone my picking out skills at this time.


And I am actually quite pleased that I figured out a continuous motion quilting pattern that only backtracked on itself a short distance in one place, near the heart symbol in the following photo.  I started at the star symbol. Straight lines 13 & 18 are the only ones that backtrack on themselves and they are short.
    1-6: I arced along the outside of the HSTs
  7-19: I sawtooth arced along the first inside of the HSTs
10-12: I surrounded the corner inner HST with arcs
13-18: I edged the chicken wire square by entering and exiting at the heart
19-21: I sawtooth arced along the other inside of the HSTs.

The gold thread shows up on the red backing and the difference between FMQ'd straight lines and the even motion feed-dog driven lines is noticeable but not horrendous. I made my label by using my alphabet decorative stitch on a length of grosgrain ribbon. I centered it diagonally in one corner, trimmed the edges at a 45° angle, and whipstitched it in place. I attached and then hand-sewed the binding after the label so the raw ends of the grosgrain ribbon are beneath the binding.


I thought "Aaah, complete at last". Then I remembered. I still had those eight chickens to embellish with eyes, beaks, wattles, both legs, and tails. Forty-eight body parts were left to go. Here are some of those eight beaks and eight wattles. They were pretty teeny-tiny and it only took me till the fifth chicken to get good at peeling off those wonder-under bits of paper in one piece.


Appliqueing them onto each chicken with a machine zig-zag stitch was a bit more challenging than it had to be since I'd spray basted the 35" x35" quilt sandwich first by mistake and had to rotate and manipulate the whole shebang in the throat of my domestic Pfaff. Then I zig-zagged the sixteen legs and decorative circle stitched the eight eyes.


Here is the completed wall hanging...


... with a bit closer looks at the top and bottom rows of chickens.


Aaaargh! I just noticed. I forgot to do their tails! At least it now truly qualifies as a work in progress so I can link up with this week's Freshly Pieced WIP Wednesday. How could such a small wall hanging take so long! And how could a blog post about it be so long? Those eight tails will just need to wait until later this week. I am chickened out by now.

Wednesday, November 5, 2014

WIP: Getting Back in the Groove

I gifted the Vintage Ornaments quilt to my son, daughter- in-law and granddaughter in Southern California last week when we were down there for her christening and for a Disney visit with my younger son. It was touch and go, but I did finish it in time for their holiday family photo shoot.


I am back now and trying to whittle down my list of UFOs. I began the quilting on my chicken quilt, a pattern from 1994. Yes, ten years ago. I'd forgotten to embellish the chickens before spray basting and was stalled deciding how to proceed. See my April 23, 2014 post. I decided to forge ahead on the quilting and deal later with their beaks, legs and wattles. Here is my start thus far using the integrated dual feed on my Pfaff for the center section. Some part of the grid is not yet sewn.  Progress is slowed down because I am back tacking and skipping over each chicken and it's 3-D wings. The outer border I will FMQ with a design TBD.


I have not yet sewn but have at least cut out and pinned a Jungle Alphabet book for my younger granddaughter. The crinkle paper in her Counting Monkey book (previous post) was such a hit I will put it the noisy stuff in this book too.


I long to start a new quilt and have given myself permission to do so even with my UFOs out there. The last time I posted this list was September 10, 2014 when I began Vintage Ornaments and worked on very little else other than minor projects. Here are my stats since then.

Completed projects (4):
    1. Jungle Alphabet book for Autumn (October 8, 2014 post)
    2. One 12" x 16" lion pillowcase for Autumn (October 8, 2014 post)
    3. Counting Monkey book for Vivian (October 21, 2014 post)
    4. Vintage Ornaments 60" x 70" quilt (October 21, 2014 post)
    Ongoing projects (4):
    1. Chicken quilt - quilting begun, embellish later (April 23, 2014 post)
    2. Classic Cars strip quilt (August 3, 2013 post) - need to back, quilt, and bind
    3. Overlapping square wall hanging - paired with thread, awaiting FMQ
    4. Mask quilt (October 19, 2011 post) - packed away... again
    New projects (0):
    1. TBD but I think it is one I will keep!
    I am hooking up to today's Freshly Pieced post for WIP Wednesday.