Yes, I know I have sworn off kits, at least until I have sewn down the backlog in my stash, but this Spooky and Sweet Quilt Along project from the Fat Quarter Shop called to me. Halloween themes that are cute, rather than macabre, are mu preference. These trick-or-treating baby ghosts in a witch or a vampire costume, especially made up in soft colors and grays could indeed be fittingly dubbed "sweet". The kit came with Moda Bella Solids, enough for a 30.5" x 34.5" Wallhanging or a 17.5" x 65.5" Door Banner, and included fabric for the backing and binding. I have very few solids in my stash so I reasoned that this purchase would be a "growth opportunity". The pattern was a free pdf download per week with releases timed for four week completion. I did not sew Spooky & Sweet as a quilt along but, after the patterns for all four weeks had been released, I started in on it.
Week 1 was the Witchy Ghost Block. It looked straightforward but I knew I would need to pay attention to the instructions and proceed carefully. Pieces were labeled A to Z plus AA to EE. Some letters had more than one piece that size; I counted 45 total pieces for this block.
The first step was cutting out all the fabric pieces. Groan. I set out thinking this would be really tedious. Once I got started, though, I abandoned the classic approach of cutting a strip and then sub-cutting shapes from that strip. Instead, I used a rectangular ruler and cut each piece in order. Deploying my Pink Alphabitties letter tabs kept everything organized. When the letters moved to AA, BB, etc I switched to Blue Alphabitties. On the far left is a wool pad. The two red square meshes are rubberized mats intended for use in a refrigerator drawer under produce. One of these drawers is generally called a crisper, but I once heard a comedian refer to it as the rotter. I agree. These pads work much, much better in the sewing room to lay out and layer fabric pieces.
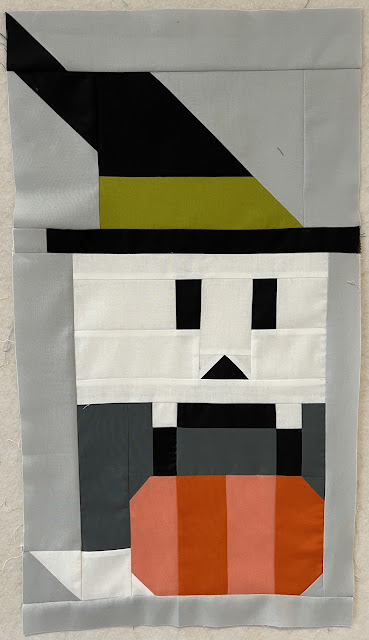
Here are the hat, face, and lower body of the Witchy Ghost Block all assembled. The rectangle was lots of fun, took me less than two hours total once all the pieces were cut out, and measures 13½" x 24½". Whoops I just noticed I put her mouth in upside down. Dang! And it is smack dab in the middle! Should I reverse it? This orientation is perfectly acceptable, but I think I would like that she look happy rather than startled.
Here is the finished Vampire Ghost Block. Because this has the Coral, Clementine, and Violet colors, I think he was my favorite to sew up. He measures 13½" x 19½".


It's good to see your alpha-bitties getting use, and the rulers are quite a clever solution for a paper (fabric?) weight. I'm envious of the windows in your sewing room! This kit turns out adorable, and it sounds like it had a net-zero impact on your total number of kits, so I think well-done there. Next year you need to post a photo of where you hang it for halloween!
ReplyDeleteI do like those alpha-bitties. They are a guilty pleasure that is a step up from using tiny scraps of paper. I like piecing quilts that are not repetitious.
Delete