Thursday, February 29, 2024

Alligator Burp Cloths

My grandson's teacher is looking forward to becoming a grandmother for the first time. My eight-year-old grandson asked if I would make some burp cloths for her and her new grandson. (I have a reputation for producing copious quantities of burp cloths.) He picked out this alligator print himself and my daughter said he was very, very excited about his choice. After googling the pattern, I learned it is Oasis Collection, Alligators Navy Flannel 446311. The alligators are about 5" wide. I paired it with a green stripe flannel from my stash

One yard of each flannel was enough to make up into four burp cloths in two complementary configurations.


Isaiah will enjoy giving them to his teacher. I hope she likes them. My tutorial for these burp cloths can be found in my post for 6/18/2014. Yes, I have been churning these out for over a decade. I have six grandchildren of my own!


Wednesday, February 28, 2024

Six Swedish Folk Art Ornaments

When I titled this post I could not decide what kind of artwork was on these ornaments. Was it Swedish or was it Scandinavian? I was hoping or Swedish since that is a shorter word. Off I go, googling down the rabbit hole to find out for sure.

I googled how Sweden and Scandinavian were related, and learned that Scandinavia denotes Norway, Sweden, and Denmark; therefore, Sweden is subset of Scandinavia. Scandinavia is not considered an ethnicity nor a race or even a nationality.  The term Norden refers to Denmark, Finland, Iceland, Norway, and Sweden, thus adding Finland and Iceland to the Scandinavian mix.


From this interesting site about Scandinavian folk art I learned that Scandinavian folk art has similar themes aspect particular to the country of origin.
Scandinavian folk art is quite particular in the sense that there are similar themes displayed in the pieces. Common elements of Scandinavian folk art include:
  • Geometric designs and patterns, lines, dots, circles, stars, and diamonds
  • Nature motifs, such as flowers, leaves and animals, particularly horses, birds and fish
  • Bright, contrasting colours
  • Symbols from folklore and mythologies
But there are distinct features that typify the folk art of each of the Scandinavian countries. Swedish folk art is known for its bright colors and whimsical designs so my best guess is that these ornaments are Swedish.

The stylized design on these six ornaments could have a name, one which I could not recall. Is it tole? No. Not correct. When I googled tole I found on this Martha Stewart site
The word "tole" is derived from the French term "tole peinte de lac," which means painted tin. Historically, tole painting is a folk art that refers to the decorative painting you commonly see on tin antiques.

These are Swedish folk art, plain and simple. I spent probably as much time researching this terminology as I did making these ornaments. But they are bright and cheerful and I learned something in the process. I am happy to add these to my growing collection.

These six Swedish folk art renditions of a cat, tree, angel, stocking, partridge, and heart are added to the angels (1/5/24 post), houses (1/17/24 post), Strawberry Shortcake (1/25/24 post), critters (2/7/24 post), nativity scene (2/17/24), and Christmas symbols 2/23/24 ornaments I made earlier this year.

Tuesday, February 27, 2024

Bin Blocks Progress

As I sandwiched my quilt top with my typical 100% bamboo batting and spray basted it, I thought about what the name should be. I am leaning toward naming it "Bin There Done That" or some permutation of that play on words. I would like to pay homage to the fact that this is a resurrected bin project that really had no plan when I made the blocks. 

I also pondered the quilting pattern. While it was spread out and available for my scrutiny, I noticed that each block was either a 2x2 array or a 3x3 array of smaller units. They may have not been assembled that way, but arrays are the basic structures. I labeled the arrays in the next photo to remind myself. There are nine 2x2's and seven 3x3's.


A favorite go-to quilting pattern of mine is from Angela Walters' book Shape by Shape book with free-motion quilting suggestions. In particular I like Square 7, especially when the squares are butted end-to- end and create a secondary pattern. I decided to use this basic motif in the units of the arrays.


The 2x2 arrays have larger base unit sizes and so I might add the proposed variation and echo another curved bracket outside the petals. I am holding off until I see the 3x3's next to the 2x2's and see if those added fill-in curves are needed for the quilting to look balanced. Alternately, I may be sick of FMQing this quilt at that point and forgo the added stitching. The Winline 100% bamboo batting will allow stitching as far apart as 8". 


Here is the Square 7 pattern in the 3x3 array. I does have a bit denser appearance. Although the thread blending in with the color of the background in the 2x2 array may create an optical illusion. There are other 2x2 arrays so I will just have to wait and see the overall picture.


So now I have eight more 2x2 arrays and six more 3x3 arrays to quilt. What to do in the sashing is another question. When a 2x2 array butts next to a 3x3 array does the sashing need to play mediator? Or does the sashing assume a role wearing blinders at the borders, and ignore the potential conflict? Pebbles is a potential solution I would like, especially with the dotted brown fabric; but I am terrible at quilting uniform pebbles. Maybe a meander? That is not a smooth, strong skill of mine either. Then again the sashing is only 1" wide so it will not need much. Sashing treatment remains to be determined. Stay tuned.

Friday, February 23, 2024

Half Dozen Xmas Symbols

I snuck in making a half dozen more Christmas stuffed ornaments while in the middle of a bin quilt project (2/19/24). These six are a bit larger than previous ornaments and so I cut the ribbon loops at 6" rather than 4½ ".  The red, green, and yellow colorway invited the choice of soft yellow for the ribbon loops. The wreath was a bit more challenging to sew closed the opening on the inside circle, since that concave edge had to be slashed before closing. 


They all came out cute and cheerful. These six Christmas symbols of a partridge, wreath, angel, stocking, candy cane, and toy soldier are added to the angels (1/5/24 post), houses (1/17/24 post), Strawberry Shortcake (1/25/24 post), critters (2/7/24 post), and nativity scene (2/17/24) ornaments I made earlier this year.

Monday, February 19, 2024

Empty Bin Incentive

In tidying my sewing room to have a quilt friend over, I peeked in a plastic bin and found 16 blocks I'd assembled from the 2006 JoAnn Block of the Month series, called Spice Meadows. I'd collected a scattering of random block kits from the clearance section for $1 per block kit. Each block measured 12½ inches square. The colors are dated and rather blah (in my opinion), but 16 was enough to assemble into a decent size quilt. Why not join the blocks together now and have an empty bin available for other projects? The challenge would be to use only fabrics from my stash.

This is not the first time emptying a bin has been my incentive for working on a long forgotten project. Other bin projects having had their rebirth after a prolonged time period neglected, dwelling, and taking up space in a plastic box. For example, in my 4/10/23 blog post for my Pieces of Blue quilt:
I typically store the components – pattern, fabric, specialty rulers, magazines, etc. – for my ongoing-projects or dream projects-to-be in these 12"x12" plastic bins designed mainly for scrapbookers. I own fifteen of these bins, as many that will store five across and three high on one of my shelves. The following photo shows nine bins. I have a self imposed limit of fifteen on this number of bins. If I need another for a new project, I constrain myself to 1) finishing a project in one of the bins or 2) giving up on a dream project and disseminating the components to free a bin.

I did not have all twelve advertised kits from 2006 JoAnn Spice Meadows series, nor the finishing set, but each block kit was an opportunity to sew up a block only for amusement. I was missing blocks 9 and 12, but since I had duplicates of others, I could substitute to create a layout of four by four blocks.


For those curious, here are the Blocks 9 and 12 that I did not have. Block 9 was a cute star named Mosaic Star. Block 12 was the central appliqué block, called Bouquet. Skipping Block 12 was perfectly fine with me. I prefer piecing far beyond appliqué. Many of these blocks can be found to buy on eBay, but certainly not for the bargain price of $1 that I paid.


My friend and I dug through my stash to find sashing and cornerstone fabrics. We came up with this brown speckle for the sashing and soft red for the cornerstones. Both seemed to go with the common tone of golden beige of the block backgrounds. But how wide to make the sashings? Simple. As wide as my one yard of brown speckle would allow. I cut 2" strips that would finish as 1½" sashings. At the outer edges, I widened it to 2½" strips so the binding would not cover up a disproportionate width of the outer edge. I only had ½ - ¾ yard of the soft red, but it was enough for cornerstones and binding. The resultant top assembly seemed a bit brighter with the rivers of brown and the splashes of red. Here is how my friend and I collaborated to arrange the blocks. Where I could manage it, there is some symmetry in the block placements.


Next up for decision was the backing. I found this Noah's Ark stripe in my stash. The height of the animal bands are about 2". Except for blue instead of purple, the fabric reflected the colors and tonality of the top quite well. The whimsy of the print also cheers up the somewhat somber nature of the top. I had three yards, which I calculated was enough area for the 57" x 57" top. I just had to figure out if I could cut and seam the Noah's Ark while preserving and matching the stripes. 

TOP: 57in x 57in = 3249 sq.in.              
BACKING: 3 yds x 36"/yd x 40" WOF = 4320 sq.in.


I did mange to seam the backing fabric quasi-invisibly with one entire width horizontal seam, and one short partial height vertical seam. The vertical seam is shown in the following photo where the tip of the scissors are pointing.


I have enough leftover Noah's Ark fabric to make another quilt. I could cut the fabric into squares and alternate it with patchwork blocks of another pattern such as nine-patch or pinwheels or rail fence. In the photo below the fabric is folded in a double thickness. Or I could use the longer pieces as the borders of a smaller quilt. Whatever I do, I am not storing this back away in the bin I just emptied!


My binding is all made from the red fabric. Next up is sandwiching this top and backing with batting, and then quilting it. Those activities are the subject of another post.

Saturday, February 17, 2024

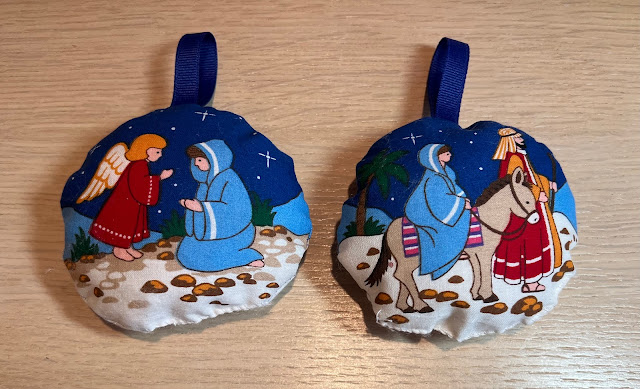
Round Nativity Stuffed Ornaments

In keeping with my self-imposed goal of sewing up my panels of Christmas ornaments, I completed these six blue orbs with nativity scenes. I used blue ribbons in keeping with the serene hue of the ornaments. The ornaments did not have a marked seam allowance; the source panel merely instructed to sew ¼" from the edge. Not having a change of color at the seam allowance interface was easier, and did not result in glimpses of white along the seams if the sewing line strayed a bit. Also, not having ins and outs or places that needed to be clipped made these ornaments super easy to sew. These orbs tell the Christmas story in six scenes:

  • The Angel telling Mary to expect a child
  • Mary and Joseph and the donkey making the trek to Bethlehem
  • The city of Bethlehem
  • Jesus after birth lying in a manger with the star above
  • Shepherds visiting from the fields, guided by the star
  • The Three Kings arriving after following the star from afar

Here are the nativity rounds before stuffing. Hand whipstitching the curved opening after stuffing took a bit more care, but nothing unmanageable. I did thumbnail crease the edges before stitching to make it easier. Even so, the curve was not as smooth as I would have liked.  


The first one I did, with Mary and the angel, had a flat spot in the whip-stitched section. The second one I did, with Joseph, Mary, and the donkey, had a jagged bottom, not a smooth curve, but the I told myself that since the trio was traveling a rocky road, it was OK.


Then I started using Clover Wonder Clips® to keep the seam allowance uniform and not sliding inward unequally as I stitched. The clips also helped keep the opening from collapsing while I pushed in the poly-fill stuffing. This little trick worked, even better than straight pins, and by the third ornament, I was a pro at keeping the whip-stitched area as round as the machine-stitched portions.


Here is the set of six stuffed ornaments. These nativity scene ornaments are added to the angels (1/5/24 post), houses (1/17/24 post), Strawberry Shortcake (1/25/24 post), and critters (2/7/24 post) ornaments I made earlier this year. How many more panels do I have stashed away? Who knows? I keep finding them. They are fun fill-in projects that give a sense of accomplishment in a short period of time.

Wednesday, February 7, 2024

Random Enjoyable Days

Today, Feb 7th, was a day when the rain poured down relentlessly outside our home in California. Per the weather man, we are currently experiencing an "atmospheric river". It was a good day to stay in my sewing room tidying up and dabbling with random small projects. I'd had a quilting friend over yesterday and we dragged out a bunch of kits and fabrics to look at and audition. I leisurely took the time today to put that stuff away, also, refreshing my memory and becoming re-inspired as I did so.

I continued my dedication to my ongoing project of completing Christmas stuffed ornaments. I found two more  angels to round out the set of six that was my first project of 2024. These two were cut out and tucked away amidst other Christmas fabrics. Take heart. UFOs never go away; they just vanish to an undisclosed location to resurface at a later time. I sewed up and stuffed those two angels. Based on their hair, my guess is that they are African and Native American. Four of the set had been made with red ribbon loops and two with green ribbon loops so I chose green for these additional two to balance out the octet. I like that the green picks up  of the wreath of the angel on the left and pick ups the tree of the angel on the right. Following the photo of the pair I sewed and stuffed today, I've repeated a picture of the other six from my post at the start of 2024. They are such a bright and cheerful lot, especially spirit-lifting on such a dreary day!


I also found nestled among the panels of fabrics two forgotten critters, a lion cub holding a poinsettia and a kitten with a Christmas ball. They were already cut out and just needed to be stitched and stuffed. I obliged. I suspect other members of the set are packed away with Christmas ornaments that had been displayed this past Christmas 2023, but there are no guarantees. Those other critter ornaments may pop up from some secret mysterious location, awaiting completion. Unusual among these type of ornaments, the kitten was labeled to be stitched at the side back rather than at the bottom. I wish I had ignored those markings, since the whip stitch closure is more visible on the side than it would have been on the uneven bottom. Oh well, what's done is done.


During my sewing room browsing (cleansing?) I came across a plastic scrapbook type bin with sixteen completed blocks and seven pinwheels. These had been made from block of the month packets from JoAnn Fabrics that I'd bought in clearance at $1 each. The block of the month kit was called Spice Meadows and was originally available through April 2006. The colors are kind of a give away. I have an incomplete assortment of assembled blocks with duplicates of some. Yesterday, I became re-inspired to assemble the blocks into a quilt. My friend helped me pick out some spotted brown fabrics from my stash that I may use as sashing. There were some fabric scraps in the bin so today I sewed up an eight ~2" pinwheel. More details will follow when I actually work on this quilt but I least have the intention to do it in 2024. My real incentive is to free up that plastic bin. I have a self-imposed upper limit of 15 of these bins.


The colors of the previous set of blocks are very muted and not my normal preferred palette. I dragged out a kit title Harvest Home that I'd bought at a show (©2006 pattern included within) purely because of its clearance bargain price (~75% off!) thinking to possibly raid it for completion fabrics. Instead, when taking it out of the package and really looking at it, I became re-enamored with the kit and now want to work on it, too, as designed.


All in all, today was an enjoyable day of indulgent dabbles and foibles indoors, heedless of the puddles and dribbles outdoors.