Sunday, September 22, 2024

DVQ Show "Autumn Renewal"

Saturday, September 21st, I went to the Diablo Valley Quilters 2024 Quilt Show Autumn Renewal in Walnut Creek with my friend Kathie. In addition to showcasing quilts of its members, the show also featured a Fabric Follies where cloth was available at the bargain price of $4/yd. I counted 88 quilts on display. In this post I will show only my favorites, the top 10% that appealed most to me, in no particular order. Then I will reveal my purchases at the Fabric Follies.

The Quilts
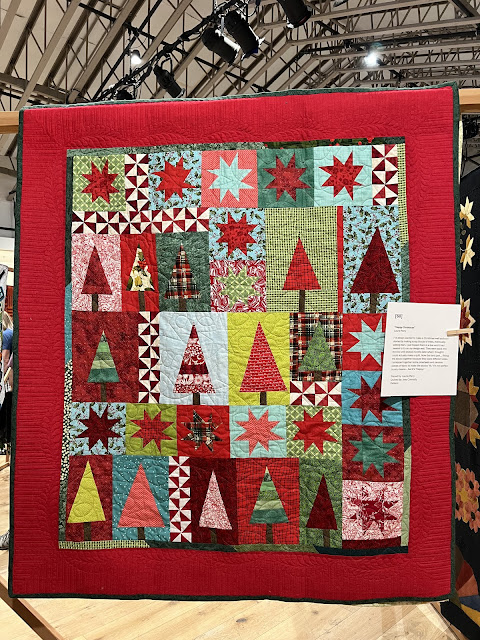
This Christmas quilt was appropriately titled Happy Christmas as it did indeed scream happy to me. The story behind how it was made up from a gradual collection of scrap blocks of trees was creative and inspiring. This approach gives me permission to make up random blocks just because I feel like it and because I've accumulated scraps that I think go together. I resolve to have faith. All will work out.


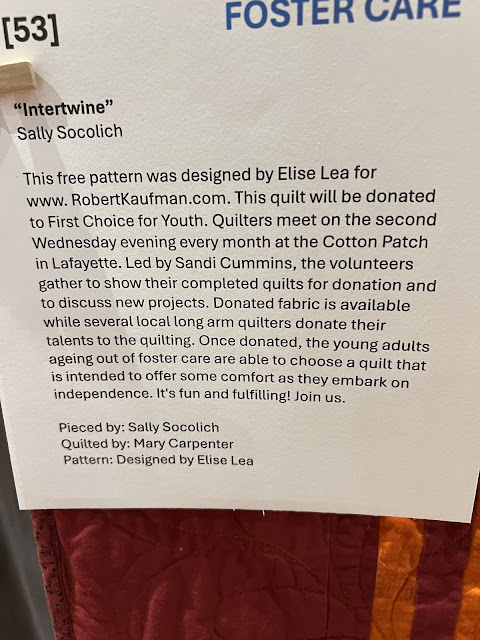
The next three quilts all have a modern feel to them and are destined for donation to youth in foster care. The first, Intertwine, interested me in the blocks that have either one, two, or three stripes and then capitalize on that with the graded colors on the diagonal. All the straight lines are complemented by a swirling quilting pattern. The second quilt, Elements, once again is very angular but the rigidity is set off by the flowing parallel wave quilting, effective, simple, and requiring a lot of patience. The third quilt, Paint Box, reminded me of a fabric color chart, so naturally it appealed to me due to the association. The quilt pattern was not dense and yet was oh-so fitting. I enjoyed the intermingling of circular and angular stitching lines — kind of like a clever hybrid of Bishop Fan and Grecian Key.


I Love Us Year Round appealed because of the bright colors and assortment of block patterns. It also showcased a variety of techniques in block creation.


Whirligigs reminded me of a quilt I made for my daughter and her husband. I was bemused that it lingered in the creator's stash just as mine had done. Whirligigs has a kaleidoscope appearance in each block made from four identical rotated quarters, a sort of Stack and Whack technique.  My quilt that it brought to mind was call Masquerade but more regularly referred to by me as The Quilt From Hell. Masquerade was completed in October 2020. My daughter had been married in 2011 and that is how long that hexagonal quilt was in the making. I could truly relate to Maryann Maiorana and the amount of effort involved; I gave Whirligigs my "Heartfelt" vote at the poll of the show.


Christmas in Baltimore got my WOW vote at the show. The block detail brought out by the exquisite quilting was truly WOW.


Pretty Polly was the last quilt I viewed in the show. It was modest in size. I do not have exact dimensions but, for scale, that clothespin is 3½" long, so I estimate the height at about 30". What gave me inspiration about this wall hanging was how effective the echo quilting around the bird was. I am always on the lookout for FMQ techniques I can add to my repertoire that enhance the quilt and yet are still within my skill limit. Hopefully my skill limit is an upwardly moving target, but progress is relatively slow. The beading and embroidery details on the bird are also pretty awesome. These intricacies are, however, a bit beyond my patience level.


My Bargain Purchases
You can't get more of a bargain than free, and I picked up these two patterns as giveaways. I liked that the Round Trip Duffle has a back strap to fit over a luggage handle. The Sunshine pattern by Elizabeth Hartman is sweet and I can see making just one row as a table runner or one block as a pillow. The Sunshine pattern uses conventional patchwork. No templates or paper piecing! Both should be small, fun projects to complete relatively quickly with fabrics I already have.


At $4/yd this stack of five fat quarters was $5. I am not overly fond of the black, large scale feature fabric but the mottled solids in red or yellow and the stripes in multi-color or black will easily get used.


These ten fat quarters of buffalo plaid flannels could make five great burp cloths for a baby for the bargain price of $10. I enjoy making these quick projects and often finding good quality flannel in a cute-but-not-insipid print is challenging. In 2015, I made 42 burp cloths! I made 42 more in May of 2017


These pretty two-tone florals in one-yard lengths caught my eye. I may use them all together in one project but I think they are versatile enough to be separated and blended with other prints. They are from different colorways of Tula Pink's TRUE COLOR series, pattern Wildflower by Free Spirit. They are very pretty fabrics and at $4/yd what a bargain — $24 for 6 yards!


This next collection of three ½ yards on the far left are from Kaffe Fassett and are titled Shark's Teeth. These are fun to use when a spot of nearly solid fabrics are called for and I want to be a bit risqué. To the immediate right of the Sharks' Teeth is a ½ yard length of a large scale print that would make a whimsical pillow or large scale blocks in a small quilt.  To the far right is 2½ yards and ½ yard of a large scale graphic reminiscent of Alice In Wonderland ; this fabric yardage could be useful as a backing. I show the ½ yard large scale print and the 2½ yard graphic Alice in Wonderland opened up in the follow on photos. 


I learned from the selvage that the delightful birds birds nestled among vines is from the art work of Monika Forsberg and the collection of Anna Marie's Conservatory.
Monika Forsberg was born in a seaside town in the very north of Sweden, where it was almost always winter. She moved to London to study art, became an animator and a mum. And later on an illustrator. Her work has appeared in magazines and books, and on children’s apparel and gift products.
I also learned of Anna Marie's Conservatory, which is a fabric collection made from the works of various artists. Among these artists are Anna Maria, Carolyn Gavin, Courtney Cerutti, Monika Forsberg, and Nathalie Lete. I will admit I am ignorant about these artists and of Anna Marie's Conservatory, but I plan to learn more. I like the colors and style of many of these fabrics.


This fabric is a Tula Pink design and titled Down the Rabbit Hole. Note that it is printed cross grain, the selvages run above and below the print when the trees are oriented up and down. I will need to keep this in mind if using it as a backing. The extra half-yard I picked up may help out in piecing if necessary.


The DVQ Autumn Renewal Quilt Show with accompanying Fabric Follies was not only a fun, social, experience, but also a source of inspiration for techniques and fabrics. I have some new ideas to try out in my FMQ. I also have some new artists to watch out for in fabric purchases.

Friday, September 20, 2024

Spooky and Sweet

Yes, I know I have sworn off kits, at least until I have sewn down the backlog in my stash, but this Spooky and Sweet Quilt Along project from the Fat Quarter Shop called to me. Halloween themes that are cute, rather than macabre, are mu preference. These trick-or-treating baby ghosts in a witch or a vampire costume, especially made up in soft colors and grays could indeed be fittingly dubbed "sweet". The kit came with Moda Bella Solids, enough for a 30.5" x 34.5" Wallhanging or a 17.5" x 65.5" Door Banner, and included fabric for the backing and binding. I have very few solids in my stash so I reasoned that this purchase would be a "growth opportunity". The pattern was a free pdf download per week with releases timed for four week completion. I did not sew Spooky & Sweet as a quilt along but, after the patterns for all four weeks had been released, I started in on it.

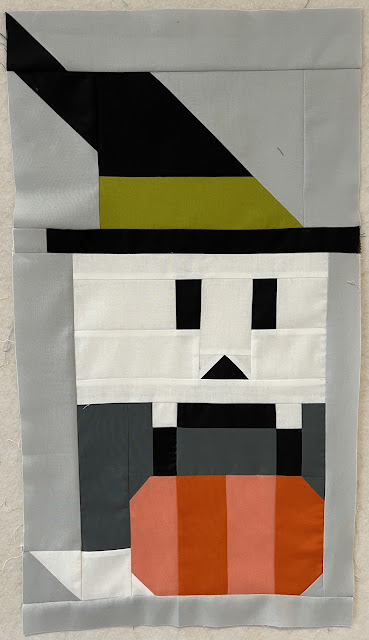
Week 1 was the Witchy Ghost Block. It looked straightforward but I knew I would need to pay attention to the instructions and proceed carefully. Pieces were labeled A to Z plus AA to EE. Some letters had more than one piece that size; I counted 45 total pieces for this block.

The first step was cutting out all the fabric pieces. Groan. I set out thinking this would be really tedious. Once I got started, though, I abandoned the classic approach of cutting a strip and then sub-cutting shapes from that strip. Instead, I used a rectangular ruler and cut each piece in order. Deploying my Pink Alphabitties letter tabs kept everything organized. When the letters moved to AA, BB, etc I switched to Blue Alphabitties. On the far left is a wool pad. The two red square meshes are rubberized mats intended for use in a refrigerator drawer under produce. One of these drawers is generally called a crisper, but I once heard a comedian refer to it as the rotter. I agree. These pads work much, much better in the sewing room to lay out and layer fabric pieces.


Heaven forbid the breeze from an open window or an overhead fan should destroy all my detailed organization. I protected these pieces by laying clear acrylic rulers over them.

Here are the hat, face, and lower body of the Witchy Ghost Block all assembled. The rectangle was lots of fun, took me less than two hours total once all the pieces were cut out, and measures 13½" x 24½". Whoops I just noticed I put her mouth in upside down. Dang! And it is smack dab in the middle! Should I reverse it? This orientation is perfectly acceptable, but I think I would like that she look happy rather than startled.


Week 2 was the Spirit Star and Spooky Stars Blocks. I believe it was these soft colors that first attracted my attention to this kit. The soft gray of the background played so nicely with the Coral, Clementine, Pesto and Violet hues, toned down from the typical garish orange, green, and purple for Halloween.

Again calling upon my Alphabitties to help organize, these star blocks required 62 pieces A to O. As might be expected with stars, there were a lot of multiples, so the letters only went up to O. It took me slightly over an hour to do the cutting.


Here are the finished star blocks, The Spirit Star is on the top and the two Spooky Stars are underneath. The star blocks were not as quite as much fun as the Witchy Ghost block since they are not as novel, but the cheery colors kept me engaged. The HSTs of the Spooky Stars finish at 2½" inches but start out with instruction to cut 3" squares, not the usual 2⅞" squares; trimming was absolutely essential. Spirit Star measures 11½" x 13½". The pair of Spooky Stars measure 6½" x 13½".


Week 3 was the Vampire Ghost Block. Not only was this block novel like the Witchy Ghost Block but it had those lovely coral and violet colors to lure me on. I had loads of fun with this one. I paid special attention to assure his mouth was facing upward and smiling.


Alphabitties to the rescue again. This vampire ghost block needed 49 pieces, A to Z, and AA to BB.


Here is the finished Vampire Ghost Block. Because this has the Coral, Clementine, and Violet colors, I think he was my favorite to sew up. He measures 13½" x 19½".


Week 4 was Finishing. I opted for the squarish 30½" x 34½" wall hanging rather than the tall 17½" x 65½" door banner. Although I might have had more luck in finding wall space in my home to display the door banner, I preferred how the stars were more integrated in the wall hanging. I can always just display the wall hanging by draping it over the back of a couch or a chair.


The additional cutting for the wall hanging was minimal at 4 - 2½ x 30½ strips for the outer sashing. Here is the assembled wall hanging. Notice I did invert the mouth on the Witchy Ghost so it matched the mouth orientation on the Vampire Ghost.


The quilting, labeling, and binding I will address at a later time in a future blog post. But for now, here is the assembled wall hanging. It may be only somewhat Spooky but it is indeed Sweet!

Saturday, September 14, 2024

Bin_There_Done_That is DONE!

I named this 55" x 55" quilt  BIN THERE DONE THAT. I wonder if anyone will recognize this quilt as derived from JoAnn Fabrics' 2006 Block of the Month Spice Meadows or even realize how far back the blocks date — nearly two decades. The fun Noah's Ark fabric on the back makes it feel a bit more contemporary... maybe. Actually I chose the striped backing fabric because I already had a generous amount of it  in my stash and the colors go really well with the front.

Noah's Ark has the same muted reds, soft golds, greens, and tan beiges as the front blocks. An exception is royal blue instead of regal purple. Here is a close-up of the backing fabric with my customary grosgrain ribbon labels on the lower corners of the quilt back. Here are previous posts about this quilt.

2/07/24 laying out collection of blocks from circa 2006
2/19/24 rediscovery of blocks in a bin and incentive to resurrect
2/27/24 sandwiching and quilt pattern decisions
9/07/24 FMQ completion
9/14/24 (this post) finished in time for Thanksgiving


These colors, except for some royal blue on the back instead of purple accents on the front, remind me of Thanksgiving hues. Bin There Done That kind of goes with the turkeys, don't ya think? I plan to deploy this quilt for Thanksgiving 2024.


Saturday, September 7, 2024

FMQ Completed on Bin Project

This project was initially resurrected in February 2024 to empty a bin containing blocks from a 2006 Block of the Month activity. In my post for 2/19/24 I described the assembly of blocks along with fabric choices from my stash for sashing and backing. In my post for 2/27/24 I described my designation of blocks as either a 2x2 or a 3x3 array and how I intended to FMQ them. There are nine 2x2s and seven 3x3s. Then all progress halted for about six months. Now work on this quilt has resumed and I intend to see it through to completion. I have some momentum going and I am determined to refrain from tabling it again.

Once I started the FMQ I realized that I did not like the low quilting density on some of the 2x2 blocks and decided to treat them as 4x4 blocks. Here is a sample of 2x2 block quilted as 4x4 followed by a 2x2 block quilted as a 2x2. Since the four petal motif landed centered in each of the four striped squares, I decided to leave this four square 2x2 block as is and not quilt it more densely.


I then got the idea to quilt the brown speckled sashing in a centered repeat of the leaf motif in the blocks and to embellish each red cornerstone with a four petal flower. This pattern is a go-to for me. Yes, I was not very adventurous in my FMQ with this top but since it had been languishing in a plastic bin since around 2008, I just wanted it done. My goal is to have completed it by Thanksgiving since its colors reflect the mood and tonality of that holiday. On the edge sashing I biased the quilt pattern away from the edge so the petals will appear centered once the binding is attached. The binding will be the same fabric as the red cornerstones.


Next up is making the label, attaching the binding, and taking final photos.