Tuesday, November 26, 2024

Oh, Deer

There are many projects in my wings waiting to be completed. I was preparing to start the FMQ on my layer cake batik from July 6, 2024 when my Handi-Quilter bobbin winder ceased to function. I am awaiting its repair or replacement. I am not too bummed though. Piecing is my first love anyway and I was itching to try out this Deerly Loved pattern from Coriander Quilts.


The time it took me to cut out all the pieces exceeded my expectations, needing my investment a whole day's time. I should know this by now, but hope springs eternal. The diagram for the head of the deer is shown in the next image. Not shown to cut out are ten stars in the upper and lower bands. 

The colored fabrics added up to 105 pieces (blue letters A-U); the white background required 144 pieces (blue letters A-U + pink letters A-K) totals 105 pieces colors. I have not cut out the black border; I am undecided on my fabric choice and size for it.


I finished assembling the antlers. I was pleased that I had been able to fussy cut the black and white medallion fabric so the discs were centered along the two horizontal branches and also along each vertical branch.


I also centered a medallion in each eye and in the nose. In retrospect, I was not thrilled with my black/white medallion fabric choice for the facial features. I was so focused on achieving a contrast with the white background for the face that I was hesitant to use the beige floral called out in the pattern. The brown fabric that I chose instead had mini swirls in it that reminded me of fur, but it is dark enough that I lost contrast with the nose and eyes. Or maybe the black print is just too busy. Oh, well. I will plunge on. At the end, if I am still malcontent, I can appliqué or insert a different eye and nose fabric in those three spots. Hmm... maybe blue eyes and a red nose...  perhaps?


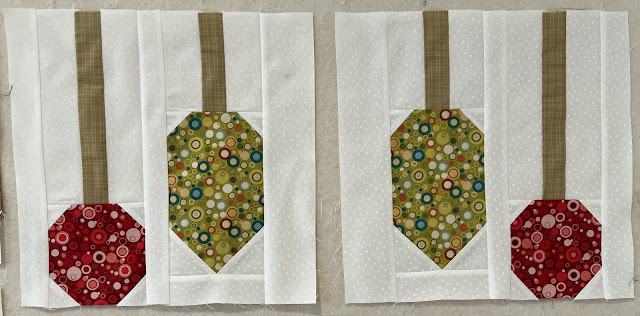
While pondering this decision,  I tackled the dangling ornaments in the red (L) and green (M) bubble fabrics with the beige plaid (O) for the hanging ribbons. Here they are the left pair and the right pair. The ornaments are pretty straightforward modified snowball block piecing. They are baubles so, fittingly, I made them from bubbles.


I assembled the deer face with its antlers and ornaments. Then I definitely decided I did not like the black and white medallion fabric for the nose and eyes. I kept the nose as is and did not change it to red. After all, this is a deer and not a reindeer, and so there is no reason for his nose to be red like Rudolph's. However, the eyes did not sit well with me, plus the medallions were not centered the same on the two eyes. I switched the eyes out to blue. This switch made the medallion print nose all the more distracting. I removed the nose and replaced it with solid black. Solid black is not as creative, true, but sometimes safe is more appealing than creative.


I moved on to making the bands of stars. Quite pleasingly, not all the stars were the same. The green and black ones are sawtooth stars and the red one is an Ohio Star. Those quarter square triangle units on the red stars took a bit more time to make, but the crispness of the points really paid off.


This switch to blue eyes was a bit stark being the only blue in the top. I toned it down by contemplating pupils for the eyes. Should I insert the triangles or appliqué them on top? Iron on adhesive was an option instead of needle turn appliqué and would avoid opening up that seam yet again. The seam would get stretched out no matter how careful I was. Also, with the iron on I used only one layer of fabric instead of the four layer bulk created by backed triangles. The black pupil detail was not enough to distract from the stark singleness of the the only blue in the top. I further deflected the distraction by inserting a narrow band of blue in the outer sashings to draw the eye toward the edges as well. 


I'd already planned to leave off the black borders to decrease the overall size and also because I thought them too dark and brooding. Here is the assembled top, ready to be FMQ'd. Hmm...  more decisions. Decisions are what slow me down. Next post will show FMQ, labels, and binding.


Wednesday, November 20, 2024

Chemo Chaos Completion

This quilt top has remained dormant since July. The post for 7/5/24 looked at the contrast of the layer cake fabrics from the Bobbins and Bits selection in Sept 2013 by designer Pat Sloan. The post for 7/6/24 displayed the block designs for the layer cake fabrics and explained my choice of the name Chemo Chaos. Then the perfect batik fabric for the backing went on clearance sale at my local quilt shop. It is a whimsical orange batik with stylized ladybug images. There was enough of the backing fabric to use it for my binding as well. I set those glasses on the piece of fabric for scale. In retrospect, probably a ruler would have been a better choice to show scale.

Since the quilt top is 48½" wide, greater than one width of fabric, I needed to add an insert or edging. I placed four remaining 10" squares from the layer cake in a column onto the back interspersed with more ladybug batik. Three of my these leftover squares have words. Batiks do not really have a right and wrong side but I found an exception. I did not notice this detail until they were sewed into a column. I had to remove one and flip it so that the phrases such as MAKE DO AND MEND and  STITCH ON! were not reading backward.

My idea was to have the FMQ accentuate the secondary patterns in top...  small and big diamonds and perhaps that octagon with maybe some smaller squares. I've shown my scribbles in PowerPoint although the actual decision would be finalized in real time. Those four-petal motifs are a go-to pattern of mine so perhaps setting them on point in the bigger diamonds might add interest. How to handle the zig-zag fabric remained an unknown. Maybe a large scale wave at the outer edges... ?


Here is how that center square of sixteen four-petal motifs came out, followed by how one of those orange pointed diamonds looks with four three-leaf motifs in the center bordered by parallel lines.


Quilting this top was a true adventure. I used King Tut 40 weight variegated thread with the recommended #90/14 needle with a side-spooling rather than an end-spooling spindle, and yet the thread periodically shredded and broke, even when loosening the top tension... frustrating to say the least. I muddled through by changing the needle (in case there was a burr or I had installed it incorrectly) and rethreading in case there was something I had overlooked. I then threaded through only two of the three top holes; doing that did not eliminate my breakage but it did reduce it.  I would do a trial on a practice sandwich and all would go fine. Then I'd switched to the quilt top and, not immediately, but eventually, the thread would shred and break once again. Bad thread maybe? Top and backing were batiks, maybe they are tougher? Also twice I managed to catch a corner of the quilt under the quilting area that cost me some remedial tear-out time. Grrr...! Maybe the quilt's feelings are hurt by my proposed name of Chemo Chaos? If so, that moniker is well deserved! 

My envisioned variety of FMQ patterns became less and less ambitious; I just wanted to get it done! I wound up with a combination of parallel lines in the secondary pattern of smaller diamonds and my go-to four petal motif elsewhere. 


I kept the Chemo Chaos name. Here are my grosgrain ribbon labels stitched on the two lower back corners.


The following two images are the front and back of completed Chemo Chaos.


This quilt is a lighthearted reminder of my battles and triumphs with my surprise diagnosis and treatment of lung cancer per my brief 6/13/24 post on the topic. As it says on the back inserts, MAKE DO AND MEND. Yes, indeed!