Deciding and Executing the FMQ Patterns
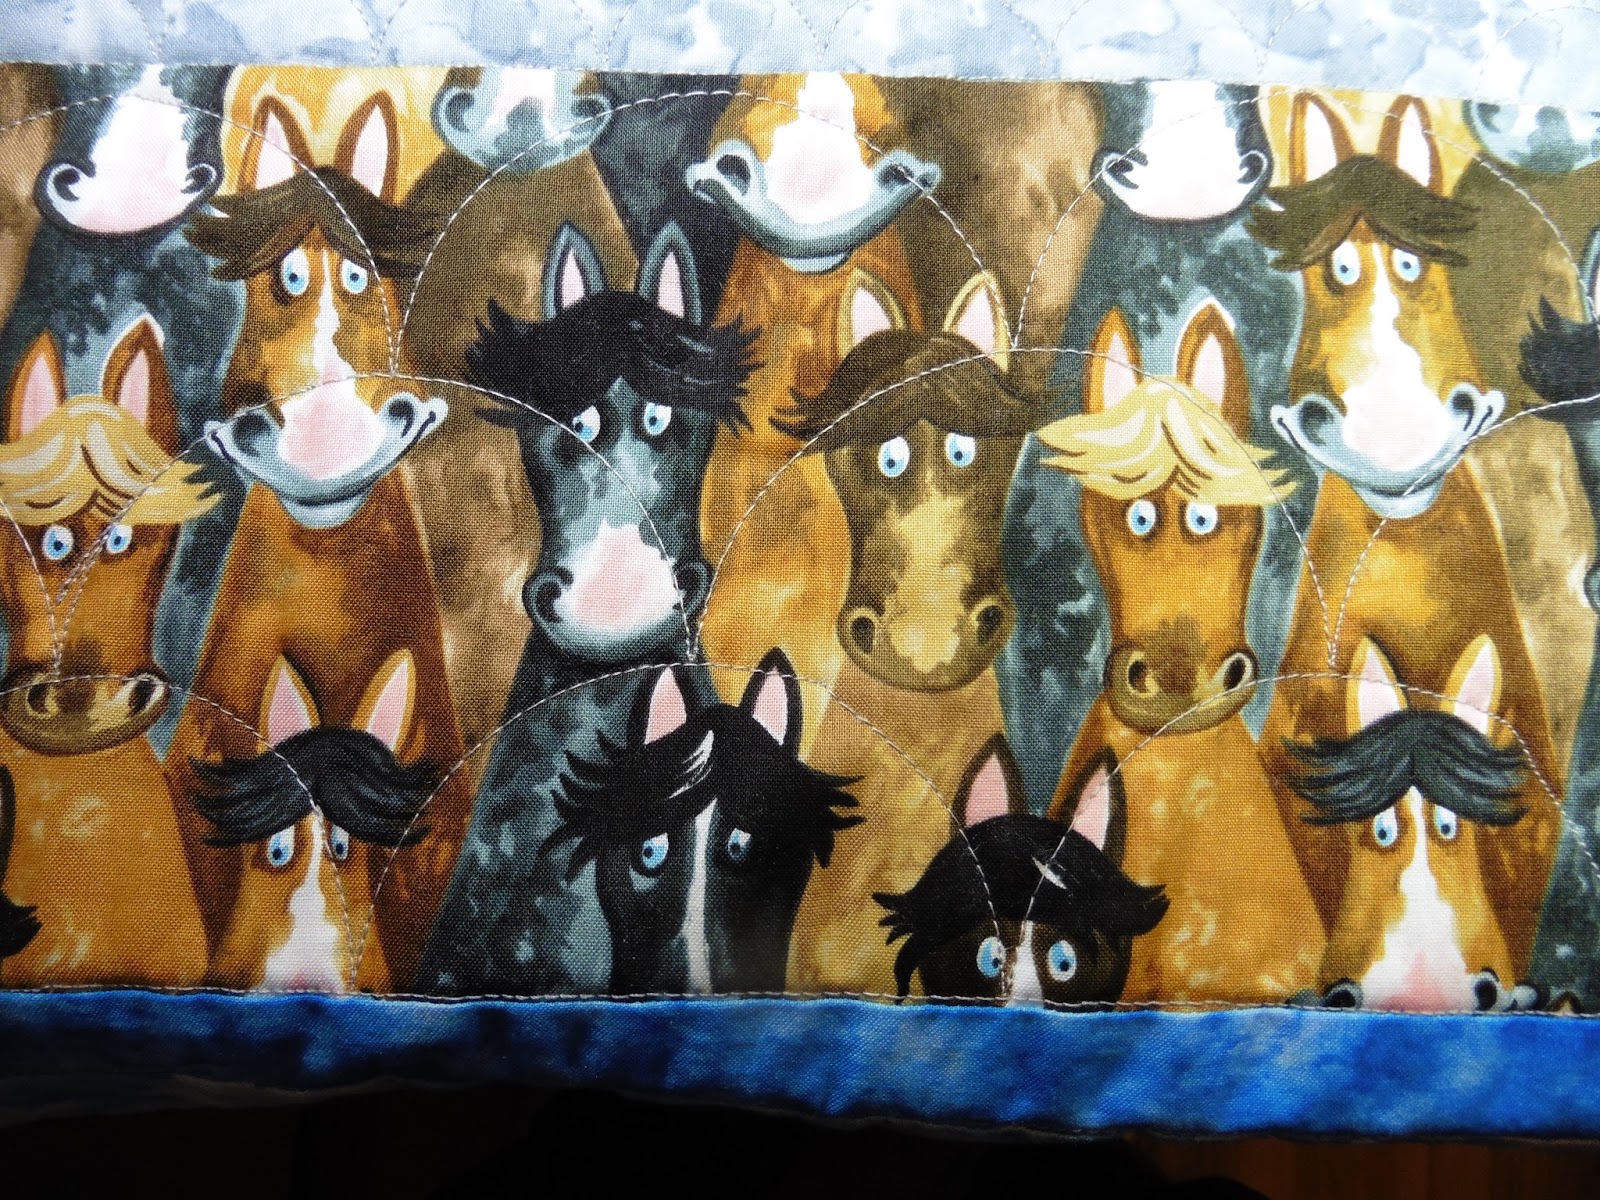
I have been staring at a strip quilt from Barnyard Buddies fabric for months to get inspired as to what to quilt on it and then to get the courage to do it. I just love the fabric collection with its horses, pigs, sheep, and cows, all with those egg-shaped, blue, cartoonishly intense eyes. Here is one of the fabrics in the line that happens to feature all of the barnyard buddies congregated with each other.
At a club meeting sponsored by a local quilt shop HQ-16 sitdown owners, one quilter suggested that a clamshell pattern would look good among those faces and I agreed. It would sure beat stitching around each animals head and still give the effect. Last spring I took a ruler class by Megan Best and described it in
my post for June 24, 2015. Earlier this week I practiced my clamshells on a quilt for my guild and recorded some tips in
my post for November 28, 2015. I was finally ready. It was a simple strip quilt for goodness sake. It was about time that I stopped stalling! I did the horse section first. No more "stall"ing. With a band that was 6 inches tall and 40 inches wide, I'd planned to fit in three rows of ten 4" clamshells each. I carefully laid out two strips of masking tape spaced so that I'd be aware of where 40 inches fell.

Despite my reasonably successful practice with the clamshell ruler just a couple days ago, the ruler kept slipping badly on my first three or so clamshells on this quilt. So much for those accurate 4" wide clamshells. I discovered I was placing the ruler upside down, sandpaper grippers up and not against the fabric. Duh! So much for my even distribution and those carefully placed tape borders at the two edges. I continued with the remainder of the row, which went well now that the ruler was staying put. The row ended in fraction of a clamshell though because of my accumulated slips at the beginning. On the way back in the row above I had to fudge the placement to land centered between the irregularly sized clamshells. I chose not to rip out the first few that were wrong. I need to practice FMQ more than I need to practice ripping out so my time was better spent forging ahead and improving my recovery skills. Those three rows came pretty close to filling the vertical space.

Here is the mixed crowd of barnyard buddies. There are four rows of 4" clamshells here. I am not sure if I am getting better at controlling the ruler while moving the fabric or just getting better at compensating when I mess up and stitch lines do not wind up quite where I intended. I am getting braver at doing and more accepting of the results so that counts for something. That band was 8" tall but I guess I squooshed them a bit because the top row did not quite reach the seam line beneath the chicken strip.

For clamshells on the pigs I used a smaller, 3" clamshell size and inserted three rows. There are narrow strips in between some of the wider bands and I needed to decide how to treat those. Since the pigs were FMQ'd with smaller clamshells I chose one row of small scallops in the two gray bands bordering the pigs. I am actually getting confident enough to put a pattern in an area that reads like a solid! I am glad those bigger clamshells are in a busy pattern area. It allows me to practice without glitches being too obvious. Once washed, those mounds should pop up and give a gingerbread house roof kind of texture.
The scenic pasture bands called for long wavy lines and I followed the hill contours for those. Then I used my newly purchase echo feet and stitched parallel to those contours.
The Echo Feet provide a 3/8-inch, a 1/2-inch, and a 3/4-inch distance from the needle to the edge of the hopping foot. Without them there is only a 1/4-inch option from the edge of the hopper foot. The visibility was a bit less than desirable. I peeked between the shafts of the hopper foot and the needle foot to see where I was going. In retrospect, I probably could have sewn sideways with the line I was echoing in front instead of to the left. I tried orienting the quilt horizontally for the other scenic band and it did work out better visibility wise. I am better at stitching forward and backward, rather than side to side, but improvement will come with practice.

Even though the lines passed through the bodies of the animals, I fought back my urge to strictly follow the fabric print. I did deviate in two to three places because I felt those few tree pairs that jutted up into the sky, needed to be accented a bit. I chose to make the contour lines about 1/2 inch apart. That spacing looked just about right. On the scenic pastures, I wanted to accent the landscape, not the dotting of barnyard animals. Once washed I think the channels will puff up like furrows. I still have some more FMQ-ing to do. The pattern in the sky is still up for grabs. Maybe clouds?
Having just practiced pebbles in
my post for November 28, 2015, I am considering placings "eggs" instead of pebbles amongst the chickens. There is a also sheep band much like the pig band. I want to throw some curlicues in for the sheep but I am doubtful I can manage loopy clamshells. Should I instead 1) do straight clamshells and fill some with loops or 2) free form loops around the sheep's bodies and forget the clamshell ruler entirely?
Inspiration has not struck yet either for the strip of straw - or is it hay? I do not think this distinction will matter when I pick an FMQ pattern but I have been told that if it is hay, it is food and the animals eat it and if it is straw, it is bedding and they lie on it. Every other FMQ on this quilt is curly and rounded but this strip calls for something a bit straighter and more attuned to the wisps of hay/straw. Tune in later for my final choices.
Mini-retrospective on Strip Quilts
Assembling a strip quilt is a snap and a great beginner project. I have made a few strip quilts, mainly from assembled kits where the fabrics have been pre-selected from a particular fabric line. I made
Duck and Cover, FMQ'd in my
post for September 12, 2012, and shown completed in
my post for October 24, 2012. There was
Fun Guys, FMQ'd in
my post for June 17, 2015. I also made
the Ghastlies, shown in
my post for March 17, 2014, but that one was not a kit. I took some feature fabrics and supplemented with my own strips pieced from other fabrics. So it was no surprise that I bought yet another strip quilt kit. This one gave me pause for thought, but not until after I'd assembled it and proceeded to trim it and start FMQ ruler work on it.
I bought this farm animals quilt top as a kit several years ago in OKC because the fabrics was just so stinkin' cute. The fabric line is Barnyard II by Blank Quilting circa 2009. Those googly eyes of these animals have been staring me in the face for a fair amount of time before I assembled it. Once inspired to get moving I assembled it in a of couple hours as described in
my post for April 15, 2015. I followed the suggested sequencing layout for the horizontal bands. I was careful to alternate the sewing direction of the seams, aware that I could create a curving rainbow effect if I did not do so, especially for the narrower strips.
Several months later when I went to add the batting and backing – yes, it sat again for weeks between stages – I began to trim the edges. I learned something else I
should have done. I should have carefully trimmed the top and bottom edges of
each strip to be parallel and squared to the selvages
before I ever started stitching. I used the strips from the kit straight out of the package. There were no cutting or trimming references in the kit instructions, and it just simply did not occur to me to do otherwise. Perhaps because there were no square or rectangular or triangular pieces to prepare, I was lulled into a false sense of security. Whatever the reason, I did not pre-trim the strips to assure that the upper and lower edges were parallel. The following diagram is exaggerated but I think it illustrates the concept.

I assumed, if I even thought about it at all, that the bands had been rotary cut straight and square by the kit compiler, or if slightly off, that the angle would be random and average out in the end. That was not my experience. And when I contemplated it some more, it kind of makes sense that the angle would not be random about zero. Imagine that the clerk who prepares the kits veers slightly off to one side when she cuts. She will most likely be consistently biased to the same side. She may periodically stop and square up the fabric coming from the bolt occasionally but that means the amount being "off" was an accumulation from the cuts that was distributed among the previous kit components. It may be a little amount but each time a new fabric is introduced to the kit, a new cluster of accumulations occurs. In all fairness, the preparer is in production mode, not precision cutting mode, slicing off pieces of fabric rapidly to fold into bags or boxes and sell as a kit.
Sewing these strip "wedges" together I had a challenge to trim and a challenge to FMQ, especially since I chose a linear pattern, like the regimented rows of clamshells. That topmost strip may look cattywampus. Trimming it to true horizontal after assembly can make some prints look crooked or like they are traveling uphill or downhill. Trimming after FMQing can have its own idiosyncracies. Lesson learned: I will square up those strips from that strip quilt kit my local quilt shop or show vendor prepared for my convenience. I'll invest a small bit of time to avoid the headaches that will creep in later. If the fabric is printed off grain so that it drifts up or down across the width of the fabric, perhaps I'll reconsider that a strip quilt may not be the optimum choice for its use. If I had been doing free form FMQ instead of attempting more precise ruler work the slants would not have been as much a concern. So when selecting a pattern to FMQ I now can add another criterion. Would freeform or precision ruler work be better suited to the piecing style of the quilt?
I will link up now to
this week's Freshly Pieced's Works in Progress since this week I have a work that I have actually made some progress on.